
1. Introducció
Thank you for choosing the CLOUDY BAY 3-Inch Ultra-Thin LED Recessed Light. This manual provides detailed instructions for the safe installation, operation, and maintenance of your new lighting fixtures. Please read this manual thoroughly before installation and retain it for future reference.
Contingut del paquet
- 6 llums encastats LED ultraprims de 3 polzades
- 6 caixes de connexió
- Connectors ràpids
- Plantilla de tall
- Manual d'instruccions d'instal·lació (aquest document)

2. Informació important de seguretat
To reduce the risk of fire, electric shock, or injury to persons, please observe the following safety precautions:
- ADVERTIMENT: Risc de descàrrega elèctrica. Desconnecteu l'alimentació al fusible o al disjuntor abans d'instal·lar o fer el servei.
- Aquest producte s'ha d'instal·lar d'acord amb el codi d'instal·lació aplicable per una persona familiaritzada amb la construcció i el funcionament del producte i els perills que comporta.
- Ensure all electrical connections are made correctly and securely.
- Do not use this product in wet locations. It is designed for indoor use only and is not water resistant.
- Do not alter or modify the fixture. Any alterations may void the warranty and create safety hazards.
- The fixture is IC Rated, meaning it is suitable for direct contact with insulation.
3. Especificacions del producte
| Característica | Especificació |
|---|---|
| Número de model | LJD005WH5C-6PK |
| Mida | 3 polzades |
| Wattage | 8 watts |
| Voltage | 120 Volts |
| Brillantor | 420 lúmens |
| Temperatura de color | 2700K/3000K/3500K/4000K/5000K Selectable |
| CRI | 90+ |
| Material | Aluminum (Fixture), Acrylic (Shade) |
| Dimensions del producte | 3.25 cm de llargada x 3.25 cm d'amplada x 0.87 cm d'alçada |
| Tipus de muntatge | Muntatge al sostre |
| Certificació | Certificat ETL, classificat IC |
| Garantia | 3 Anys Limitats |

4. Guia d'instal·lació
These ultra-thin LED recessed lights are designed for easy installation in new construction, remodel, or retrofit applications. No traditional recessed cans are required.
Eines necessàries (no incloses):
- Llapis
- Cinta mètrica
- Drywall Saw or Hole Saw
- Pelafils
- Tornavís
Passos d'instal·lació:
- Prepara el sostre: Use the provided 1:1 cutting template to mark a 3-inch (75mm) diameter hole on the ceiling. Carefully cut the hole using a drywall saw or hole saw.
- Cablejat d'accés: Disconnect power at the circuit breaker. Open the junction box cover. Feed the supply wires (live, neutral, ground) into one of the four wiring knockouts on the junction box. Secure the wires using the included wire clamp.
- Fer connexions elèctriques: Use the quick connectors inside the junction box to connect the house wiring to the fixture's wires. Connect the black (live) wire to the black wire, the white (neutral) wire to the white wire, and the bare copper or green (ground) wire to the green wire. Ensure all connections are secure.
- Position Junction Box: Insert the wired junction box into the ceiling opening. The compact design allows it to fit easily into the ceiling space.
- Connecteu el dispositiu a la caixa de connexions: Connect the cable from the LED recessed light to the junction box. Ensure the connection is firm.
- Instal·leu la llum: Hold the spring clips on the sides of the light fixture against the fixture body. Gently guide the fixture into the ceiling hole. The spring clips will snap into place, securing the light flush with the ceiling.


5. Initial Setup: Color Temperature Selection
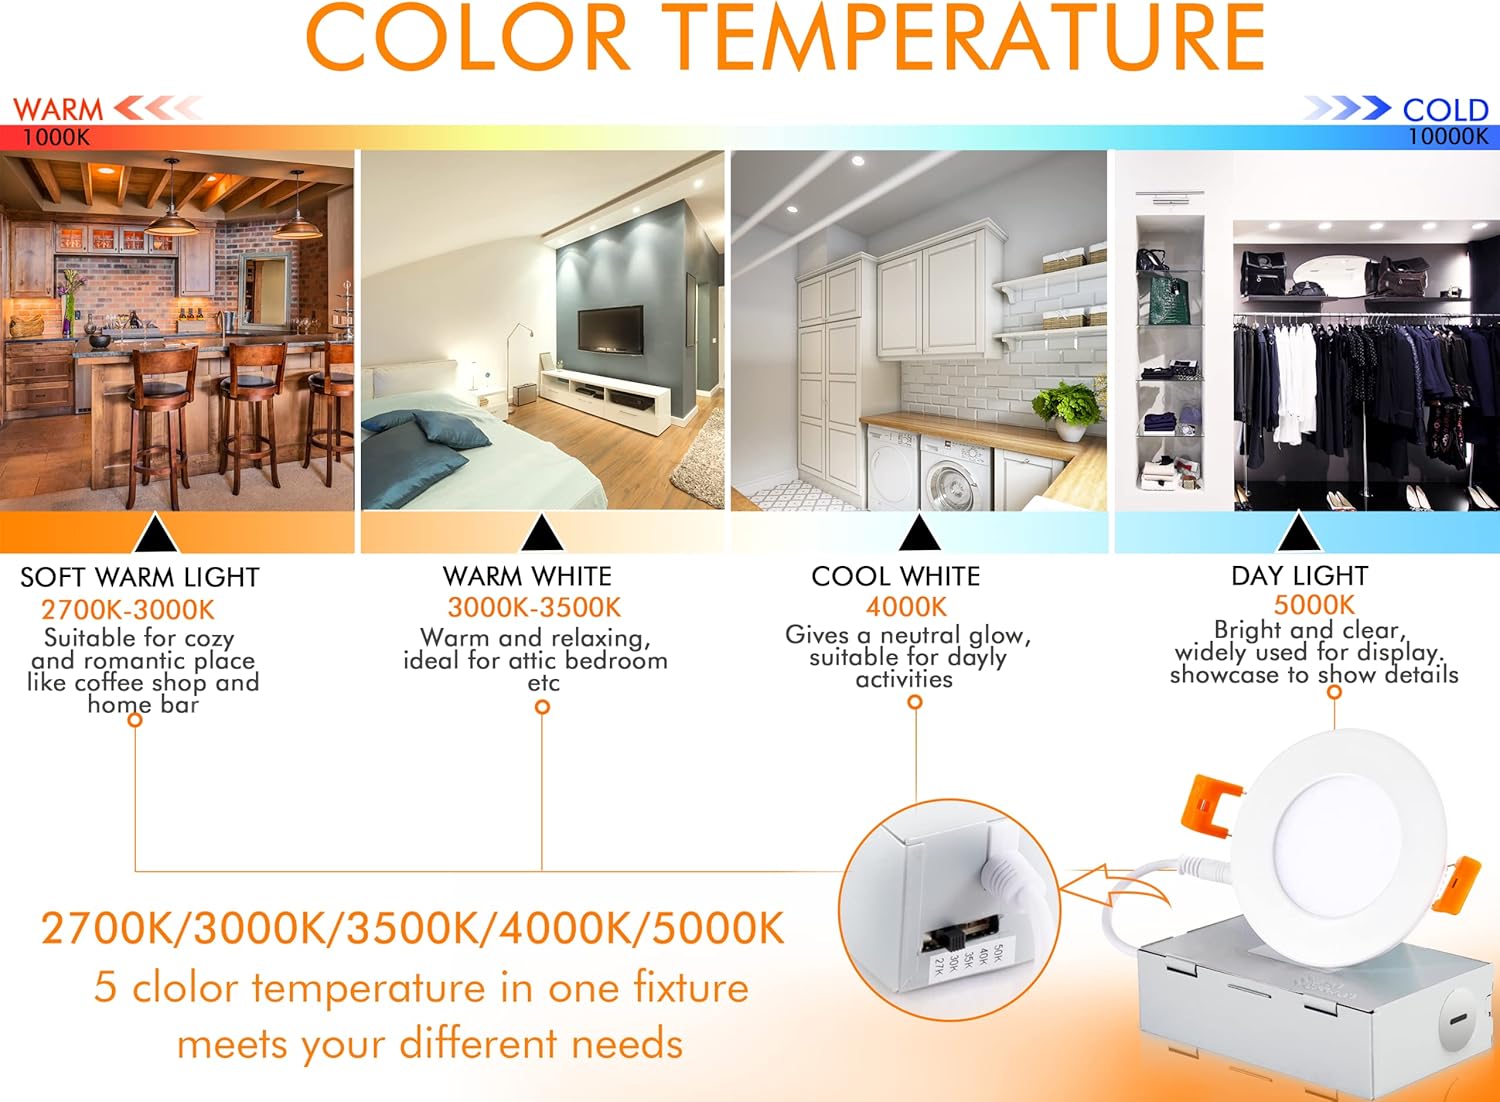
Your CLOUDY BAY recessed light features 5 selectable color temperatures (CCT) to suit various preferences and room ambiances. This setting is adjusted via a toggle switch located on the junction box.
- Locate the CCT Switch: Before installing the junction box into the ceiling, locate the small toggle switch on the side of the junction box.
- Select Desired CCT: Move the switch to select one of the five color temperature options: 2700K (Soft Warm Light), 3000K (Warm White), 3500K (Neutral White), 4000K (Cool White), or 5000K (Daylight).
- Test (Optional): You may temporarily restore power to test the selected color temperature before fully securing the fixture. Remember to disconnect power again before proceeding with final installation.
6. Instruccions de funcionament
Once installed and powered, your CLOUDY BAY recessed lights are ready for use. These lights are dimmable, allowing you to adjust brightness levels.
Funcionalitat d'atenuació:
- The fixture supports dimming from 10% to 100% brightness.
- For optimal performance, use with compatible LED dimmers. A list of compatible dimmers is often provided by the manufacturer or can be found on the product packaging/weblloc.
- Ensure the dimmer switch is rated for LED lighting to prevent flickering or buzzing.

7. Manteniment
The CLOUDY BAY LED recessed lights require minimal maintenance.
- Neteja: Assegureu-vos que l'alimentació estigui apagada abans de netejar-la. Netegeu l'aparell amb un drap suau, sec o lleugerament humit.amp drap. No utilitzeu productes químics agressius ni netejadors abrasius, ja que poden danyar l'acabat o els components elèctrics.
- Substitució de bombetes: These fixtures are integrated with LED chips and do not have replaceable bulbs. The entire unit is designed for a long operational lifespan.
8. Solució De Problemes
If you encounter issues with your CLOUDY BAY recessed lights, refer to the following common problems and solutions:
| Problema | Causa possible | Solució |
|---|---|---|
| La llum no s'encén | No power supply; Loose wiring; Faulty fixture | Check circuit breaker; Verify all wire connections; Test with a known working fixture if possible. |
| Parpelleigs o brunzits de llum | Incompatible dimmer switch; Loose wiring; Overloaded circuit | Ensure dimmer is LED compatible; Check wire connections; Reduce load on circuit. |
| Temperatura de color incorrecta | L'interruptor CCT està mal configurat | Access the junction box and adjust the CCT toggle switch to the desired setting. |
| Light output is too dim/bright | Dimmer setting; CCT setting (perceived brightness) | Adjust the dimmer switch; Note that higher CCTs (e.g., 5000K) may appear brighter than lower CCTs (e.g., 2700K). |
9. Garantia i atenció al client
CLOUDY BAY offers a Garantia limitada d'3 any on this product. This warranty covers defects in materials and workmanship under normal use.
The warranty does not cover damage caused by improper installation, misuse, abuse, or use in wet locations. If you experience any issues with your product or have questions, please contact CLOUDY BAY customer support for assistance.
For warranty claims or technical support, please refer to the contact information provided on the product packaging or the official CLOUDY BAY weblloc.