
1. Introducció
This manual provides detailed instructions for the setup, operation, and maintenance of the Ikan Lite-Puter CX-804 8-Channel DMX Lighting Console. The CX-804 is designed for controlling DMX512 compatible lighting fixtures, offering 8 dimming channels, 8 scene memory slots, and a chaser function for dynamic lighting effects. Please read this manual thoroughly before using the device to ensure proper and safe operation.
2. Informació de seguretat
- Assegureu-vos que la font d'alimentació voltage compleix els requisits especificats a la unitat.
- No exposeu la unitat a la pluja ni a la humitat per evitar incendis o descàrregues elèctriques.
- No obriu la c.asing. No hi ha peces a l'interior que l'usuari pugui reparar. Demaneu totes les tasques de manteniment a personal qualificat.
- Place the console on a stable, flat surface.
- Keep the unit away from excessive heat sources, direct sunlight, and strong vibrations.
- Disconnect power before cleaning or when not in use for extended periods.
3. Contingut del paquet
Verifiqueu que tots els elements siguin presents al paquet:
- Lite-Puter CX-804 DMX Lighting Console
- Adaptador d'alimentació (DC 12V)
- Manual d'usuari (aquest document)
4. Producte acabatview
4.1 Controls del panell frontal
The front panel provides access to all primary control functions for DMX channels, scenes, and chaser operations.
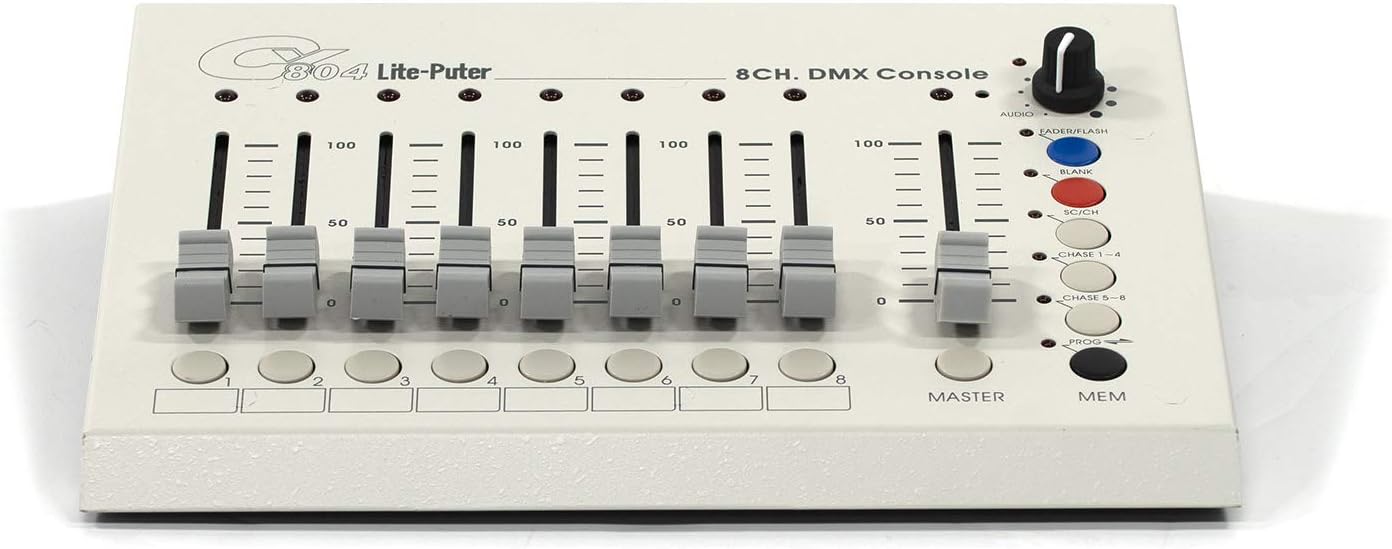
Figure 4.1: Front Panel Layout of the CX-804 Console.
- Channel Faders (1-8): Eight individual sliders to control the DMX output level (0-100%) for each of the 8 channels.
- Botons de canal (1-8): Buttons corresponding to each channel, typically used for scene programming or selection.
- Fader mestre: Controls the overall output level of all active DMX channels.
- Botó MEM: Used to save or recall programmed scenes.
- Botó PROG: Activates programming mode for scenes or chasers.
- CHASE 1-4 / CHASE 5-8 Buttons: Selects between different chaser patterns.
- Botó SC/CH: Toggles between Scene and Channel mode.
- BLANK Button: Instantly blacks out all DMX output.
- FADERFLASH Button: Momentarily activates the current fader settings.
- AUDIO Knob: Adjusts the sensitivity of the audio input for sound-to-light functions.
4.2 Connexions del panell posterior
The rear panel houses all input and output connections for power, audio, and DMX signals.

Figure 4.2: Rear Panel Connections of the CX-804 Console.
- Entrada DC 12V: Power input jack for the included DC 12V power adapter.
- Interruptor ON / OFF: Main power switch for the console.
- AUDIO IN: 1/4-inch (6.35mm) jack for connecting an audio source for sound-to-light synchronization.
- SENSES: Sensitivity adjustment for the audio input.
- SORTIDA DMX: DMX512 output ports (XLR 3-pin and 5-pin, and RJ45) for connecting to DMX lighting fixtures.
5. Configuració
5.1 Connexió d'alimentació
- Ensure the console's ON/OFF switch is in the OFF position.
- Connect the provided DC 12V power adapter to the 'DC 12V IN' jack on the rear panel.
- Connecteu l'adaptador d'alimentació a una presa de corrent adequada.
5.2 Connexió DMX
- Connect a DMX cable (3-pin XLR, 5-pin XLR, or RJ45, depending on your fixtures) from one of the 'DMX OUT' ports on the CX-804 to the DMX IN port of your first DMX lighting fixture.
- For multiple fixtures, daisy-chain them by connecting the DMX OUT of the first fixture to the DMX IN of the next, and so on.
- Ensure the last fixture in the chain has a DMX terminator installed to prevent signal reflection.
5.3 Audio Input Connection (Optional)
- If using sound-to-light functions, connect an audio source (e.g., mixer output) to the 'AUDIO IN' jack using a 1/4-inch (6.35mm) audio cable.
- Adjust the 'SENSES' knob to fine-tune the audio input sensitivity.
6. Instruccions de funcionament
6.1 Basic DMX Control
- Turn on the console using the ON/OFF switch.
- Ensure the SC/CH button is in Channel mode (LED off).
- Mou el Mestre Fader to the desired overall output level.
- Adjust individual Channel Faders (1-8) to control the intensity or specific parameters of your DMX fixtures assigned to those channels.
- Premeu el botó EN BLANC button to momentarily black out all output. Release to restore.
- Utilitza el FADERFLASH button to momentarily activate the current fader settings.
6.2 Programming and Recalling Scenes
The CX-804 allows you to store up to 8 scenes.
6.2.1 Programming a Scene
- Premeu el botó PROG button to enter programming mode (PROG LED will illuminate).
- Set the desired lighting levels using the Channel Faders (1-8) i el Mestre Fader.
- Premeu el botó MEM botó.
- Premeu un dels fitxers Channel Buttons (1-8) to save the current lighting state to that scene number. The PROG LED will flash to confirm.
- Premeu PROG again to exit programming mode.
6.2.2 Recalling a Scene
- Ensure the console is not in programming mode (PROG LED off).
- Premeu el botó SC/CH button to switch to Scene mode (SC/CH LED will illuminate).
- Premeu el desitjat Channel Button (1-8) to recall the corresponding saved scene.
- Ajusteu el Mestre Fader to control the overall intensity of the recalled scene.
6.3 Chaser Function
The chaser function allows for dynamic, automated lighting sequences.
- Ensure the console is not in programming mode.
- Premeu el botó CHASE 1-4 or CHASE 5-8 button to activate a chaser pattern.
- The speed and pattern of the chaser can often be adjusted via internal settings or by the AUDIO knob if in sound-to-light mode. Refer to specific chaser programming details if available in advanced documentation.
- To deactivate the chaser, press the active CHASE button again or select a scene/channel mode.
6.4 Audio Input Control
When an audio source is connected to the 'AUDIO IN' jack, the console can synchronize lighting effects with music.
- Ensure an audio source is connected to the 'AUDIO IN' jack.
- Ajusteu el AUDIO knob to set the sensitivity of the audio input. Higher sensitivity will make the lights react to quieter sounds.
- The chaser function or other programmed effects may respond to the audio input, creating sound-activated lighting.
7. Manteniment
7.1 Neteja
- Desconnecteu l'adaptador de corrent abans de netejar.
- Feu servir un drap suau i sec per netejar l'exterior de la consola.
- Do not use abrasive cleaners, solvents, or chemical sprays, as these can damage the finish and internal components.
7.2 Emmagatzematge
- Guardeu la consola en un lloc fresc i sec, allunyat de la llum solar directa i de temperatures extremes.
- If storing for an extended period, it is recommended to place the unit in its original packaging or a protective case.
8. Solució De Problemes
| Problema | Causa possible | Solució |
|---|---|---|
| La consola no s'encén. | Power adapter not connected or faulty. Power switch off. | Ensure power adapter is securely connected and plugged into a live outlet. Verify ON/OFF switch is in the ON position. Test with another compatible power adapter if available. |
| No DMX output to fixtures. | Incorrect DMX cabling. Fixtures not addressed correctly. Master fader at zero. BLANK button active. | Check DMX cable connections. Ensure fixtures are set to correct DMX addresses. Raise the Master Fader. Ensure BLANK button is not active. |
| Scenes not recalling or saving. | Incorrect mode (not in Scene mode for recall, not in PROG mode for saving). | For recall, ensure SC/CH LED is illuminated. For saving, ensure PROG LED is illuminated and follow the save procedure correctly. |
| Audio-to-light function not working. | Audio cable not connected. AUDIO knob set too low. No audio signal. | Verify audio cable connection. Increase the AUDIO knob sensitivity. Check the audio source for output. |
9. Especificacions
| Característica | Detall |
|---|---|
| Model | CX-804 |
| Marca | Ikan (Manufactured by Lite-Puter) |
| Protocol de control | DMX 512 estàndard |
| Canals DMX | 8 Dimming Control Sliders |
| Escenes | 8 escenes |
| Funcions | Chaser function, Audio input |
| Entrada d'àudio | Yes (1/4-inch jack) |
| Entrada de potència | DC 12V |
| Pes de l'article | 3.3 lliures |
| ASIN | B08NKC5L5J |
10. Garantia i Suport
For warranty information and technical support, please refer to the documentation provided with your purchase or contact the retailer or manufacturer directly. Keep your proof of purchase for any warranty claims.