
1. Introducció
The KEYESTUDIO Mega Plus 2560 R3 Board is an advanced microcontroller development board designed for various electronic projects. It is fully compatible with the MEGA REV3 2560 and features an upgraded USB to TTL chip (CP2102) and a Type-C USB port for enhanced stability and connectivity. This board offers a robust platform for both beginners and experienced users to develop complex applications.
2. Producte acabatview
The Mega Plus 2560 R3 board is equipped with a 2560-16AU processor core, providing 54 digital input/output pins (15 of which support PWM), 16 analog inputs, and 4 serial communication ports. It also includes a 16MHz crystal oscillator, a USB port, a power socket, an ICSP interface, and a reset button. The board's design prioritizes ease of use and expanded capabilities.

Figura 2.1: superior view of the KEYESTUDIO Mega Plus 2560 R3 Board.
Característiques principals:
- Compatibilitat millorada: Fully compatible with Arduino Mega R3 2560, offering more powerful features and additional pins.
- Stable USB-to-Serial Chip: Utilizes the CP2102 chip for reliable communication.
- Port USB tipus C: Modern and convenient connectivity.
- Sortida de corrent alta: Provides up to 5V, 1.5A output, capable of driving high-current devices like servos and motors.
- Extended Communication Interfaces: Includes additional SPI, IIC, and 4-channel Serial communication interfaces.
- Clear Pin Labeling: Yellow text on the black board ensures easy identification of pin sets.


Figura 2.2: Detallada views of the board's power input, USB-C port, and pin headers.
3. Especificacions
| Característica | Descripció |
|---|---|
| Microcontrolador | 2560-16AU |
| USB to TTL Chip | CP2102 |
| Vol. Operatiutage | 5V |
| Entrada Voltage (recommended) | DC 7-12V |
| Pins I / O digitals | 54 (D0-D53) |
| PWM Digital I/O Pins | 15 (D2-D13, D44-D46) |
| Pins d'entrada analògics | 16 (A0-A15) |
| Corrent continu per pin d'E / S | 20 mA |
| Corrent continu per pin de 3.3 V. | 50 mA |
| Memòria Flash | 256 KB (8 KB used by bootloader) |
| SRAM | 8 KB |
| EEPROM | 4 KB |
| Velocitat del rellotge | 16 MHz |
| LED_BUILTIN | D13 |
| Tecnologia de connectivitat | I2C, USB |
| Ports USB totals | 1 (Tipus C) |
4. Configuració
4.1 Instal·lació del controlador
Before using the KEYESTUDIO Mega Plus Board, the necessary drivers must be installed to enable communication with your computer. This board uses the CP2102 chip for USB-to-TTL communication.
- Arduino IDE Version: Ensure your Arduino IDE is version 1.8.0 or newer. The driver for the CP2102 chip is typically included in these versions.
- Instal·lació manual del controlador (si cal): If your Arduino IDE is older than 1.8.0, or if the driver is not automatically recognized, you may need to install it manually.
- For Windows: Download the driver from https://fs.keyestudio.com/CP2102-WIN.
- For Mac: Refer to the installation guide at https://wiki.keyestudio.com/How_to_Install_the_Driver_of_CP2102_on_MAC_System.
- Seguiu les instruccions a la pantalla per completar la instal·lació del controlador.
4.2 Connecting the Board
- Connect one end of the provided Type-C USB cable to the USB port on the KEYESTUDIO Mega Plus 2560 R3 Board.
- Connecteu l'altre extrem del cable USB a un port USB disponible de l'ordinador.
- The power indicator LED on the board should illuminate, indicating that the board is receiving power.
- Open the Arduino IDE. Go to Tools > Board and select "Arduino Mega or Mega 2560".
- Vés a Eines > Port and select the serial port corresponding to your connected board (e.g., COMx on Windows, /dev/cu.usbmodemxxxx on Mac).
5. Instruccions de funcionament
Once the board is connected and drivers are installed, you can begin programming it using the Arduino IDE.
5.1 Basic Program Upload
- Obriu l'IDE d'Arduino.
- Load an example sketch (e.g., File > Examples > 01.Basics > Blink).
- Ensure the correct board and port are selected under the Eines menú.
- Click the "Upload" button (right arrow icon) to compile and upload the sketch to your board.
- The built-in LED (D13) on the board should start blinking if the Blink sketch was uploaded successfully.
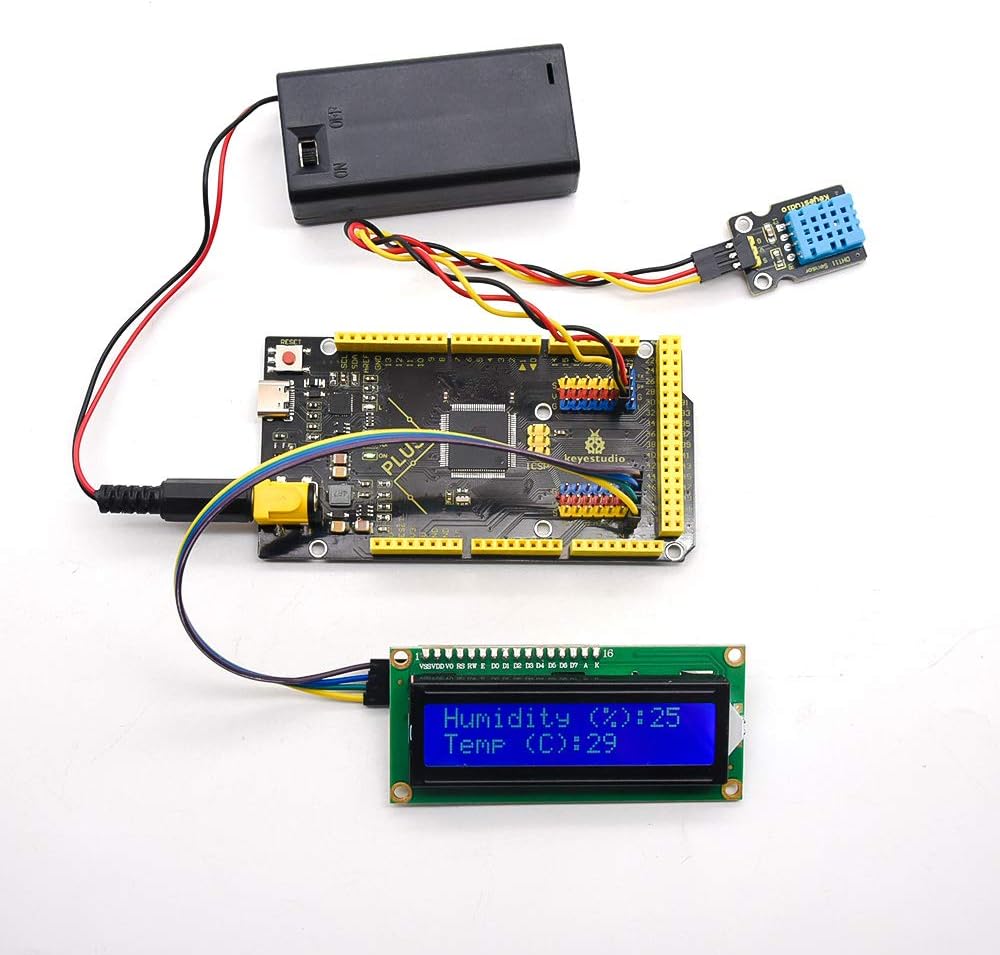
Figura 5.1: Example setup with the board connected to a breadboard and an LED.
5.2 Using Peripherals
The board's numerous I/O pins and communication interfaces allow for connection to a wide range of sensors, actuators, and other modules.

Figura 5.2: Example setup with the board connected to a humidity/temperature sensor and an LCD display.
Refer to the Arduino documentation and KEYESTUDIO's online resources for specific examples and libraries for various components.
6. Special Interfaces Description
- Serial Communication Interfaces (4 channels):
- Serial (Hardware Serial 0): D0 (RX0), D1 (TX0) - Connected to the ATMEGA16U2-MU (USB-to-Serial converter).
- Serial1: D19 (RX1), D18 (TX1)
- Serial2: D17 (RX2), D16 (TX2)
- Serial3: D15 (RX3), D14 (TX3)
- I2C Communication Interface: Dedicated pins for I2C communication, facilitating connection to I2C-enabled sensors and modules.
- Interfície de comunicació SPI: Additional pins for SPI communication, useful for high-speed data transfer with compatible devices.
- External Interrupt Pins: Supports external interrupts for responsive event handling.
7. Solució De Problemes
- Junta no reconeguda:
- Ensure CP2102 drivers are correctly installed. Check Device Manager (Windows) or System Information (Mac) for the serial port.
- Verify the USB cable is securely connected and not damaged.
- Proveu un port USB diferent a l'ordinador.
- Errors de càrrega:
- Confirm that the correct board ("Arduino Mega or Mega 2560") and serial port are selected in the Arduino IDE's Eines menú.
- Check for syntax errors in your code.
- Ensure no other applications are using the serial port.
- Problemes d'alimentació:
- If using an external power supply, ensure it provides DC 7-12V and is connected correctly.
- Check that the power indicator LED on the board is lit.
For further assistance, search for "keyestudio wiki KS0499" in Google Chrome to access the online tutorial and support resources.
8. Vídeo oficial del producte
Vídeo 8.1: Producte oficial acabatview video for the KEYESTUDIO Mega Plus 2560 R3 Board for Arduino, demonstrating its features and capabilities.
9. Assistència i garantia
KEYESTUDIO provides technical support for its products. For detailed information, online tutorials, and community forums, please visit the official KEYESTUDIO website or search for "keyestudio wiki KS0499".
This product comes with a standard manufacturer's warranty. Please refer to the product packaging or the official KEYESTUDIO weblloc web per conèixer els termes i condicions específiques de la garantia.