
1. Introducció
The Traynor AM Mini is a 65-watt ultra-compact acoustic guitar combo amplifier designed to provide clear and powerful sound for acoustic instruments and vocals. It features two discrete input channels, one optimized for acoustic guitar and the other for vocals, making it suitable for solo musicians and various live applications. The amplifier also includes an XLR balanced DI output for connecting to external PA systems or powered speakers.
2. Configuració
2.1 Desembalatge
Traieu amb cura amplifier from its packaging. Retain the original packaging for future transport or storage. Inspect the amplifier for any signs of damage that may have occurred during shipping. If damage is found, contact your dealer immediately.
2.2 Connexió d'alimentació
Assegureu-vos el amplifier's power switch is in the 'OFF' position. Connect the supplied AC power cord to the power inlet on the rear panel of the amplifier and then to a grounded electrical outlet. The AM Mini operates on 120VAC, 60Hz.
2.3 Connexió d'instruments i micròfons
The AM Mini features two input channels:
- Channel 1 (Instrument): Connect your acoustic guitar or other instrument to the 1/4-inch 'Input' jack.
- Channel 2 (Microphone): Connect a microphone to the XLR 'Mic' input jack.
2.4 Engegada inicial
After all connections are made, set all volume controls (Gain, Master) to their minimum positions. Flip the power switch to the 'ON' position. The 'Power' indicator light will illuminate. Gradually increase the volume controls to your desired level.
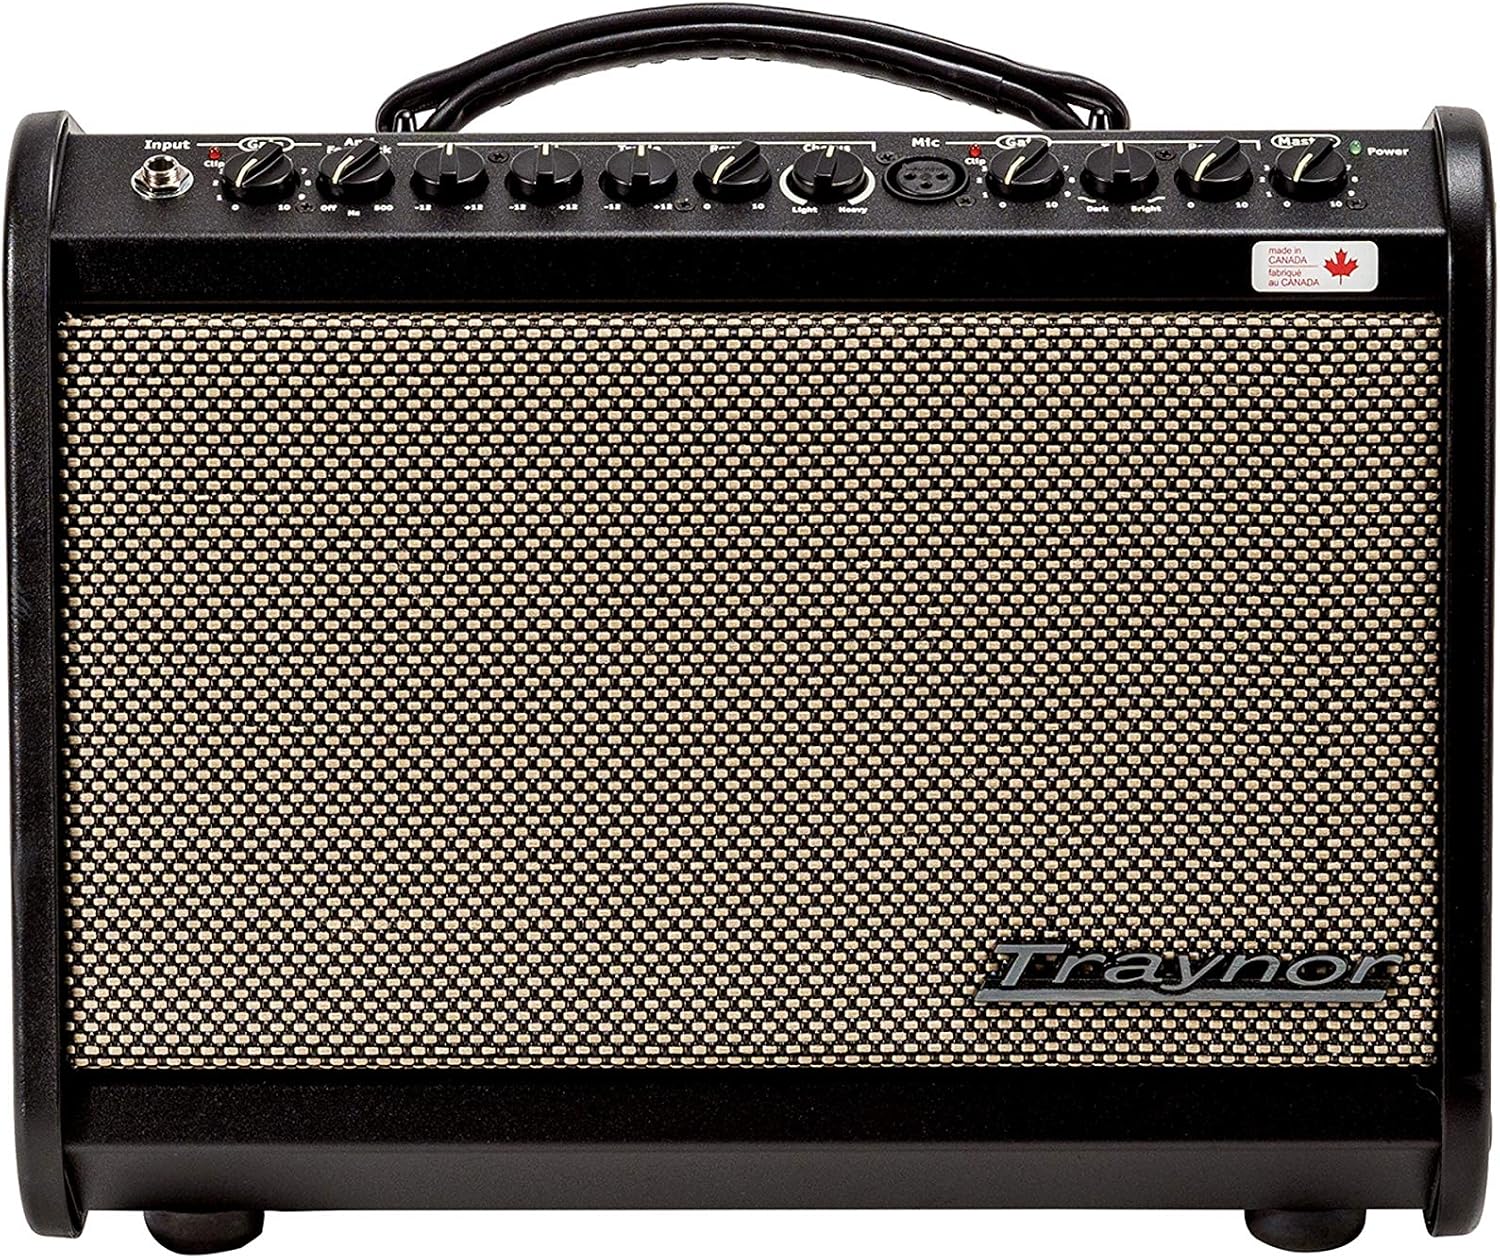
Figure 1: Front Panel Controls and Inputs

Figura 2: Connexions del panell posterior
3. Instruccions de funcionament
3.1 Front Panel Controls (Refer to Figure 1)
- Input (Channel 1): 1/4-inch jack for acoustic guitar or other instruments.
- Gain (Channel 1): Adjusts the input sensitivity and overall volume for Channel 1.
- Low (Channel 1): Bass frequency equalization control for Channel 1.
- Mid (Channel 1): Mid-range frequency equalization control for Channel 1.
- High (Channel 1): Treble frequency equalization control for Channel 1.
- Reverb (Channel 1): Controls the amount of reverb effect applied to Channel 1.
- Chorus (Channel 1): Controls the amount of chorus effect applied to Channel 1.
- Mic (Channel 2): XLR input jack for microphones.
- Gain (Channel 2): Adjusts the input sensitivity and overall volume for Channel 2.
- Low (Channel 2): Bass frequency equalization control for Channel 2.
- High (Channel 2): Treble frequency equalization control for Channel 2.
- Reverb (Channel 2): Controls the amount of reverb effect applied to Channel 2.
- Mestre: Overall master volume control for the entire ampsortida més elevada.
- Potència: Llum indicador de l'estat d'alimentació.
3.2 Rear Panel Connections (Refer to Figure 2)
- Interruptor d'alimentació: Gira el ampmés viu encès o apagat.
- Entrada d'alimentació: Es connecta al cable d'alimentació de CA.
- Auxiliary In: 3.5mm stereo input for connecting external audio devices like MP3 players or phones.
- Sortida DI: Balanced XLR output for sending the mixed signal (instrument and vocal) to a PA system, mixing console, or another powered speaker.
4. Manteniment
4.1 Neteja
Per netejar el amplifier, use a soft, dry cloth. Do not use abrasive cleaners, solvents, or waxes, as these can damage the finish. Ensure the amplifier is unplugged from the power source before cleaning.
4.2 Emmagatzematge
Emmagatzemar el amplifier in a dry, cool environment away from direct sunlight and extreme temperatures. If storing for extended periods, it is recommended to cover the unit to protect it from dust.
4.3 Canvi de fusibles
El amplifier is equipped with a fuse for protection. If the amplifier fails to power on, check the fuse located near the power inlet on the rear panel. Replace with a fuse of the exact same type and rating (120VAC 60Hz 300mA, FUSE: T1.0AL250V). Always unplug the power cord before attempting to replace the fuse.
5. Solució De Problemes
- Sense energia:
- Comproveu si el cable d'alimentació està connectat correctament a tots dos amplificador i la presa de corrent.
- Verifiqueu que la presa de corrent de paret funciona.
- Check and replace the fuse if necessary (refer to Section 4.3).
- Sense so:
- Ensure the 'Master' volume control is turned up.
- Check the 'Gain' controls for both channels.
- Verify that instruments and microphones are properly connected and functional.
- Test with different cables to rule out faulty connections.
- So distorsionat:
- Reduce the 'Gain' control for the respective channel.
- Lower the 'Master' volume.
- Check if the input signal from your instrument or microphone is too strong.
- Brunzit o soroll:
- Assegureu-vos que tots els cables estiguin correctament blindats i en bon estat.
- Proveu de connectar el amplifier into a different electrical outlet, preferably on a different circuit.
- Mantenir el amplifier away from other electronic devices that may cause interference.
6. Especificacions
| Característica | Especificació |
|---|---|
| Marca | Traynor |
| Nom del model | AM Mini |
| Potència de sortidatage | 65 watts |
| AmpTipus més viu | Estat sòlid |
| Output Channel Quantity | 2 |
| Dispositius compatibles | Guitarra |
| Tipus de connector | 3.5mm Jack, XLR |
| Font d'alimentació | Elèctric amb cable |
| Color | Negre |
| UPC | 840402040972 |
| ASIN | B08X8N3MH1 |
7. Garantia i Suport
This product is covered by the manufacturer's warranty. For specific warranty terms and conditions, please refer to the documentation provided with your purchase or visit the official Traynor website. For technical support, service, or parts, please contact Traynor customer service or your authorized dealer.
Conserveu el vostre comprovant de compra per a reclamacions de garantia.