TRONXY XY-2 PRO 2E

TRONXY XY-2 PRO 2E Upgraded 3D Printer
Manual d'instruccions
1. Producte acabatview
The TRONXY XY-2 PRO 2E is an advanced 3D printer featuring a dual-extruder system for two-color printing. Designed for both beginners and experienced users, it offers a semi-assembled setup for quick installation and incorporates silent mainboards for quiet operation. Its robust build volume of 255 x 255 x 245mm allows for a wide range of printing projects.

Figure 1.1: Fully assembled TRONXY XY-2 PRO 2E 3D Printer with dual filament spools.
Característiques principals:
- Dual-Extruder System: Enables two-color printing with automatic switching of filaments through a single nozzle.
- Semi-Assembled Design: Facilitates quick and easy setup, typically within 5 steps.
- Silent Mainboards: Equipped with TMC mute driver chips for significantly reduced operational noise.
- Auto Leveling TR Sensor: Enhances bed leveling accuracy for consistent first layers.
- Filament Detection Sensor: Automatically pauses printing when filament runs out, preventing failed prints.
- Resume from Power Failure: Allows printing to continue from the last known position after a power interruption.
- Fast Heating Hot Bed: Reaches 120°C quickly, reducing pre-print waiting times.
2. Muntatge i muntatge
The TRONXY XY-2 PRO 2E is designed for straightforward assembly. Follow these steps to set up your printer.

Figure 2.1: Visual guide for the semi-assembled components of the 3D printer.
Passos de muntatge:
- Desempaquetar components: Traieu amb cura totes les peces de l'embalatge i verifiqueu-les amb la llista d'embalatge.
- Attach Gantry to Base: Secure the Z-axis gantry to the printer base using the provided screws. Ensure all connections are firm.
- Install Filament Holders: Mount the two filament spool holders onto the top frame of the gantry.
- Connecteu el cablejat: Connect all necessary cables, including the 30-pin wire, to their respective ports. Refer to the included wiring diagram for precise connections.
- Install Extruders: Attach the dual extruders and ensure they are properly seated.
Identificació de components:
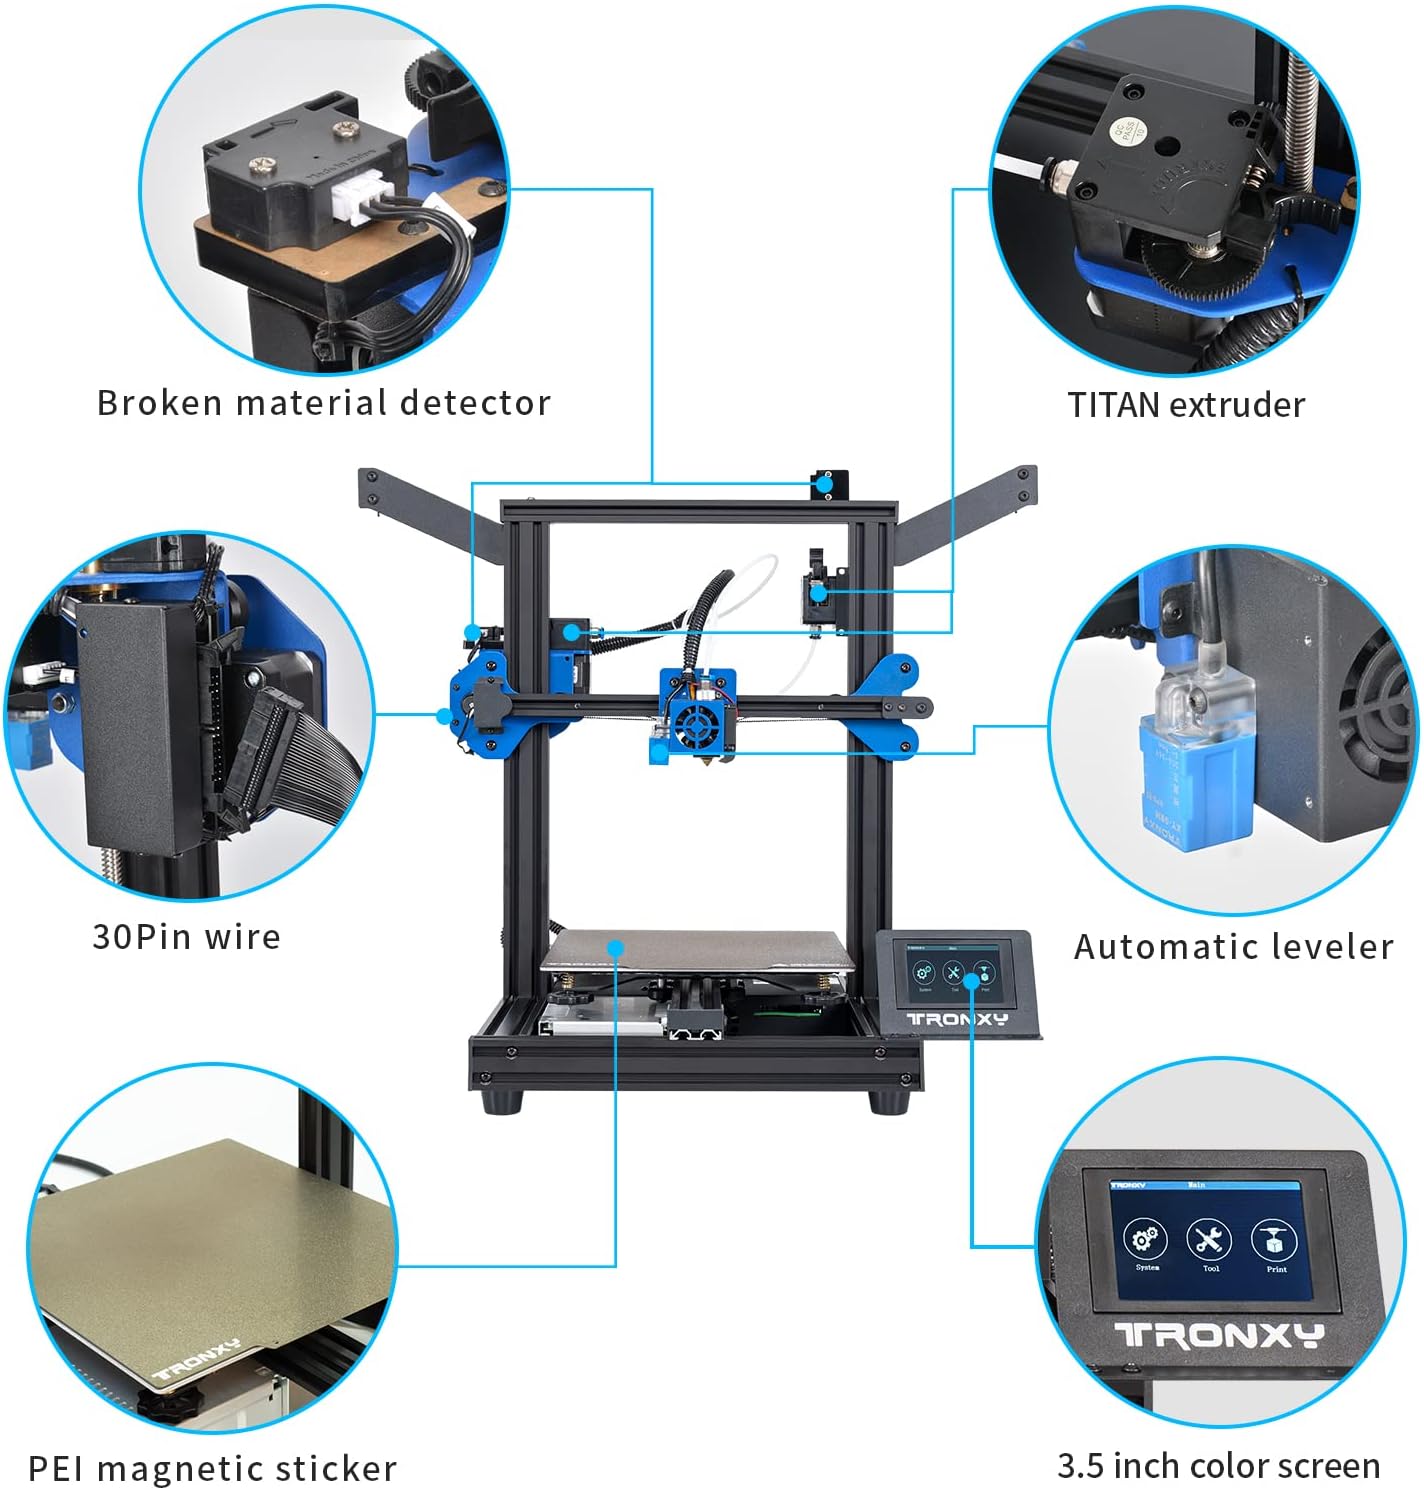
Figura 2.2: Detallada view of key components including the TITAN extruder, automatic leveler, and 3.5-inch color screen.
- Broken Material Detector: Sensor to detect filament breakage or run-out.
- TITAN Extruder: High-performance extruder for precise filament feeding.
- 30Pin Wire: Main data and power cable connecting the gantry to the base.
- Automatic Leveler: Sensor for automated bed leveling.
- PEI Magnetic Sticker: Flexible print surface for easy print removal.
- 3.5 inch Color Screen: User interface for printer control.
3. Instruccions de funcionament
This section guides you through the basic operation of your TRONXY XY-2 PRO 2E 3D printer.
3.1 Engegada i configuració inicial
- Connectar l'alimentació: Plug the power cord into the printer and a suitable power outlet.
- Interruptor d'alimentació: Flip the power switch located on the printer's base to the 'ON' position. The screen will illuminate.
- Selecció d'idioma: If prompted, select your preferred language on the touchscreen.
3.2 Càrrega del filament

Figure 3.1: Illustration of the dual filament input and single nozzle output system.
- Prepare Filament: Place your two filament spools onto the respective holders.
- Insert Filament 1: Gently feed filament 1 into its designated input hole until it reaches the bottom.
- Insert Filament 2: Feed filament 2 into its input hole, ensuring it is approximately 3 cm away from the pneumatic connector.
- Preheat Nozzle: On the touchscreen, navigate to the preheat settings and select the appropriate temperature for your filament type (e.g., PLA, ABS).
- Extrude Filament: Once the nozzle reaches temperature, use the 'Extrude' function on the screen to feed the filament through the nozzle until it flows smoothly.
3.3 Bed Leveling
The TRONXY XY-2 PRO 2E features an Auto Leveling TR Sensor to assist with bed leveling. For optimal print quality, ensure the print bed is properly leveled.
- Anivellació automàtica: From the main menu, select the 'Auto Level' option. The printer will automatically probe multiple points on the print bed to adjust for unevenness.
- Manual Adjustment (if needed): After auto-leveling, if you observe issues with the first layer adhesion, fine-tune the bed height using the adjustment knobs located under the print bed. Ensure the nozzle is at the correct distance from the bed (typically the thickness of a piece of paper).
3.4 Inici d'una impressió
- Prepara el codi G: Slice your 3D model using a compatible slicing software (e.g., Cura, Simplify3D) and save the G-code file to a TF card.
- Inseriu la targeta TF: Insert the TF card into the designated slot on the printer.
- Seleccioneu File: On the touchscreen, navigate to the 'Print' menu and select your desired G-code file de la targeta TF.
- Inicia la impressió: Confirm your selection to begin the printing process. The printer will preheat the nozzle and bed, then start printing.
4. Manteniment
Un manteniment regular garanteix la longevitat i el rendiment òptim de la impressora 3D.
4.1 Neteja general
- Clean Print Bed: After each print, allow the print bed to cool and remove any residual filament or debris. Use isopropyl alcohol to clean the PEI magnetic sticker periodically.
- Clear Nozzle: Before and after prints, check the nozzle for any clogs or filament buildup. Use a brass brush or a needle to clear it if necessary.
- Eliminació de pols: Regularly wipe down the printer's frame and components with a dry, lint-free cloth to remove dust and filament particles.
4.2 Lubricació
- Lead Screws: Apply a small amount of lithium grease or silicone lubricant to the Z-axis lead screws every few months or if you notice any grinding sounds.
- Smooth Rods: Wipe the smooth rods clean and apply a thin layer of lubricant to ensure smooth movement of the print head and bed.
5. Solució De Problemes
Aquesta secció aborda problemes comuns que podeu trobar i ofereix solucions.
| Problema | Causa possible | Solució |
|---|---|---|
| El filament no s'extrudeix | Clogged nozzle, tangled filament, incorrect temperature. | Clean the nozzle, untangle filament, verify and adjust print temperature. |
| Prints not sticking to bed | Bed not leveled, bed too cold, dirty print surface. | Re-level the bed (auto or manual), increase bed temperature, clean print surface with isopropyl alcohol. |
| Canvi de capa | Loose belts, motor issues, print speed too high. | Check and tighten belts, inspect motor connections, reduce print speed. |
| Printer making loud noises | Loose components, worn bearings, fan issues. | Inspect for loose screws, lubricate moving parts, check cooling fans for obstructions or damage. |
| La impressora no s'encén | Faulty power cord, power supply issue. | Ensure power cord is fully inserted and functional. Try a different power cord if available. Contact support if issue persists. |
6. Especificacions
Detailed technical specifications for the TRONXY XY-2 PRO 2E 3D Printer.
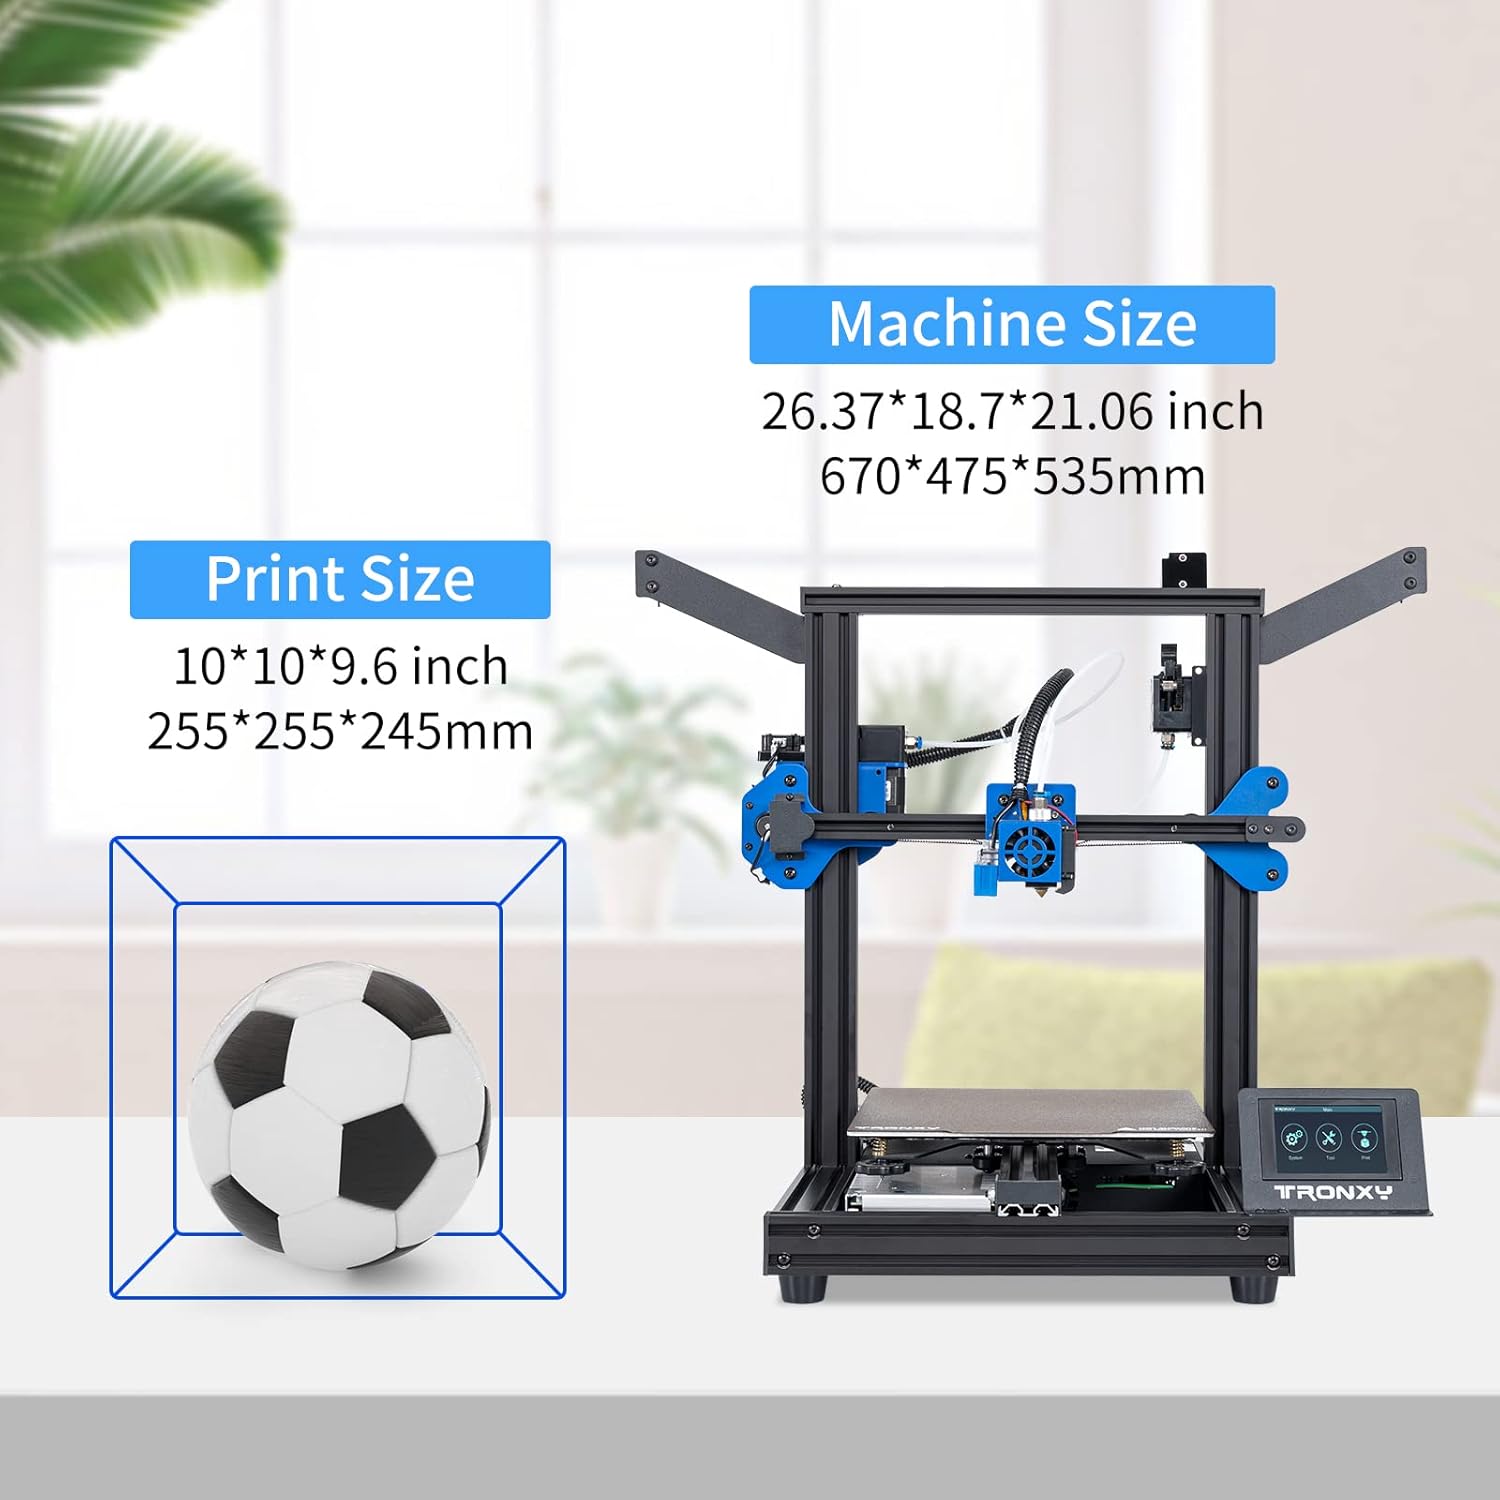
Figure 6.1: Machine and print size dimensions of the TRONXY XY-2 PRO 2E.
| Especificació | Valor |
|---|---|
| Dimensions del producte | 10.04 x 10.04 x 9.65 polzades (255 x 255 x 245 mm) |
| Pes de l'article | 26.4 lliures |
| Mida d'impressió (volum de construcció) | 255 x 255 x 245 mm |
| Marca | TRONXY |
| Model | XY-2 PRO 2E |
| Admet File Format | STEP (G-code for printing) |
| Compatibilitat de sistemes operatius | Linux (and other common OS via slicing software) |
| Temperatura del llit calent | Fins a 120°C |
| Tipus d'extrusora | Dual Extruder (Titan) |
| Placa base | Silent Mainboards with TMC mute driver chip |
7. Garantia i Suport
TRONXY is committed to providing excellent customer service and support for its products.
7.1 Suport tècnic
TRONXY offers lifetime professional technical support for the XY-2 PRO 2E 3D printer. If you encounter any issues or have questions, please contact our support team.
- Mètode de contacte: For support, please find your order and click 'Contact Seller' on the platform where you purchased the product.
- Temps de resposta: We aim to provide a satisfactory answer within 24 hours.
- Suport per correu electrònic: You may also reach out via email at lisa@tronxy.com for direct assistance.
7.2 Informació de la garantia
Specific warranty terms and conditions may vary by region and retailer. Please refer to your purchase documentation or contact customer support for detailed warranty information.