
1. Introducció
This manual provides detailed instructions for the installation, operation, and maintenance of the VIVOTEK ND9323P H.265 8-Channel Embedded PoE Network Video Recorder (NVR). Please read this manual thoroughly before using the product to ensure proper and safe operation. Keep this manual for future reference.
2. Informació de seguretat
Observe the following safety precautions to prevent damage to the NVR and to ensure user safety:
- Font d'alimentació: Use only the power adapter supplied with the NVR. Ensure the power source matches the NVR's voltage requisits.
- Ventilació: Do not block any ventilation openings. Install the NVR in a well-ventilated area to prevent overheating.
- Medi ambient: Avoid exposing the NVR to water, moisture, extreme temperatures, or direct sunlight. Do not place heavy objects on the NVR.
- Manteniment: No intenteu atendre aquest producte vosaltres mateixos. Consulteu tots els serveis a personal de servei qualificat.
- Manipulació: Handle the NVR with care. Avoid dropping or subjecting it to strong impacts.
3. Contingut del paquet
Carefully unpack the box and ensure all items are present and in good condition. If any items are missing or damaged, contact your vendor immediately.
- VIVOTEK ND9323P NVR Unit
- Adaptador d'alimentació
- Ratolí USB
- Guia d'instal·lació ràpida
- Accessory Pack (Screws for HDD installation, Ethernet cable)
- Case (referring to the NVR enclosure itself)
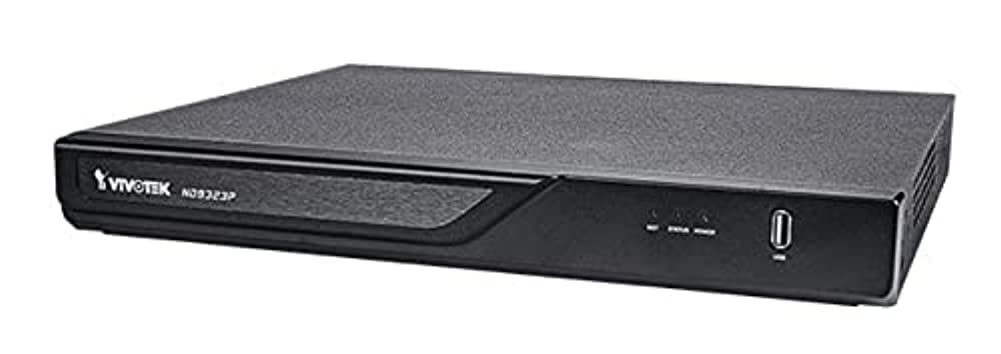
Figure 3.1: VIVOTEK ND9323P NVR unit. This image shows the front panel of the NVR, typically featuring status indicators and USB ports.
4. Producte acabatview
The VIVOTEK ND9323P is an 8-channel embedded Network Video Recorder designed for IP surveillance systems. It supports H.265 video compression for efficient storage and bandwidth usage. With its integrated Power over Ethernet (PoE) ports, it simplifies camera installation by providing both power and data connectivity through a single Ethernet cable.
4.1 Característiques clau
- 8-Channel Video Input
- H.265/H.264 Video Compression
- 8 x 802.3at/af PoE Ports
- Local Display Output (HDMI/VGA)
- Remote Access via VIVOTEK VIVOCloud App or VMS
- Supports up to 16TB HDD storage (HDD not included)
4.2 Panells frontal i posterior
Refer to the Quick Installation Guide for detailed diagrams of the front and rear panels, indicating ports and indicators.
- Panell frontal: Power LED, HDD LED, Network LED, USB ports.
- Panell posterior: Power input, LAN port, PoE ports (1-8), HDMI output, VGA output, Audio I/O, USB ports.
5. Configuració
5.1 Instal·lació del disc dur (opcional)
The NVR does not typically include a pre-installed hard drive. Follow these steps to install a 3.5-inch SATA hard drive:
- Unscrew and remove the NVR's top cover.
- Connect the SATA data and power cables from the NVR to the hard drive.
- Fixeu el disc dur al xassís de l'NVR amb els cargols proporcionats.
- Torneu a col·locar la coberta superior i fixeu-la amb cargols.
Nota: Ensure the NVR is powered off and unplugged before installing or removing a hard drive.
5.2 Connexions físiques
- Connectar càmeres: Connect your IP cameras to the NVR's PoE ports (1-8) using Ethernet cables. The NVR will provide power and network connectivity to the cameras.
- Connecteu-vos a la xarxa: Connect the NVR's LAN port to your local network router or switch using an Ethernet cable.
- Connecta la pantalla: Connecteu un monitor al port de sortida HDMI o VGA de l'NVR.
- Connecta el ratolí: Connecteu el ratolí USB a un dels ports USB de l'NVR.
- Encès: Connecteu l'adaptador de corrent a l'entrada d'alimentació de l'NVR i després endolleu-lo a una presa de corrent. L'NVR s'encendrà automàticament.
5.3 Configuració inicial
Upon first boot, the NVR will guide you through a setup wizard on the connected monitor:
- Selecció d'idioma: Trieu el vostre idioma preferit.
- Configuració de la contrasenya: Create a strong password for the administrator account. This is crucial for security.
- Configuració de la xarxa: Configure network settings (DHCP or Static IP). DHCP is recommended for most home users.
- Hora i data: Set the correct time zone, date, and time.
- Inicialització del disc dur: If you installed a new hard drive, the NVR will prompt you to format it. Confirm to proceed. Avís: Formatting will erase all data on the drive.
- Camera Search and Add: The NVR will automatically search for connected VIVOTEK cameras. Select and add them to the NVR.
- Acabat: Complete the wizard to access the NVR's live view.
6. Funcionament de l'enregistrador NVR
6.1 Accessing the NVR
You can access and manage the NVR through various methods:
- Visualització local: Directly via the connected monitor and USB mouse.
- Web Navegador: Introduïu l'adreça IP de l'NVR en un web navegador en un ordinador connectat a la mateixa xarxa.
- VIVOTEK VIVOCloud App: Download the mobile app for remote viewing i gestió.
- VIVOTEK VAST 2 VMS: For advanced management and multi-NVR systems.
6.2 Viu View
El directe view displays real-time video feeds from all connected cameras. You can switch between single-camera view, graella multicàmera view, and customize the display layout.
6.3 Configuració de gravació
Configure recording schedules and modes for each camera:
- Gravació contínua: Registres 24/7.
- Gravació de detecció de moviment: Només registra quan es detecta moviment.
- Enregistrament programat: Registres durant períodes de temps específics.
- Enregistrament d'esdeveniments: Records based on external triggers or alarms.
Access these settings through the NVR's main menu: Configuration > Recording > Schedule.
6.4 Reproducció
Per tornarview foo gravattage:
- Al menú principal, seleccioneu Reproducció.
- Choose the camera(s) and the date/time range you wish to review.
- Use the timeline and playback controls (play, pause, fast forward, rewind) to navigate through the footage.
6.5 Event Management and Notifications
Configure the NVR to respond to events such as motion detection, camera tampering, or network disconnection. The NVR can send email notifications, trigger alarms, or start recording.
Access these settings via: Configuration > Event.
7. Manteniment
7.1 actualitzacions de microprogramari
Regularly check for and install firmware updates to ensure optimal performance, security, and access to new features. Firmware can be updated via the NVR's web interface or local display menu: Configuration > System > Firmware Upgrade.
Precaució: Do not power off the NVR during a firmware upgrade. This can cause permanent damage.
7.2 Gestió del disc dur
Monitor the health of your hard drive(s) and ensure sufficient storage space. The NVR will automatically overwrite the oldest recordings when the disk is full, based on your settings.
Access HDD status and settings via: Configuration > Storage > HDD Management.
7.3 Neteja
Keep the NVR unit clean and free from dust. Use a soft, dry cloth for cleaning. Do not use liquid cleaners or aerosols.
8. Solució De Problemes
This section addresses common issues you might encounter with your VIVOTEK ND9323P NVR.
8.1 No Video Display on Monitor
- Comproveu els cables: Assegureu-vos que el cable HDMI/VGA estigui connectat correctament tant a l'NVR com al monitor.
- Entrada del monitor: Verify the monitor is set to the correct input source (HDMI/VGA).
- NVR Power: Confirm the NVR is powered on and its power LED is illuminated.
8.2 Cameras Not Showing Up / No Image
- Connexió PoE: Ensure cameras are properly connected to the NVR's PoE ports. Check if the PoE port LEDs on the NVR are active.
- Potència de la càmera: If not using PoE, ensure cameras are receiving power from their own power adapters.
- Connectivitat de xarxa: Verify the NVR and cameras are on the same network segment if not directly connected via PoE.
- Estat de la càmera: Check the camera's own status indicators.
- NVR Camera Management: Vés a Configuration > Camera > Camera Management to ensure cameras are added and enabled. Try rescanning for cameras.
8.3 Cannot Access NVR via Web Navegador
- Adreça IP: Confirm the NVR's IP address is correct and that your computer is on the same network.
- Cable de xarxa: Ensure the NVR's LAN port is connected to your network.
- Tallafoc: Temporarily disable your computer's firewall to check if it's blocking access.
- Compatibilitat del navegador: Use a recommended web navegador (per exemple, Chrome, Firefox).
8.4 Contrasenya oblidada
If you forget the administrator password, you may need to perform a factory reset. Refer to the VIVOTEK support website or contact technical support for the specific procedure for your model, as this often involves a physical reset button or a specific utility.
9. Especificacions
The following table lists the key specifications for the VIVOTEK ND9323P NVR:
| Característica | Especificació |
|---|---|
| Número de model | ND9323P |
| Marca | VIVOTEK |
| Nombre de canals | 8 |
| Tecnologia de connectivitat | Ethernet |
| Dispositius compatibles | Camera, Mobile Device |
| Compressió de vídeo | H.265, H.264 |
| Ports PoE | 8 x 802.3at/af |
| Dimensions del producte | 19.69 x 19.69 x 11.02 polzades |
| Pes de l'article | 0.01 unces |
| Fabricant | Vivotek |
10. Garantia i Suport
VIVOTEK products are covered by a limited warranty. For detailed warranty terms and conditions, please refer to the warranty card included with your product or visit the official VIVOTEK weblloc.
For technical support, product registration, or to download the latest firmware and software, please visit the VIVOTEK support portal:
VIVOTEK Official Support Weblloc
When contacting support, please have your NVR's model number (ND9323P) and serial number ready.