
Kadimendium V01A
Manual d'usuari del multímetre digital ANENG V01A
Model: V01A | Brand: Kadimendium
1. Introducció
This user manual provides detailed instructions for the safe and effective operation of the ANENG V01A Auto Range True RMS Digital Multimeter. This ultra-portable multi-tester is designed for measuring AC/DC current, voltage, resistance, and for continuity testing. Its intelligent measurement capabilities allow for automatic identification and display of measurement data, making it user-friendly for various electrical tasks.
2. Informació de seguretat
Please read all safety warnings and operating instructions carefully before using this multimeter. Failure to follow these instructions may result in electric shock, fire, or serious injury.
- Always ensure the multimeter is in the correct measurement mode before connecting test leads to a circuit.
- No supereu els valors d'entrada màxims especificats per a cada rang de mesura.
- Aneu amb extrema precaució quan treballeu amb voltagper sobre de 30 V CA RMS, 42 V pic o 60 V CC. Aquests voltagsuposen un risc de xoc.
- Inspect test leads for damage before each use. Do not use if insulation is damaged or if the metal is exposed.
- No feu servir el multímetre si sembla que està danyat o no funciona correctament.
- Canvieu les piles immediatament quan aparegui l'indicador de bateria baixa per garantir lectures precises.
- Keep hands and fingers behind the probe barriers during testing.
- This device is designed for indoor use and should not be exposed to rain or moisture.

Image: A warning sign with multilingual text emphasizing the importance of reading product instructions carefully before use.
3. Contingut del paquet
Verifiqueu que tots els elements que s'enumeren a continuació s'inclouen al vostre paquet. Si falta algun element o hi ha algun malmès, poseu-vos en contacte amb l'atenció al client.
- 1 x ANENG V01A Digital Multimeter (Battery not included)
- 2 x Test Probes (Red and Black)
- 1 x Manual d'usuari

Image: The ANENG V01A Digital Multimeter, its test probes, and the user manual, displayed alongside its product packaging.
4. Producte acabatview
Familiarize yourself with the components of your ANENG V01A Digital Multimeter.

Imatge: Un front clar view of the ANENG V01A Digital Multimeter, showcasing its display, buttons, and input jacks, accompanied by its red and black test leads.

Imatge: Un front directe view of the ANENG V01A Digital Multimeter, highlighting its display and control panel.

Image: The ANENG V01A Digital Multimeter shown with its integrated kickstand extended, allowing for angled viewing on a flat surface.
Components clau:
- Pantalla LCD: Mostra lectures de mesura, unitats i indicadors de funció.
- Botons de funció:
- Botó NCV: Activates Non-Contact Voltage detecció.
- H/* Button: Data Hold function (short press) and Backlight/Flashlight activation (long press).
- Botó d'encesa: Turns the multimeter On/Off.
- Preses d'entrada:
- Connector COM (negre): Terminal comú per a totes les mesures. Connecteu aquí el cable de prova negre.
- VΩmA Jack (Red): Entrada per a Voltage, Resistance, and milliampere Current measurements. Connect the red test lead here.
- 10A Fused Jack (Red): Input for high current (up to 10A) measurements. Connect the red test lead here for 10A measurements.
- Sondes de prova: Red and black leads for connecting to circuits.
5. Configuració
5.1 Instal·lació de la bateria
The ANENG V01A Multimeter requires 2 x AAA batteries (not included) for operation.
- Assegureu-vos que el multímetre estigui apagat.
- Localitzeu la tapa del compartiment de la bateria a la part posterior del multímetre.
- Utilitzeu un tornavís per obrir el compartiment de la bateria.
- Introduïu dues piles AAA, observant la polaritat correcta (+ i -) tal com s'indica a l'interior del compartiment.
- Substituïu la tapa del compartiment de la bateria i fixeu-la amb el cargol.
5.2 Connexió dels cables de prova
Always connect the black test lead to the COM jack. Connect the red test lead to the appropriate input jack based on the measurement you intend to perform.
- Per al voltage, Resistance, Continuity, and milliampere Current (mA) measurements: Connect the red test lead to the VΩmA jack.
- For high current (up to 10A) measurements: Connect the red test lead to the 10A Fused jack.

Image: The ANENG V01A Digital Multimeter with its red and black test leads properly connected to the input jacks, ready for use.
6. Instruccions de funcionament
6.1 Power On/Off and Auto Range
Premeu el botó Poder button to turn the multimeter on. The V01A features an auto-range function, meaning it automatically recognizes and displays the measurement data without requiring manual range selection. To turn off the multimeter, press the Poder button again. The device also has an Auto Power Off feature to conserve battery life.

Image: The ANENG V01A Digital Multimeter with its display showing a reading, emphasizing its auto-ranging capability for convenient measurement.
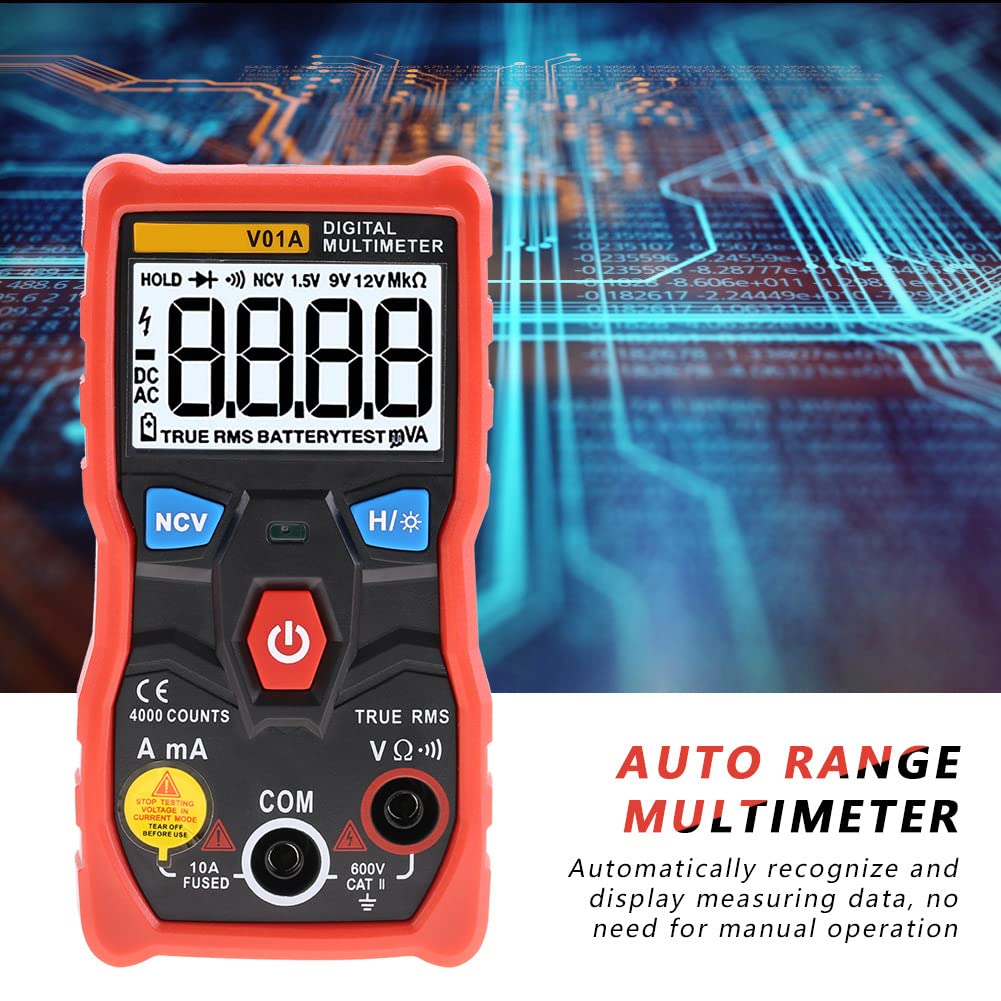
Imatge: Un primer pla view of the ANENG V01A Digital Multimeter's display, highlighting the "AUTO RANGE MULTIMETER" text and indicating its automatic measurement recognition.
6.2 Funcions de mesura
6.2.1 DC Voltage Mesura
Connect the red test lead to the VΩmA jack and the black test lead to the COM jack. Connect the probes across the DC voltage source. The multimeter will automatically detect and display the DC voltage.

Image: A user's hands holding the multimeter probes to measure components on a circuit board, demonstrating a typical voltage or resistance measurement scenario.
6.2.2 AC Voltage Mesura
Connect the red test lead to the VΩmA jack and the black test lead to the COM jack. Connect the probes across the AC voltage source. The multimeter will automatically detect and display the AC voltage (RMS veritable).
6.2.3 DC/AC Current Measurement (mA/A)
Precaució: To measure current, the multimeter must be connected in series with the circuit. Never connect the multimeter in parallel with a voltage source when in current mode, as this can damage the device or blow the fuse.
- Per mil·liampere (mA) current: Connect the red test lead to the VΩmA jack and the black test lead to the COM jack.
- Per ampere (A) current (up to 10A): Connect the red test lead to the 10A Fused jack and the black test lead to the COM jack.
Break the circuit and connect the multimeter in series. The multimeter will automatically detect and display the current.
6.2.4 Mesura de la Resistència
Connect the red test lead to the VΩmA jack and the black test lead to the COM jack. Ensure the circuit or component is de-energized before measuring resistance. Connect the probes across the component. The multimeter will automatically detect and display the resistance in Ohms (Ω), kilo-Ohms (kΩ), or Mega-Ohms (MΩ).
6.2.5 Prova de continuïtat
Connect the red test lead to the VΩmA jack and the black test lead to the COM jack. Ensure the circuit is de-energized. Touch the probes to the two points you want to test for continuity. If there is continuity (low resistance), the multimeter will emit an audible beep.
6.2.6 Vol. sense contactetage (NCV) Detecció
Premeu el botó NCV button. Hold the top part of the multimeter near an AC voltage source (e.g., a live wire or outlet). The multimeter will indicate the presence of AC voltage through an audible beep and/or visual indicator on the display, without direct contact.
6.2.7 Battery Test (1.5V, 9V, 12V)
The multimeter can test common battery voltages. Connect the red test lead to the VΩmA jack and the black test lead to the COM jack. Connect the probes to the positive and negative terminals of the battery. The multimeter will display the battery voltage.

Image: A user's hands holding the multimeter probes to test the voltage of a 9V battery, demonstrating the battery test function.
6.3 Funcions especials
- Data Hold (H): Premeu breument H/* per congelar la lectura actual a la pantalla. Premeu-la de nou per alliberar-la.
- Backlight/Flashlight (*): Premeu llargament el botó H/* button to turn on the display backlight and the integrated flashlight. Long press again to turn them off. This is useful for working in dimly lit environments.
- Apagat automàtic: The multimeter will automatically power off after a period of inactivity to save battery life.
- Indicació de bateria baixa: A battery icon will appear on the display when the battery voltage is low, indicating that the batteries need to be replaced.
7. Manteniment
7.1 Neteja
Netegeu el cas amb l'anunciamp drap i detergent suau. No utilitzeu abrasius ni dissolvents. Mantingueu els endolls d'entrada nets de pols i deixalles.
7.2 Substitució de la bateria
When the low battery indicator appears on the display, replace the batteries as described in Section 5.1. Always use 2 x AAA batteries.
7.3 Emmagatzematge
If the multimeter is not used for a long period, remove the batteries to prevent leakage and damage to the device. Store the multimeter in a cool, dry place, away from direct sunlight and extreme temperatures.
8. Solució De Problemes
If you encounter issues with your multimeter, refer to the table below for common problems and solutions.
| Problema | Causa possible | Solució |
|---|---|---|
| El multímetre no s'encén. | Piles gastades o instal·lades incorrectament. | Comproveu la polaritat de la bateria o substituïu les bateries. |
| No reading or "OL" displayed. | Open circuit, out of range, or incorrect function/lead connection. | Check circuit continuity, ensure measurement is within range, verify test lead connections for the selected function. |
| Lectures inexactes. | Low battery, environmental interference, or damaged test leads. | Replace batteries, move away from strong electromagnetic fields, inspect and replace damaged test leads. |
| Continuity test does not beep. | Circuit obert o alta resistència. | Ensure good contact with the circuit; the circuit may not be continuous. |
9. Especificacions
| Paràmetre | Valor |
|---|---|
| Marca | ANENG (Kadimendium) |
| Model | V01A |
| Mostra | 4000 recomptes |
| DC Voltage Rang | 4.000V, 40.00V, 400.0V, 600V |
| Vol. ACtage Rang | 4.000V, 40.00V, 400.0V, 600V (True RMS) |
| Interval de corrent de CA | 999.9mA, 9.999A |
| Interval de corrent DC | 999.9mA, 9.999A |
| Interval de resistència | 4.000kΩ, 40.00kΩ, 400.0kΩ, 4.000MΩ, 40.00MΩ |
| AC Frequency Response | 40Hz-1kHz |
| Prova de continuïtat | Sí |
| NCV (vol sense contacte).tage) | Sí |
| Rang automàtic | Sí |
| RMS veritable | Sí |
| Retenció de dades | Sí |
| Llum de fons | Sí |
| Llanterna | Sí |
| Apagat automàtic | Sí |
| Indicació de bateria baixa | Sí |
| Material | ABS, PVC |
| Sampli Rate | 3 PS |
| Entorn de funcionament | 0~40℃, <75%RH |
| Entorn d'emmagatzematge | -20~60℃, <80%RH |
| Font d'alimentació | 2 x AAA Batteries (NOT included) |
| Dimensions | 12 x 6 x 2.8 cm / 4.7 x 2.4 x 1.1 polzades |
| Pes (aprox.) | 199 g / 7.0 oz |
10. Garantia i Suport
This product comes with a standard manufacturer's warranty. For specific warranty terms and conditions, please refer to the warranty card included with your purchase or contact the seller directly. If you have any questions, require technical assistance, or need to report an issue, please contact Kadimendium customer support through your purchase platform. We are committed to providing timely assistance and ensuring your satisfaction.
Ask a question about this manual
Ask about setup, troubleshooting, compatibility, parts, safety, or missing instructions. Manuals+ will review the question and use this page’s manual context to help answer it.