
Introducció
Thank you for choosing the DEWENWILS 3-Outlet Automatic Watering Timer. This device is designed to simplify your garden and lawn irrigation, offering independent control for up to three zones with flexible programming options. Please read this manual carefully before installation and operation to ensure proper use and longevity of the product.
Informació de seguretat
- This watering timer is designed for outdoor use with cold water only.
- No submergiu el producte en aigua.
- Assegureu-vos que totes les connexions estiguin ajustades per evitar fuites.
- Use only 2 AA 1.5V alkaline batteries. Do not mix old and new batteries or different types of batteries.
- Remove batteries if the unit will not be used for an extended period or during freezing temperatures.
- Mantenir fora de l'abast dels nens.
Producte acabatview
The DEWENWILS watering timer features a durable ABS plastic shell, a large LCD display, and intuitive controls for easy programming. It supports three independent watering zones.
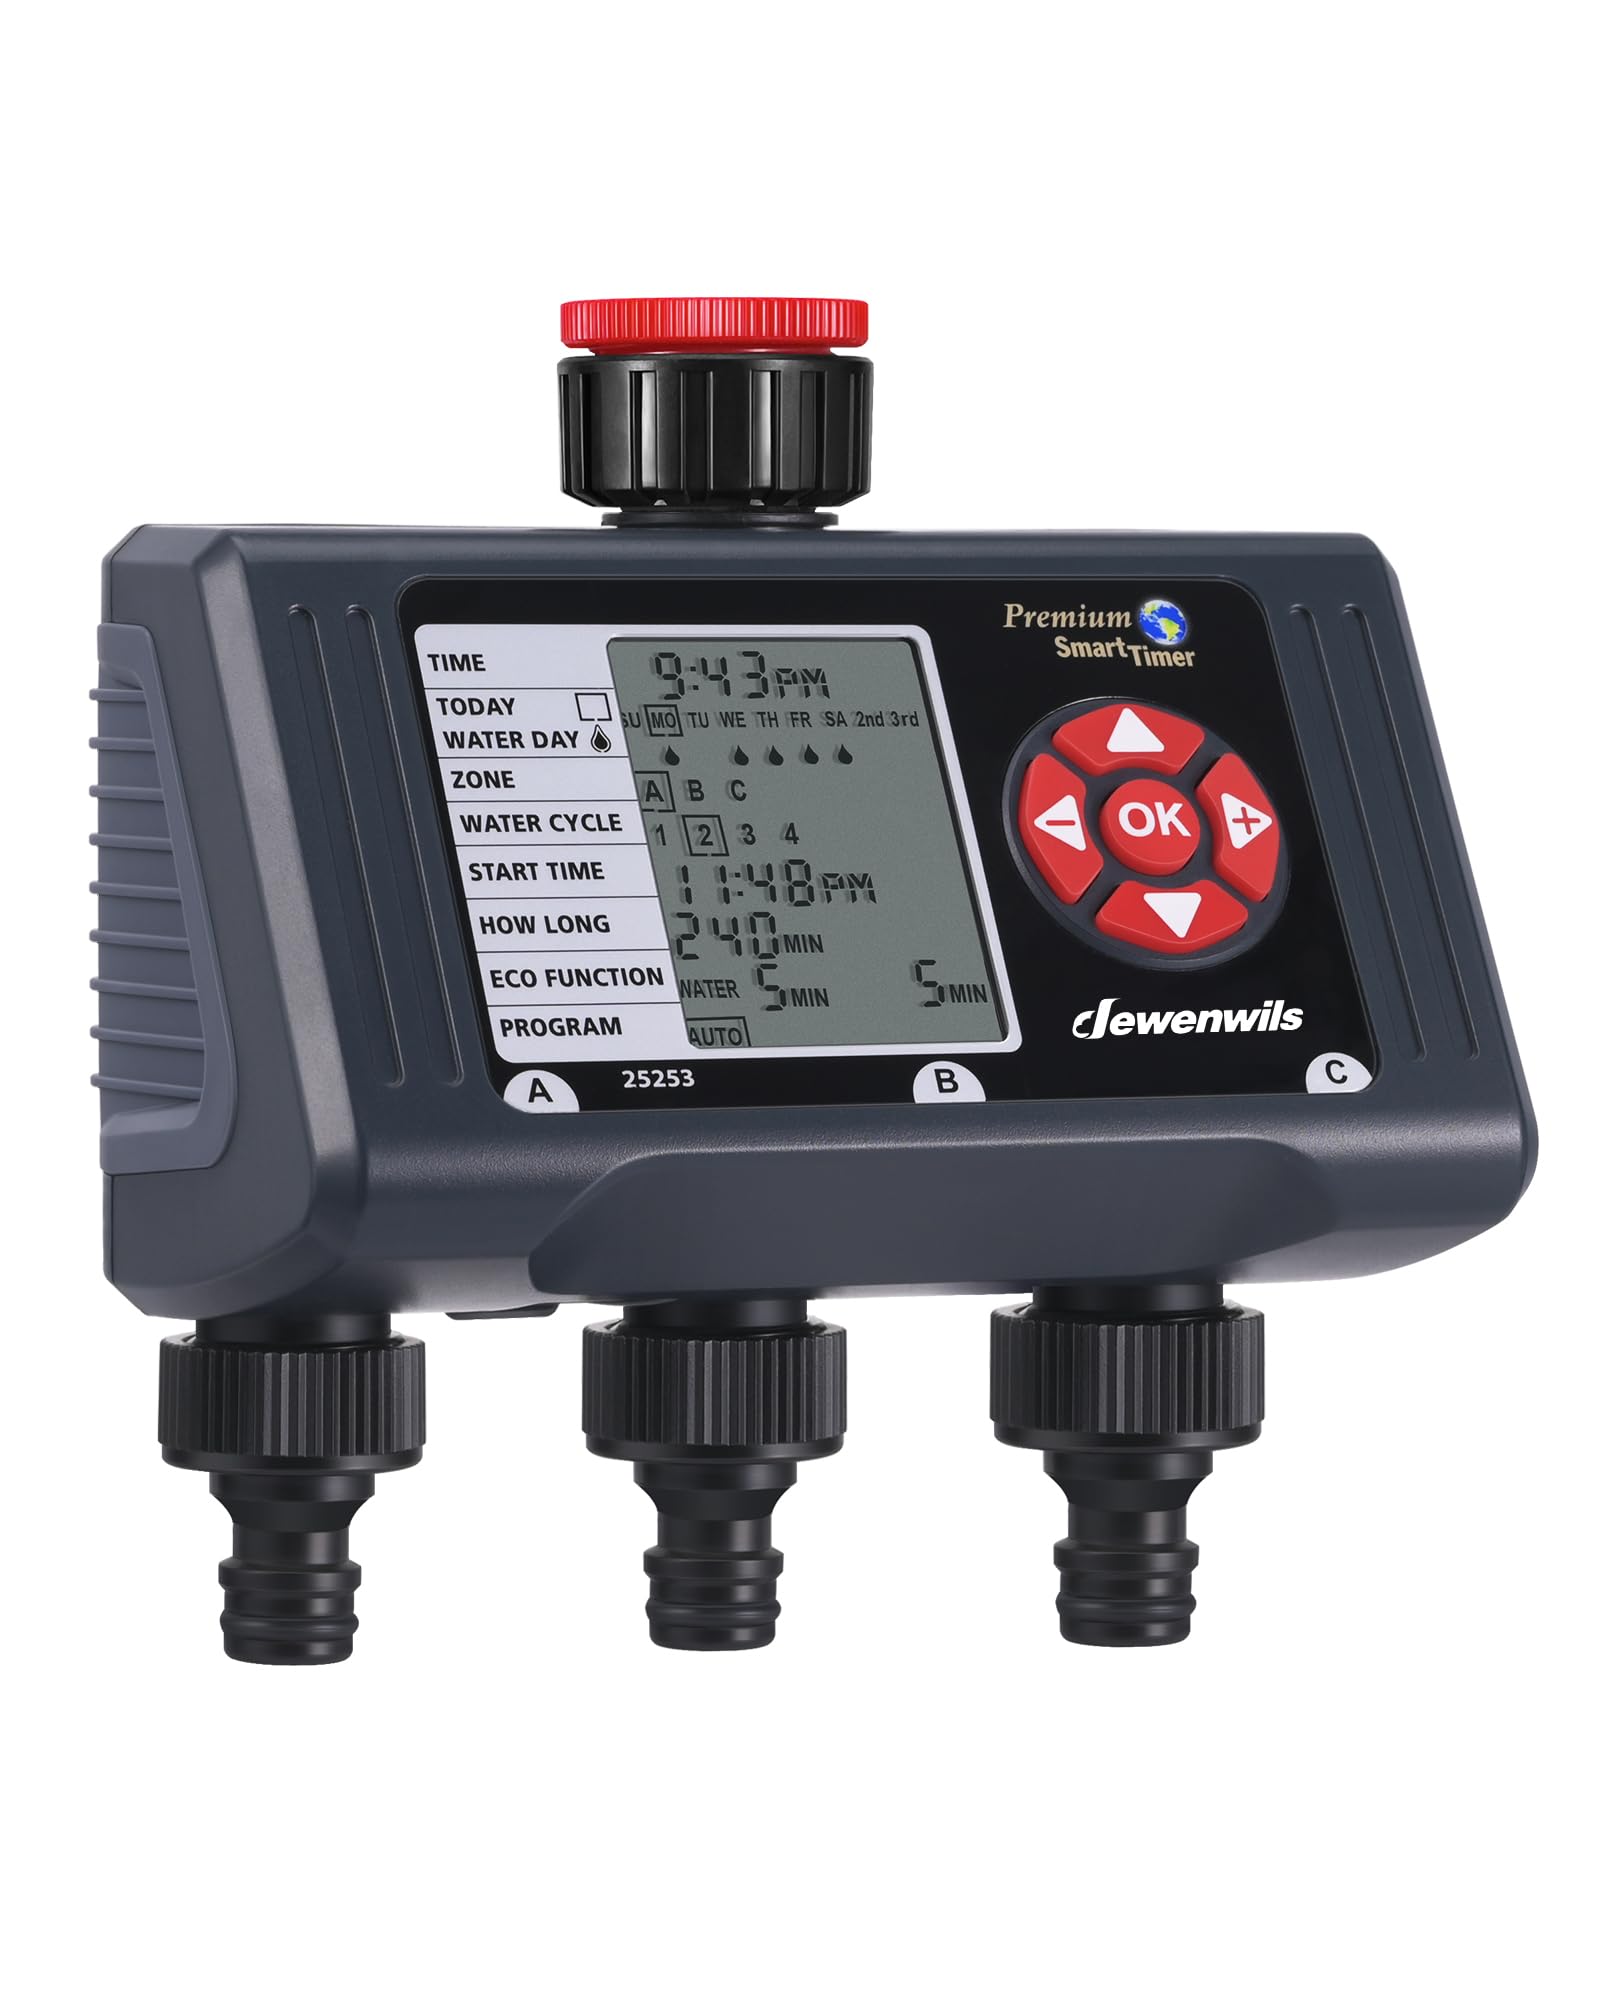
Principal view of the DEWENWILS 3-Outlet Automatic Watering Timer, showing the LCD screen and three output valves.
Components clau:
- Pantalla LCD: 3.4-inch screen showing time, watering status, and program details.
- Botons de control: 5 buttons (OK, Arrow Up, Arrow Down, Left, Right) for navigation and setting adjustments.
- Faucet Connector: Standard 3/4-inch inlet for connecting to a water tap.
- Water Outlets (A, B, C): Three independent outlets for connecting hoses to different irrigation zones.
- Compartiment de la bateria: Located at the back, requires 2 AA 1.5V batteries.

Detallada view of the large LCD screen and the 5 control buttons for easy programming.
Configuració
1. Instal·lació de la bateria
- Localitza el compartiment de les piles a la part posterior del temporitzador.
- Feu lliscar la tapa de la bateria.
- Insert 2 new AA 1.5V alkaline batteries, ensuring correct polarity (+/-).
- Replace the battery cover securely. The timer will power on and display the current time setting.

Close-up of the battery compartment, showing the spring contacts and seal.
2. Connexió a l'aixeta
- Assegureu-vos que l'aixeta estigui tancada.
- Screw the timer's inlet connector onto a standard 3/4-inch outdoor faucet. Hand-tighten firmly to prevent leaks. Do not overtighten.
- A filter washer is pre-installed in the inlet to prevent debris from entering the timer. Ensure it is properly seated.

Detail of the integrated filter mesh within the faucet connector.
3. Connexió de mànegues
- Connect your garden hoses to the three independent outlets (A, B, C) at the bottom of the timer.
- Ensure these connections are also tight to prevent leaks.

Visual guide showing the three steps for installing the watering timer: battery insertion, connecting to faucet, and attaching hoses.
Instruccions de funcionament
The timer features a user-friendly interface with a large LCD and 5 control buttons. The blinking cursor on the screen indicates the current setting being adjusted.
1. Configuració de l'hora actual
- Press the 'OK' button to enter the setting mode. The 'TIME' indicator will blink.
- Use the 'Up' and 'Down' arrows to adjust the hour, then press 'OK'.
- Adjust the minutes, then press 'OK'.
- Adjust the day of the week, then press 'OK' to confirm.
2. Programming Watering Schedules (4 Programs per Zone)
Each of the three outlets (A, B, C) can be programmed independently with up to 4 watering cycles. The programming steps are identical for each zone.

Illustration of the three independent watering zones (A, B, C) with customizable start times and durations.
- Seleccioneu la zona: Use the 'Left' or 'Right' arrow buttons to select the desired zone (A, B, or C) you wish to program. The selected zone will blink. Press 'OK'.
- Select Water Cycle: Use 'Up' or 'Down' to select one of the 4 available water cycles (1, 2, 3, 4) for the chosen zone. Press 'OK'.
- Establir hora d'inici: The 'START TIME' indicator will blink. Use 'Up' or 'Down' to set the desired start hour, then 'OK'. Repeat for minutes, then 'OK'.
- Configura la durada del reg: The 'HOW LONG' indicator will blink. Use 'Up' or 'Down' to set the watering duration from 1 to 240 minutes. Press 'OK'.
- Set Watering Frequency (Water Day): The 'WATER DAY' indicator will blink. You can choose from:
- Specific days of the week (SU, MO, TU, WE, TH, FR, SA)
- Every 2nd day
- Every 3rd day
- Set ECO Function (Repeat Irrigation Mode): The 'ECO FUNCTION' indicator will blink. This mode allows for intermittent watering (e.g., ON 5 minutes, OFF 15 minutes) within a set period.
- Use 'Up' or 'Down' to set the 'WATER' duration (e.g., 5 minutes). Press 'OK'.
- Use 'Up' or 'Down' to set the 'PAUSE' duration (e.g., 15 minutes). Press 'OK'.
- To disable ECO function, set both WATER and PAUSE to 0.
- Desa el programa: After setting all parameters for a cycle, the timer will automatically save the settings and return to the main display. Repeat for other cycles and zones as needed.
Use 'Up' or 'Down' to navigate and 'OK' to select/deselect days or frequency. Press 'OK' to confirm the frequency setting.

Visual representation of the four customizable watering programs per zone, allowing for diverse irrigation schedules.

Diagram illustrating the Eco Function for intermittent watering, the Rain Delay feature, and the Manual Watering mode.
3. Reg manual
The manual watering mode allows you to water immediately without interrupting your programmed schedule.
- From the main screen, press the 'Right' arrow button to select the desired zone (A, B, or C) for manual watering.
- Press the 'Up' arrow button. The 'MANUAL' indicator will appear.
- Use 'Up' or 'Down' to set the desired manual watering duration (e.g., 10 minutes).
- Press 'OK' to start manual watering. The timer will count down the duration.
- To stop manual watering early, press 'OK' again. The timer will return to automatic mode.
4. Funció de retard per pluja
The rain delay function allows you to pause your watering schedule for a set period, preventing overwatering after rainfall.
- From the main screen, press the 'Left' arrow button. The 'DELAY' indicator will appear.
- Use 'Up' or 'Down' to set the desired delay duration (e.g., 24 hours, 48 hours, up to 6 days).
- Press 'OK' to activate the rain delay. The timer will pause all programmed watering for the selected duration.
- To cancel the rain delay, press 'OK' again. The timer will resume its normal schedule.
Manteniment
Neteja
- Netegeu l'exterior del temporitzador amb un drap suau iamp tela. No utilitzeu netejadors abrasius ni dissolvents.
- Regularly check and clean the filter washer in the inlet to prevent blockages.
Canvi de bateria
The timer features a low battery indicator on the LCD screen. When the battery icon appears or blinks, replace the batteries promptly. The timer is designed to retain programmed settings even when batteries are depleted or removed, but it's recommended to replace them as soon as the indicator appears.
Emmagatzematge d'hivern
Before the first frost, disconnect the timer from the faucet and hoses. Remove the batteries. Store the timer in a dry, frost-free location to prevent damage from freezing water.
Resolució de problemes
| Problema | Causa possible | Solució |
|---|---|---|
| Timer does not turn on or LCD is blank. | Piles gastades o instal·lades incorrectament. | Replace batteries with new AA 1.5V alkaline batteries, ensuring correct polarity. |
| Water does not flow or flow is weak. | Faucet is off; low water pressure; clogged filter; timer not programmed correctly. | Turn on faucet; check water pressure (max 120 psi); clean filter; verify program settings. |
| Fuites de les connexions. | Connexions soltes; volanderes desgastades. | Tighten all connections; replace rubber washers if damaged. |
| Timer waters at wrong times. | Incorrect current time or program settings. | Verify and adjust the current time and all program settings for each zone. |
| Rain delay activates unexpectedly. | Rain delay was manually activated. | Press 'OK' to cancel the rain delay. |
Especificacions
- Model: DHDWT03A
- Material: Acrilonitril butadiè estirè (ABS)
- Color: Negre
- Dimensions del producte: 17.4 cm (profunditat) x 16.8 cm (amplada) x 10.4 cm (alçada)
- Mida de la pantalla: 3.4 polzades
- Nombre de punts de venda: 3 independents
- Programs per Zone: 4
- Durada del reg: De 1 a 240 minuts
- Pressió màxima d'aigua: 120 psi
- Font d'alimentació: 2 x AA 1.5V Alkaline Batteries (not included)
- Fabricant: DEWENWILS

Image displaying the timer's screen with various settings, including watering duration and frequency, alongside maximum water pressure and low battery warning indicators.
Garantia i Suport
Els productes DEWENWILS estan dissenyats per a la fiabilitat i el rendiment. Per obtenir informació sobre la garantia o assistència tècnica, consulteu les dades de contacte proporcionades amb la vostra compra o visiteu el lloc web oficial de DEWENWILS. website. Please have your model number (DHDWT03A) ready when contacting support.