
1. Introducció
Thank you for choosing the Comelit VEDOKPR LCD Keypad with RFID. This device is designed to provide secure and convenient access control and system management for your Vedo series alarm control units. This manual provides detailed instructions for installation, operation, and maintenance to ensure optimal performance and longevity of your keypad.
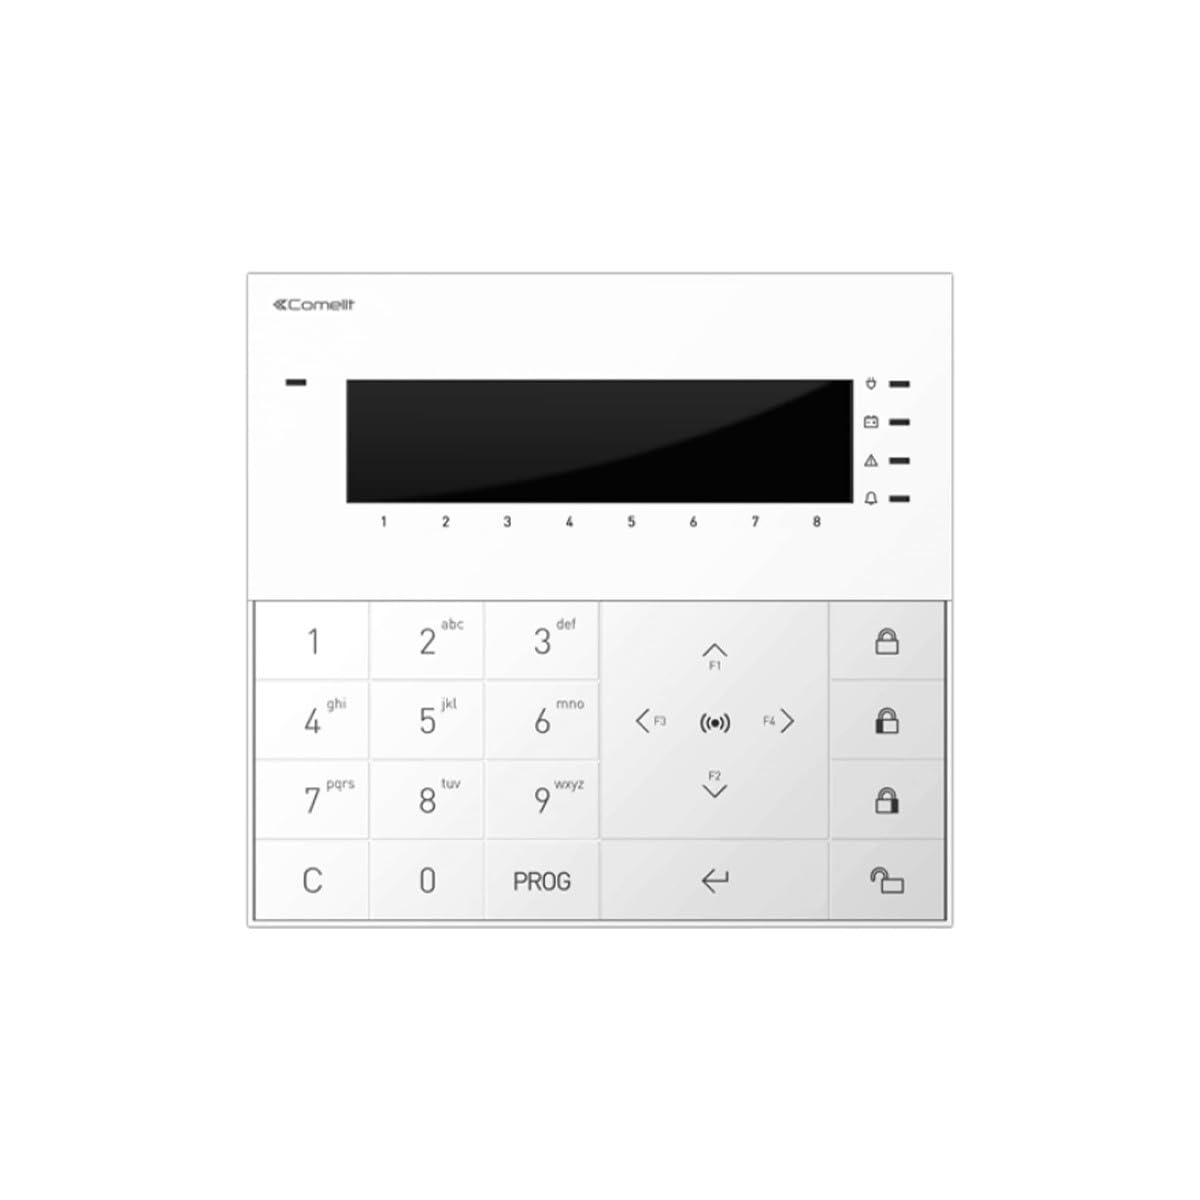
Figure 1: The Comelit VEDOKPR LCD Keypad with RFID.
The VEDOKPR keypad features an intuitive LCD display, a tactile keypad for code entry, and an integrated RFID reader for proximity tag access. It is an essential component for managing your security system.
2. Informació de seguretat
Please read all safety instructions carefully before installation and operation. Failure to follow these instructions may result in injury, damage to the product, or void the warranty.
- Seguretat elèctrica: Installation must be performed by qualified personnel in accordance with local electrical codes and regulations. Disconnect power before performing any wiring or maintenance.
- Medi ambient: Do not expose the keypad to extreme temperatures, high humidity, direct sunlight, or corrosive environments. Ensure the installation location is dry and well-ventilated.
- Manipulació: Manipuleu el dispositiu amb cura. Eviteu deixar-lo caure ni sotmetre'l a impactes forts.
- Neteja: Use a soft, dry cloth for cleaning. Do not use abrasive cleaners, solvents, or spray liquids directly onto the keypad.
- Modificacions: Do not attempt to modify or repair the keypad yourself. Refer all servicing to authorized Comelit service personnel.
3. Configuració
3.1. Desembalatge
Carefully remove the keypad from its packaging. Verify that all components are present:
- Comelit VEDOKPR LCD Keypad
- Cargols de muntatge i taps de paret
- Guia d'inici ràpid (aquest manual)
If any components are missing or damaged, contact your supplier immediately.
3.2. Ubicació de muntatge
Choose a suitable indoor location for mounting the keypad. Consider the following:
- Visibility and Accessibility: The keypad should be easily visible and accessible for daily use.
- Cablejat: Ensure the location allows for easy routing of necessary wiring to the Vedo control unit.
- Factors ambientals: Avoid areas with direct sunlight, excessive heat, moisture, or strong electromagnetic interference.
Per a un òptim viewing and operation, mount the keypad at eye level, typically between 1.2 to 1.5 meters (4 to 5 feet) from the floor. Ensure there is sufficient clear space around the keypad for comfortable use.
3.3. Cablejat i connexions
Before proceeding, ensure the Vedo control unit is powered off.
- Open the keypad casing by gently prying the front cover from the base using a small screwdriver at the designated points.
- Route the communication cable from the Vedo control unit to the keypad's mounting location.
- Connect the wires to the terminal block on the keypad's PCB. The terminal block typically has connections for power and data. Pay close attention to polarity.
- + 12V: Connect to the +12V output of the control unit.
- GND: Connect to the common ground of the control unit.
- DATA A: Connect to the DATA A terminal of the control unit.
- DATA B: Connect to the DATA B terminal of the control unit.
- Ensure all connections are secure to prevent accidental disconnection.
Refer to the wiring diagram provided with your Vedo control unit for specific terminal assignments and cable requirements. Incorrect wiring can damage the keypad or control unit.
3.4. Muntatge del teclat
- Mark the drilling points on the wall using the keypad base as a template.
- Perfora forats i insereix els tacs de paret.
- Secure the keypad base to the wall using the provided screws.
- Carefully reattach the front cover to the base, ensuring it clicks securely into place.
3.5. Engegada i configuració inicials
After mounting and wiring, power on the Vedo control unit. The keypad LCD will illuminate, and the system will initiate a self-test. Follow the instructions on the LCD display or refer to your Vedo control unit manual for initial system configuration, including keypad address assignment and user programming.
4. Instruccions de funcionament
The VEDOKPR keypad allows users to interact with the Vedo control unit for various security functions.
4.1. Keypad Layout
The VEDOKPR keypad features a clear LCD display at the top, a numeric keypad (0-9) in the center, and several function keys. An integrated RFID reader is located on the front panel, typically indicated by a small icon or designated area.
- Pantalla LCD: Shows system status, messages, and menu options.
- Tecles numèriques (0-9): Used for entering PIN codes and numerical data.
- Tecles de funció: Specific keys for arming, disarming, panic, and menu navigation (refer to your Vedo control unit manual for specific functions and their labels).
- Lector RFID: Located on the front panel, used for proximity tag autenticació.
4.2. Armament del sistema
To arm the security system:
- Ensure all protected zones are closed (e.g., doors and windows). The LCD will display "System Ready to Arm" or a similar message.
- Enter your valid user PIN code.
- Press the "Arm" or designated function key.
- Alternatively, present a valid RFID tag al lector RFID.
- The keypad will emit an arming tone, and the LCD will display "System Armed" or the current armed status.
4.3. Desactivació del sistema
Per desarmar el sistema de seguretat:
- Enter your valid user PIN code.
- Press the "Disarm" or designated function key.
- Alternatively, present a valid RFID tag al lector RFID.
- The keypad will emit a disarming tone, and the LCD will display "System Disarmed" or the current disarmed status.
4.4. Using RFID Tags
The integrated RFID reader allows for quick arming and disarming without entering a PIN code. To use an RFID tag:
- Mantingueu la RFID tag approximately 1-2 cm from the RFID reader area on the keypad.
- The keypad will beep, and the system will arm or disarm based on the tag's programming.
- Ensure your RFID tags are properly programmed into the Vedo control unit. Refer to the control unit manual for RFID tag enrollment procedures.
4.5. Navegació del menú
The LCD display provides access to various system menus. Use the arrow keys (if present) or designated function keys to navigate through options. Refer to your Vedo control unit manual for detailed menu structures and functions, as these are specific to the control unit's programming.
5. Manteniment
5.1. Neteja
To maintain the appearance and functionality of your keypad:
- Wipe the keypad surface with a soft, dry, lint-free cloth.
- Per a marques difícils, lleugerament dampen the cloth with water. Do not use chemical cleaners, abrasives, or solvents.
- Eviteu ruixar líquids directament sobre el teclat numèric.
5.2. Controls periòdics
Periodically check the keypad for any signs of physical damage or loose connections. Ensure the keys respond correctly and the LCD display is clear and legible. Test the RFID reader functionality occasionally with a programmed tag.
6. Solució De Problemes
This section addresses common issues you might encounter with your VEDOKPR keypad. For more complex problems, consult your Vedo control unit manual or contact technical support.
| Problema | Causa possible | Solució |
|---|---|---|
| Keypad LCD is blank. | No power to the keypad or control unit. Loose wiring connection. |
|
| Keypad does not respond to key presses. | Keypad frozen. Communication issue with control unit. |
|
| RFID tag no reconegut. | Tag no programat. Tag damaged. Incorrect scanning technique. |
|
| System fails to arm/disarm. | Incorrect PIN code. Open zones. System fault. |
|
7. Especificacions
The following are the technical specifications for the Comelit VEDOKPR LCD Keypad with RFID:
| Característica | Detall |
|---|---|
| Número de model | VEDOKPR |
| Marca | Comelit |
| Tipus de visualització | LCD |
| Material | Plàstic |
| Color | Negre |
| Lector RFID | Integrat |
| Compatibilitat | Comelit Vedo Control Units |
| Temperatura de funcionament | Typically -10°C to +50°C (14°F to 122°F) |
| Font d'alimentació | 12V DC (supplied by control unit) |
8. Informació de la garantia
Comelit guarantees this product against defects in materials and workmanship for a period specified by local regulations from the original date of purchase. This warranty does not cover damage caused by improper installation, misuse, unauthorized modification, accident, or natural disaster.
For detailed warranty terms and conditions, please refer to the official Comelit weblloc web o poseu-vos en contacte amb el vostre distribuïdor local.
9. Suport tècnic
If you encounter any issues that cannot be resolved using the troubleshooting guide, or if you require further assistance, please contact Comelit technical support.
Comelit Contact Information:
- Weblloc: www.comelitgroup.com
- Correu electrònic: Consulteu el weblloc web per a contactes de suport regional.
- Telèfon: Consulteu el weblloc web per a números de telèfon d'assistència regional.
When contacting support, please have your product model number (VEDOKPR) and a detailed description of the issue ready.