1. Informació de seguretat
Read all instructions carefully before installation and use. Failure to follow these instructions may result in property damage, personal injury, or death.
- Desconnecteu sempre l'alimentació de la nevera abans d'intentar qualsevol instal·lació, manteniment o reparació.
- Utilitzeu equips de protecció personal adequats, com ara guants i ulleres de seguretat.
- Si teniu dubtes sobre alguna part del procés d'instal·lació, consulteu un tècnic qualificat.
- Assegureu-vos que totes les connexions estiguin ben fixades i correctament aïllades després de la instal·lació.
- Mantingueu els nens i les mascotes allunyats de la zona de treball durant la instal·lació.
2. Configuració i instal·lació
This ice maker is designed as a replacement part for specific Whirlpool refrigerator models. Verify compatibility before proceeding with installation.
2.1 Eines necessàries
- Screwdriver (Phillips head and/or flathead, depending on your refrigerator model)
- Alicates (opcionals, per a connexions difícils)
- Guants de treball
2.2 Passos d'instal·lació
- Desconnecteu l'alimentació: Desendolleu la nevera de la presa de corrent o apagueu l'interruptor que subministra alimentació a la nevera.
- Accés a la màquina de gel antiga: Open the freezer door and locate the existing ice maker. Depending on your model, you may need to remove an ice bucket or shelf to gain full access.
- Remove Old Ice Maker:
- Disconnect the electrical wiring harness from the old ice maker. This usually involves pressing a tab and pulling the connector apart.
- Unscrew any mounting screws holding the ice maker in place. There are typically 2-3 screws.
- Carefully remove the old ice maker from the freezer compartment.
- Prepare New Ice Maker:
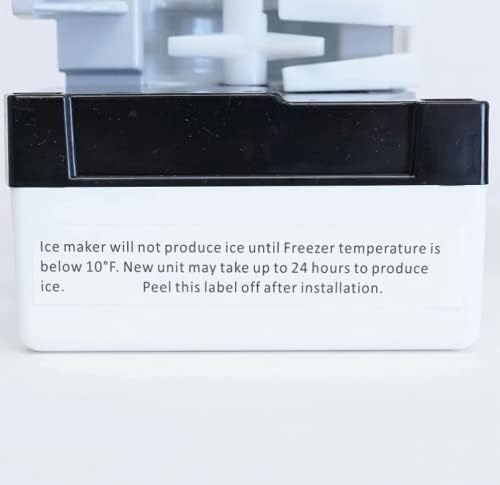
Descripció de la imatge: Un primer pla view of the ice maker's side, showing a white label with black text. The text reads: "Ice maker will not produce ice until Freezer temperature is below 10°F. New unit may take up to 24 hours to produce ice. Peel this label off after installation." This label provides critical information regarding initial operation.
Before installing the new ice maker, read any labels attached to the unit. Remove any protective films or labels as instructed, such as the one shown in the image above, after installation is complete.
- Instal·leu una nova màquina de gel:
- Position the new ice maker in the freezer compartment, aligning it with the mounting holes.
- Secure the ice maker with the screws removed in step 3. Do not overtighten.
- Connect the electrical wiring harness to the new ice maker. Ensure it clicks securely into place.

Descripció de la imatge: Un costat view of the ice maker, highlighting the ice tray and the water fill cup. This perspective shows the general shape and components of the unit.

Descripció de la imatge: Un costat diferent view of the ice maker, providing a clearer look at the ice level sensing arm and its connection points. This arm controls ice production.
- Torneu a connectar l'alimentació: Torneu a connectar la nevera a la presa de corrent o activeu l'interruptor automàtic.
- Funcionament inicial: Allow the refrigerator to cool down. The ice maker will begin producing ice once the freezer temperature drops below 10°F (-12°C). It may take up to 24 hours for the first batch of ice to be produced and for the ice maker to operate normally.
3. Instruccions de funcionament
The ice maker operates automatically to produce ice cubes. Ensure the water supply to the refrigerator is turned on and the ice maker's shut-off arm is in the down position.
- Producció automàtica: Once the freezer reaches the correct temperature and the water supply is connected, the ice maker will automatically fill with water, freeze it, and eject the ice cubes into the ice bucket.
- Ice Level Arm: The metal shut-off arm (also known as the feeler arm or bail arm) detects the ice level in the bucket. When the ice bucket is full, the arm will be pushed up by the ice, stopping further ice production. When ice is removed, the arm will drop, and ice production will resume.
- Desactivació de la producció de gel: To temporarily stop ice production, manually lift the shut-off arm into its upright (locked) position. Ensure it is fully engaged to prevent water from filling the tray.
4. Manteniment
Un manteniment regular ajuda a garantir un rendiment òptim i una llarga durada de la màquina de gel.
- Neteja: Periodically remove the ice bucket and empty any old ice. Clean the ice bucket with mild soap and warm water, then rinse thoroughly and dry before returning it to the freezer. Do not use abrasive cleaners.
- Filtre d'aigua: Si la nevera té un filtre d'aigua, assegureu-vos que es substitueixi segons les recomanacions del fabricant per mantenir la qualitat de l'aigua i la producció de gel.
- Check Water Line: Occasionally inspect the water supply line for kinks, leaks, or damage.
- Pols: Keep the area around the ice maker clean and free of dust or debris.
5. Solució De Problemes
If your ice maker is not functioning as expected, refer to the following common issues and solutions.
| Problema | Causa possible | Solució |
|---|---|---|
| Sense producció de gel |
|
|
| Slow Ice Production |
|
|
| Ice Maker Not Stopping |
|
|
| Ice Cubes are Small or Hollow |
|
|
6. Especificacions
| Marca | Genèric |
| Fabricant | Genèric |
| Part Number / Model | WRS325FDAB06 (and other compatible Whirlpool models) |
| Dimensions del producte | 12 x 6 x 6 polzades |
| Capacitat | 1 Cubic Centimeters (Note: This refers to the internal volume, not ice production rate.) |
| UPC | 824252645914 |

Descripció de la imatge: A view of the underside of the ice maker, revealing the heating element and other internal electrical components. This view is typically seen during installation or repair.
7. Garantia i Suport
This product is a replacement part. Specific warranty terms are typically provided by the seller or manufacturer at the time of purchase. Please retain your proof of purchase for any warranty claims.
- Informació de la garantia: For details regarding the warranty period and coverage, refer to the documentation included with your purchase or contact the retailer directly.
- Suport tècnic: If you encounter issues not covered in the troubleshooting section, or require further assistance, please contact the seller or a qualified appliance repair technician.

