
Thinkbee Thinkbee Wireless Switch (Model SW-R01)
Thinkbee Wireless Switch Instruction Manual
Model: Thinkbee Wireless Switch (SW-R01)
1. Introducció
Thank you for choosing the Thinkbee Wireless Switch. This product offers a convenient and flexible solution for controlling your lighting and other electrical appliances without the need for complex wiring. Its innovative design allows for quick installation and relocation, making it ideal for various applications, both indoors and outdoors. Please read this manual carefully before installation and use to ensure safe and optimal performance.
2. Producte acabatview
The Thinkbee Wireless Switch system consists of a mini portable switch and a compact receiver. The switch is battery-powered and communicates wirelessly with the receiver, which is connected to your light fixture or appliance. This setup eliminates the need for traditional wiring between the switch and the load.
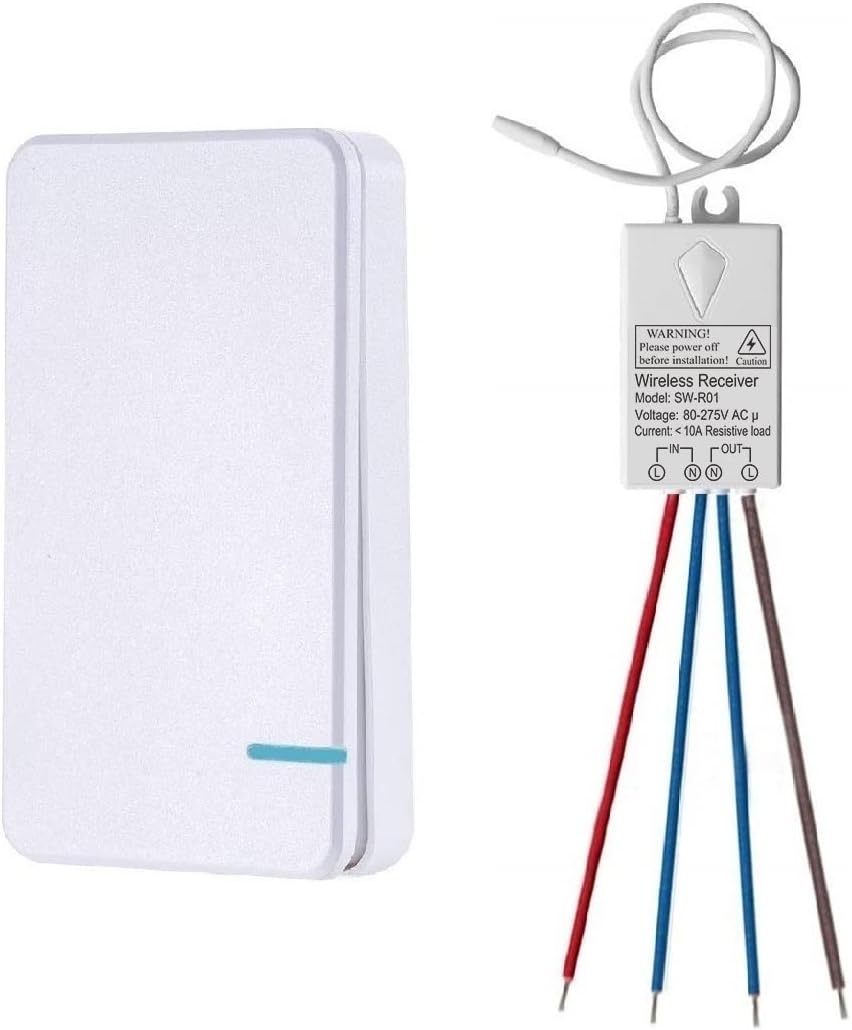
Figure 2.1: Thinkbee Wireless Switch (left) and Receiver (right).
This image displays the two main components of the Thinkbee Wireless Switch system: the sleek, white mini portable switch on the left and the compact receiver with its wiring on the right. The switch is designed for easy handling and placement, while the receiver is small enough to fit into most electrical boxes.
Característiques principals:
- Funcionament sense fil: No wiring required between the switch and the lamp, offering flexible placement.
- Àmplia compatibilitat: Suitable for various light fixtures including halogen, incandescent, fluorescent, and LED lamps, up to 1000W.
- Interval estès: Control fixtures indoors (through walls) up to 165ft and outdoors up to 1300ft.
- Disseny durador: Fireproof (V0 level) and IP66 waterproof for enhanced safety and longevity.
- Multi-way Switching: Easily create 2-way or multi-way switching setups by adding more switches.
- Llarga vida útil de la bateria: CR2032 button lithium battery in the switch can last 6-8 years.
3. Especificacions
| Característica | Especificació |
|---|---|
| Marca | pensa abella |
| Número de model | Thinkbee Wireless Switch (SW-R01 Receiver) |
| Vol. Operatiutage | 80~275V AC |
| Càrrega màxima (receptor) | 1000W (Resistive Load), 5 Amps standard load, max support 10A |
| Canvia les dimensions | 7.5 x 4.8 x 1.5 cm |
| Dimensions del receptor | 3.9 x 2.3 x 2.2 cm |
| abast sense fils | Indoor: Up to 165ft (through walls), Outdoor: Up to 1300ft |
| Classificació impermeable | IP66 |
| Fireproof Level | V0 |
| Vida útil del botó de commutació | Fins a 600,000 vegades |
| Vida útil del receptor | Fins a 400,000 vegades |
| Battery Type (Switch) | CR2032 button lithium battery (included) |

Figure 3.1: Dimensions of the Thinkbee Wireless Switch and Receiver.
This image provides a visual representation of the dimensions for both the Thinkbee wireless switch and its receiver, highlighting their compact size. It also illustrates key features such as V0 Fireproof Level, IP66 Waterproof rating, and the ability to penetrate walls and floors for extended range.
4. Guia d'instal·lació
Precaucions de seguretat:
- WARNING: Always turn off the power at the circuit breaker before beginning any electrical installation to prevent electric shock.
- Ensure all wire connections are secure and no bare wires are protruding from terminals.
- Si no teniu cap dubte sobre el cablejat elèctric, consulteu un electricista qualificat.
4.1 Cablejat del receptor
The receiver needs to be wired between the power source and the light fixture. It requires both a live (L) and neutral (N) line for input, and provides live (L) and neutral (N) output to the load.
- Desconnecteu l'alimentació principal al disjuntor.
- Connect the input Live (L) wire from your power source to the 'IN L' terminal on the receiver.
- Connect the input Neutral (N) wire from your power source to the 'IN N' terminal on the receiver.
- Connect the output Live (L) wire to your light fixture's live input from the 'OUT L' terminal on the receiver.
- Connect the output Neutral (N) wire to your light fixture's neutral input from the 'OUT N' terminal on the receiver.
- Ensure all connections are firm and insulated.

Figure 4.1: Wiring diagram for the Thinkbee Wireless Receiver.
This image illustrates the wiring process for the Thinkbee wireless receiver, showing connections for AC 80-275V input (Live and Neutral) and output to a light bulb (Live and Neutral). It also depicts the receiver's antenna and the "Matching Key" button for pairing. Below the diagram, there are visual examples of how the switch can be used: handheld, or mounted via screw-in/paste methods.
Video 4.1: How to quickly install and use in one minute?
This video demonstrates the quick installation process of the Thinkbee Wireless Switch and Receiver. It shows how to connect the receiver to a light fixture and pair it with the wireless switch, providing a visual guide for a fast setup.
4.2 Switch Placement
The wireless switch offers versatile placement options:
- Portàtil: Use it as a handheld remote control.
- Muntatge en superfície: Attach it to any flat surface using the supplied double-sided adhesive sticker.
- Muntatge de cargol: Secure it to a wall or junction box using screws (ensure proper mounting for battery access).

Figure 4.2: Remote control range capabilities of the Thinkbee Wireless Switch.
This image illustrates the impressive remote control range of the Thinkbee Wireless Switch. It shows the switch effectively controlling lights in an indoor setting up to 165 feet (even through walls) and in an outdoor environment up to 1300 feet, demonstrating its versatility for various property sizes.

Figure 4.3: Comparison of Thinkbee Wireless Switch with a traditional wired switch.
This image visually compares the installation of a traditional wired switch with the Thinkbee Wireless Switch. The top panel shows a complex wiring setup for a traditional switch, while the bottom panel highlights the simplicity of the wireless switch, which requires no wiring between the switch and the light fixture, offering greater flexibility in placement.
5. Pairing the Switch and Receiver
After wiring the receiver, you need to pair it with the wireless switch.
- Turn on the power supply to the receiver. The connected lamp may briefly flash or turn on.
- Press and hold the small setting button (often labeled "Matching Key" or similar) on the receiver for approximately 2 seconds. The indicator light on the receiver will start flashing.
- While the indicator light is flashing, quickly press the wireless switch button you wish to pair.
- If the pairing is successful, the connected lamp will turn on or off, indicating that the learning code is complete.
- You can pair multiple switches to one receiver or one switch to multiple receivers to create multi-way control.
6. Funcionament
Once installed and paired, operating the Thinkbee Wireless Switch is straightforward:
- Simply press the button on the wireless switch to toggle the connected light or appliance ON/OFF.
- The switch operates on an RF signal, allowing control through walls and over long distances.

Figure 6.1: Various applications for the Thinkbee Wireless Switch.
This image showcases the wide applicability of the Thinkbee Wireless Switch across different environments. It displays examples of its use in indoor lighting, outdoor lighting, basements, and other areas, emphasizing its versatility and ability to function without signal interference in various settings.

Figure 6.2: Thinkbee Wireless Switch demonstrating IP66 waterproof capability.
This image highlights the IP66 waterproof feature of the Thinkbee Wireless Switch, showing the switch mounted on a wall in a shower setting with water splashing. This demonstrates its suitability for use in damp or wet environments, ensuring safety and functionality without the need for traditional wiring.
7. Manteniment
7.1 Neteja:
Netegeu l'interruptor i el receptor amb un drap suau i sec. No utilitzeu productes de neteja abrasius ni dissolvents.
7.2 Battery Replacement (Wireless Switch):
The wireless switch is powered by a CR2032 button lithium battery. When the switch's performance degrades or it stops responding, it may be time to replace the battery.
- Carefully open the switch casing. Refer to the video below for guidance.
- Traieu la bateria CR2032 antiga.
- Introduïu una pila CR2032 nova, assegurant-vos de la polaritat correcta (+/-).
- Close the switch casing de manera segura.
Video 7.1: How to Replace the Battery? (Mini)
This video provides a step-by-step guide on how to open the mini wireless switch and replace its CR2032 button lithium battery. It demonstrates the tools and technique required for safe and effective battery replacement.
8. Solució De Problemes
| Problema | Causa possible | Solució |
|---|---|---|
| El llum no s'encén/s'apaga. | No power to receiver; Receiver not paired; Switch battery low/dead; Wiring error. | Check power supply to receiver. Re-pair switch and receiver (Section 5). Replace switch battery (Section 7.2). Verify wiring connections (Section 4.1). |
| Abast sense fil reduït. | Obstructions (thick walls, metal objects); Signal interference; Low switch battery. | Relocate switch or receiver to minimize obstructions. Ensure no strong RF interference sources nearby. Replace switch battery (Section 7.2). |
| Switch button unresponsive. | Battery dead; Internal damage. | Replace switch battery (Section 7.2). If problem persists, contact customer support. |
9. Garantia i Suport
All Thinkbee wireless switches purchased from Yamipho-UK come with a 12-month guarantee and friendly customer service.
For technical support, warranty claims, or any inquiries, please contact your retailer or visit the official Thinkbee website. Please have your product model number (Thinkbee Wireless Switch, Model SW-R01) and purchase details ready when contacting support.
També podeu visitar el Thinkbee Store on Amazon per a més informació i productes.
Ask a question about this manual
Ask about setup, troubleshooting, compatibility, parts, safety, or missing instructions. Manuals+ will review the question and use this page’s manual context to help answer it.