
Introducció
Thank you for choosing the VOCOO Wireless Digital Indoor Outdoor Thermometer Hygrometer. This device is designed to provide accurate temperature and humidity readings for both indoor and outdoor environments, helping you maintain optimal comfort and conditions. Please read this manual thoroughly before use to ensure proper operation and longevity of your device.

Image: The main display unit and the remote outdoor sensor of the VOCOO Thermometer Hygrometer.
Què hi ha a la caixa
- 1 x Indoor Thermometer Hygrometer Main Unit
- 1 x Outdoor Remote Sensor
- 4 x AAA Batteries (for both units)
- 1 x Manual d'usuari
Configuració
1. Instal·lació de la bateria
- Open the battery compartment on the back of both the main unit and the remote sensor.
- Introduïu 2 piles AAA a la unitat principal, observant la polaritat correcta (+/-).
- Insert 2 AAA batteries into the remote sensor, observing the correct polarity (+/-).
- Tanqueu els compartiments de la bateria de manera segura.
The main unit will power on automatically and begin searching for the remote sensor.
2. Col·locació
Proper placement ensures accurate readings and optimal wireless signal transmission.
- Indoor Main Unit: Place the main unit on a flat surface using its retractable stand or mount it on a wall using the hanging hole. Avoid direct sunlight, heat sources, or areas with high drafts.
- Sensor remot exterior: The remote sensor is IP43 waterproof, suitable for outdoor use. Mount it in a shaded, dry location away from direct rain and sunlight for the most accurate temperature and humidity readings. Ensure the sensor is positioned with the ventilation holes facing upwards to prevent water ingress. The wireless range is up to 100m (328ft) in an open area.

Imatge: Detallada view of the main unit and remote sensor, illustrating dimensions and available mounting options like the retractable stand and hanging holes. The back of the main unit shows buttons for °F/°C selection, time setting (12/24H), MAX/MIN display, and +/- adjustments.

Imatge: Visual examples of placing the main unit indoors (e.g., on a bedside table) and the remote sensor outdoors (e.g., on a wall under an overhang).
3. Pairing Remote Sensor
The main unit should automatically connect to the remote sensor after battery installation. If the outdoor reading is not displayed or is flashing, follow these steps:
- Ensure batteries are correctly installed and not depleted in both units.
- Bring the remote sensor close to the main unit.
- Press and hold the 'CH' button on the main unit for 3 seconds to initiate a new search for the sensor.
- The outdoor temperature and humidity should appear on the display once connected.
Instruccions de funcionament
1. Mostra mésview
The large LCD displays various information:
- Temperatura interior (°C/°F)
- Indoor Humidity (%)
- Outdoor Temperature (°C/°F)
- Outdoor Humidity (%)
- Temperature and Humidity Trend Indicators (arrow icons)
- Comfort Level Icon (DRY, COMFORT, WET)
- Time (12/24H) and Date
- MAX/MIN Temperature and Humidity Records
- Indicador de bateria baixa

Image: A visual guide highlighting the display features including temperature, humidity, MAX/MIN records, trend indicators, backlight, and comfort indicator.
2. Funció de retroiluminació
Press the light bulb icon button on the front of the main unit or any other button to activate the backlight. The backlight will illuminate for 15 seconds, making it easy to read the display in low-light conditions.

Image: A hand demonstrating how to activate the backlight on the device's large LCD screen.
3. Selecció de la unitat de temperatura (°C/°F)
Press the '°F/°C' button on the back of the main unit to switch between Celsius and Fahrenheit temperature units.
4. Configuració de l'hora i la data
- Press and hold the 'TIME' button on the back of the main unit for 3 seconds to enter time setting mode.
- Use the '+' and '-' buttons to adjust the flashing value (e.g., hour, minute, year, month, day).
- Press the 'TIME' button again to confirm the setting and move to the next parameter.
- To switch between 12-hour and 24-hour format, press the 'TIME' button briefly while the hour is flashing.
- Exit setting mode by pressing the 'TIME' button after setting the date or by waiting 10 seconds for automatic exit.
5. Registres MAX/MIN
The device records the maximum and minimum temperature and humidity values over a 24-hour period. These records are automatically cleared every 24 hours.
- Press the 'MAX/MIN' button on the back of the main unit to view the maximum recorded values.
- Press the 'MAX/MIN' button again to view the minimum recorded values.
- Press the 'MAX/MIN' button a third time to return to current readings.

Image: A graphical representation of temperature and humidity trends over a 24-hour period, illustrating the MAX/MIN recording feature.
6. Indicador del nivell de confort
The display features a comfort icon (DRY, COMFORT, WET) to indicate the current air comfort level based on humidity:
- SEC: 0-39% d'humitat
- CONFORT: 40-69% d'humitat
- MÚLID: 70-99% d'humitat
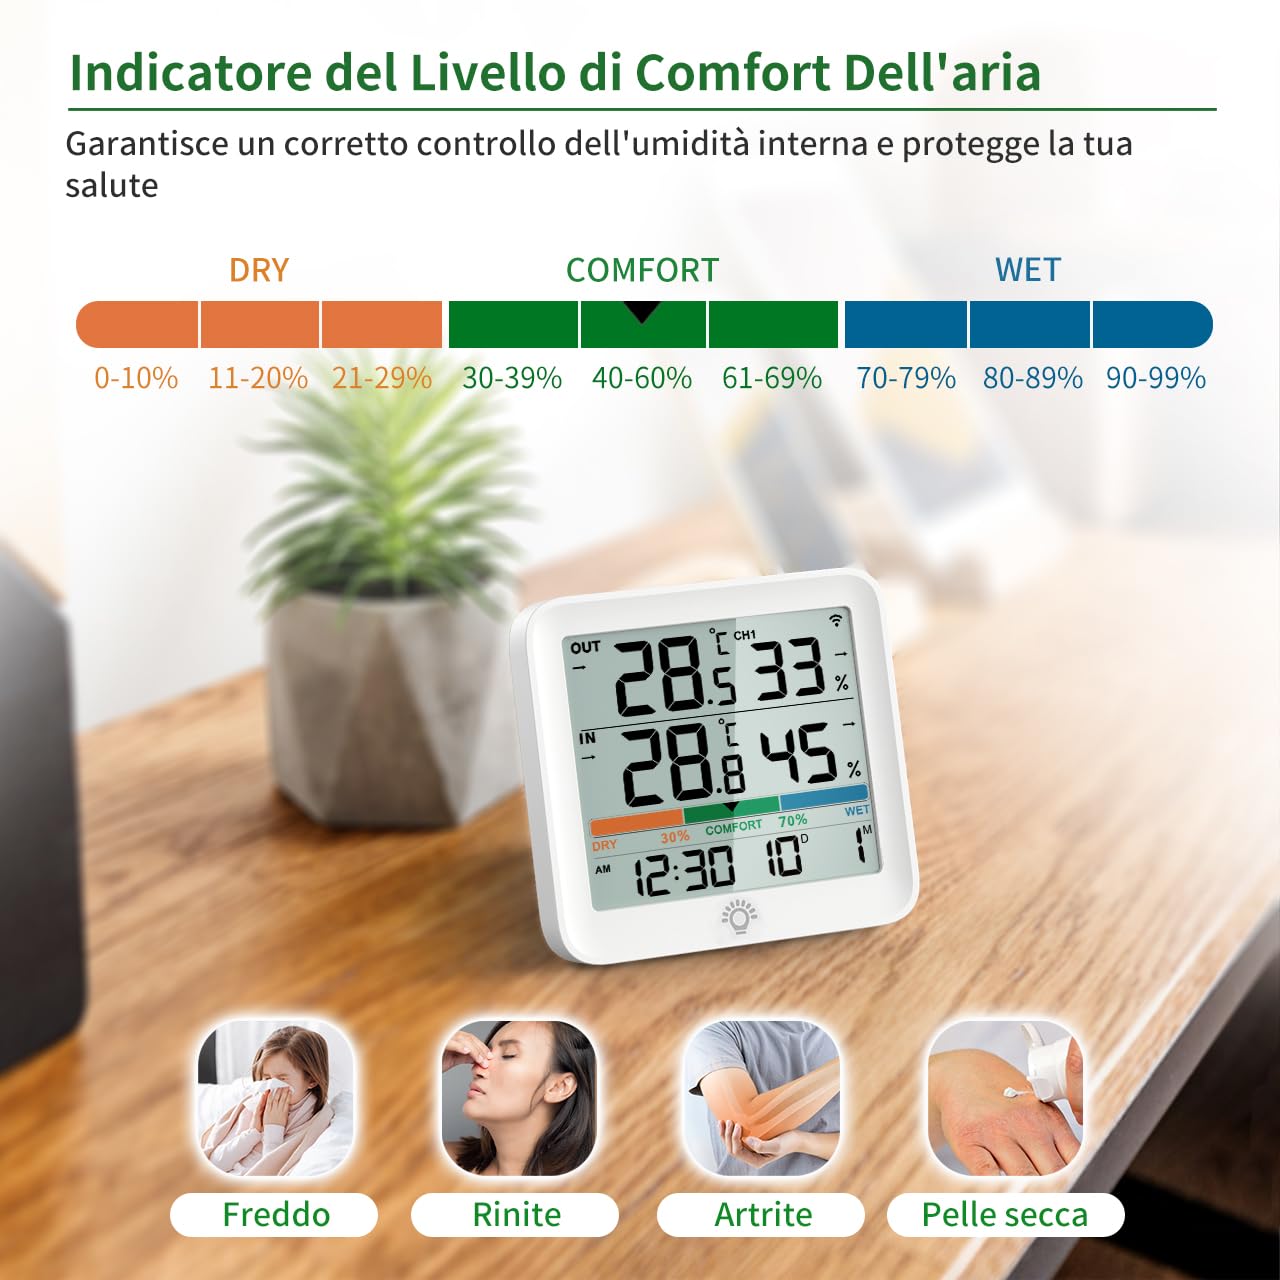
Image: An explanation of the comfort level indicator, showing humidity ranges for Dry, Comfort, and Wet conditions.
Manteniment
1. Neteja
Netegeu el dispositiu amb un suau, damp drap. No utilitzeu productes de neteja abrasius ni submergiu les unitats en aigua.
2. Substitució de la bateria
When the low battery indicator appears on the display, replace the batteries in the respective unit (main unit or remote sensor) with new AAA batteries. Ensure correct polarity.
Resolució de problemes
- No outdoor reading / Flashing outdoor reading:
- Ensure batteries are correctly installed and not depleted in both units.
- Bring the remote sensor closer to the main unit.
- Press and hold the 'CH' button on the back of the main unit for 3 seconds to re-establish connection.
- Eviteu col·locar el sensor a prop d'objectes metàl·lics grans o d'interferències electromagnètiques fortes.
- Lectures inexactes:
- Ensure both units are placed away from direct sunlight, heat sources, or drafts.
- Allow the device to stabilize for a few hours after initial setup or relocation, as sensors need time to acclimate to new environments.
- Check if the outdoor sensor is adequately protected from direct weather elements.
- La pantalla està tènue o en blanc:
- Canvieu les piles de la unitat principal.
- Comproveu la polaritat de la bateria.
Especificacions
| Número de model | 5276 |
| Rang de temperatura interior | -10 °C a 60 °C (de 14 °F a 140 °F) |
| Interval de temperatura exterior | -40 °C a 70 °C (-40 °F a 158 °F) |
| Gamma d’humitat | 10% a 95% HR |
| abast sense fils | Up to 100m (328ft) in open area |
| Font d'alimentació | 4 x AAA batteries (2 for main unit, 2 for sensor) |
| Mida de la pantalla | LCD de 3.7 polzades |
| Dimensions (unitat principal) | 90 x 87 x 23 mm |
| Dimensions (Remote Sensor) | 64.3 x 101 x 20 mm |
| Water Resistance (Sensor) | IP43 |

Image: Visual representation of the indoor and outdoor temperature ranges, and the humidity monitoring range.
Garantia i Suport
This VOCOO product comes with a standard brand warranty. For specific warranty details, please refer to the warranty card included in your package or contact VOCOO customer support.
For further assistance, troubleshooting, or product inquiries, please visit the official VOCOO weblloc o poseu-vos en contacte amb el seu departament d'atenció al client.