
1. Introducció
This manual provides essential information for the installation, setup, operation, and maintenance of your Phillips PCD265 Digital Smart Lock. Designed for enhanced security and convenience, this smart deadbolt is suitable for residential and office environments. Please read these instructions carefully before installation and use to ensure proper function and longevity of the product.
Important Note: The Phillips PCD265 Digital Smart Lock is not resistant to direct sun and rain exposure. It is intended for interior use or on main entrance doors that are protected from direct weather elements.
2. Producte acabatview
The Phillips PCD265 is a digital smart lock featuring a numeric keypad and traditional key access. It offers a secure and convenient way to manage access to your property.
Característiques principals:
- Accés amb el teclat: Supports 4 to 8-digit user codes.
- Capacitat d'usuari: Up to 50 unique user codes can be programmed.
- Substitució de claus tradicional: Includes a point key for manual access.
- Indicador de bateria baixa: Alertes quan cal substituir la bateria.
- Entrega de la porta: Configurable for left or right-hand door opening.
- Indicador de llum: Provides visual feedback for locking, unlocking, and incorrect code entry.
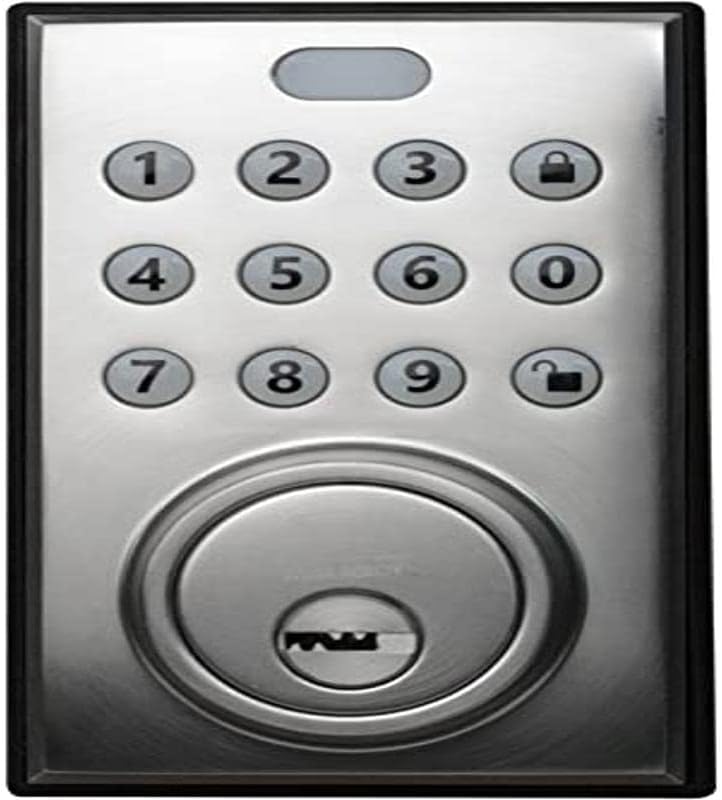
Figura 2.1: Frontal view of the Phillips PCD265 Digital Smart Lock, showing the numeric keypad and keyhole.

Figura 2.2: Interior view of the Phillips PCD265 Digital Smart Lock, featuring the thumb turn and the area for battery installation.
3. Instal·lació
The Phillips PCD265 Digital Smart Lock is designed for installation on wooden doors with a thickness between 3.5 cm and 4.5 cm.
3.1 Comprovacions prèvies a la instal·lació
- Ensure your door meets the specified thickness requirements (3.5 cm to 4.5 cm).
- Verify that the door frame and existing boreholes are compatible with a standard deadbolt installation.
- Confirm the lock will be installed in a location protected from direct weather exposure (sun and rain).
3.2 Door Handing Configuration
Before final installation, configure the lock for your door's opening direction (left or right). An internal switch within the mechanism allows for this adjustment. Refer to the detailed installation guide provided in the product packaging for specific instructions on setting the door handing.
3.3 Instal·lació de la bateria
The lock requires 4 AA alkaline batteries (not included). Install these into the interior unit's battery compartment. Ensure correct polarity. It is recommended to use new, non-rechargeable alkaline batteries for optimal performance and longevity.
4. Configuració i programació
After installation, you will need to program user codes for access. The lock supports up to 50 unique 4 to 8-digit codes.
4.1 Programació de codis d'usuari
- Locate the programming button on the interior unit (refer to the full installation guide for exact location).
- Press the programming button. The keypad will illuminate.
- Enter your desired 4 to 8-digit user code.
- Press the lock symbol button (🔒) to confirm the code.
- Repeat for additional user codes.
For detailed instructions on adding, deleting, or modifying user codes, consult the comprehensive programming guide included with your product.
5. Instruccions de funcionament
5.1 Desbloqueig de la porta
- Using a Code: Enter a valid 4 to 8-digit user code on the keypad, then press the unlock symbol button (🔓). The light indicator will confirm successful unlocking.
- Ús de la clau: Insert the provided point key into the keyhole and turn to unlock.
- Des de dins: Turn the thumb turn on the interior unit to unlock the deadbolt.
5.2 Tancar la porta
- Des de fora: Press the lock symbol button (🔒) on the keypad. The light indicator will confirm successful locking.
- Des de dins: Turn the thumb turn on the interior unit to lock the deadbolt.
5.3 Light Indicator Feedback
- Llum verda: Indicates successful operation (e.g., lock/unlock).
- Llum vermella: Indicates an error (e.g., incorrect code entered).
- Llum intermitent: May indicate low battery or a programming mode. Consult the full manual for specific flash patterns.
6. Manteniment
6.1 Substitució de la bateria
When the low battery indicator activates, replace all four AA batteries promptly. Using fresh alkaline batteries is crucial for reliable performance. Do not mix old and new batteries, or different types of batteries.
6.2 Neteja
Netegeu l'exterior del pany amb un drap suau iamp drap. Eviteu utilitzar netejadors abrasius, dissolvents o esprais químics, ja que poden danyar l'acabat i els components electrònics.
6.3 Key Cylinder Maintenance
Periodically, apply a small amount of graphite-based lubricant to the key cylinder to ensure smooth operation. Avoid oil-based lubricants, which can attract dirt.
7. Solució De Problemes
| Problema | Causa possible | Solució |
|---|---|---|
| El pany no respon a les entrades del teclat. | Bateries esgotades. | Substituïu les quatre piles AA per piles alcalines noves. |
| Incorrect code entered, but light indicator shows red. | Incorrect code sequence or timing. | Re-enter the code carefully. Ensure the code is correct and within 4-8 digits. |
| Lock is difficult to operate with the key. | Key cylinder needs lubrication. | Apply graphite lubricant to the key cylinder. |
| El bloqueig no s'activa/desactiva suaument. | Desalineació o obstrucció. | Check for any obstructions in the door frame or strike plate. Ensure the lock is properly aligned. |
8. Especificacions
| Característica | Detall |
|---|---|
| Número de model | PCD-265 |
| Fabricant | Assa Abloy |
| Color | Níquel setinat |
| Material | Acer d'aliatge |
| Compatibilitat del gruix de la porta | 3.5 cm a 4.5 cm |
| Longitud del codi | D'4 a 8 dígits |
| Max User Codes | 50 |
| Font d'alimentació | 4 piles AA (no incloses) |
| Dimensions del producte (L x A x A) | 21.01 x 10.01 x 23.01 cm (8.27 x 3.94 x 9.06 polzades) |
| Pes del producte | 1.16 kg |
| Característiques especials | Left/Right door opening, Low battery indicator, Key override |
9. Garantia i Suport
For warranty information, technical support, or service inquiries regarding your Phillips PCD265 Digital Smart Lock, please refer to the warranty card included in your product packaging or visit the official Phillips weblloc web. Conserveu el rebut de compra com a comprovant de compra per a reclamacions de garantia.
If you encounter issues not covered in this manual, please contact Phillips customer support for assistance.