
AUTOPHIX OM129
Manual d'usuari de l'escàner AUTOPHIX OM129 OBD2
Model: OM129 | Brand: AUTOPHIX
Introducció
The AUTOPHIX OM129 is an advanced OBD2 scanner designed to diagnose vehicle issues, read and clear diagnostic trouble codes (DTCs), perform battery tests, and monitor various vehicle parameters. This manual provides detailed instructions for its proper use and maintenance. The OM129 features a 2.8-inch high-definition true color LCD screen for clear display of diagnostic results and supports 16 languages for wide accessibility.
Configuració
To begin using your AUTOPHIX OM129 OBD2 scanner, follow these steps:
- Localitza el port OBD2: El port OBD2 normalment es troba sota el tauler de control, al costat del conductor del vehicle. Consulteu el manual del propietari del vostre vehicle si no el trobeu.
- Connecteu l'escàner: Plug the OM129's OBD2 connector into your vehicle's OBD2 port. The device will power on automatically, drawing power directly from the vehicle.
- Escolliu l'idioma: Navigate to the "Setup" menu on the device and select your preferred language from the 16 available options.

Image: The AUTOPHIX OM129 scanner connected to a vehicle's OBD2 port, ready for use.

Image: The OM129 display showing the language selection menu, highlighting English.
Instruccions de funcionament
The AUTOPHIX OM129 offers various diagnostic functions. Use the navigation buttons (Up, Down, Left, Right) and the ENTER/EXIT buttons to navigate the menus. The diagnostic speed is optimized for quick results.
1. Llegir codis
This function allows you to retrieve Diagnostic Trouble Codes (DTCs) from the vehicle's engine control unit (ECU). These codes indicate specific issues detected by the vehicle's onboard diagnostic system.
- From the main menu, select "Read Codes".
- The scanner will display any active DTCs.
- Press the "i" button for a detailed explanation of the code and potential causes, providing precise repair advice.
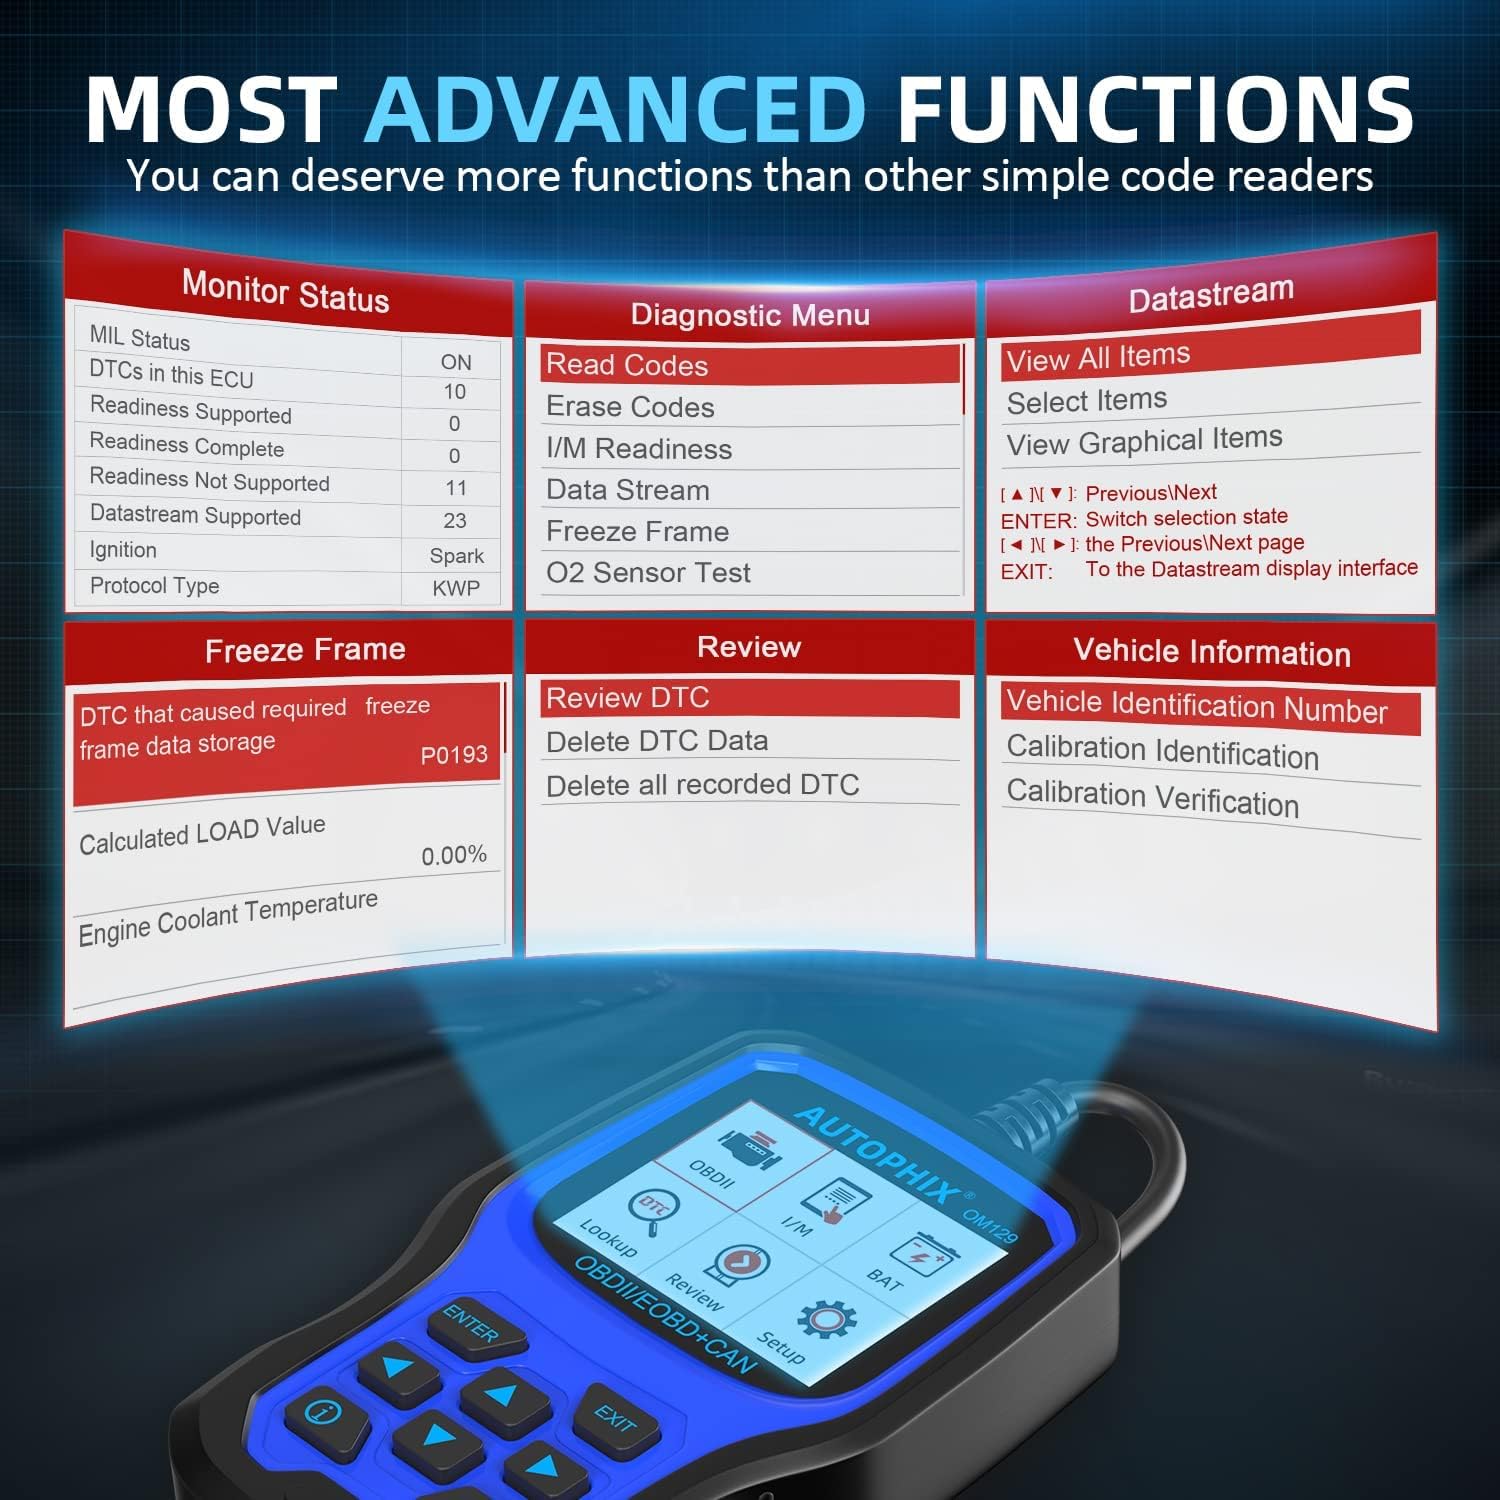
Image: The OM129 screen showing the diagnostic menu with "Read Codes" highlighted.

Image: The scanner displaying a P0114 code and its possible causes, demonstrating the DTC Lookup feature.
2. Esborrar codis
After performing repairs, you can use this function to clear the DTCs and turn off the Check Engine Light (MIL).
- Al menú principal, seleccioneu "Esborrar codis".
- Confirmeu l'acció quan se us demani.
- The Check Engine Light should turn off if the issue has been resolved.

Image: A comparison showing the Check Engine Light (MIL) illuminated before clearing codes and off afterward.
3. Preparació I/M
This function checks if the various emission-related systems on the vehicle are operating correctly and are ready for inspection and maintenance testing.
- From the main menu, select "I/M Readiness".
- The scanner will display the status of various monitors (e.g., Misfire, Fuel System, Comprehensive Component).
- A "Ready" status indicates the system has completed its self-test.

Image: The OM129 screen showing the I/M Readiness status for various vehicle systems.

Image: A vehicle's exhaust pipe with a "Smog Check" overlay, illustrating the purpose of I/M Readiness.
4. Flux de dades
View live data parameters from the vehicle's sensors in real-time. This can help identify intermittent problems or verify repairs. The OM129 records live data stream (PID) for deeper diagnostic analysis.
- From the main menu, select "Data Stream".
- Choose the parameters you wish to monitor (e.g., Engine RPM, Vehicle Speed, Coolant Temperature).
- The data can be displayed numerically or graphically for easier analysis.

Image: The OM129 displaying live data stream in a graphical format, showing various engine parameters.

Image: The scanner showing a data stream with parameters like Calculated Load Value, Engine Coolant Temperature, and Fuel Rail Pressure.
5. Congelar fotograma
When an emission-related fault occurs, the vehicle's computer stores a "freeze frame" of data, capturing the operating conditions at the moment the fault was detected. This helps in diagnosing the root cause of engine failure.
- Al menú principal, seleccioneu "Imatge congelada".
- Review the recorded parameters such as engine load, coolant temperature, and RPM at the time of the fault.

Image: The OM129 screen showing freeze frame data, including a P0193 DTC and associated vehicle conditions.
6. Prova del sensor d'O2
This function monitors and tests the operation of oxygen sensors to identify issues that may affect fuel efficiency and vehicle emissions.
- From the main menu, select "O2 Sensor Test".
- The scanner will display the O2 sensor readings, allowing you to assess their performance.
7. Prova del sistema EVAP
Initiate a leak test for the vehicle's Evaporative Emission Control System (EVAP system) to detect leaks that can cause emissions problems.
- From the main menu, navigate to "Test or Component" and select "Evap System Test".
- Follow the on-screen prompts to perform the test.
Video: Demonstration of various diagnostic functions including I/M Readiness, Read Code, DTC Lookup, Data Stream, Evap System Test, Battery Check, and Multi-language selection on the AUTOPHIX OM129.

Image: The scanner's display showing the menu for On-Board Monitoring, including the EVAP System Test.
8. Prova de la bateria
The OM129 can perform a professional battery test, collecting real-time voltage data and analyzing the battery's health. This helps identify battery aging or alternator malfunctions.
- From the main menu, select "BAT" (Battery).
- Follow the on-screen instructions, which may include turning the ignition off.
- The device will display the current voltage and a graphical analysis of the battery's health.
Voltage Directrius:
- Before Ignition:
- <10.8V: Battery voltage too low, may need replacement.
- 10.8V-11.8V: Slightly low voltage, may be difficult to start.
- 11.8V-12.8V: Normal battery voltage, good condition.
- After Ignition:
- 12.8V-13.2V: Battery voltage too low, alternator might not be charging effectively.
- 13.2V-14.8V: Normal battery voltage, normal alternator charging.
- >14.8V: Voltage too high, potential overcharging issue.

Image: The OM129 performing a graphical battery test, showing voltage trends and health status indicators.

Imatge: Una imatge detallada view of the OM129's accurate battery check feature, showing real-time voltage and a graph.
9. Cerca DTC
This feature allows you to manually enter a DTC and view its detailed definition and possible causes, even if it's not currently active in the vehicle.
- From the main menu, select "Lookup".
- Enter the DTC using the navigation buttons.
- The device will display the definition and potential solutions.
10. Informació del vehicle
Retrieve important vehicle information such as the Vehicle Identification Number (VIN), Calibration ID, and Calibration Verification Number (CVN).
- From the main menu, select "Vehicle Information".
- The relevant vehicle data will be displayed.

Image: The scanner's display showing vehicle information, including the VIN.
Manteniment
Actualitzacions de programari
The AUTOPHIX OM129 offers free lifetime software updates to ensure compatibility with new vehicle models and to fix any bugs or add new parameters. To update the software:
- Visit the official AUTOPHIX weblloc.
- Download the latest software update package.
- Connect the OM129 to your computer using the provided USB cable.
- Follow the on-screen instructions from the downloaded software to install the update.

Image: The OM129 connected to a computer via USB, illustrating the software update process.
Resolució de problemes
This section addresses common issues you might encounter while using the AUTOPHIX OM129. If you cannot determine the problem, you can record the diagnostic data and consult a mechanic.
- El dispositiu no s'encén: Ensure the OBD2 connector is securely plugged into the vehicle's OBD2 port. The device draws power directly from the vehicle. Check the vehicle's battery if the issue persists.
- "Link Error" message: This indicates a communication problem with the vehicle's ECU. Verify the connection, ensure the ignition is on (engine off), and check if your vehicle is OBD2 compliant (most vehicles after 1996 in the US, 2002 in EU, and 2008 in Asia are).
- Cannot clear codes: Codes can only be cleared if the underlying fault has been resolved. If the fault is still present, the codes will reappear. Ensure the ignition is on (engine off) when attempting to clear codes.
- Inaccurate battery test results: Ensure the battery terminals are clean and securely connected. Perform the test with the engine off for accurate readings.
Especificacions
| Característica | Detall |
|---|---|
| Marca | AUTOFIX |
| Número de model | OM129 |
| Font d'alimentació | Battery Powered (from vehicle OBD2 port) |
| Mida de la pantalla | 2.8 polzades |
| Protocols compatibles | KWP2000, ISO9141, J1850 VPW, J1850 PWM, CAN |
| Suport lingüístic | 16 languages (including English, French, German, Spanish, etc.) |
| Compatibilitat | Most US vehicles 1996+, EU vehicles 2002+, Asian vehicles 2008+ |
Garantia i Suport
AUTOPHIX provides free lifetime software updates for the OM129. For specific warranty details, technical assistance, or customer support, please refer to the official AUTOPHIX weblloc web o contacteu directament amb el servei d'atenció al client. Conserveu el rebut de compra per a reclamacions de garantia.
Oficial Weblloc: www.autophix.com
Documents relacionats - OM129
 |
AUTOPHIX OM129 User Manual: Vehicle Diagnostic Scan Tool Guide Comprehensive user manual for the AUTOPHIX OM129 OBDII/EOBD/CAN diagnostic scan tool. Learn how to perform vehicle diagnostics, read trouble codes, check I/M readiness, and battery voltage. |
 |
Manual d'usuari de l'escàner Autophix 3910 OBD2: característiques i funcionament Manual d'usuari detallat per a l'escàner de diagnòstic OBD2 Autophix 3910, que cobreix les seves característiques, configuració, funcions, resolució de problemes i especificacions per al diagnòstic d'automòbils. |
 |
Manual d'usuari de l'AUTOPHIX OM126P: Guia de l'eina de diagnòstic de vehicles Manual d'usuari complet per a l'escàner AUTOPHIX OM126P OBD II. Apreneu a diagnosticar problemes del vehicle, llegir/esborrar DTC, comprovar la preparació I/M i utilitzar funcions avançades per a un manteniment eficaç del cotxe. |
 |
Manual d'usuari de l'AUTOPHIX 7910: Guia completa de diagnòstic d'automoció This user's manual for the AUTOPHIX 7910 provides detailed instructions on operating this advanced automotive diagnostic tool. Learn about its features, safety precautions, and diagnostic capabilities for BMW, Mini, and Rolls-Royce vehicles, along with OBDII/EOBD compliance. |
 |
Autophix ES680 V/A Scan Tool User Manual Comprehensive user manual for the Autophix ES680 V/A Scan Tool. Learn how to perform V/A and OBDII diagnostics, read fault codes, and configure device settings. |
 |
Autophix 1100 OBD II Scan Tool User Manual Comprehensive user manual for the Autophix 1100 OBD II/EOBD + CAN scan tool. Includes safety instructions, device setup, diagnostic procedures, and technical specifications. |
Ask a question about this manual
Ask about setup, troubleshooting, compatibility, parts, safety, or missing instructions. Manuals+ will review the question and use this page’s manual context to help answer it.