ThreeH H-AC60White
ThreeH Rotary Digital Timer with Clock (Model: H-AC60White) - User Manual
Instruccions completes per a la instal·lació, el funcionament i el manteniment.
1. Introducció
Thank you for choosing the ThreeH Rotary Digital Timer. This versatile device is designed to assist with time management, offering preset timers, a customizable DIY timer, an alarm clock, and various reminder modes. Please read this manual carefully to ensure proper use and to maximize the benefits of your new timer.
2. Producte acabatview
The ThreeH Rotary Digital Timer features a unique four-sided rotating design, allowing quick switching between modes. It includes an LED display, control buttons, and a battery compartment.
2.1 Components
- Pantalla LED: Shows time, timer, and alarm settings.
- Rotation Sides: Labeled "CLOCK", "DIY", "5 min", and "25 min" for mode selection.
- Botons de control (superior): 'M' (Minute/Mode), 'S' (Second/Set), 'S/S' (Start/Stop/Power).
- Alarm Mode Switch (Back): Selects reminder type.
- Battery Compartment (Back): Holds AAA batteries.
2.2 Guia visual

This image displays the timer from a front-angle view, highlighting its compact, square design and the central digital display. The labels "DIY", "CLOCK", "5 min", and "25 min" are visible on its four sides, indicating the different operational modes.
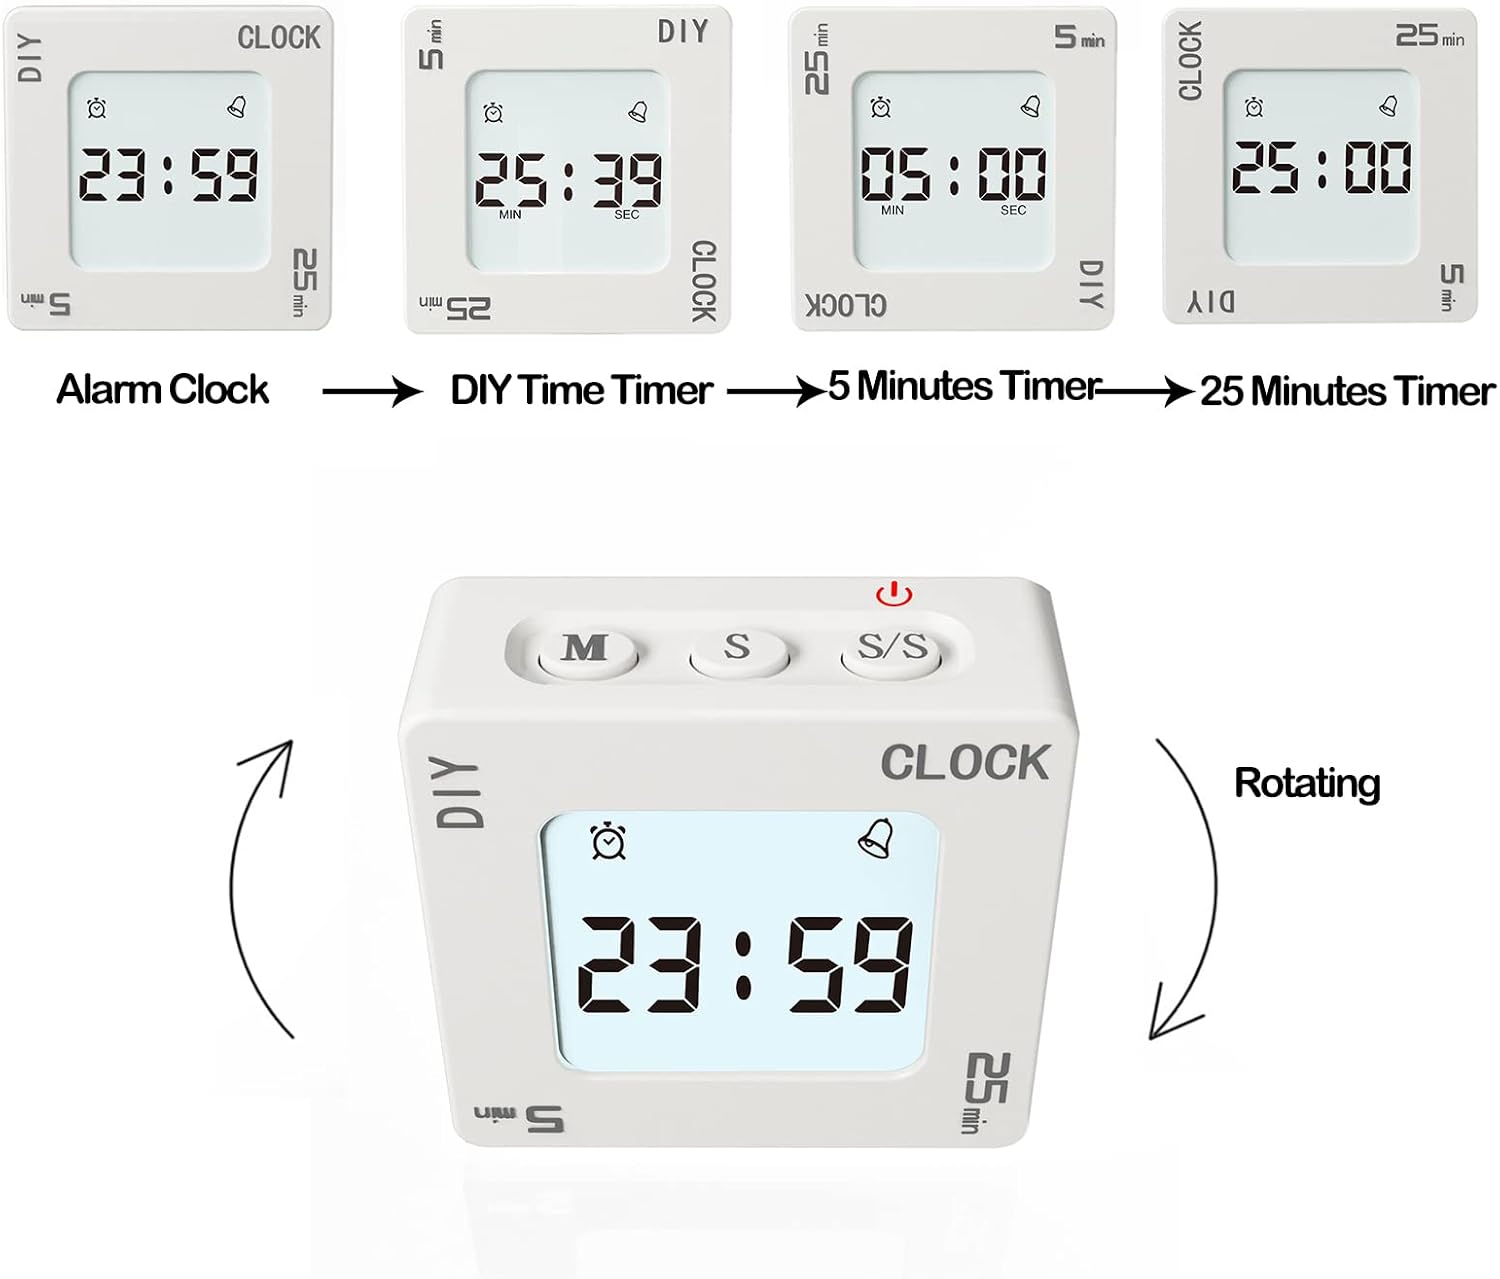
This diagram illustrates the four main modes of the timer: Alarm Clock, DIY Time Timer, 5 Minutes Timer, and 25 Minutes Timer. Arrows indicate the rotational movement required to switch between these modes, with the active mode displayed on the screen.
3. Configuració
3.1 Instal·lació de la bateria
- Localitza el compartiment de les piles a la part posterior del temporitzador.
- Obriu la tapa del compartiment de la bateria.
- Introduïu dues piles AAA (no incloses), assegurant-vos de la polaritat correcta (+/-).
- Tanqueu bé la tapa del compartiment de la bateria.
The timer requires two AAA batteries for operation. Ensure they are inserted correctly to power on the device.
3.2 Encès/Apagat
- Per encendre: Press and hold the 'S/S' button. The display will light up.
- Per apagar: Press and hold the 'S/S' button. All settings will be saved.
4. Instruccions de funcionament
4.1 Selecció del mode
The timer has four main modes, selected by rotating the device so the desired mode label faces upwards:
- CLOCK Mode: Displays the current time and allows alarm setting.
- 5 min Mode: Activates a preset 5-minute countdown timer.
- 25 min Mode: Activates a preset 25-minute countdown timer.
- Mode DIY: Allows setting a custom countdown or count-up timer.

This image shows various display configurations for the timer, including a 24-hour clock, a 12-hour clock with AM/PM indicator, an alarm setting, and a countdown timer. This illustrates the versatility of the display across different functions.
4.2 Setting Time and Alarm (CLOCK Mode)
- Rotate the timer to the "CLOCK" side.
- Press and hold the 'M' button to enter time setting mode. The hour digits will flash.
- Use the 'M' button to adjust hours and the 'S' button to adjust minutes.
- Press 'S/S' to confirm and exit time setting.
- To set the alarm, briefly press 'S' while in CLOCK mode. The alarm icon will appear.
- Press and hold 'M' to enter alarm setting mode. Adjust hours and minutes using 'M' and 'S'.
- Press 'S/S' to confirm and activate the alarm.
4.3 Using Preset Timers (5 min / 25 min Modes)
- Rotate the timer to either the "5 min" or "25 min" side. The display will show the preset time.
- Començar: Gently shake the timer or press the 'S/S' button. The countdown will begin.
- Per posar en pausa: Gently shake the timer again or press the 'S/S' button.
- When the timer reaches zero, the selected alarm mode will activate.

This image demonstrates the interactive "shaking" function of the timer. It shows a hand gently shaking the device, indicating how to start or pause a timer without needing to press buttons, providing a quick and intuitive control method.
4.4 Using DIY Timer (DIY Mode)
- Rotate the timer to the "DIY" side.
- Press 'M' to set minutes and 'S' to set seconds for your custom timer.
- Començar: Gently shake the timer or press the 'S/S' button.
- Per posar en pausa: Gently shake the timer again or press the 'S/S' button.
- The timer has a memory function; it will save your last DIY setting. To reset, press 'M' and 'S' simultaneously.
4.5 Funció de repetició
When an alarm sounds (either from the alarm clock or a timer), gently shake the timer to activate the snooze function. The snooze duration can be set from 5 to 60 minutes.

This image depicts the snooze alarm feature, showing a child in bed with the timer nearby. It highlights that the alarm function includes a snooze option, which can be set for 5 to 60 minutes, providing flexibility for waking up.
4.6 Reminder Modes
The timer offers four reminder modes, selectable via a switch on the back of the device. These modes allow you to customize how you are alerted when a timer or alarm finishes, suitable for various environments without disturbing others.
- Alarm + Vibration + Backlight Flashing: Full alert mode.
- Alarm + Backlight Flashing: Audible and visual alert.
- Vibration + Backlight Flashing: Silent and visual alert.
- Backlight Flashing Only: Discreet visual alert.

Aquesta imatge ofereix un detall view of the back of the timer, specifically highlighting the four-position switch used to select different alarm modes. Each position corresponds to a unique combination of vibration, sound, and light alerts, allowing users to choose the most suitable notification method.
5. Manteniment
- Netegeu el temporitzador amb un drap suau i sec. No utilitzeu productes de neteja abrasius ni el submergiu en aigua.
- Eviteu deixar caure el dispositiu o exposar-lo a temperatures extremes.
- Si no heu d'utilitzar el temporitzador durant un període prolongat, traieu-ne les piles per evitar fuites.
6. Solució De Problemes
| Problema | Causa possible | Solució |
|---|---|---|
| Timer does not power on. | Les piles estan gastades o incorrectament inserides. | Canvieu les piles per piles AAA noves, assegurant-vos de la polaritat correcta. |
| La pantalla està tènue o parpelleja. | Potència de bateria baixa. | Substituïu les piles. |
| Timer does not start/pause with shaking. | Insufficient shaking motion or internal sensor issue. | Ensure a clear, gentle shake. Try using the 'S/S' button to start/pause. |
| L'alarma no sona. | Alarm mode set to silent (vibration or light only). | Check the alarm mode switch on the back and select an audible option. |
7. Especificacions
- Marca: Tres H
- Model: H-AC60White
- Color: Blanc
- Dimensions del producte: 6 x 3 x 7 cm (approximately 60P x 30l x 70H mm)
- Material: Plàstic
- Pes de l'article: 82 grams
- Font d'alimentació: 2 piles AAA (no incloses)
- Preset Timers: 5 minuts, 25 minuts
- Temps de posposar: 5-60 minuts (ajustable)
- Reminder Modes: Alarm+Vibration+Backlight, Alarm+Backlight, Vibration+Backlight, Backlight Only
8. Garantia i Suport
For warranty information or technical support, please refer to the documentation included with your purchase or contact ThreeH customer service through their official website or the retailer where the product was purchased. Keep your purchase receipt for warranty claims.
Per a més informació, podeu visitar el ThreeH Store on Amazon.
Ask a question about this manual
Ask about setup, troubleshooting, compatibility, parts, safety, or missing instructions. Manuals+ will review the question and use this page’s manual context to help answer it.