
Introducció
This manual provides detailed instructions for the installation, operation, and maintenance of your OOYCYOO 100A MPPT Solar Charge Controller. This controller is designed for 12V and 24V solar systems, featuring advanced MPPT tracking technology for high efficiency and multiple protection functions to ensure reliable performance.
Si us plau, llegiu aquest manual detingudament abans d'utilitzar el producte per garantir-ne el funcionament correcte i evitar danys.
Instruccions de seguretat
- Assegureu-vos que la bateria voltage és suficient perquè el controlador reconegui el tipus de bateria abans de la primera instal·lació.
- Connect the battery cable first to minimize loss.
- This regulator is suitable only for lead-acid batteries (OPEN, AGM, GEL). It is not suitable for nickel metal hydride, lithium ions, or other battery types.
- El regulador de càrrega només és adequat per regular mòduls solars. No connecteu mai cap altra font de càrrega al regulador de càrrega.
- Always connect the battery first, then the solar panel, and finally the load. Reverse this order for disconnection.

Image: Excerpt from the user manual showing safety instructions, system connection, and display information.
Característiques del producte
- Tecnologia MPPT avançada: Utilizes innovative Maximum Power Point Tracking (MPPT) technology for high tracking efficiency, up to 99%, potentially increasing efficiency by 20%-40% compared to standard PWM controllers.
- Compatibilitat del sistema: Automatically detects and is compatible with both 12V and 24V battery systems.
- Multiple Intelligent Protections: Features built-in overcurrent, short circuit, reverse connection, open circuit, overcharge, and undervoltage protection. All protections offer automatic recovery without damaging the controller.
- Bateria Undervoltage Protecció: Automatically turns off the solar controller if battery voltage drops below 8V to protect battery lifespan.
- Multifunctional LCD Display: Provides real-time data display for battery voltage, solar panel charging current, discharge current, accumulated charge/discharge power, and various settings.
- Sortides USB duals: Equipped with two USB ports (DC 5V, 2A total) for charging mobile devices.
- Modes de control de càrrega: Supports manual load switching and various time-controlled load operation modes.
- Industrial-Grade Master Chip: Features 32AD sampling accuracy for precise monitoring of temperature, charging current, and discharge current.
- Compensació automàtica de temperatura: Adjusts charging parameters based on ambient temperature.

Image: Visual representation of the controller's security protection features, including short-circuit, overload, overcharge, undervoltage, i overvoltagprotecció.
Configuració i instal·lació
Seqüència de cablejat:
- Connecteu la bateria: First, connect the battery to the charge regulator (positive and negative terminals). Ensure correct polarity.
- Connecteu el panell solar: Next, connect the photovoltaic module (solar panel) to the regulator (positive and negative terminals). Ensure correct polarity.
- Connect the Load: Finally, connect the load to the charge regulator (positive and negative terminals). Ensure correct polarity.
Important: Always follow the reverse order when uninstalling: disconnect the load first, then the solar panel, and finally the battery.
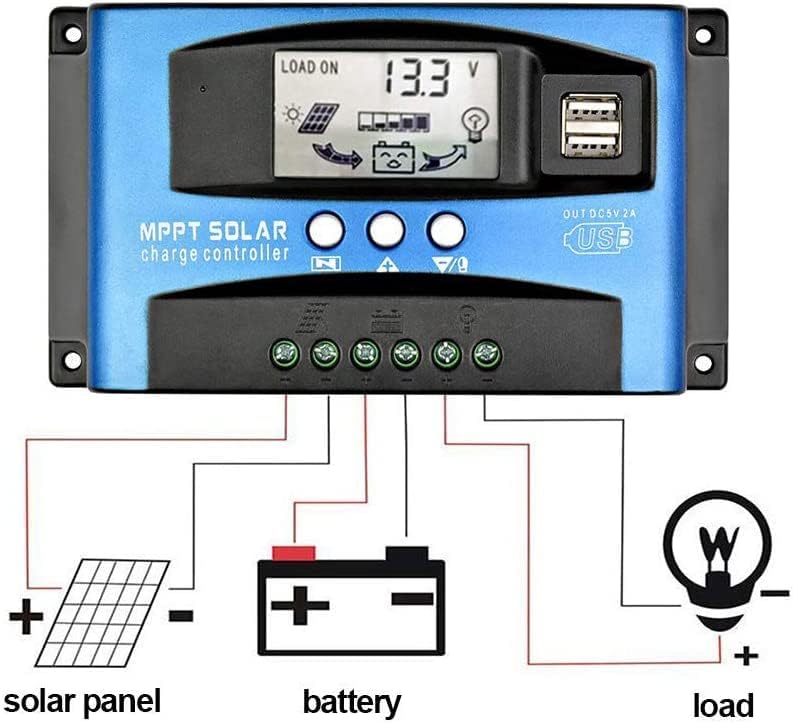
Image: Detailed wiring diagram showing how to connect the solar panel, battery, and load to the charge controller.

Image: Physical dimensions of the solar charge controller, showing length, width, and height in millimeters.
Instruccions de funcionament
Funcions de la pantalla LCD i dels botons:
The controller features an LCD screen that displays various real-time data and settings. There are three buttons below the screen:
- Botó MENÚ: Press to switch between different display interfaces or to enter/exit setting mode.
- Botó amunt: Press to increase values or navigate up in menus.
- Botó ABAIX: Press to decrease values or navigate down in menus.
Display Information Cycle:
Press the MENU button to cycle through the following display interfaces:
- Voltage (Main Interface): Mostra el volum actual de la bateriatage.
- Solar Panel Charging Current: Shows the current flowing from the solar panel to the battery.
- Load Discharge Current: Displays the current being drawn by the load.
- Vol. Alttage Desconnexió (HVD): El voltage at which charging stops to prevent overcharge.
- Accumulated Discharge Power (Ah): Total ampere-hours discharged from the battery.
- Accumulated Charging Power (Ah): Total ampere-hours charged into the battery.
- Volum baixtage Reconnection (LVR): El voltage at which the load will reconnect after being disconnected due to low battery.
- Volum baixtage Desconnexió (LVD): El voltage at which the load will disconnect to protect the battery from over-discharge.
- Load Working Mode: Displays the current load control mode (e.g., 24H for continuous operation, timed modes).
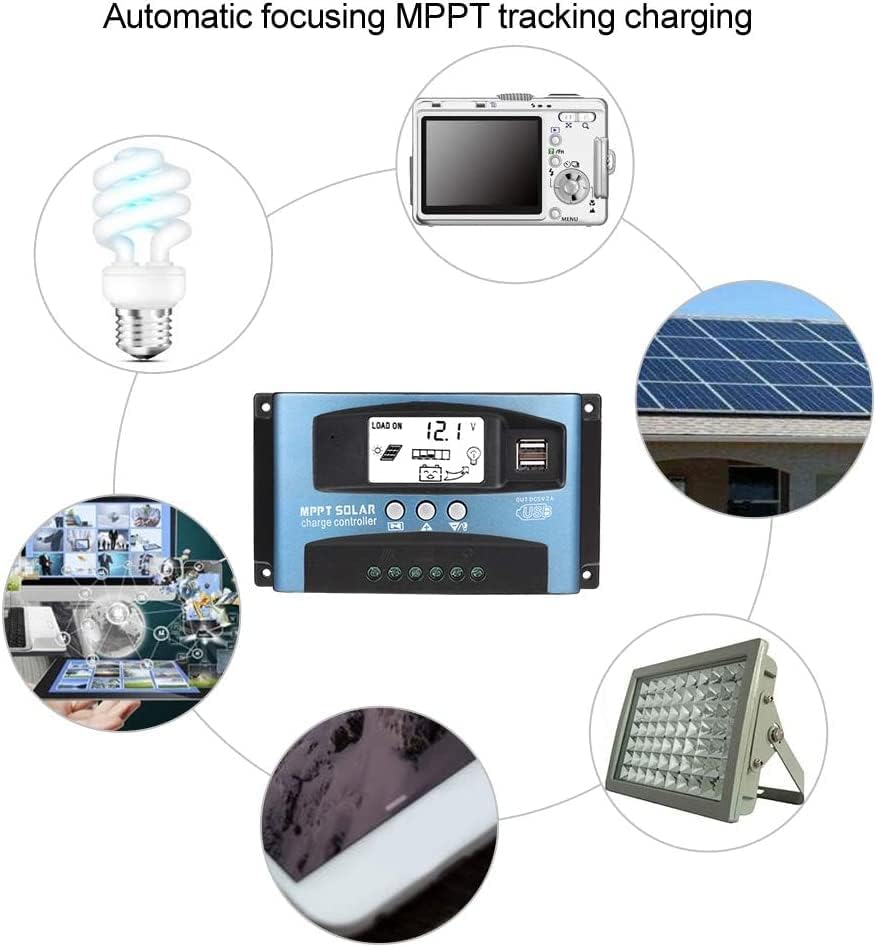
Image: Illustration of the automatic focusing MPPT tracking charging process and examples of devices that can be powered by the controller.
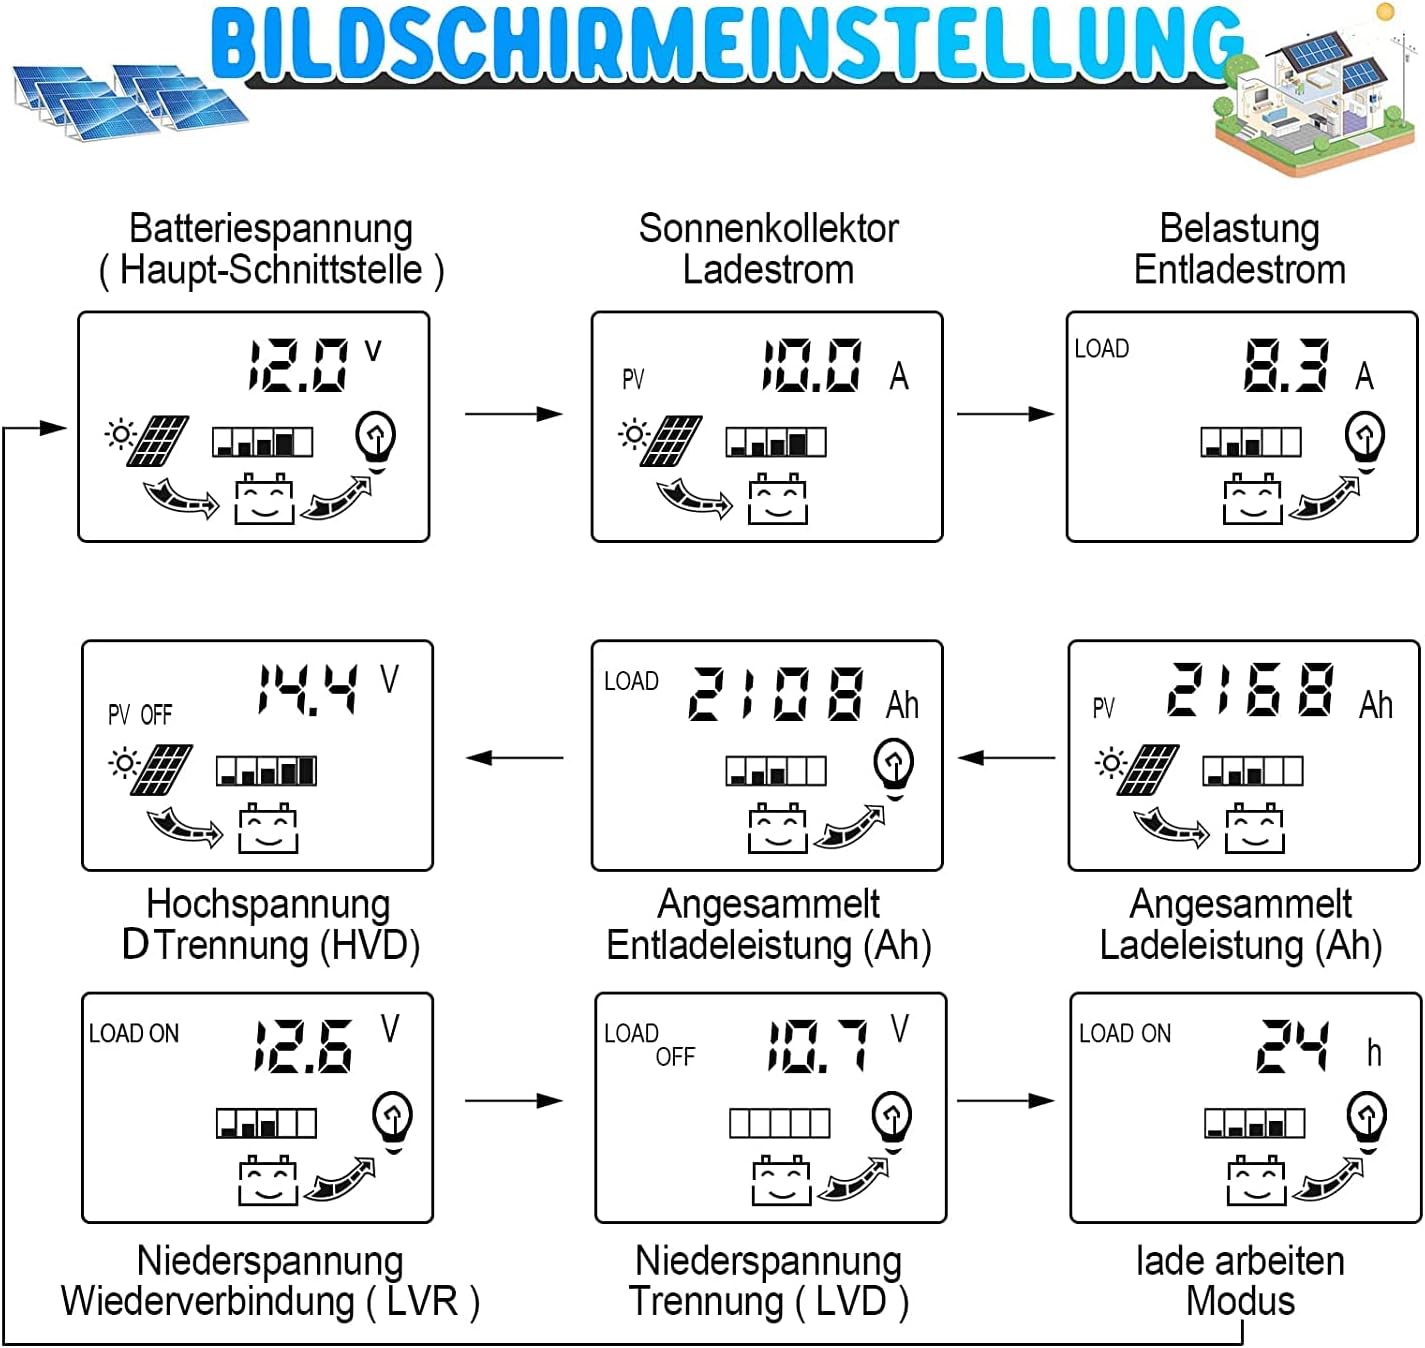
Image: Flowchart detailing the various screens and parameters accessible via the LCD display, including battery voltage, solar panel current, load current, and voltage configuració.
Pantalla i configuració
Ajust de paràmetres:
To adjust parameters, press and hold the MENU button for 3 seconds to enter the settings menu. The current setting will flash. Use the UP and DOWN buttons to change the value, then press MENU again to confirm and move to the next parameter. To exit the settings menu, press and hold MENU for 3 seconds or wait for 10 seconds without input.
Nota: The battery type default is 'b1' (lead-acid). While the manual mentions parameter adjustment, specific instructions for changing battery type (e.g., to 'b3' for LiFePO4) are not clearly detailed on the provided manual image. Ensure your battery type is compatible with the controller's default settings or consult the manufacturer for advanced configuration.
Modes de control de càrrega:
- [24H]: Load output 24 hours (except for battery undervoltagi).
- [1-19H]: Load on after sunset and closed after setting hours.
- [0H]: Dusk to dawn.
Restabliment de fàbrica: To restore factory settings, press and hold the DOWN button for 5 seconds.
Manual Load Control: Press the UP button to manually turn the load on or off.
Manteniment
To ensure optimal performance and longevity of your OOYCYOO MPPT Solar Charge Controller, consider the following maintenance guidelines:
- Inspecció periòdica: Reviseu periòdicament totes les connexions del cablejat per assegurar-vos que estiguin ben fixades i que no presentin corrosió.
- Neteja: Mantingueu el controlador net i lliure de pols i brutícia. Feu servir un drap sec per netejar-lo.
- Ventilació: Assegureu-vos que el controlador estigui instal·lat en una zona ben ventilada per evitar el sobreescalfament.
- Condicions ambientals: Avoid exposing the controller to extreme temperatures, direct sunlight, or moisture beyond its operating specifications.
- Salut de la bateria: Monitor your battery's health and ensure it is compatible with the controller's charging parameters.
Resolució de problemes
| Situació | Causa probable | Solució |
|---|---|---|
| La icona de càrrega no està activada quan fa sol | Panell solar obert o invertit | Torna a connectar |
| Carrega la icona desactivada | Mode setting wrong / Battery low | Set right / Recharge |
| La icona de càrrega parpelleja lentament | Over load / Short circuit protection | Reduce load / Remove short circuit, 5 minutes to auto recovery |
| Apagueu | Battery too low / Reverse connection | Comproveu la bateria / connexió |
Image: Excerpt from the user manual showing common troubleshooting scenarios and their solutions.
Especificacions
| Model | MPPT 100A |
| Volum del sistematage | 12V / 24V Auto |
| Corrent de potència màxima | 100A |
| Peak Power of Solar Panels (Max. Wp) | 1300 W (12 V) / 2600 W (24 V) |
| Battery Capacity Configuration | 400 Ah |
| Flotador de la bateria Voltage | 13.8V (12V system) / 27.6V (24V system) |
| Battery Protection (Low Voltage) | 10.6V (12V system) / 21.2V (24V system) |
| Battery Recovery Voltage (Undervoltage) | 12.6V (12V system) / 25.2V (24V system) |
| System Load Loss | <= 13 mA |
| Temperatura de treball | -10 ℃ a 60 ℃ |
| Temperatura d'emmagatzematge | -30 ℃ a 70 ℃ |
| Humitat de treball | <= 90%, no condensation |
| Compensació de temperatura | -4mV/cell/℃ |
| Max Idle Voltage de plaques solars | <= 48 V |
| Sortida USB | 2-way USB output, 5V/2A (MAX) |
| Dimensions | 170 mm x 95 mm x 40 mm (aprox. 6.69 x 3.74 x 1.57 polzades) |
| Pes | 9.9 unces (aprox. 280 g) |
Note: Product specifications are subject to change without prior notice.
Garantia i Suport
This OOYCYOO product comes with a Garantia de satisfacció de 360 dies. If you encounter any issues or have questions regarding the product, please contact OOYCYOO customer support for assistance.
For further support, please refer to the official OOYCYOO store or contact the seller directly through your purchase platform.


