
Introducció
This manual provides detailed instructions for the installation, operation, and maintenance of your ASHATA 4-inch 1080P Car Dash Camera DVR. Please read this manual thoroughly before using the device to ensure proper functionality and to prevent damage. Keep this manual for future reference.
Producte acabatview
The ASHATA Car Dash Camera is a high-definition driving recorder designed to capture video footage of your journeys. It features a 4-inch display, 1080P resolution, a 170° wide-angle lens, G-Sensor for collision detection, WDR (Wide Dynamic Range) for improved image quality, loop recording, motion detection, and parking monitoring capabilities.
Característiques principals:
- Enregistrament Full HD 1080P: Captura vídeo nítidtage at 1920x1080 resolution.
- Lent gran angular de 170°: Provides a broad view del camí per davant.
- 3-Camera System: Includes a front camera, an in-car camera, and a rear-view camera for comprehensive coverage.
- Sensor G (sensor de gravetat): Detecta automàticament moviments sobtats o col·lisions i bloqueja el vídeo actual file per evitar la sobreescriptura.
- Enregistrament en bucle: Registra contínuament sobreescrivint el desbloquejat més antic filequan la targeta de memòria està plena, garantint una gravació sense interrupcions.
- Detecció de moviment: Automatically starts recording if movement is detected in front of the DVR when parked.
- Supervisió del pàrquing: Activates recording if the vehicle is shaken or impacted while parked.
- Tecnologia WDR: Enhances video quality in varying light conditions.
- Pantalla de 4 polzades: Permet en temps real viewing and playback of recorded footage.
Components del producte:
Familiarize yourself with the various parts of your dash camera:
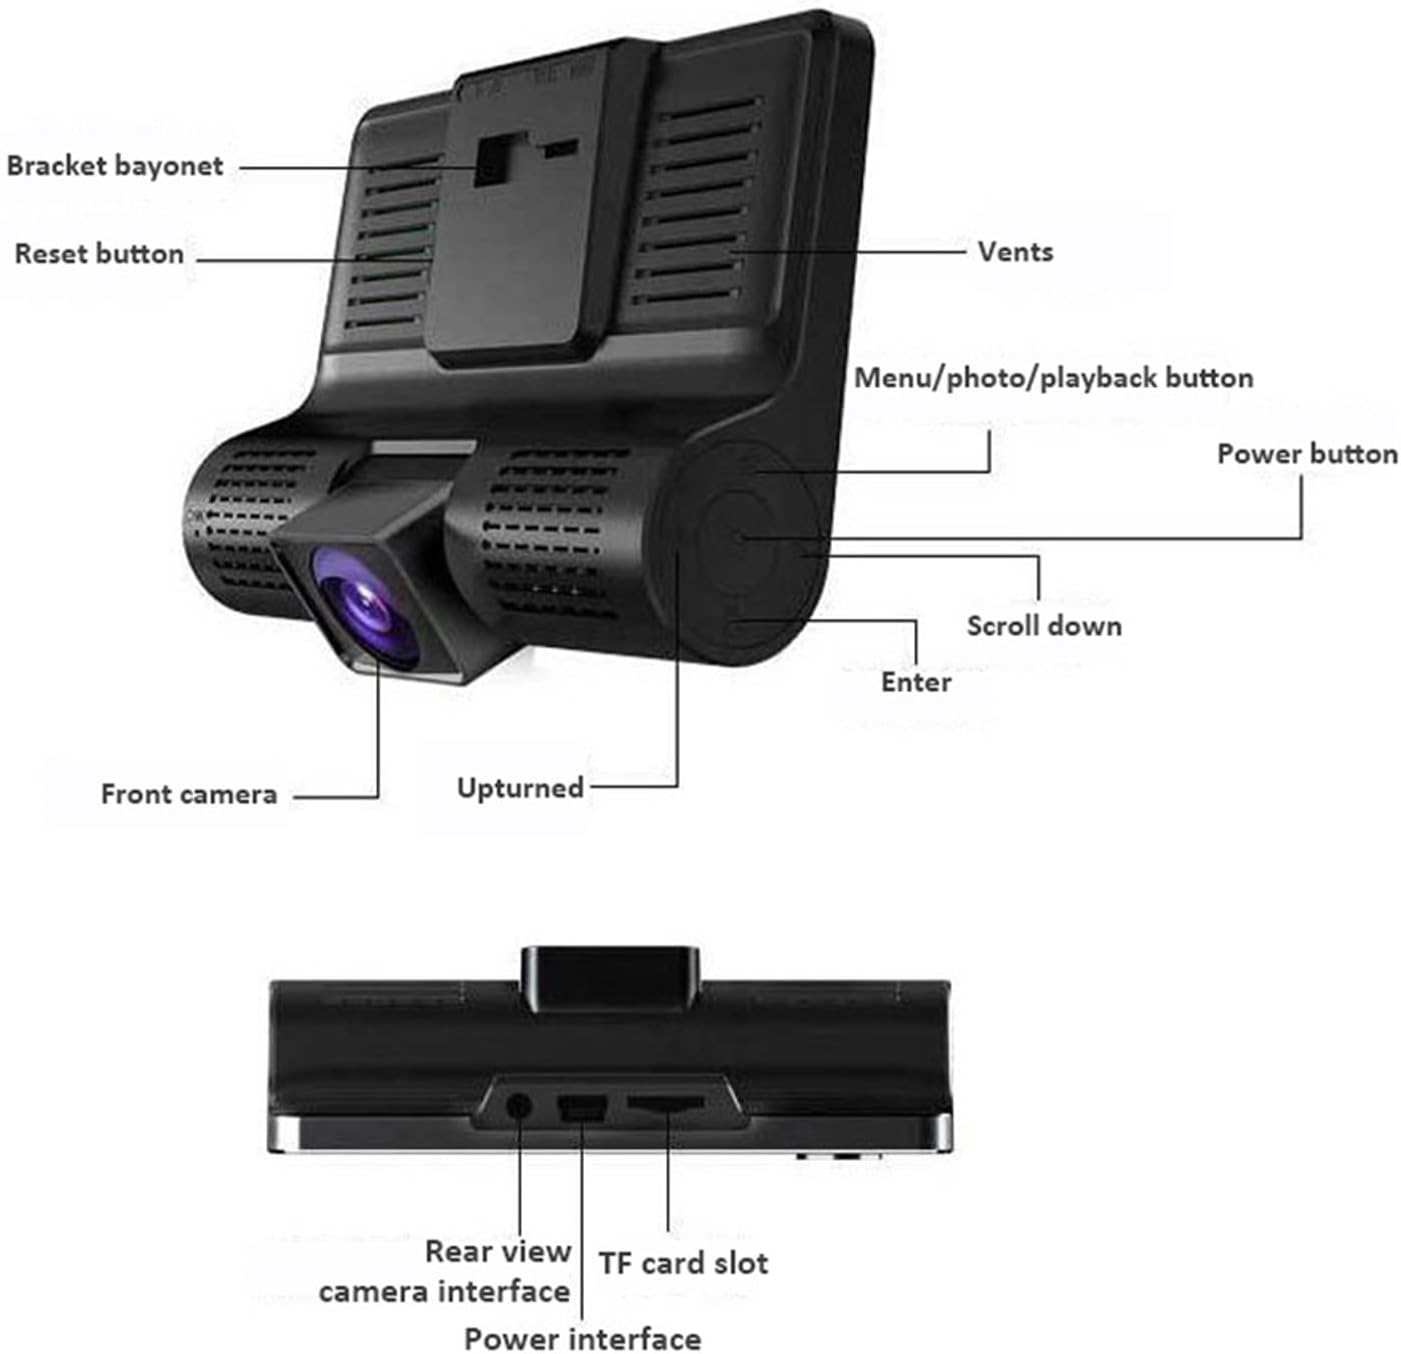
Descripció de la imatge: A detailed diagram of the ASHATA dash camera, highlighting its various components including the bracket bayonet, reset button, vents, menu/photo/playback button, power button, scroll down button, enter button, front camera, and the upturned indicator. The bottom view mostra la part posterior view camera interface, TF card slot, and power interface.

Descripció de la imatge: Un altre view of the ASHATA dash camera, labeling the 4.0-inch IPS display screen, inside camera, navigation buttons (up, down, OK), power button, holder slot, reset button, louver, rear camera interface, power interface, TF slot, and front camera.
Configuració
Contingut del paquet:

Descripció de la imatge: The complete ASHATA dash camera kit, showing the main dash camera unit, a suction cup mount, a car power adapter, a rear camera, and various connecting cables.
Abans de la instal·lació, assegureu-vos que hi hagi tots els components:
- Main Dash Camera Unit
- Muntatge de la ventosa
- Carregador de cotxe
- Càmera posterior
- Cable de la càmera posterior
- Manual d'usuari (aquest document)
Passos d'instal·lació:
- Inseriu la targeta TF: Insert a Class 10 or higher TF (microSD) card (up to 32GB, not included) into the TF card slot on the side of the dash camera. Ensure it is inserted correctly until it clicks into place.
- Mount the Dash Camera: Attach the suction cup mount to the windshield, preferably behind the rearview mirall, assegurant-vos que no us obstrueixi view. Securely attach the main dash camera unit to the mount.
- Connectar l'alimentació: Plug the car charger into your vehicle's cigarette lighter socket. Connect the other end of the charger cable to the power interface on the dash camera. Route the cable neatly along the windshield trim to avoid interference.
- Instal·leu la càmera posterior (opcional): If using the rear camera, mount it on the rear windshield or near the license plate. Connect the rear camera cable to the rear camera interface on the main unit. Route the cable carefully to the back of the vehicle.
- Ajust de l'angle de la càmera: Power on the vehicle. The dash camera should automatically turn on and begin recording. Adjust the front camera lens angle to ensure it captures the road ahead clearly. Adjust the rear camera angle if installed.
Instruccions de funcionament
Funcionament bàsic:
- Encès/apagat: The camera typically powers on automatically when the vehicle starts and powers off when the ignition is turned off. You can manually power it on/off by pressing and holding the Botó d'encesa.
- Iniciar/Aturar la gravació: Once powered on, the camera will automatically start loop recording. A red dot or recording icon on the screen indicates active recording. Press the botó D'acord to manually start or stop recording.
- Canvia càmera Views: Durant la gravació, premeu el botó Botons amunt / avall to cycle through different camera views (front, in-car, rear, picture-in-picture combinations).
- Navegació del menú: Premeu el botó Menu/Mode/Playback button to enter the menu settings. Use the Botons amunt / avall to navigate through options and the botó D'acord to select. Press the Menu/Mode/Playback button torneu a sortir del menú.
Característiques avançades:
The dash camera includes several advanced features to enhance your driving safety and recording experience:
- Enregistrament en bucle: This feature ensures continuous recording. When the memory card is full, the camera automatically overwrites the oldest unlocked video files. You can set the loop recording duration (e.g., 1, 3, 5 minutes) in the settings.

Descripció de la imatge: This image illustrates two key features: G-sensor based collision detection, where a collision automatically locks video files, and loop recording, which ensures continuous recording by overwriting old files.
- Sensor G (detecció de col·lisions): The built-in G-Sensor detects sudden acceleration, braking, or impacts. When triggered, it automatically locks the current video segment, preventing it from being overwritten by loop recording. The sensitivity of the G-Sensor can be adjusted in the settings.
- Detecció de moviment: When enabled in the settings, the camera will automatically start recording if it detects movement in its field of view while the vehicle is parked. This is useful for monitoring your vehicle when you are away.
- Supervisió del pàrquing: If the camera detects a shake or impact to the vehicle while parked and the ignition is off, it will automatically power on and record a short video segment. This feature requires a continuous power supply or the camera's internal battery to be charged.

Descripció de la imatge: A composite image explaining four features: Cyclic Recording (loop recording), G-Sensor (locking footage during impact), Moving Detection (recording when motion is detected), and Parking Monitoring (recording if the car is disturbed while parked).
Reproducció:
A view recorded videos or photos:
- Stop recording by pressing the botó D'acord if it's currently recording.
- Premeu el botó Menu/Mode/Playback button repeatedly until you enter playback mode.
- Utilitza el Botons amunt / avall to navigate through your recorded files.
- Premeu el botó botó D'acord to play a selected video or view una foto.
- Premeu el botó Menu/Mode/Playback button to exit playback mode.
Manteniment
- Neteja de la lent: Regularly clean the camera lenses with a soft, lint-free cloth to ensure clear video quality. Avoid using abrasive cleaners.
- Neteja de la pantalla: Feu servir un drap suau i sec per netejar la pantalla.
- Gestió de targetes de memòria: It is recommended to format the TF card periodically (e.g., once a month) through the camera's settings menu to maintain optimal performance and prevent data corruption. Back up any important files abans de formatar.
- Temperatura de funcionament: Avoid exposing the dash camera to extreme temperatures for extended periods, as this can affect battery life and device performance.
Resolució de problemes
If you encounter issues with your ASHATA Dash Camera, refer to the following common problems and solutions:
- La càmera no s'encén:
- Ensure the car charger is properly connected to both the camera and the vehicle's power outlet.
- Check if the vehicle's cigarette lighter socket is functioning.
- The internal battery might be depleted. Charge the camera for a few hours.
- La càmera no grava:
- Check if a TF card is inserted and properly seated.
- Ensure the TF card is not full. Format the card if necessary (back up important files primer).
- Verify that loop recording is enabled in the settings.
- The TF card might be faulty or too slow. Use a Class 10 or higher TF card.
- Vídeo footage is blurry or unclear:
- Netegeu la lent de la càmera amb un drap suau.
- Assegureu-vos que s'hagi tret la pel·lícula protectora de la lent.
- Check if the windshield is clean where the camera is mounted.
- G-Sensor is too sensitive or not sensitive enough:
- Ajusteu el nivell de sensibilitat del sensor G al menú de configuració de la càmera.
- Camera freezes or malfunctions:
- Premeu el botó Botó de restabliment (usually a small pinhole, refer to the product overview image for location) using a thin object like a paperclip.
- Update the firmware if a new version is available (check the manufacturer's weblloc).
Especificacions
| Característica | Especificació |
|---|---|
| Marca | ASHATA |
| Número de model | ASHATAbigdpv1h4x |
| Pantalla de visualització | Pantalla IPS de 4.0 polzades |
| Resolució de vídeo | 1080P (1920x1080) |
| Angle de la lent | 170 Degrees (Ultra Wide Angle) |
| Suport per a targetes de memòria | TF Card, up to 32GB (Class 10 or higher recommended) |
| Sensor G | Sí |
| Enregistrament en bucle | Sí |
| Detecció de moviment | Sí |
| Monitor d’aparcament | Sí |
| WDR | Sí |
| Piles incloses | Sí |
| Posició de peces d'automòbil | Darrera, davantera |
Garantia i Suport
Specific warranty information for the ASHATA 4-inch 1080P Car Dash Camera DVR is not provided in the product data. For warranty details, technical support, or customer service inquiries, please refer to the official ASHATA website or contact your retailer directly.