
1. Introducció
The NVX XLOC22X is a 2-channel high voltage active line output converter designed to integrate aftermarket amplifiers with factory car audio systems. It converts high-level speaker signals from a factory head unit into low-level RCA signals, providing up to 9.5 volts of output. This device features impedance matching, auto turn-on capabilities, and a built-in low-pass filter to ensure optimal audio performance and system compatibility.

Imatge 1.1: Frontal view of the NVX XLOC22X Line Output Converter, showing all controls and connections.
2. Característiques clau
- 2-Channel Speaker Level Inputs: Accepts high-level signals from factory head units.
- 2-Channel RCA Outputs: Provides low-level signals for aftermarket ampaixecadors.
- Vol. Alttage Handling: Capable of handling up to 40V (400 watts RMS) input.
- Vol d'alta sortidatage: Delivers up to 9.5 Volts of output for strong signal to ampaixecadors.
- Encès automàtic: Features DC offset or Audio detection for automatic ampencès del lifier.
- Interruptor de selecció de càrrega: Adjustable impedance (20, 60, or 20K ohms) to prevent factory stereo shutdown.
- Built-in Low Pass Filter (LPF): Selectable LPF for subwoofer applications.
- Intensificació dels sons més greus: Adjustable bass boost (0dB to 12dB).
- Control de guany: Independent gain adjustment for optimal level matching.
- Indicador de retall: Visual indicator for signal clipping.
3. Informació de seguretat
Please read all instructions carefully before installation and use. Failure to follow these guidelines may result in damage to the product, vehicle, or personal injury.
- Desconnecteu sempre el terminal negatiu de la bateria del vehicle abans de començar qualsevol treball elèctric.
- Ensure proper wiring and connections to prevent short circuits or electrical fires.
- Mount the device securely in a dry, well-ventilated area away from heat sources and moisture.
- Consulteu un instal·lador professional si teniu dubtes sobre alguna part del procés d'instal·lació.
- Do not operate the device if it has been damaged or exposed to water.
4. Producte acabatview
The NVX XLOC22X features various inputs, outputs, and controls for seamless integration and audio optimization.
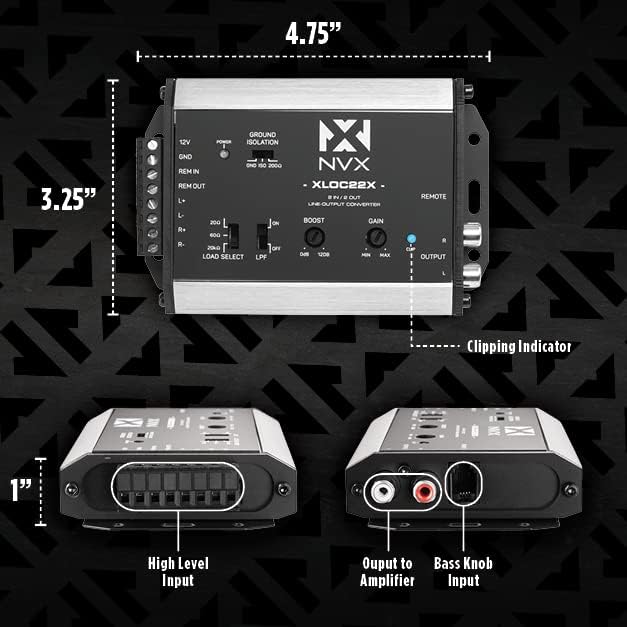
Image 4.1: Diagram showing the dimensions (4.75" x 3.25" x 1") and key labeled components of the NVX XLOC22X, including High Level Input, Output to Amplifier, Bass Knob Input, and Clipping Indicator.
4.1 Connections and Controls
- 12 V: Terminal d'entrada d'alimentació.
- GND: Ground input terminal.
- REM EN: Remote turn-on input (optional, for remote turn-on mode).
- REM OUT: Remote turn-on output for ampmés viu.
- L+/L- and R+/R-: High-level speaker inputs (Left and Right channels).
- GROUND ISOLATION Switch: Selects ground isolation mode (GND, ISO, 200Ω) to eliminate ground loop noise.
- LED d'alimentació: Indica l'estat d'alimentació.
- LOAD SELECT Switch: Adjusts input impedance (20Ω, 60Ω, 20KΩ) to prevent factory stereo shutdown.
- LPF Switch: Toggles the Low Pass Filter ON/OFF.
- BOOST Control: Adjusts bass boost level (0dB to 12dB).
- Control GAIN: Adjusts output gain (MIN to MAX).
- CLIP Indicator: S'il·lumina quan el senyal de sortida està saturat.
- OUTPUT (L/R RCA): Low-level RCA outputs to ampmés viu.
- Port REMOT: RJ11 port for optional bass knob connection.

Imatge 4.2: De dalt a baix view of the NVX XLOC22X, clearly showing the terminals for 12V, GND, REM IN, REM OUT, L+/L-, R+/R-, and the switches for Ground Isolation, Load Select, LPF, Boost, Gain, and the Clip indicator.
5. Configuració i instal·lació
Proper installation is critical for optimal performance. Follow these steps carefully.
5.1 Muntatge
Choose a secure, dry location for mounting the XLOC22X, such as under the dashboard, behind the glove box, or in the trunk. Ensure adequate ventilation. Use the provided screws to secure the unit.

Image 5.1: Included mounting screws and a small screwdriver for installation.
5.2 Connexions de cablejat
- Power (12V): Connect the 12V terminal to a constant +12V power source from the vehicle's battery. Use an appropriate gauge wire and an inline fuse (not included) near the battery.
- Terra (GND): Connect the GND terminal to a solid chassis ground point in the vehicle. Ensure a clean, paint-free metal surface for the best connection.
- Remote Turn-On (REM IN/REM OUT):
- Si s'utilitza el REM turn-on mode (selected via the 'TURN ON MODE' switch), connect the REM IN terminal to the remote output of your head unit. The REM OUT terminal will then provide a remote signal to your ampmés viu.
- Si s'utilitza DC offset or Àudio detection turn-on mode, the REM IN connection is not required. The REM OUT terminal will still provide a remote signal to your amplifier when the XLOC22X detects an input signal.
- High-Level Inputs (L+/L-, R+/R-): Connect the factory speaker wires to the corresponding high-level input terminals. Ensure correct polarity.
- Sortides RCA (E/D): Connect the RCA outputs of the XLOC22X to the RCA inputs of your aftermarket amplifier. The XLOC22X provides up to 9.5 Volts of output.
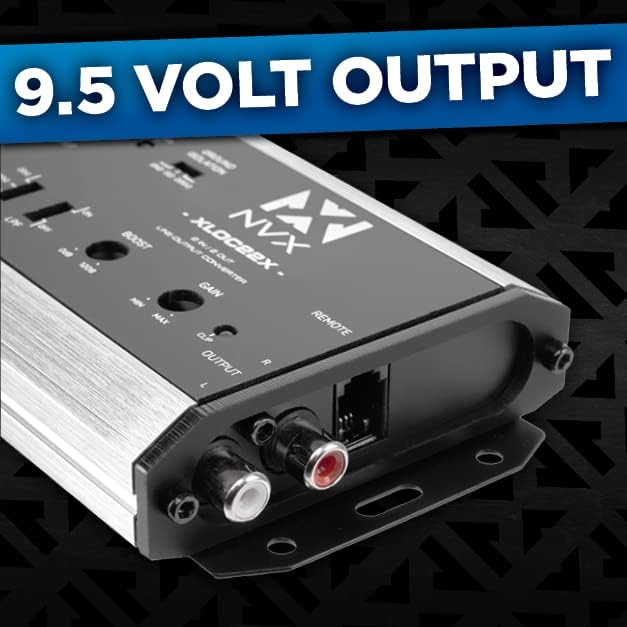
Imatge 5.2: Primer pla view of the RCA output section, highlighting the capability of 9.5 Volt output.
5.3 Configuració inicial
- Aïllament del sòl: Start with the 'GND' position. If noise (e.g., engine whine) is present, try 'ISO' or '200Ω' to eliminate it.
- LOAD SELECT: This switch adjusts the impedance presented to the factory head unit. If the factory stereo shuts down or produces distorted sound, try adjusting this switch (20Ω, 60Ω, or 20KΩ) until stable operation is achieved.
- TURN ON MODE: Select 'DC' for DC offset detection or 'REM' for remote wire turn-on. If your factory head unit does not provide a DC offset on its speaker outputs, use 'REM' with a dedicated remote wire, or 'AUDIO' if available (check specific model features).
- LPF: If connecting to a subwoofer amplifier, set the LPF switch to 'ON'. For full-range applications, set to 'OFF'.
- IMPULS: Set the BOOST control to 0dB initially.
- GUANY: Set the GAIN control to MIN initially.

Image 5.3: Close-up of the Bass Boost knob (0dB to 12dB) and the LPF (Low Pass Filter) ON/OFF switch.

Image 5.4: Close-up of the Auto Turn-On Mode switch, showing options for DC offset or Remote (REM) detection.
6. Instruccions de funcionament
Once installed, follow these steps to optimize your audio system.
- Encès: Turn on your vehicle's ignition and head unit. The XLOC22X POWER LED should illuminate.
- Set AmpGuany lifier: With the XLOC22X GAIN at MIN, set your amplifier's gain to its minimum setting.
- Adjust XLOC22X Gain: Play a dynamic piece of music at a moderate volume level on your head unit. Slowly increase the GAIN control on the XLOC22X until the CLIP indicator just begins to flash. Then, slightly reduce the gain until the CLIP indicator no longer flashes. This ensures a clean, unclipped signal to your ampmés viu.
- Afinar AmpGuany lifier: Now, adjust your amplifier's gain to achieve the desired volume level without distortion.
- Bass Boost Adjustment: If desired, slowly increase the BOOST control to enhance bass frequencies. Monitor for distortion.
- Ground Isolation Adjustment: If you experience any unwanted noise (e.g., engine whine), try adjusting the GROUND ISOLATION switch to 'ISO' or '200Ω' to find the setting that eliminates the noise.
7. Manteniment
The NVX XLOC22X requires minimal maintenance. Keep the unit clean and free from dust and debris. Periodically check all wiring connections to ensure they are secure and free from corrosion.
- Do not use harsh chemicals or abrasive cleaners on the unit.
- Ensure the mounting location remains dry and free from excessive heat.
8. Solució De Problemes
| Problema | Causa possible | Solució |
|---|---|---|
| Sense so ampmés viu. |
|
|
| So distorsionat. |
|
|
| Engine whine or other noise. |
|
|
| Factory stereo shuts down. |
|
|
9. Especificacions
| Característica | Especificació |
|---|---|
| Número de model | XLOC22X |
| Nombre de canals | 2 |
| Volum d'entrada màximtage | 40 Volts (400 watts RMS) |
| Volum de sortida màximtage | 9.5 Volts |
| Selecció de càrrega | 20Ω, 60Ω, 20KΩ |
| Auto Turn-On Modes | DC Offset, Audio Detection, Remote (REM) |
| Bass Boost | 0 dB a 12 dB |
| Potència de sortida | 22 Watts (This specification seems to be a general product detail and not directly related to the LOC's function as a signal converter. It's included as per provided data.) |
| Pes de l'article | 9.9 unces |
| Dimensions del paquet | 6.77 x 4.92 x 2.13 polzades |
| Certificacions | CE, FCC |
10. Garantia i Suport
For warranty information and technical support, please refer to the official NVX website or contact NVX customer service directly. Keep your purchase receipt as proof of purchase.