
1. Introducció
The SHIDU M500 is a compact and portable wired voice amplifier designed to project your voice clearly and powerfully. It is an ideal tool for teachers, presenters, tour guides, and anyone who needs to amplify their voice in various settings. This device also supports music playback from multiple sources.

Image 1.1: SHIDU M500 Wired Voice Amplifier. This image shows the front view of the compact, black and white voice ampmés viu.
2. Producte acabatview
2.1. Components i controls
Familiarize yourself with the various parts and controls of your SHIDU M500 ampmés viu:

Image 2.1: SHIDU M500 Controls and Ports Diagram. This diagram illustrates the top panel controls including Play/Pause, Recording, Previous, Next, Mode Switch, LED Screen, and the Switch/Volume knob. It also shows the side ports: USB, TF card socket, DC 5V charging port, AUX-IN, and MIC-IN.
- Switch/Vol Knob: Gireu per encendre/apagar i ajustar el volum.
- Pantalla LED: Displays current mode, battery level, and track information.
- Botó Reproduir/Pausa: Starts or pauses audio playback.
- Botó d'enregistrament: Initiates or stops audio recording.
- Botó anterior: Skips to the previous track or navigates menus.
- Botó següent: Skips to the next track or navigates menus.
- Botó de canvi de mode: Toggles between different input modes (e.g., USB, TF card, AUX).
- Port USB: For connecting USB flash drives for music playback.
- Socket de targeta TF: For inserting a TF (MicroSD) card for music playback.
- Port DC 5V: Power input for charging the ampmés viu.
- Port AUX-IN: Per connectar dispositius d'àudio externs mitjançant un cable d'àudio de 3.5 mm.
- MIC-IN Port: Per connectar el micròfon amb cable.
3. Configuració
3.1. Càrrega de la Ampmés viu
- Connecteu el cable de càrrega proporcionat a DC 5V port al ampmés viu.
- Connect the other end of the cable to a standard USB power adapter (not included) or a computer's USB port.
- La pantalla LED indicarà l'estat de càrrega. Una càrrega completa sol trigar entre 3 i 5 hores.
- Assegureu-vos el amplifier is fully charged before first use for optimal battery life.
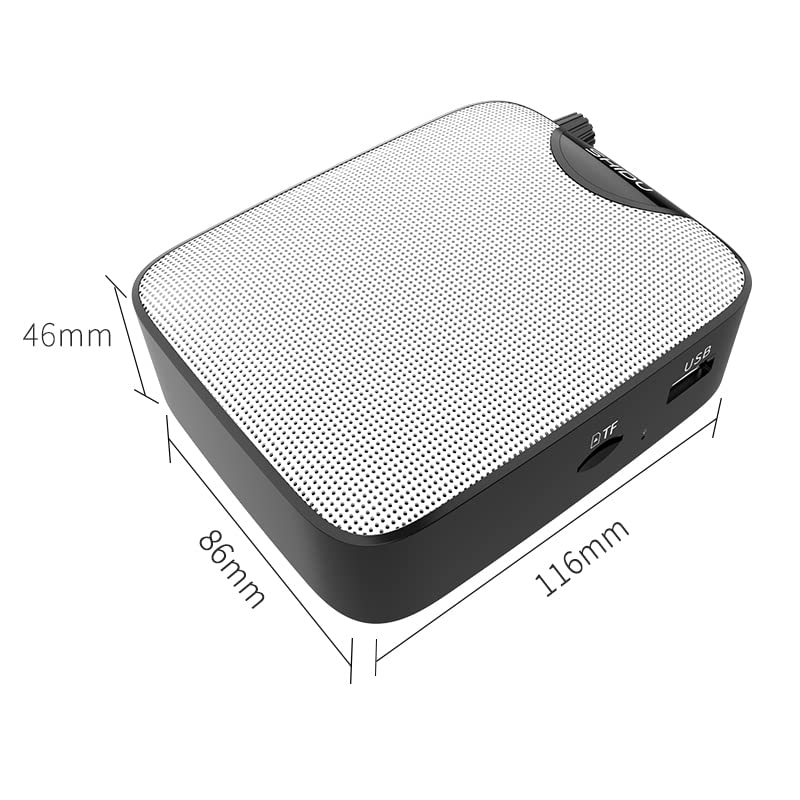
Image 3.1: SHIDU M500 Built-in 1800mAh Battery. This image highlights the amplifier's internal 1800mAh high-quality lithium battery, indicating long standby time and extended battery life.
3.2. Connexió del micròfon
- Insert the 3.5mm plug of the wired microphone into the MIC IN port al ampmés viu.
- Position the microphone headset comfortably on your head, ensuring the microphone is close to your mouth for best voice pickup.
3.3. Powering On/Off and Volume Adjustment
- To power on, rotate the Switch/Vol Knob clockwise until you hear a click and the LED screen illuminates.
- Continueu girant el botó en sentit horari per augmentar el volum. Gireu-lo en sentit antihorari per disminuir el volum.
- To power off, rotate the Switch/Vol Knob counter-clockwise until you hear a click and the LED screen turns off.
4. Instruccions de funcionament
4.1. Veu Amplificació
- Ensure the microphone is connected and the ampel lifier està encès.
- Ajusteu el Switch/Vol Knob al vostre desitjat ampnivell de lificació.
- Speak clearly into the microphone. Avoid placing the microphone too close to the amplifier to prevent feedback (a high-pitched squeal).
4.2. Music Playback (USB/TF Card/AUX-IN)
- Targeta USB/TF: Inseriu una unitat flaix USB al Port USB or a TF card into the Socket de targeta TF. El amplifier will automatically switch to the corresponding mode and begin playback. If not, press the Botó de canvi de mode.
- AUX IN: Connecteu un dispositiu d'àudio extern (per exemple, un telèfon intel·ligent o un reproductor MP3) al Port AUX-IN using a 3.5mm audio cable. Press the Botó de canvi de mode until 'AUX' is displayed on the LED screen.
- Utilitza el Reproduir/Pausa, Anterior, i A continuació buttons to control music playback.
- Ajusteu el volum amb el botó Switch/Vol Knob.
4.3. Funció d'enregistrament
- Ensure a USB flash drive or TF card is inserted to save recordings.
- Premeu el botó Botó de gravació to start recording. The LED screen will indicate recording status.
- Parla pel micròfon.
- Premeu el botó Botó de gravació again to stop recording. The recording will be saved to the inserted storage device.
5. Manteniment
5.1. Neteja
- Netegeu el amplifier's exterior with a soft, dry cloth.
- No utilitzeu productes químics agressius, dissolvents ni netejadors abrasius.
- Mantingueu els ports lliures de pols i deixalles.
5.2. Cura de la bateria
- Carregar el amplifier regularly, even if not in frequent use, to maintain battery health.
- Eviteu esgotar completament la bateria abans de tornar-la a carregar.
- No exposar el ampLifer a temperatures extremes.
5.3. Emmagatzematge
- Emmagatzemar el amplifier in a cool, dry place away from direct sunlight and moisture.
- When storing for extended periods, ensure the battery is partially charged (around 50%).
6. Solució De Problemes
| Problema | Causa possible | Solució |
|---|---|---|
| Sense so ampmés viu | Amplifier is off; Volume is too low; Microphone not connected properly; Incorrect mode selected. | Enceneu el amplifier and increase volume; Ensure microphone is fully plugged into MIC-IN; Press Mode Switch to select correct input. |
| So o feedback distorsionats | Volum massa alt; Micròfon massa a prop amplifier; Microphone damaged. | Decrease volume; Increase distance between microphone and amplifier; Try a different microphone if available. |
| La bateria no es carrega | Charging cable not connected properly; Faulty cable or adapter; Amplifier not powered off during charging. | Ensure cable is securely connected to DC 5V port and power source; Try a different USB cable or adapter; Power off the amplifier while charging. |
| La reproducció de música no funciona | USB/TF card not inserted correctly; Incorrect mode selected; Corrupt audio files. | Reinsert USB/TF card; Press Mode Switch to select USB/TF mode; Ensure audio files estan en un format compatible. |
7. Especificacions
- Model: SHIDU M500
- Dimensions (L x A x A): 8.6 x 2.8 x 10.4 centímetres
- Pes: 280 grams
- Tecnologia de connectivitat: Amb cable
- Potència de sortida: 10W
- Bateria: Built-in 1800mAh High Quality Lithium Battery
- Dispositius compatibles: Laptop, MP3 Player, Smartphone (via AUX-IN)
- Ports d'entrada: MIC-IN (3.5mm), AUX-IN (3.5mm), USB, TF Card Slot, DC 5V (Charging)
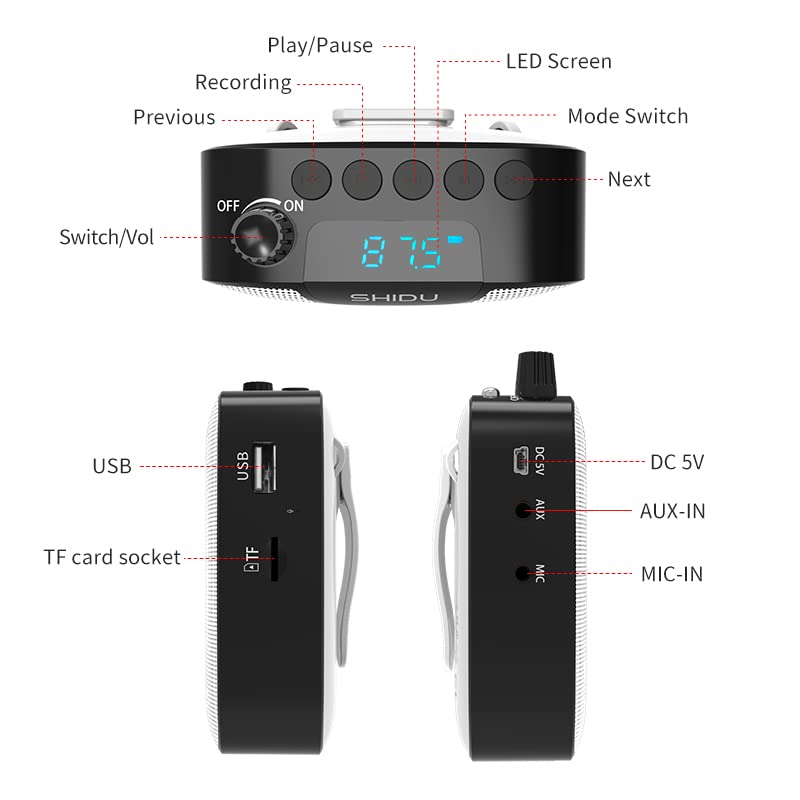
Image 7.1: SHIDU M500 Dimensions Diagram. This image shows the amplifier's dimensions: 116mm length, 86mm width, and 46mm height.

Image 7.2: SHIDU M500 10W High Power Acoustic Amplifier. This image illustrates the amplifier's 10W power output, capable of providing loud and clear sound in a standard 500m² space.

Image 7.3: SHIDU M500 Mini and Portable. This image emphasizes the amplifier's compact size and light weight of only 282g, comparable to the size of a mobile phone.

Image 7.4: SHIDU M500 High-Fidelity Dual Magnetic Speaker. This image highlights the advanced speaker technology for realistic vocal reproduction and powerful bass and treble.
8. Informació de la garantia
SHIDU warrants its voice amplifier hardware products against defects in materials and workmanship for a period of un any from the date of original purchase, provided the purchase was made from an authorized SHIDU dealer. This warranty is void if the equipment is altered, misused, mishandled, suffers excessive wear, or is serviced by any parties not authorized by SHIDU.
9. Suport
For further assistance, technical support, or warranty claims, please refer to the contact information provided with your purchase or visit the official SHIDU website. Ensure you have your product model number (M500) and proof of purchase ready when contacting support.


