ovedisa S6-CN
Dash Cam Front and Rear, 4K Full UHD 3 Channel Dash Camera User Manual
Brand: ovedisa | Model: S6-CN
1. Introducció
Thank you for choosing the ovedisa 4K Full UHD 3 Channel Dash Camera. This manual provides detailed instructions for the proper installation, operation, and maintenance of your new dash camera. Please read this manual thoroughly before use to ensure optimal performance and longevity of the device. This dash cam is designed to provide comprehensive video surveillance for your vehicle, capturing footage from the front, rear, and interior simultaneously.
2. Producte acabatview
2.1 Característiques clau
- 4K Front and Rear Recording: Achieves ultra HD 4K (3840x2160) resolution for the front camera and 1080P for the rear, providing clear evidence.
- 3-Channel Coverage: Simultaneous recording from front (170° wide angle), interior (120°), and rear (120°) cameras for maximum road coverage.
- Supervisió nocturna: Equipped with 6 glass lenses, F1.8 aperture, WDR technology, and 4 infrared lights for enhanced clarity in low-light conditions.
- G-Sensor & Emergency Lock: Automatically detects sudden vibrations/collisions and locks the current video file per evitar la sobreescriptura.
- Enregistrament en bucle: Sobreescriu automàticament el menjar més antictage quan la targeta de memòria està plena, garantint un enregistrament contínuu.
- Monitor d'aparcament les 24 hores: Automatically switches to parking mode when the vehicle is off, providing continuous surveillance (requires additional hardware kit).
- Included 32GB Micro-SD Card: Comes with a U3 32GB Micro-SD memory card, supporting up to 64GB.
2.2 Components del producte
The ovedisa Dash Cam system includes the main dash camera unit, a rear camera, and a 32GB Micro-SD card. Below is an illustration of the main components.

Image: The main dash camera unit, showing the front lens, display screen, control buttons, and the included 32GB Micro-SD card. A separate rear camera is also depicted.
3. Guia de configuració
3.1 Contingut del paquet
- Dash Cam Main Unit
- Càmera posterior
- Targeta Micro-SD de 32 GB
- Cable d'alimentació (carregador de cotxe)
- Suport de muntatge
3.2 Passos d'instal·lació
3.2.1 Instal·lació de la càmera frontal
- Netegeu la zona del parabrisa on voleu muntar la càmera del salpicader. Assegureu-vos que no us obstrueixi la vista. view.
- Fixeu el suport de muntatge a la càmera del salpicader.
- Securely affix the dash cam with its bracket to the chosen spot on the windshield.
- Connect the power cable to the dash cam and route it along the windshield edge and down to your car's cigarette lighter socket or USB port.
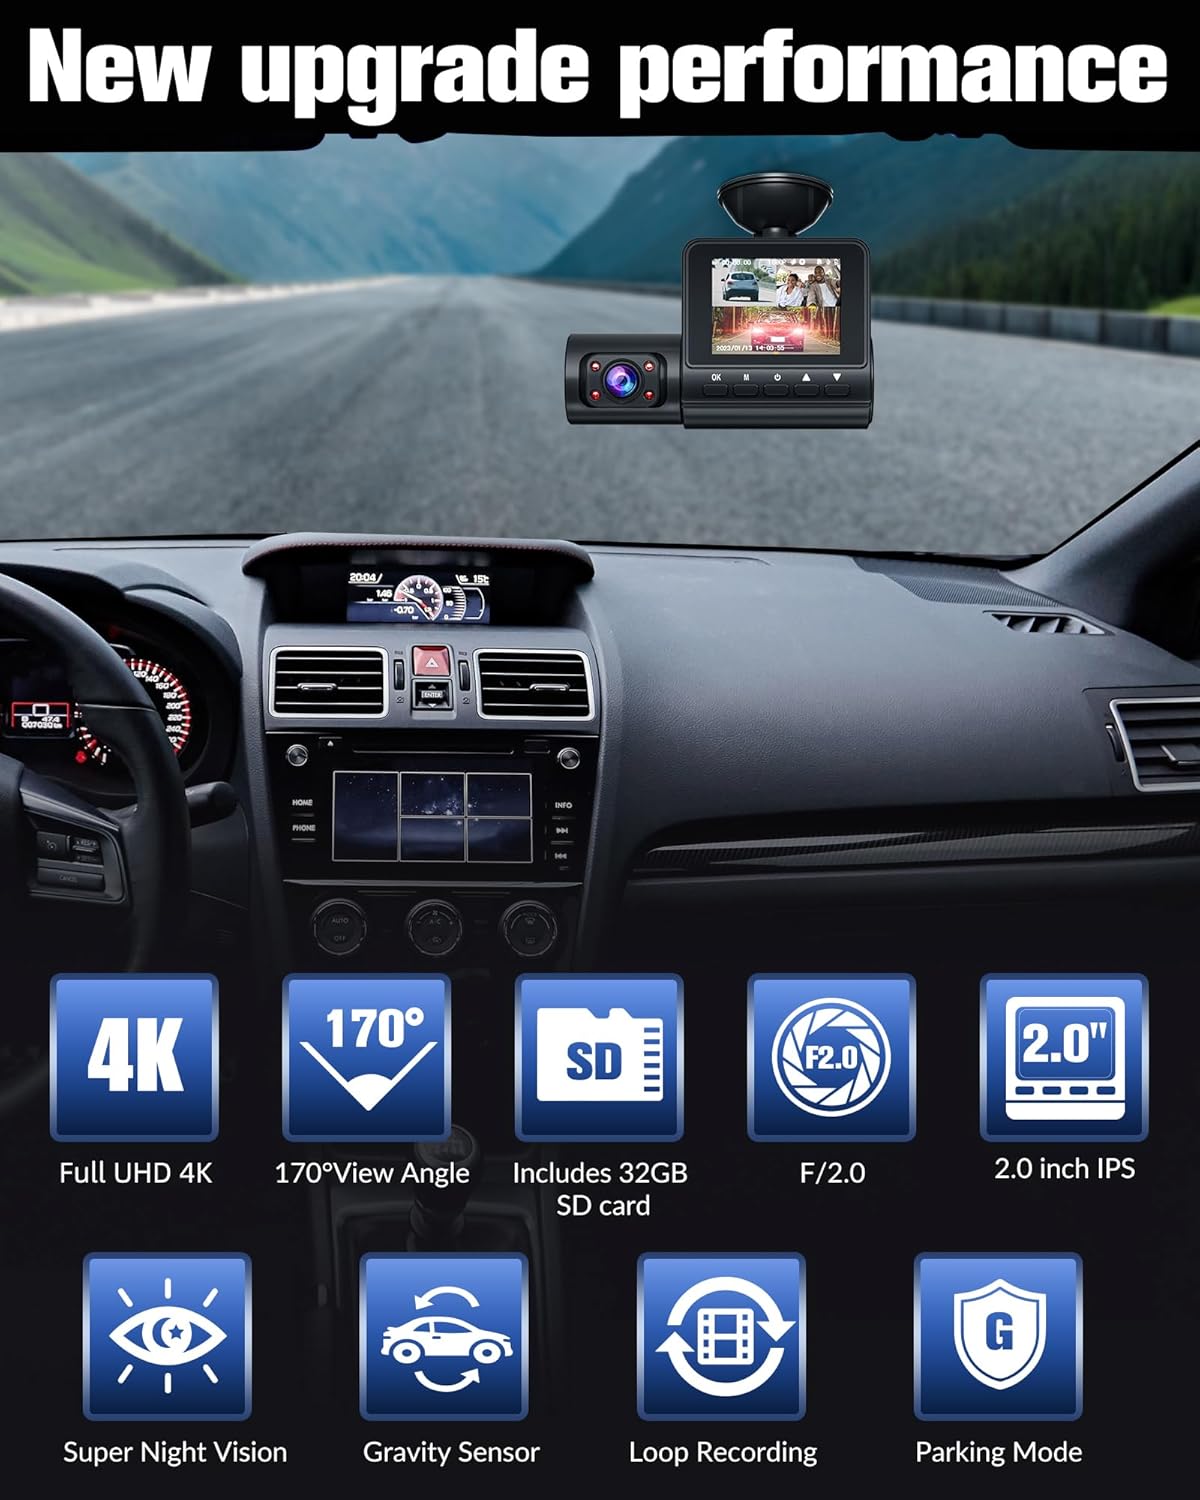
Image: The dash camera mounted on a car's windshield, illustrating its compact size and placement.
3.2.2 Instal·lació de la càmera posterior
- Identify a suitable location on your rear windshield for the rear camera, ensuring a clear view.
- Connecteu el cable de la càmera posterior a la unitat principal de la càmera del salpicader.
- Route the rear camera cable neatly along the vehicle's interior trim to the rear camera's mounting location.
- Securely mount the rear camera. This camera connects directly to the front unit and does not require connection to the reverse light for basic operation.
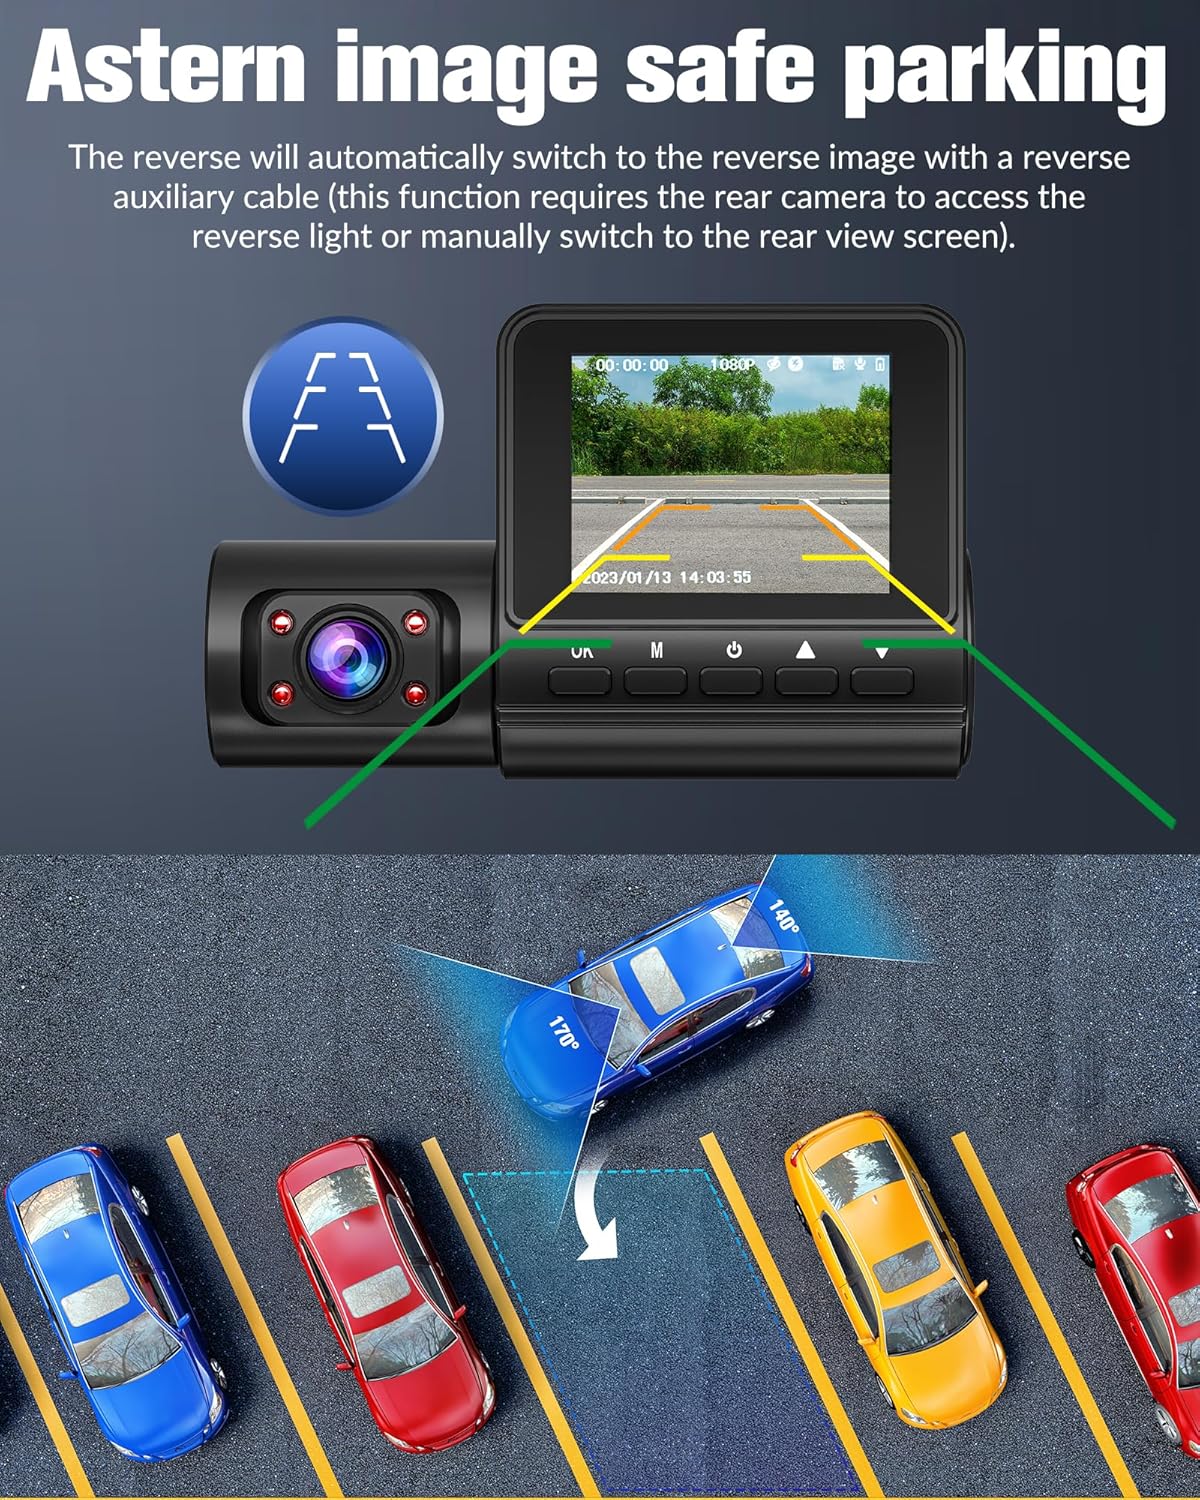
Image: The dash camera display showing the rear view with parking assist lines, indicating the functionality of the rear camera.
3.2.3 Inserció de la targeta SD
- Locate the Micro-SD card slot on the dash cam.
- Insert the included 32GB Micro-SD card into the slot until it clicks into place. Ensure the card is inserted in the correct orientation.
- It is recommended to format the SD card within the dash cam's settings before first use to ensure compatibility and optimal performance.
4. Instruccions de funcionament
4.1 Encès/Apagat
The dash cam will automatically power on and begin recording when your vehicle's ignition is turned on. It will automatically power off when the ignition is turned off.
4.2 Modes d'enregistrament
4.2.1 Gravació de 3 canals
The dash cam simultaneously records video from the front, interior, and rear cameras. The front camera records in 4K, while the interior and rear cameras record in 1080P. This provides comprehensive coverage of your driving environment.

Image: Illustration of the three recording channels: front (4K), inside (1080P), and rear (1080P), demonstrating simultaneous recording.
4.2.2 Enregistrament en bucle
When the memory card reaches its storage limit, the dash cam will automatically overwrite the oldest recorded files with new ones. This ensures continuous recording without manual intervention. Important files protected by the G-Sensor will not be overwritten.
4.2.3 G-Sensor & Emergency Lock
The built-in G-Sensor detects sudden impacts or rapid acceleration/deceleration. When triggered, it automatically locks the current video segment, preventing it from being overwritten by loop recording. These locked files'emmagatzemen en una carpeta separada a la targeta SD.
4.2.4 Monitor d'aparcament les 24 hores
With an optional hardwire kit (not included), the dash cam can monitor your vehicle continuously for 24 hours while parked. It can detect motion or impact and automatically start recording, providing all-weather protection. This feature operates with low power consumption.

Image: Visual representation of G-Sensor emergency lock, 24-hour parking monitoring, and loop recording functionalities.
4.3 Visió nocturna
The dash cam features Super Night Vision technology, utilizing 6 layers of optical lenses, an F2.0 wide aperture, and 4 infrared lights. This combination, along with WDR (Wide Dynamic Range) technology, significantly enhances image clarity and color accuracy in low-light conditions, ensuring important details are captured day or night.

Image: A side-by-side comparison demonstrating the superior clarity and detail captured by Super Night Vision compared to standard night vision.
4.4 Wide Dynamic Range (WDR)
WDR technology helps the dash cam balance exposure in scenes with high contrast, such as driving from a dark tunnel into bright sunlight or at night with strong headlights. It ensures that both bright and dark areas of the image are clearly visible, preventing overexposure or underexposure.

Image: An illustration demonstrating how Wide Dynamic Range (WDR) technology effectively restores details in both bright and dark parts of various scenes, resulting in clearer video.
4.5 Reproducció i File Gestió
Videos can be reviewed directly on the dash cam's display. To access and manage files on a computer, remove the Micro-SD card from the dash cam and insert it into a compatible card reader connected to your computer. Video files are typically organized into folders for normal recordings, emergency recordings, and parking mode recordings.
5. Manteniment
- Neteja: Feu servir un drap suau i sec per netejar la lent i la pantalla de la càmera del salpicader. No utilitzeu productes de neteja abrasius ni dissolvents.
- Cura de la targeta SD: Regularly format the Micro-SD card (e.g., once a month) to prevent data corruption and ensure optimal recording performance. Back up any important footage abans de formatar.
- Temperatura: Avoid exposing the dash cam to extreme temperatures for prolonged periods, as this can affect battery life and performance.
- Actualitzacions de firmware: Check the ovedisa official weblloc web periòdicament per a les actualitzacions de firmware disponibles per millorar el rendiment i afegir noves funcions.
6. Solució De Problemes
| Problema | Causa possible | Solució |
|---|---|---|
| La càmera del salpicader no s'encén. | Sense font d'alimentació; connexió fluixa. | Check power cable connection to the car charger and dash cam. Ensure car's ignition is on. |
| L'enregistrament s'atura o es congela. | Targeta SD plena; targeta SD corrupta; targeta SD incompatible. | Format the SD card. Use a high-speed (U3 or higher) Micro-SD card. Replace the SD card if necessary. |
| Poca qualitat de vídeo. | Dirty lens; protective film on lens; incorrect resolution settings. | Clean the lens. Remove any protective film. Check video resolution settings in the menu. |
| El sensor G és massa sensible/no prou sensible. | Configuració de la sensibilitat del sensor G. | Adjust G-Sensor sensitivity in the dash cam's settings menu. |
| La data/hora és incorrecta. | Time zone or date settings. | Manually set the date and time in the dash cam's settings. |
7. Especificacions tècniques
| Característica | Especificació |
|---|---|
| Dimensions del producte | 0.99 x 0.98 x 0.97 polzades |
| Pes de l'article | 4 unces |
| Número de model | S6-CN |
| Bateries | Necessites 1 piles de ions de liti (incloses) |
| Tecnologia de connectivitat | Auxiliar |
| Característiques especials | Built-In Display, Built-In Speaker, G-Sensor, 360 Degree, Automatic Incident Detection, Loop Recording, Motion Sensing, Night Vision, Voice Alert, Built-In Microphone, Internal Memory, Parental Control Capability |
| Color | Black-New |
| Resolució de captura de vídeo | 3840x2160 (frontal) |
| Tipus de muntatge | Muntatge al quadre de comandament |
| Angle de la càmera frontal | 170° |
| Interior Camera Angle | 120° |
| Angle de la càmera posterior | 120° |
| Mida de la pantalla | IPS d’2.0 polzades |
8. Garantia i Suport
For warranty information, technical support, or any inquiries regarding your ovedisa Dash Cam, please refer to the contact information provided on the product packaging or visit the official ovedisa weblloc web. Si us plau, conserveu el comprovant de compra per a reclamacions de garantia.
Ask a question about this manual
Ask about setup, troubleshooting, compatibility, parts, safety, or missing instructions. Manuals+ will review the question and use this page’s manual context to help answer it.