
1. Introducció i finalview
The OOYCYOO PWM 10A Solar Charge Controller is an intelligent, multi-purpose solar charge and discharge controller designed for 12V/24V lead-acid batteries. It features an integrated industrial microcontroller, an LCD display, PWM charging mode, and dual 5V USB ports. This controller is suitable for various home photovoltaic applications, including lighting systems, and automatically recognizes 12V or 24V battery systems.
This manual provides essential information for the safe and efficient operation of your solar charge controller. Please read it thoroughly before installation and use.
2. Instruccions de seguretat
- Ensure all connections are correct and secure before powering on the system.
- Critical Connection Order: Connecteu sempre la bateria al controlador de càrrega primer. Then, connect the solar panel. Finally, connect the load.
- Critical Disconnection Order: When disconnecting the system, follow the reverse order: disconnect the load, then the solar panel, and finally the battery. Incorrect connection or disconnection sequence can cause damage to the controller.
- The controller is designed for 12V/24V lead-acid batteries (GEL, LEAD-ACID, Flooded). Do not use it with other battery types unless specified.
- Install the controller in a well-ventilated area, away from flammable materials and moisture.
- Avoid exposing the controller to direct sunlight or extreme temperatures.
- Do not attempt to repair or modify the controller yourself. Contact qualified personnel for service.
3. Característiques del producte
- Integrated industrial microcontroller for stable operation.
- Clear LCD graphic symbol display.
- Automatic 12V/24V battery voltage identificació.
- PWM charging mode.
- Dual 5V/3A USB outputs for charging mobile devices.
- Adjustable charge and discharge parameters.
- Built-in protections: short-circuit, open-circuit, reverse polarity, overload.
- Protecció de corrent inversa MOSFET dual, baixa producció de calor.
- Automatic memory function for stored settings.
4. Configuració i instal·lació
Follow these steps carefully to install your solar charge controller. Ensure all power sources are disconnected before making any connections.
- Connecteu la bateria: Connect the battery to the charge controller's battery terminals (marked with a battery symbol). Ensure correct polarity: positive to positive (+), negative to negative (-).
- Connecteu el panell solar: Connect the solar photovoltaic module (solar panel) to the charge controller's solar panel terminals (marked with a solar panel symbol). Ensure correct polarity.
- Connect the Load: Connect the DC load (consumer) to the charge controller's load terminals (marked with a light bulb symbol). Ensure correct polarity.
Nota important: When uninstalling the system, always disconnect in the reverse order: first the load, then the solar panel, and finally the battery. Failure to follow this sequence can damage the controller.
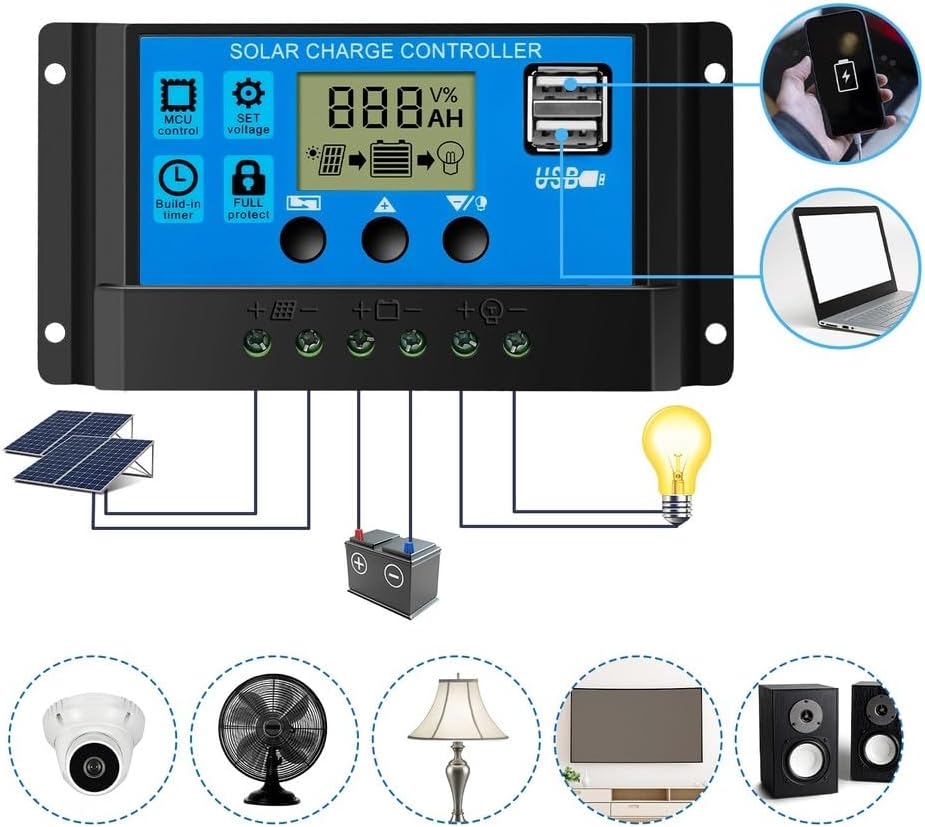
Image: Connection diagram for the OOYCYOO Solar Charge Controller, showing connections for solar panels, battery, and DC load, along with USB outputs.
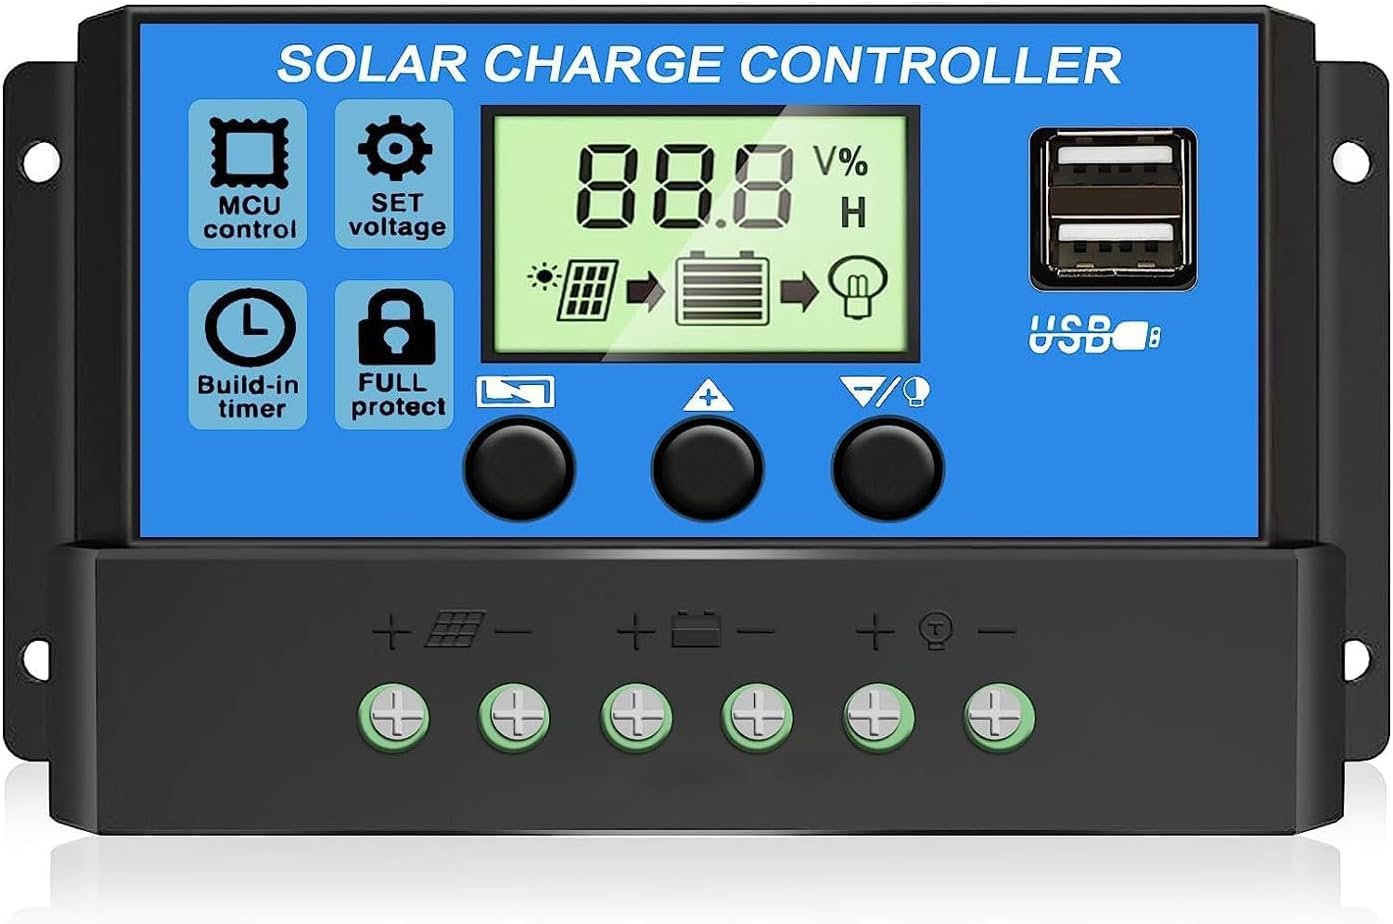
Imatge: Frontal view of the OOYCYOO Solar Charge Controller, displaying its LCD screen, control buttons, dual USB ports, and overall dimensions (approximately 5.2 inches wide, 2.7 inches high).
5. Instruccions de funcionament
The controller features an LCD display and three buttons for operation: MENU, UP, and DOWN.
5.1 Browsing Interfaces
Premeu el botó MENÚ button to cycle through different display interfaces. The typical sequence includes:
- Main Display (Current battery voltage, charge/discharge status)
- Float Voltage
- Solar Panel Connected Status
- Discharge Connected Status
- Working Mode (Load control timer)
- Tipus de bateria

Imatge: Detallada view of the LCD display on the OOYCYOO Solar Charge Controller, highlighting various indicators such as voltage, current, battery level, and load identification symbols.
5.2 Configuració dels paràmetres
To enter parameter setting mode:
- While browsing interfaces (typically from interface 2 to 5), long press the MENÚ button until the displayed value starts flashing.
- Utilitza el UP i ABAIX buttons to adjust the parameter value.
- Premeu llargament el botó MENÚ button again to save the setting and exit the parameter adjustment mode.
- To restore a parameter to its default value, long press the ABAIX button while the parameter is flashing.

Image: Flowchart illustrating the navigation and setting process for the OOYCYOO Solar Charge Controller's LCD display, showing how to browse interfaces and adjust parameters like float voltage, load mode, and battery type.
6. Parameter Settings Details
Es poden ajustar els següents paràmetres:
- Vol. De càrrega flotanttage (HVD): Adjustable from 13.3V to 15V. This is the voltage at which the battery is maintained after being fully charged.
- Recovery After Voltage (LVD): Adjustable from 11V to 13.5V. This is the voltage at which the load will reconnect after being disconnected due to low battery voltage.
- Sota el voltage Protection (RVD): Adjustable from 9V to 12.3V. This is the voltage at which the load will be disconnected to protect the battery from over-discharge.
- Mode de càrrega: Options include 24 hours (load always on), 1 to 23 hours (load on for a set duration after dusk), or 0 hours (load off).
- Opció de bateria: Select the battery type: B01 (Sealed 14.4V), B02 (Gel 14.2V), B03 (Flooded 14.6V).
- Càrrec d'igualtat: Vol específictage settings for different battery types during equalization.
- Càrrega del flotador: Default 13.7V (adjustable).
- Parada de descàrrega: Default 10.7V (adjustable).
- Torneu-vos a connectar: Default 12.6V (adjustable).
7. Solució De Problemes
If you encounter issues with your solar charge controller, consider the following:
- Sense pantalla/Sense alimentació: Check battery connections and ensure the battery has sufficient charge. Verify the connection order.
- La bateria no es carrega: Check solar panel connections and ensure the panel is receiving adequate sunlight. Verify the connection order. Check for open-circuit protection activation.
- La càrrega no funciona: Check load connections and ensure the load is not drawing excessive current (overload protection). Verify the load mode settings. Check for short-circuit protection activation or under-voltagprotecció.
- Vol incorrectetage Lectures: Assegureu-vos que totes les connexions estiguin estancades i lliures de corrosió.
- Controller Overheating: Ensure the controller is installed in a well-ventilated area. The dual MOSFET reverse current protection helps minimize heat, but proper airflow is still important.
If problems persist, refer to the connection instructions and parameter settings. For further assistance, contact customer support.
8. Especificacions
| Característica | Especificació |
|---|---|
| Model | PWM 10A |
| Voltage | 12V / 24V Auto |
| Corrent de càrrega | 10A |
| Corrent de descàrrega | 10A |
| Sortida USB | Dual 5V/3A |
| Temperatura de funcionament | -35 °C a +60 °C |
| Dimensions del producte (L x A x A) | 13.3 x 7 x 3.5 cm |
| Material | Plàstic |
| Tipus de visualització | LCD |
| UPC | 768420064315 |
9. Escenaris d'aplicació
The OOYCYOO Solar Charge Controller is versatile and can be used in various off-grid solar applications, including:
- Home solar power systems
- RV and camper solar setups
- Remote monitoring stations
- Garden lighting systems
- Small off-grid cabins

Image: Collage showing various application scenarios for the OOYCYOO Solar Charge Controller, including camping, RV use, home solar installations, and street lighting.
10. Manteniment
To ensure optimal performance and longevity of your solar charge controller:
- Comproveu regularment totes les connexions del cablejat per verificar si estan ben ajustades i si hi ha corrosió.
- Mantingueu el controlador net i lliure de pols i brutícia. Feu servir un drap sec per netejar-lo.
- Assegureu-vos que hi hagi una ventilació adequada al voltant del controlador per evitar el sobreescalfament.
- Monitoritzeu la pantalla LCD per detectar qualsevol codi d'error o lectures inusuals.
11. Garantia i Suport
For warranty information or technical support, please refer to the product packaging or contact your retailer/manufacturer directly. Keep your purchase receipt as proof of purchase.