
Allteq ALTQ-TM-160
Allteq TV/Monitor Wall Mount
Model: ALTQ-TM-160 - User Manual
1. Producte acabatview
The Allteq TV/Monitor Wall Mount (Model: ALTQ-TM-160) is a robust and flexible solution designed for securely mounting your television or computer monitor to a wall. This bracket is engineered to accommodate screens ranging from 23 to 42 inches in size and supports a maximum weight of 30 kg (66 lbs), ensuring a safe and stable installation for a wide range of displays.
Key features include an adjustable wall distance from 8.9 cm to 46.6 cm, allowing for optimal screen positioning. The mount offers extensive adjustability with a swivel range of up to 180 degrees and a tilt range of +20 to -20 degrees, enabling you to achieve the perfect viewing angle from various positions in your room. It is compatible with common VESA mounting patterns, including 75x75, 100x100, 200x100, and 200x200 mm.

Figura 1: Frontal view of the Allteq TV/Monitor Wall Mount. This image shows the main components of the wall mount, including the wall plate, articulating arm, and VESA mounting plate.
2. Informació de seguretat
Please read all instructions carefully before installation and use. Failure to do so may result in personal injury, property damage, or voiding of warranty.
- Capacitat de pes: Do not exceed the maximum weight capacity of 30 kg (66 lbs). Ensure your TV/monitor's weight is within this limit.
- Mida de la pantalla: This mount is designed for screens between 23 and 42 inches. Using screens outside this range may compromise stability.
- Tipus de paret: Ensure the mounting surface (wall) can safely support the combined weight of the mount and your display. Consult a professional if unsure about your wall's integrity.
- Compatibilitat VESA: Verify your TV/monitor's VESA mounting pattern matches the mount's supported patterns (75x75, 100x100, 200x100, 200x200 mm).
- Instal·lació: Professional installation is highly recommended. If installing yourself, follow all steps precisely and use appropriate tools.
- Nens i animals de companyia: Keep children and pets away during installation. Small parts can be a choking hazard.
- Manteniment: Reviseu regularment totes les connexions i elements de fixació per assegurar-vos que es mantinguin segurs.
3. Contingut del paquet
Before beginning installation, please verify that all components are present and undamaged. If any parts are missing or damaged, do not proceed with installation and contact your retailer.
- Wall Mount Assembly (Articulating Arm and VESA Plate)
- Placa de paret
- Kit de ferreteria de muntatge (diversos cargols, volanderes, separadors, ancoratges de paret)
- Manual d'instruccions

Figure 2: All components included in the package. This image displays the main wall mount unit along with all the necessary screws, washers, and wall anchors for installation.
4. Configuració i instal·lació
Proper installation is crucial for the safety and performance of your wall mount. Follow these steps carefully.
- Determineu la ubicació de muntatge: Choose a suitable location on your wall, ensuring it is structurally sound and free from electrical wires or plumbing. Consider viewing angles and desired screen height.
- Mark Drilling Holes: Hold the wall plate against the wall at the desired height and use a pencil to mark the drilling points. Use a level to ensure the marks are perfectly horizontal.
- Perforar forats pilot: Drill pilot holes at the marked locations using an appropriate drill bit size for your wall type (wood stud, concrete, brick, etc.) and the provided wall anchors.
- Fixeu la placa de paret: Insert the wall anchors (if required) into the pilot holes. Secure the wall plate to the wall using the provided wall screws and washers. Ensure it is firmly attached and level.
- Attach VESA Plate to TV/Monitor: Identify the VESA mounting holes on the back of your TV/monitor. Select the correct size screws (M4, M6, M8) and spacers from the hardware kit that fit your display. Attach the VESA mounting plate of the wall mount to the back of your TV/monitor. Ensure the screws are tightened securely but do not overtighten.
- Mount TV/Monitor to Wall Arm: Carefully lift the TV/monitor (with the VESA plate attached) and hook it onto the articulating arm of the wall mount. Secure it in place according to the mount's design, typically with locking screws or clips.
- Adjust Wall Distance: The mount allows for a wall distance between 8.9 cm and 46.6 cm. Adjust the arm to achieve your preferred distance from the wall.

Figure 3: VESA compatibility diagram. This diagram illustrates the various VESA mounting patterns supported by the mount, including 75x75, 100x100, 200x100, and 200x200 mm.

Figure 4: Detailed dimensions and movement ranges of the wall mount. This image provides precise measurements for the mount's components and indicates the maximum swivel (180°) and tilt (+/-20°) angles.
5. Funcionament i ajustos
Once installed, your Allteq wall mount allows for easy adjustments to optimize your viewexperiència.
- Ajust de gir: The articulating arm allows the screen to swivel up to 180 degrees (90 degrees left and 90 degrees right from center). Gently push or pull the screen to the desired horizontal angle.
- Ajust d'inclinació: The VESA plate allows the screen to tilt from +20 degrees (upwards) to -20 degrees (downwards). Loosen any tilt locking knobs (if present), adjust the screen to the desired vertical angle, and then re-tighten the knobs to secure the position.
- Wall Distance Adjustment: Extend or retract the articulating arm to adjust the distance of your screen from the wall.

Figura 5: lateral view illustrating the tilt capability of the wall mount. This image demonstrates how the screen can be angled up or down for optimal viewing.
6. Manteniment
Un manteniment regular garanteix la longevitat i el funcionament segur del suport de paret.
- Neteja: Netegeu el suport amb un drap suau i sec. No utilitzeu netejadors ni dissolvents abrasius, ja que poden danyar l'acabat.
- Comproveu les connexions: Periodically (e.g., every 6 months) check all screws and bolts to ensure they remain tight and secure. Re-tighten if necessary.
- Inspeccionar per danys: Inspect the mount for any signs of wear, corrosion, or damage. If any damage is observed, discontinue use and contact customer support.
7. Solució De Problemes
If you encounter issues with your Allteq wall mount, refer to the following common problems and solutions.
| Problema | Causa possible | Solució |
|---|---|---|
| Mount feels loose or wobbly. | Screws are not tightened sufficiently; wall anchors are not secure; wall material is inadequate. | Re-tighten all screws. If using wall anchors, ensure they are properly installed. If the wall is compromised, consult a professional for reinforcement or relocate the mount. |
| Screen does not hold tilt position. | Tilt locking mechanism is loose. | Locate the tilt adjustment knobs/screws and tighten them firmly to secure the desired angle. |
| Cannot attach TV/monitor to VESA plate. | Patró VESA incorrecte; mida de cargol incorrecta. | Verify your TV/monitor's VESA pattern matches the mount's supported patterns (75x75, 100x100, 200x100, 200x200 mm). Use the correct diameter and length screws from the hardware kit. |
| Mount is not level. | Wall plate installed unevenly. | Remove the TV/monitor, loosen the wall plate screws slightly, adjust with a level, and re-tighten. Ensure to use a level during initial installation. |
8. Especificacions
| Marca | Allteq |
| Número de model | ALTQ-TM-160 |
| Mides de pantalla compatibles | 23 - 42 polzades (58.42 - 106.68 cm) |
| Capacitat de càrrega màxima | 30 kg (66 lliures) |
| Compatibilitat VESA | 75x75 mm, 100x100 mm, 200x100 mm, 200x200 mm |
| Wall Distance (Min-Max) | 8.9 cm - 46.6 cm |
| Gamma giratòria | Fins a 180 graus |
| Interval d'inclinació | +20 degrees to -20 degrees |
| Material | Acer, plàstic |
| Acabar | Recobert de pols |
| Color | Negre |
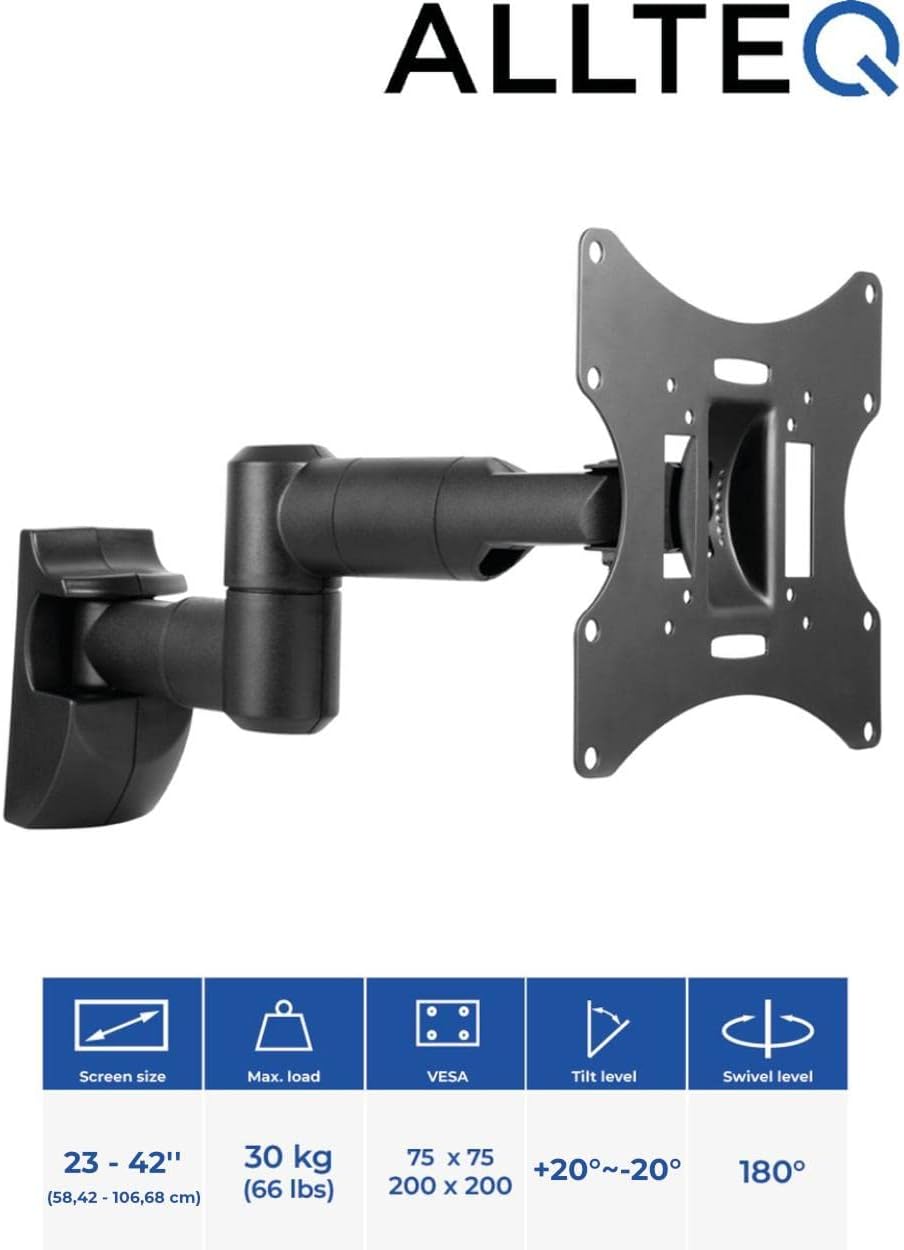
Figure 6: Summary of key product specifications. This image visually presents the screen size compatibility, maximum load, VESA patterns, and tilt/swivel levels.
9. Garantia i Suport
For warranty information, please refer to the terms and conditions provided by your retailer at the time of purchase, or visit the official Allteq website. Warranty periods and coverage may vary.
If you require technical support, have questions about installation, or need assistance with troubleshooting, please contact your point of purchase or the manufacturer directly. Have your model number (ALTQ-TM-160) and purchase details ready when contacting support.
Ask a question about this manual
Ask about setup, troubleshooting, compatibility, parts, safety, or missing instructions. Manuals+ will review the question and use this page’s manual context to help answer it.