1. Introducció
Thank you for choosing the XREXS 18-inch RGB Digital Wall Clock. This manual provides detailed instructions for the proper setup, operation, and maintenance of your new clock. Please read this manual thoroughly before use to ensure optimal performance and longevity of the product. Keep this manual for future reference.
2. Producte acabatview
Característiques clau
- Large 18-inch Display: Features clear, high-contrast 5.7-inch (14.5 cm) digits for easy readability from a distance.
- Canvi de color RGB: Offers 6 monochrome modes, 4 dynamic RGB color-changing modes, and a unique daily color-changing mode.
- Pantalla multifuncional: Shows time, temperature, humidity, date, and day of the week.
- 8 idiomes compatibles: Day of the week display available in English, German, French, Italian, Spanish, Dutch, Russian, and Danish.
- Múltiples modes: Functions as a digital clock, alarm clock, large digital timer, stopwatch, and countdown timer (up to 29 hours, 59 minutes, 59 seconds).
- Brillantor ajustable: 4-level manual brightness adjustment and an integrated auto-dimming sensor.
- Horari d'estiu automàtic (DST): Automatically adjusts for DST.
- Comandament a distància: Ajusteu convenientment la configuració des de la distància.
- Funció de memòria: Built-in memory retains settings during power outages with backup batteries.
- Col·locació versàtil: Can be wall-mounted or placed on a table using the foldable stand.
Contingut del paquet
- XREXS 18-inch RGB Digital Wall Clock (Model 099-RGB)
- Control remot
- Adaptador d'alimentació
- 2 x AAA Batteries (for memory backup)
- Mounting Aid
- Manual d'usuari

Figura 2.1: The XREXS 18-inch RGB Digital Wall Clock displaying time, temperature, humidity, date, and day, with its remote control.

Figura 2.2: A diagram illustrating the clock's features including alarm, temperature, humidity, DST, time, day, and date display.
3. Configuració
3.1 Connexió d'alimentació
- Connect the provided power adapter to the DC input port on the back of the clock.
- Plug the power adapter into a standard electrical outlet. The clock will power on and display the default time.
Nota: The clock requires continuous AC power to operate. The included AAA batteries are for memory backup only and do not power the display.
3.2 Battery Installation (Memory Backup)
- Localitzeu el compartiment de la bateria a la part posterior del rellotge.
- Introduïu les 2 piles AAA, assegurant-vos de la polaritat correcta (+/-).
- Close the battery compartment cover. These batteries will preserve your settings (time, alarm, etc.) in case of a power interruption.
3.3 Opcions de muntatge
The clock can be either wall-mounted or placed on a flat surface.
- Muntatge a la paret: Use the two keyhole slots on the back of the clock. A mounting aid is provided to assist with proper spacing for screws or nails.
- Col·locació d'escriptori: Extend the foldable stand located on the back of the clock to place it securely on a table or desk.
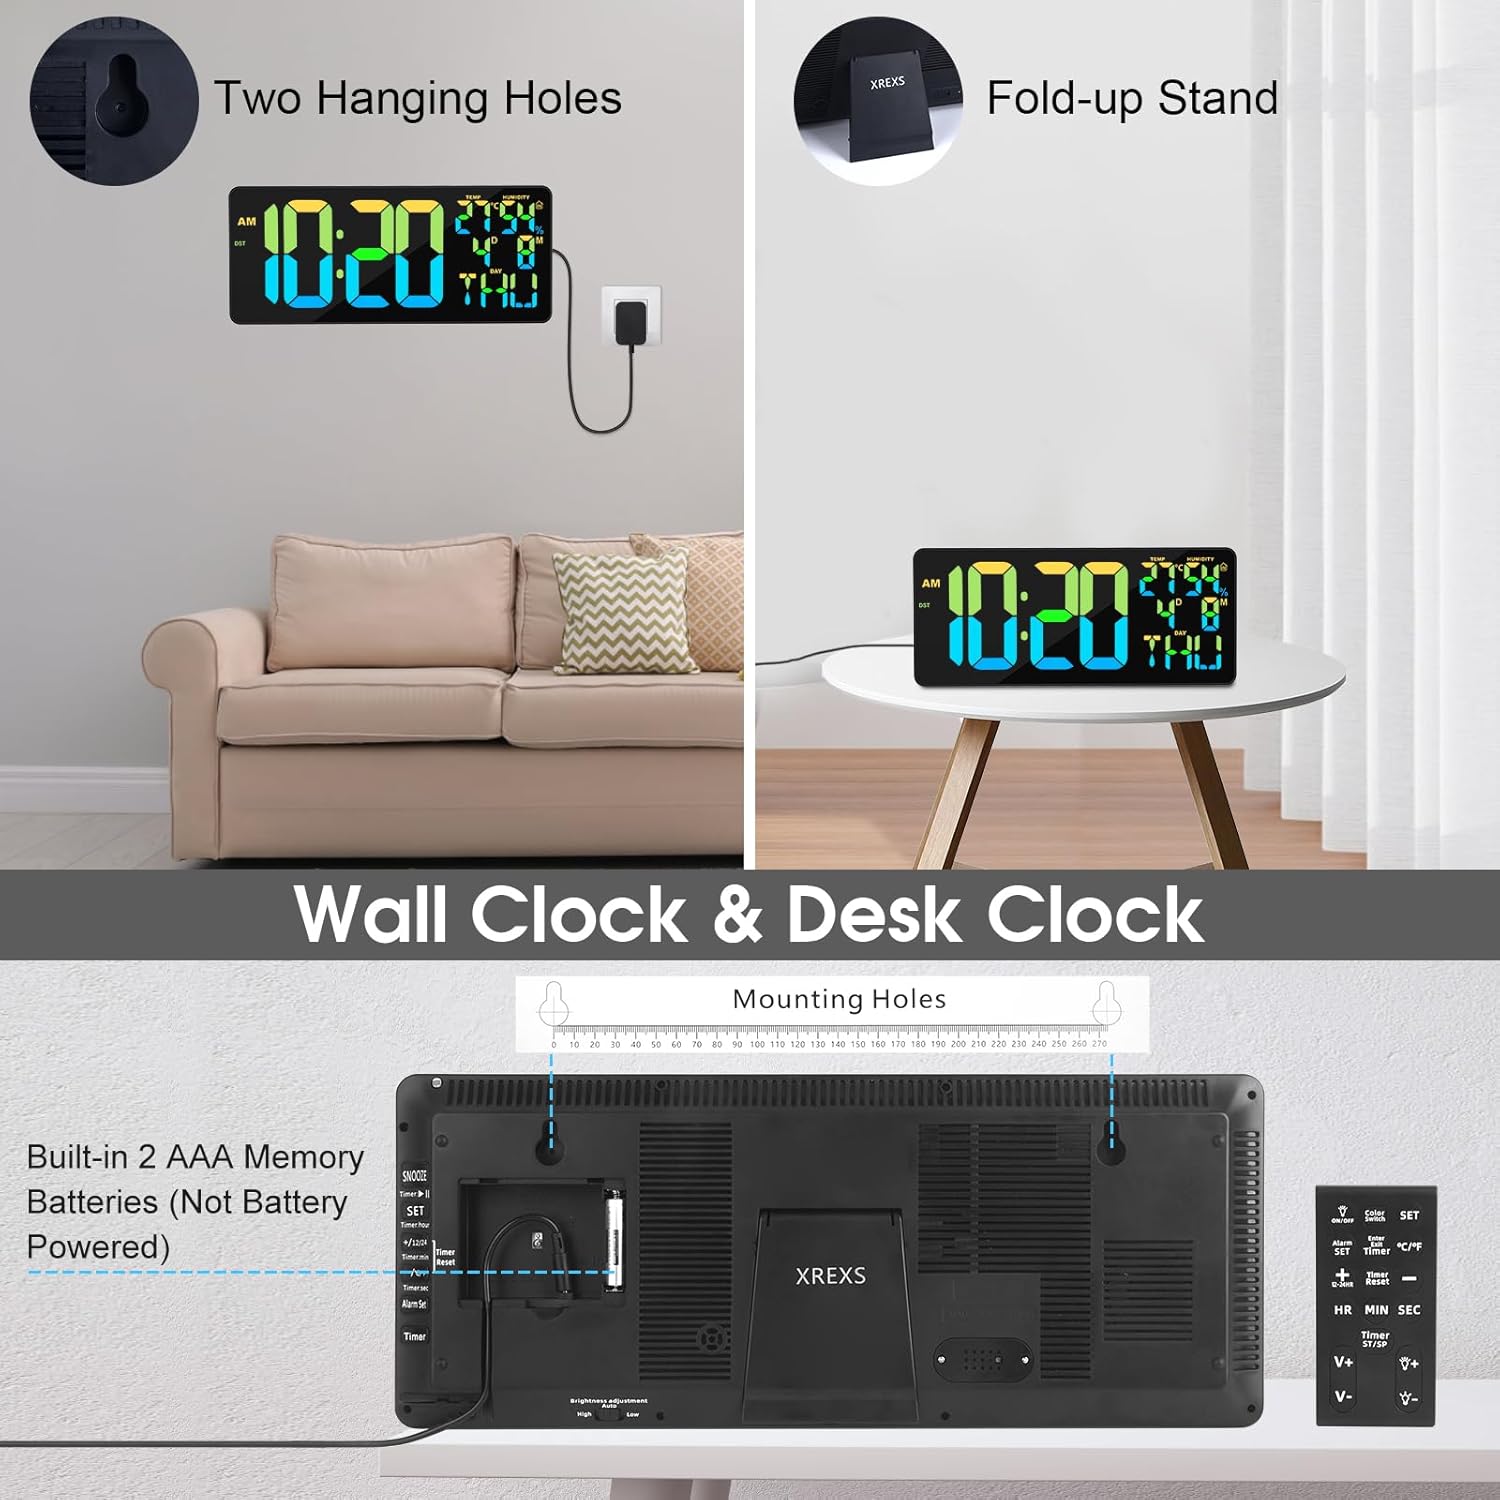
Figura 3.1: The back of the clock, illustrating the two hanging holes for wall mounting and the foldable stand for desk placement. The battery compartment is also visible.

Figura 3.2: The clock connected to its power adapter, with the remote control shown for setting adjustments.
4. Instruccions de funcionament
The clock can be operated using the remote control or the buttons on the back of the unit.
4.1 Basic Settings (Time Format, Temperature Unit, Language)
- Time Format (12/24 Hour): Press the '12/24H' button on the remote to switch between 12-hour and 24-hour display. In 12-hour format, 'AM' or 'PM' will be displayed.
- Temperature Unit (°C/°F): Press the '°C/°F' button on the remote to toggle between Celsius and Fahrenheit.
- Day Language: Press the 'LANG' button on the remote to cycle through the 8 available languages for the day of the week display.
4.2 Configuració de l'hora i la data
- Press the 'SET' button on the remote control. The hour digits will start flashing.
- Feu servir els botons "AMUNT" o "AVALL" per ajustar l'hora.
- Press 'SET' again to move to the minute digits. Use 'UP' or 'DOWN' to adjust minutes.
- Continue pressing 'SET' to cycle through year, month, and day settings, adjusting each with 'UP' or 'DOWN'.
- Press 'SET' one last time or wait a few seconds for the settings to be saved.
4.3 Configuració de l'alarma
- Press the 'ALARM SET' button on the remote. The alarm hour digits will flash.
- Utilitzeu "AMUNT" o "AVALL" per ajustar l'hora d'alarma desitjada.
- Press 'ALARM SET' again. The alarm minute digits will flash.
- Use 'UP' or 'DOWN' to set the desired alarm minutes.
- Premeu "CONFIGURACIÓ D'ALARMA" de nou per confirmar.
- Per activar/desactivar l'alarma, premeu el botó "ALARMA ON/OFF". Apareixerà/desapareixerà una icona d'alarma a la pantalla.
- When the alarm sounds, press any button on the remote or the clock to snooze or turn off.
4.4 Timer, Countdown, and Stopwatch Functions
Press the 'MODE' button on the remote to cycle through the different functions: Clock -> Alarm -> Timer -> Stopwatch -> Countdown.
- Temporitzador: In Timer mode, press 'SET' to set the desired time (hours, minutes, seconds) using 'UP'/'DOWN'. Press 'START/STOP' to begin/pause. Press 'RESET' to clear.
- Compte enrere: In Countdown mode, press 'SET' to set the desired countdown time (up to 29 hours, 59 minutes, 59 seconds). Press 'START/STOP' to begin/pause. Press 'RESET' to clear. An audible alert will sound when the countdown reaches zero.
- Cronòmetre: In Stopwatch mode, press 'START/STOP' to begin/pause. Press 'RESET' to clear.
4.5 Ajust de brillantor

Figura 4.1: The clock demonstrating its auto-dimming feature and the four levels of manual brightness adjustment.
- Ajust manual: Press the 'BRIGHTNESS' button on the remote to cycle through 4 levels of brightness (Lv.4, Lv.3, Lv.2, Lv.1) and OFF.
- Atenuació automàtica: The clock has a built-in light sensor that can automatically adjust the display brightness based on ambient light conditions. To activate/deactivate auto-dimming, press the 'AUTO DIM' button on the remote.
4.6 Modes de color RGB

Figura 4.2: Examples of the dynamic RGB color-changing modes and single color options available on the clock.
The clock offers 11 color modes:
- 6 Monochrome Colors (Red, Green, Blue, Yellow, Purple, Light Blue)
- 4 Dynamic RGB Changing Colors (RGB Changing, RGB Left to Right Flowing, RGB Top Downward Flowing, Random Color)
- 1 Daily Color Change Mode
Press the 'COLOR' button on the remote to cycle through these color modes. The 11th mode provides a unique daily color change for variety.
4.7 Horari d'estiu (DST)
To activate or deactivate the automatic Daylight Saving Time function, press the 'DST' button on the remote control. When activated, the clock will automatically adjust its time forward or backward by one hour as required by DST.

Figura 4.3: The XREXS clock shown in various settings, demonstrating its use as a wall clock, a countdown timer for exercise, and an alarm clock in a bedroom.
5. Manteniment
- Neteja: Per netejar el rellotge, netegeu suaument la pantalla iasing with a soft, dry cloth. Do not use abrasive cleaners, solvents, or chemical sprays, as these may damage the surface.
- Potència: Ensure the power adapter is securely connected. If the clock will not be used for an extended period, unplug it from the power outlet.
- Substitució de la bateria: Replace the AAA backup batteries annually or if you notice settings are not retained during power outages.
- Medi ambient: Avoid placing the clock in direct sunlight, near heat sources, or in areas with high humidity to prevent damage.
6. Solució De Problemes
| Problema | Causa possible | Solució |
|---|---|---|
| La pantalla del rellotge està en blanc o no funciona. | No power or power adapter issue. | Ensure the power adapter is securely plugged into the clock and a working electrical outlet. Check if the outlet has power. |
| El comandament a distància no respon. | Remote batteries are dead or incorrect orientation. Obstruction between remote and clock. | Replace the remote control batteries. Ensure there are no obstacles between the remote and the clock's sensor. Point the remote directly at the clock. |
| Time/settings are lost after power outage. | Les bateries de reserva estan gastades o no estan instal·lades. | Install 2 new AAA batteries in the battery compartment on the back of the clock, ensuring correct polarity. |
| La pantalla és massa tènue o massa brillant. | Brightness setting needs adjustment or auto-dimming is active/inactive. | Press the 'BRIGHTNESS' button on the remote to manually adjust. Press 'AUTO DIM' to toggle automatic brightness control. |
| Les lectures de temperatura/humitat semblen inexactes. | Clock placed near heat/cold source or in an area with fluctuating humidity. | Relocate the clock to a more stable environment, away from direct sunlight, vents, or high humidity areas. Allow time for readings to stabilize. |
7. Especificacions
| Característica | Especificació |
|---|---|
| Marca | XREXS |
| Número de model | 099-RGB |
| Mida de la pantalla | 18 polzades (45.7 cm) |
| Alçada dels dígits | 5.7 polzades (14.5 cm) |
| Dimensions del producte (L x A x A) | 43 x 3.81 x 17.8 cm (16.9 x 1.5 x 7 polzades) |
| Pes de l'article | 1.32 quilos (2.91 lliures) |
| Material | Plàstic |
| Color | RGB (multicolor) |
| Font d'alimentació | AC Adapter (required for operation) |
| Bateries de còpia de seguretat | 2 x AAA (included, for memory function only) |
| Estil | Modern |
| Forma | Rectangular |
8. Garantia i Suport
For warranty information or technical support, please refer to the contact details provided with your purchase or visit the official XREXS weblloc web. Conserveu el rebut de compra com a comprovant de compra per a qualsevol reclamació de garantia.