Sterwins 600W 40V Battery Lawnmower
STERWINS 600W 40V Battery Lawnmower User Manual
Model: 600W 40V Battery Lawnmower
Brand: Sterwins
1. Introducció
This manual provides essential information for the safe and efficient operation, assembly, maintenance, and troubleshooting of your STERWINS 600W 40V Battery Lawnmower. Please read this manual thoroughly before first use and keep it for future reference.
The STERWINS battery-powered lawnmower is designed for maintaining lawns up to 300 m². Its 3-wheel design offers excellent maneuverability, making it suitable for both flat and uneven terrains with obstacles. The 36 cm cutting width and adjustable cutting height ensure efficient mowing for various lawn types.

Image 1: STERWINS 600W 40V Battery Lawnmower overview.
This image shows the complete STERWINS battery-powered lawnmower from an angled top-down perspective, highlighting its compact design, handle, and grass collection bag.
2. Informació de seguretat
Always observe basic safety precautions to reduce the risk of fire, electric shock, and personal injury. Keep children and bystanders away while operating the lawnmower. Wear appropriate personal protective equipment (PPE) including eye protection, sturdy footwear, and hearing protection.
- Llegiu totes les instruccions abans d’utilitzar l’aparell.
- No feu servir la tallagespa en condicions humides o amb pluja.
- Ensure the battery is fully charged before use and removed during maintenance or storage.
- Inspeccioneu la zona que s'ha de tallar i retireu qualsevol objecte que pugui ser llançat per la fulla.
- Never lift or carry the lawnmower while the motor is running.
- Mantingueu les mans i els peus allunyats de la fulla de tall.
3. Components mésview
Familiarize yourself with the main parts of your lawnmower:
- Manillar: Ergonomic, height-adjustable, foam-coated for comfort.
- Carcassa del motor: Contains the 600W motor and battery compartment.
- Plataforma de tall: Houses the 36 cm rotary blade.
- Front Swivel Wheel: Provides enhanced maneuverability.
- Rodes posteriors: Large wheels for stability and easy movement.
- Grass Collection Basket: 35 L capacity, semi-rigid, with level indicator.
- Palanca d'ajust de l'alçada de tall: For setting blade height (3-6 cm).
- Compartiment de la bateria: For the 40V battery.

Image 2: Lawnmower with included battery and charger.
This image displays the STERWINS lawnmower alongside its 40V battery and the UP40 charger, illustrating the complete power system.
4. Muntatge i muntatge
4.1 Muntatge del manillar
- Unfold the handlebar sections and align the holes.
- Secure the handlebar using the provided knobs and bolts. Ensure it is firmly attached and stable.
- Adjust the handlebar height to a comfortable position for operation.
4.2 Grass Collection Basket Installation
- Assemble the semi-rigid grass collection basket according to the instructions.
- Lift the rear discharge flap of the lawnmower.
- Hook the grass collection basket onto the designated slots under the flap. Ensure it is securely seated.
4.3 Càrrega i instal·lació de la bateria
- Connect the UP40 charger to a suitable power outlet.
- Insert the 40V battery into the charger. The indicator light on the charger will show the charging status.
- Un cop estigui completament carregat, traieu la bateria del carregador.
- Obriu la tapa del compartiment de la bateria de la tallagespa.
- Slide the charged battery into the compartment until it clicks into place. Ensure it is fully seated.
- Tanqueu la tapa del compartiment de la bateria.

Image 3: Proper battery insertion into the lawnmower.
This image shows a person wearing gloves inserting the 40V battery into the designated compartment on the top of the lawnmower, demonstrating the correct procedure.
5. Instruccions de funcionament
5.1 Ajust de l'alçada de tall
The cutting height can be adjusted centrally to 4 positions, ranging from 3 cm to 6 cm. To adjust:
- Ensure the lawnmower is turned off and the battery is removed for safety.
- Locate the cutting height adjustment lever on the side of the mower.
- Pull the lever outwards and move it to the desired height setting.
- Release the lever to lock it into position.

Image 4: Close-up of the cutting height adjustment lever.
Aquesta imatge ofereix un detall view of the red lever used to adjust the cutting height of the lawnmower, located near the rear wheel.
5.2 Starting and Mowing
- Assegureu-vos que la bateria estigui ben instal·lada.
- Premeu i manteniu premut el botó de seguretat del manillar.
- Mentre manteniu premut el botó de seguretat, estireu la palanca de la fiança cap al manillar. El motor s'engegarà.
- Release the safety button, but continue to hold the bail lever to keep the motor running.
- Push the lawnmower forward at a steady pace, overlapping each pass slightly to ensure even cutting.
- The 3-wheel design with a swivel front wheel allows for easy navigation around obstacles.
- When the grass collection basket indicator shows it is full, empty the basket.
- To stop the lawnmower, release the bail lever.

Image 5: A person operating the STERWINS lawnmower.
This image shows a user pushing the STERWINS lawnmower across a green lawn, demonstrating its use in a garden setting.
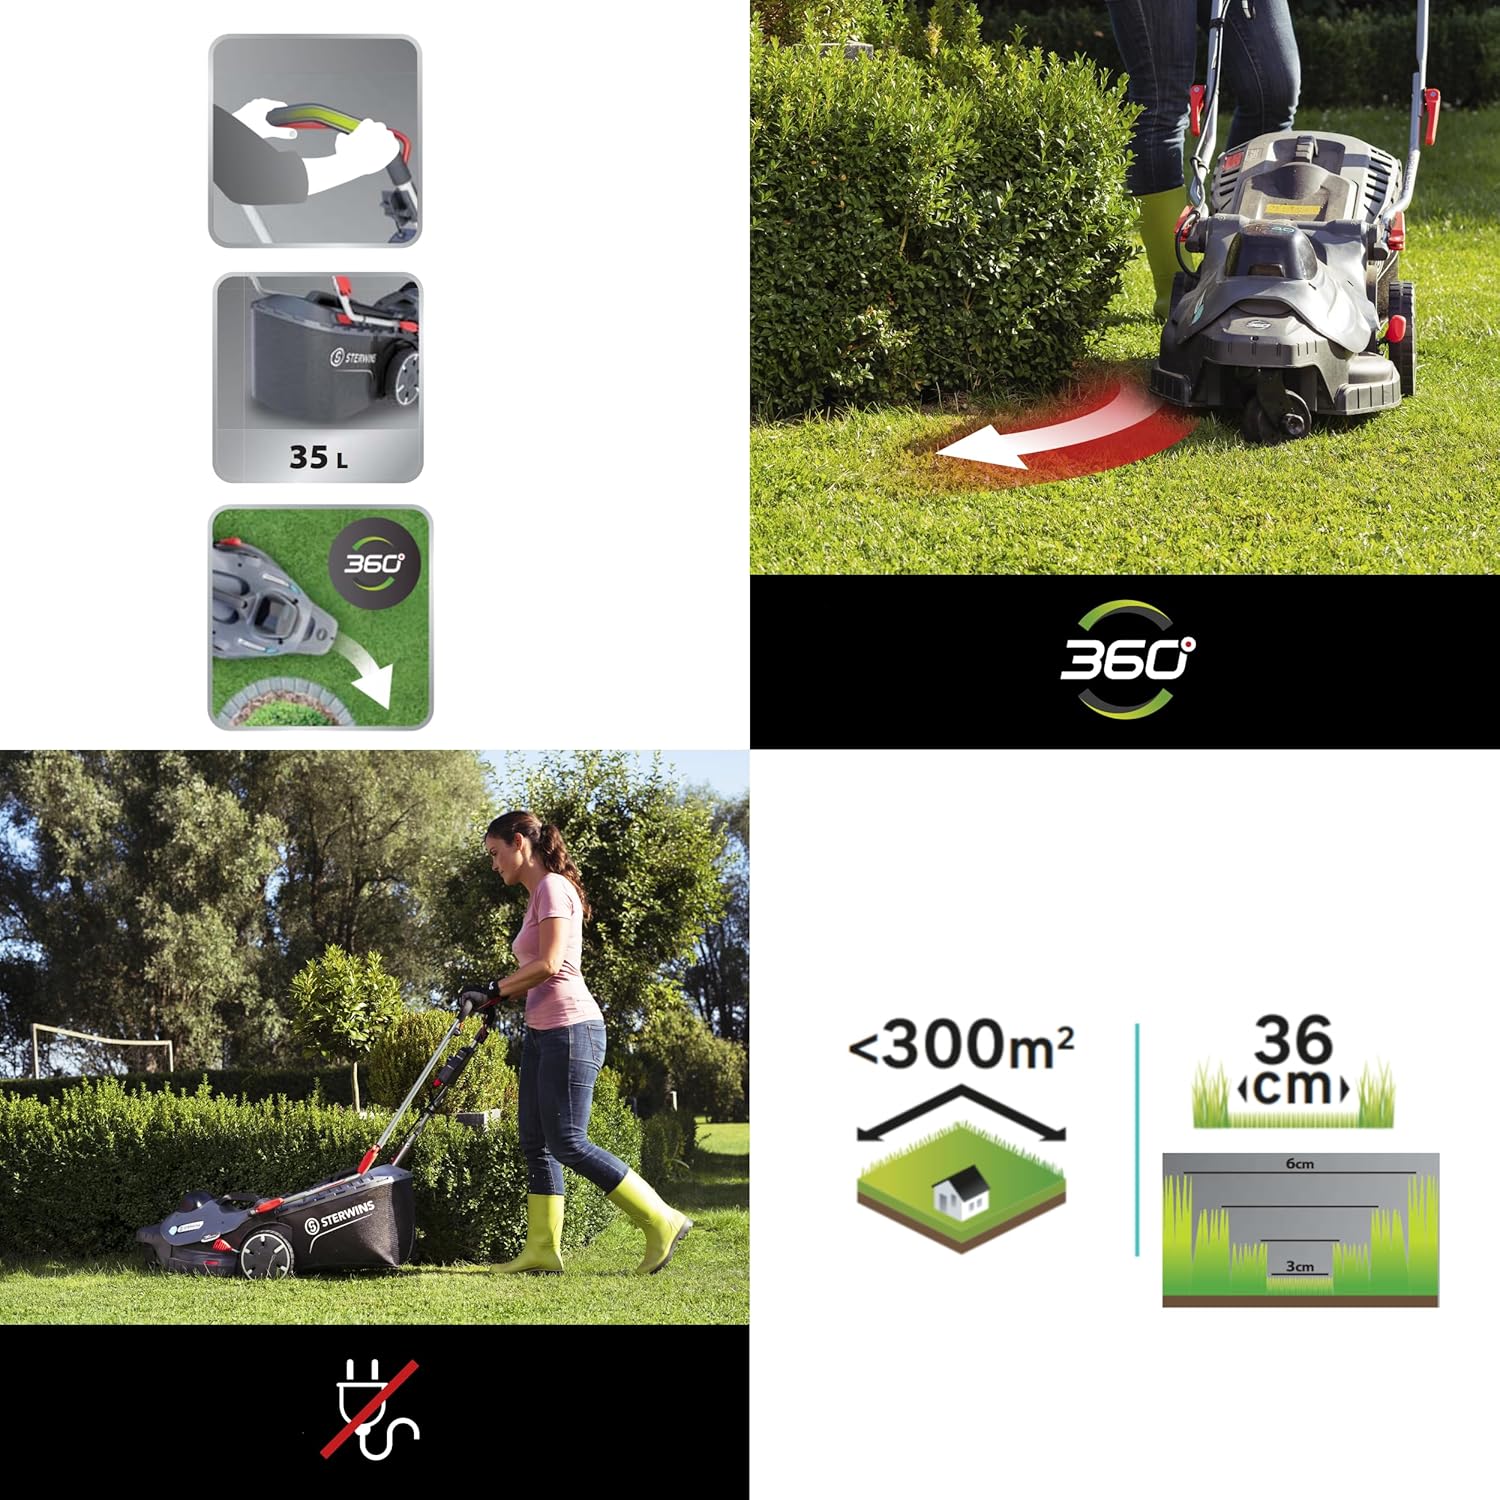
Image 6: Visual representation of lawnmower features.
This composite image highlights key features: the 360-degree maneuverability, the 35L grass collection capacity, and the recommended area coverage of less than 300m² with adjustable cutting heights from 3cm to 6cm.
6. Manteniment
6.1 Neteja
- Traieu sempre la bateria abans de netejar-la.
- After each use, clean the underside of the cutting deck to remove grass clippings. Use a brush or scraper.
- Wipe down the exterior of the lawnmower with a damp cloth. Do not use high-pressure washers or immerse the unit in water.
- Clean the grass collection basket regularly.
6.2 Cura de la fulla
- Regularly inspect the cutting blade for sharpness and damage. A dull blade can tear grass, leading to an unhealthy lawn.
- Si la fulla està desafilada o danyada, l'ha d'esmolar o un tècnic de servei qualificat l'ha de substituir.
6.3 Emmagatzematge
- Before storing, ensure the lawnmower is clean and dry.
- Remove the battery from the lawnmower.
- El manillar es pot plegar per a un emmagatzematge compacte.
- Guardeu la tallagespa en un lloc sec i segur, fora de l'abast dels nens.
- For optimal battery life, store the battery at a temperature between 4°C and 24°C (39°F and 75°F) and with a charge level between 25% and 50%.
7. Solució De Problemes
| Problema | Causa possible | Solució |
|---|---|---|
| Lawnmower does not start. | Battery not charged or not properly inserted. Safety button/bail lever not engaged. | Charge battery and ensure it is fully inserted. Engage safety button and pull bail lever simultaneously. |
| Mal rendiment de tall. | Dull or damaged blade. Cutting height too low for grass type. Grass collection basket full. | Inspect and sharpen/replace blade. Adjust cutting height. Empty grass collection basket. |
| Vibració excessiva. | Fulla danyada o desequilibrada. Components solts. | Inspeccioneu la fulla per si hi ha danys; substituïu-la si cal. Comproveu que tots els elements de fixació estiguin ben ajustats. |
| El motor s'atura durant el funcionament. | Battery depleted. Overload protection activated (e.g., very thick grass). | Recarrega la bateria. Redueix la càrrega augmentant l'alçada de tall o segant seccions més petites. |
8. Especificacions
| Característica | Detall |
|---|---|
| Font d'alimentació | Bateria (40 V) |
| Potència del motor | 600 W |
| Amplada de tall | 36 cm |
| Ajust d'alçada de tall | 4 positions (3 cm to 6 cm) |
| Capacitat de recollida d'herba | 35 L |
| Zona de gespa recomanada | Fins a 300 m² |
| Dimensions del producte (L x A x A) | 61.5 x 41.5 x 37 cm |
| Pes del producte | 13.1 kg |
| Fabricant | ADEO |
| ASIN | B0CB64G1FM |
9. Garantia i Suport
For warranty information, technical support, or spare parts, please contact your retailer or the manufacturer's customer service. Keep your proof of purchase for any warranty claims.
For further assistance, please refer to the contact information provided with your purchase or visit the official Sterwins weblloc.