ABASK A8
Abask Dash Cam 4K GPS User Manual
Model: A8
Introducció
Thank you for choosing the Abask Dash Cam A8. This advanced car camera system is designed to provide comprehensive recording of your journeys, offering enhanced safety and peace of mind. Featuring a 4K front camera and a 1080P cabin camera, built-in GPS, infrared night vision, 24-hour parking monitoring, G-sensor for accident detection, and seamless loop recording, the A8 ensures critical moments are captured with clarity. This manual will guide you through the setup, operation, and maintenance of your new dash cam.
Contingut del paquet
- Abask Dash Cam A8
- Muntatge de succió
- Car Charger (Cigarette Lighter Adapter)
- Cable USB
- Targeta MicroSD de 32 GB
- USB/USB-C Card Reader
- Manual d'usuari

Image: The Abask Dash Cam A8 shown with its suction mount, a 32GB MicroSD card, and a USB/USB-C card reader.
Configuració i instal·lació
Follow these steps to properly install your Abask Dash Cam A8:
- Prepareu la targeta MicroSD: Insert the included 32GB MicroSD card into the designated slot on the dash cam. Ensure it is inserted correctly until it clicks into place.
- Muntar la càmera del salpicadero: Attach the suction mount to a clean, dry area on your windshield, preferably behind the rearview mirall per evitar obstruir-vos view. Ensure the dash cam has a clear line of sight for both the front and cabin cameras.
- Connectar l'alimentació: Plug the car charger into your vehicle's cigarette lighter socket. Connect the other end of the cable to the dash cam's power input port.
- Cables de ruta: Carefully route the power cable along the edge of your windshield and dashboard to conceal it and prevent interference with driving.
- Ajust de l'angle de la càmera: Once powered on, adjust the angle of the front and cabin cameras to ensure optimal coverage. The front camera should capture the road ahead, and the cabin camera should cover the interior of your vehicle.

Image: A visual guide demonstrating the recommended method for installing the dash cam and routing its power cable discreetly within the vehicle's interior.
Instruccions de funcionament
Funcionament bàsic
- Encès/apagat: The dash cam will automatically power on and begin recording when connected to power and your vehicle starts. It will power off automatically when the vehicle is turned off.
- Indicador de gravació: A flashing light or on-screen icon indicates that recording is in progress.
- Navegació del menú: Use the physical buttons or touch screen (if applicable) to navigate through the menu options for settings adjustments.
Característiques clau
4K Front Camera + 1080P Cabin Camera
The dash cam records simultaneously from two perspectives: a 4K (2160P) resolution camera for the road ahead and a 1080P resolution camera for the vehicle's interior. This dual-camera setup provides comprehensive video evidence for both external and internal events.
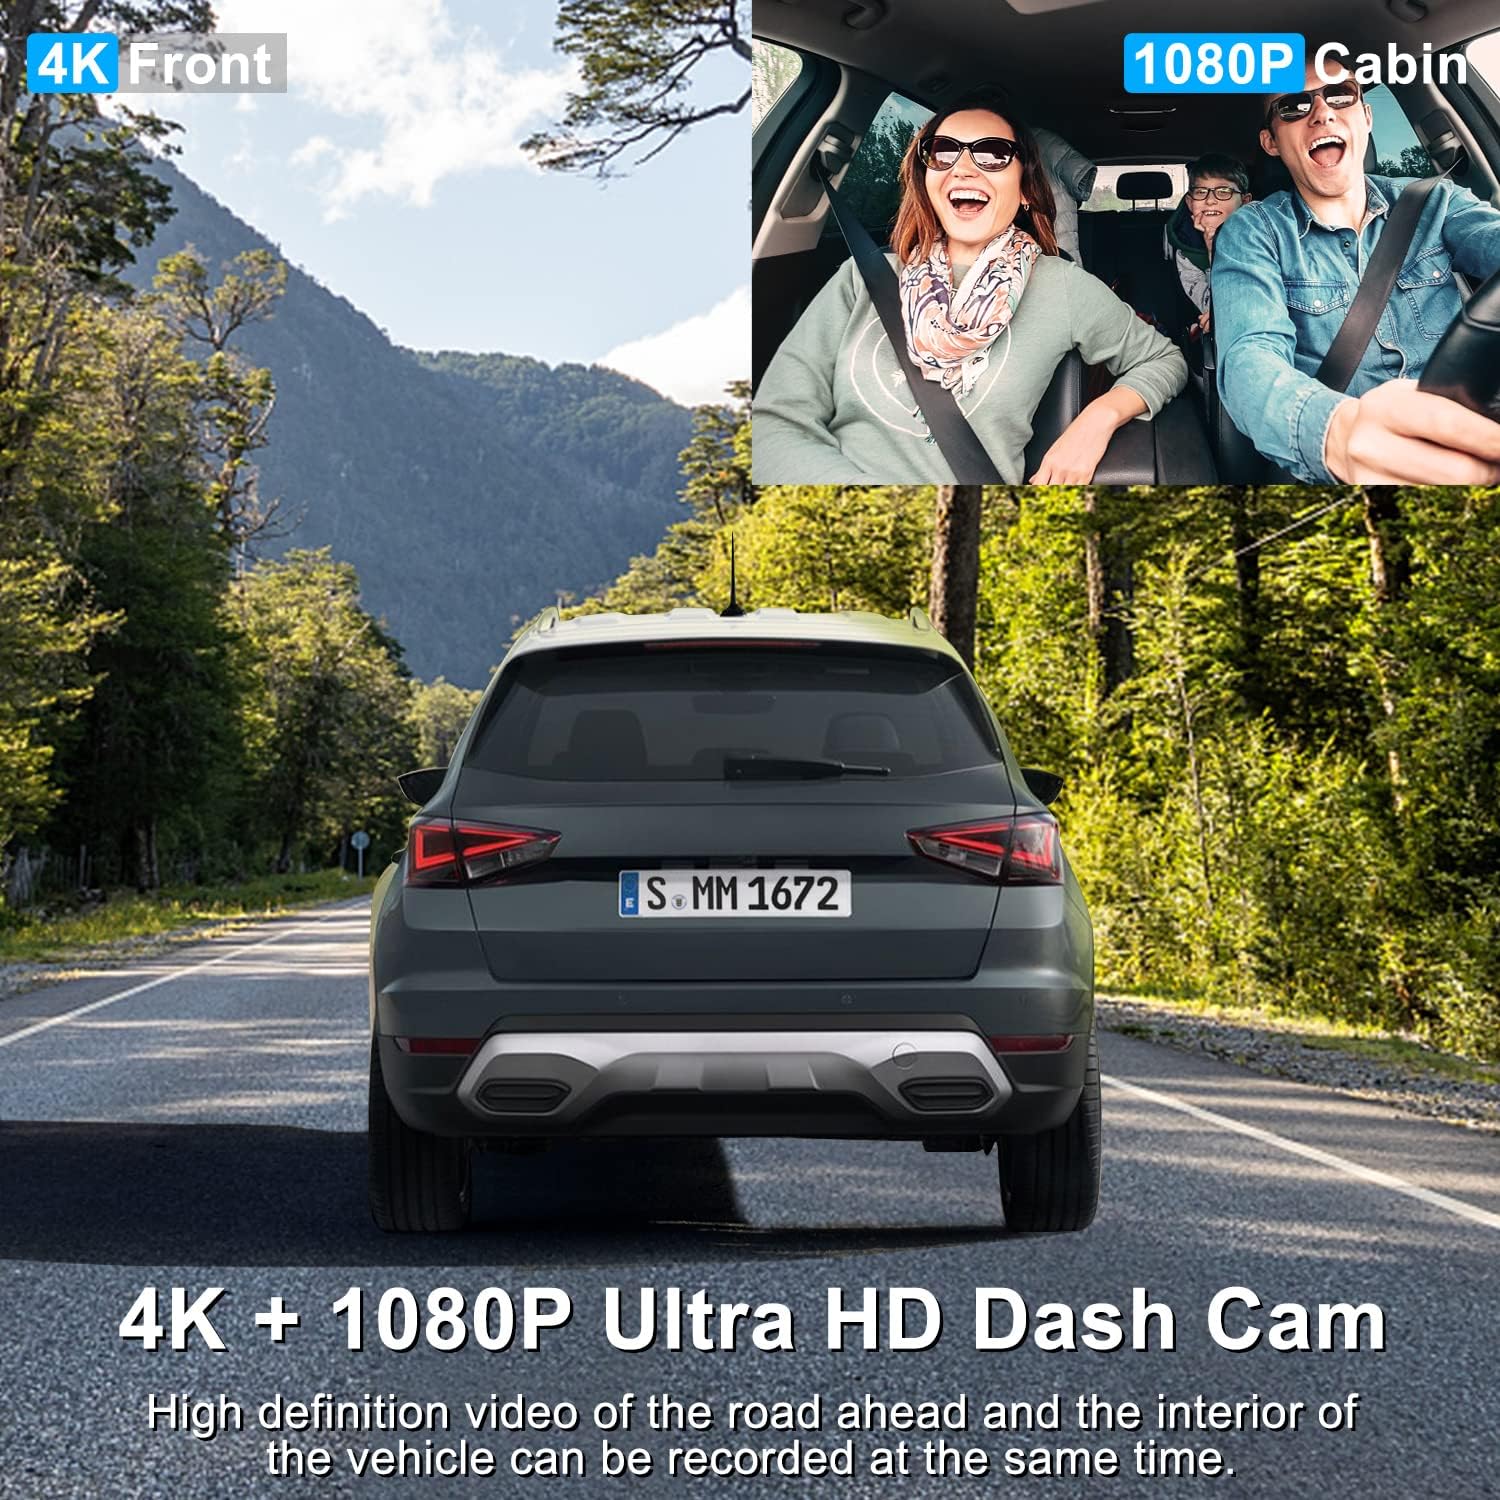
Image: A split image showing the clear 4K view from the front camera and the 1080P view from the cabin camera, capturing both the road and vehicle occupants.
Supervisió nocturna i WDR
Equipped with advanced WDR (Wide Dynamic Range) technology and four discreet infrared (IR) lights for the cabin camera, the dash cam ensures clear and detailed video recording even in low-light conditions or at night. This is particularly beneficial for night drivers.

Image: An illustration highlighting the dash cam's night vision features, including IR LED lights, 4K+1080P recording, and WDR technology for improved clarity in dark environments.
Funcionalitat GPS integrada
The integrated GPS module allows the dash cam to record your driving speed and route data. This information can be viewjuntament amb el teu vídeo footage, providing crucial context and evidence in case of an incident.
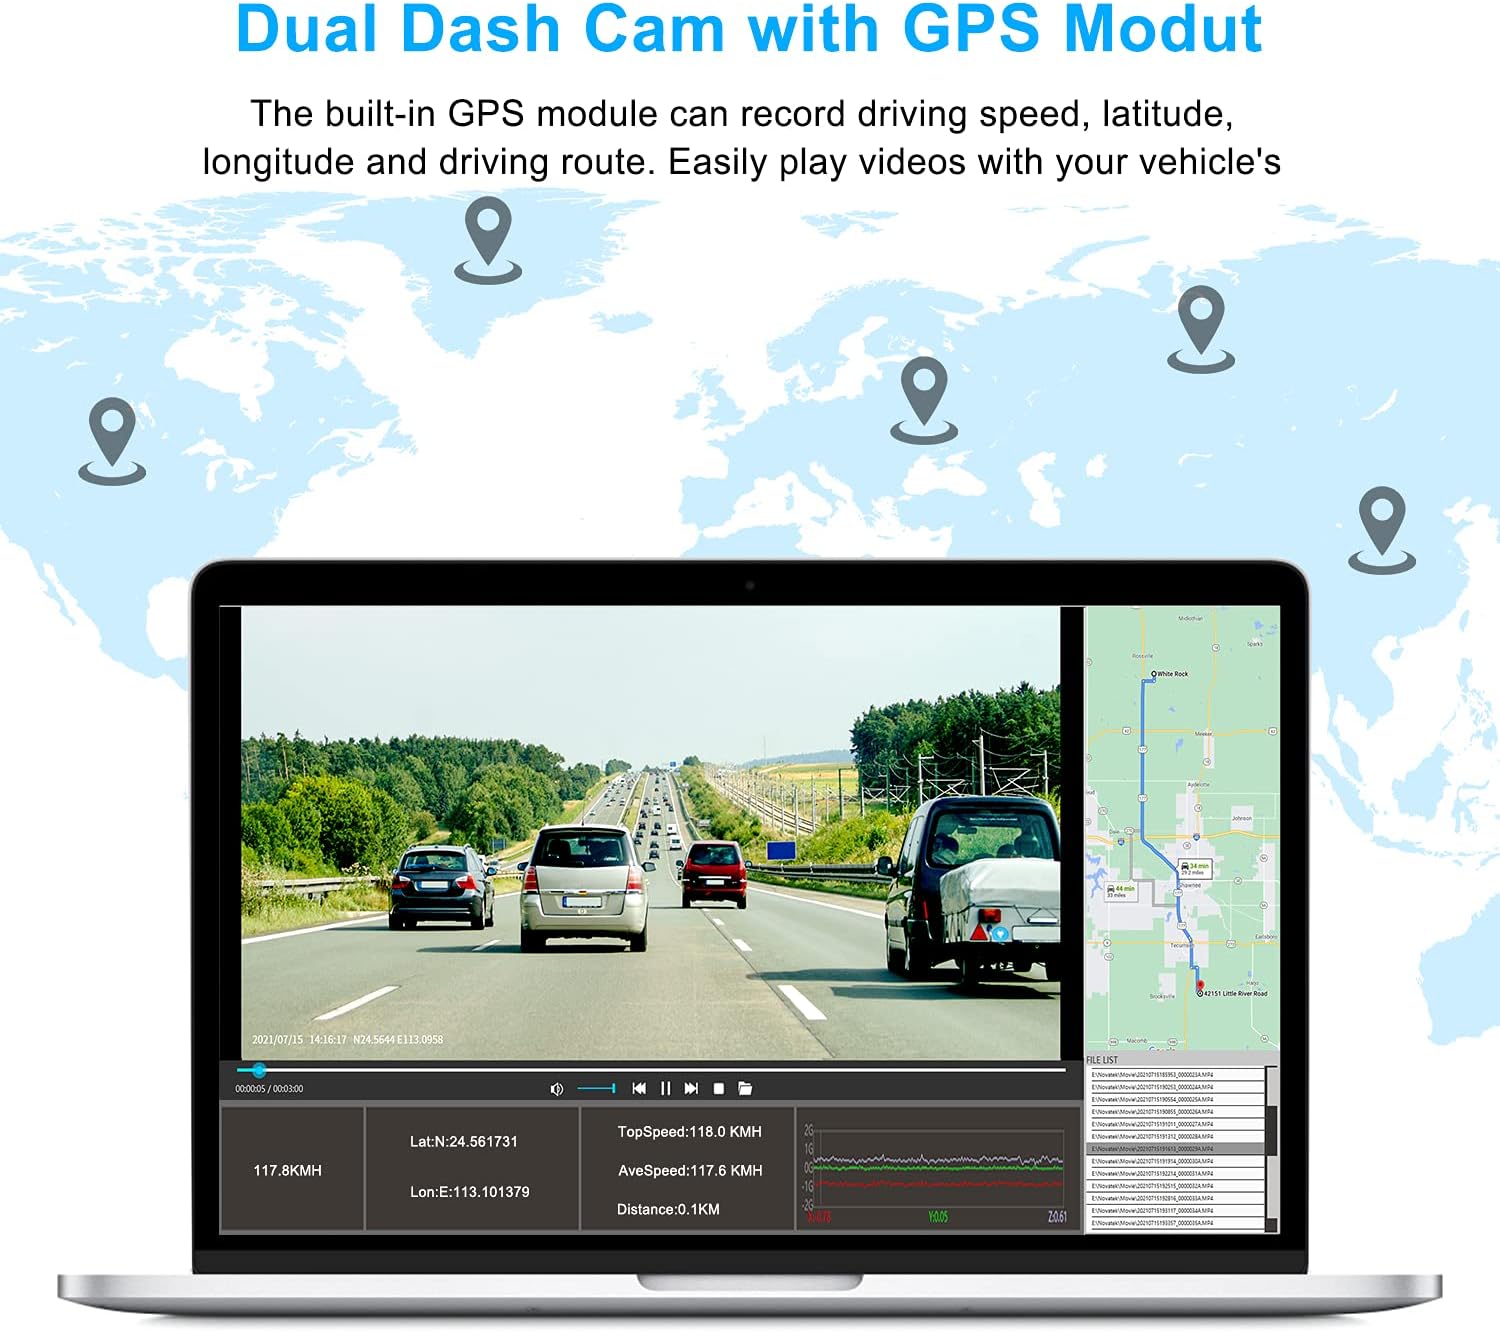
Image: A laptop screen displaying dash cam footage with overlaid GPS data, including latitude, longitude, speed, and a map of the driving route.
Wide-Angle Field of View
The dash cam offers a total 310° wide-angle field of view, with 170° for the front camera and 140° for the interior camera. This extensive coverage minimizes blind spots and captures a broader perspective of your surroundings and vehicle cabin.

Image: A diagram illustrating the 170° front and 140° interior wide-angle coverage of the dash cam, providing a comprehensive view of the road and car interior.
Enregistrament en bucle
The loop recording function automatically overwrites the oldest unlocked video files when the memory card is full, ensuring continuous recording without manual intervention. This feature optimizes storage space on your MicroSD card.
G-Sensor (Accident Detection)
The built-in G-sensor detects sudden impacts or collisions. When an event is detected, the dash cam automatically saves and locks the current video segment, preventing it from being overwritten by loop recording. These locked files serve as critical evidence.

Image: A visual representation of the G-sensor locking a video file during a collision, demonstrating how important footage is protected from being overwritten by loop recording.
Monitorització d'aparcament les 24 hores
When enabled, the parking monitor feature allows the dash cam to automatically turn on and record video if it detects a collision or impact while your vehicle is parked. This provides surveillance even when you are away. Nota: To utilize this feature, a dash cam hardwiring kit (not included) is required to provide continuous power to the device.
Image: An overhead diagram showing the dash cam's 24-hour parking mode coverage, indicating its ability to monitor the vehicle's surroundings when parked.
Viewenregistraments
A view foo gravattage:
- Remove the MicroSD Card: Safely eject the MicroSD card from the dash cam.
- Insert into Card Reader: Insert the MicroSD card into the provided USB/USB-C card reader.
- Connexió a l'ordinador: Plug the card reader into a USB or USB-C port on your computer.
- Accés Files: The card will appear as a removable drive. Navigate to the video folders to access your recordings. Videos are typically organized by date and time.
Manteniment
- Lents netes: Regularly wipe the front and cabin camera lenses with a soft, lint-free cloth to ensure clear video quality. Avoid abrasive materials that could scratch the lenses.
- Gestió de targetes de memòria: It is recommended to format the MicroSD card periodically (e.g., once a month) within the dash cam's settings to maintain optimal performance and prevent data corruption. Back up any important files abans de formatar.
- Control de temperatura: Avoid exposing the dash cam to extreme temperatures for prolonged periods. If the vehicle is parked in direct sunlight, consider removing the dash cam or using a sunshade.
- Actualitzacions de firmware: Check the official ABASK website periodically for any available firmware updates. Keeping your dash cam's firmware up-to-date can improve performance and add new features.
Resolució de problemes
| Problema | Causa possible | Solució |
|---|---|---|
| La càmera del salpicader no s'encén. | Sense font d'alimentació; carregador de cotxe defectuós; connexió fluixa. | Check car charger connection; ensure vehicle's cigarette lighter socket is functional; try a different power source if available. |
| L'enregistrament s'atura o es congela. | Memory card full or corrupted; incompatible memory card; firmware issue. | Format the MicroSD card; try a different, high-speed MicroSD card; check for firmware updates. |
| Mala qualitat de vídeo (borrós, fosc). | Dirty lens; protective film still on lens; incorrect settings; low light conditions. | Clean the camera lenses; remove any protective film; adjust exposure settings; ensure WDR is enabled for challenging lighting. |
| El monitor d'aparcament no funciona. | Not hardwired; feature not enabled in settings. | Install a hardwiring kit for continuous power; enable parking monitor in the dash cam settings. |
| GPS not tracking speed/route. | Poor GPS signal; GPS module not connected or faulty. | Assegureu-vos que la càmera del salpicader tingui una visió clara view of the sky; check GPS module connection (if external); verify GPS settings are enabled. |
Especificacions
| Característica | Detall |
|---|---|
| Model | A8 |
| Dimensions del producte | 5.2 x 4.4 x 3.3 polzades |
| Pes de l'article | 12.1 unces |
| Bateries | Necessita 1 bateria de polímer de liti |
| Tecnologia de connectivitat | USB |
| Característiques especials | 2160P, Built-In GPS |
| Components inclosos | Dash Cam A8 |
| Orientació | Front & Inside |
| Tipus de servei del vehicle | Cotxe |
| Resolució de captura de vídeo | 2160p (frontal) |
| Tipus de muntatge | Muntatge de succió |
| Camp de View | 310 Degrees (Total) |
| Mètode de control | Toca |
Garantia i Suport
ABASK is committed to providing high-quality products and an excellent shopping experience. If you encounter any issues or have questions regarding your Abask Dash Cam A8, please do not hesitate to contact our customer support team. We aim to respond within 24 hours and provide a satisfactory solution.
For support, please refer to the contact information provided on the product packaging or the official ABASK weblloc.

Image: Customer support representatives ready to assist with product inquiries.
Ask a question about this manual
Ask about setup, troubleshooting, compatibility, parts, safety, or missing instructions. Manuals+ will review the question and use this page’s manual context to help answer it.