ABASK J05Pro
ABASK J05Pro Dash Cam User Manual
Model: J05Pro
1. Introducció
This user manual provides comprehensive instructions for the installation, operation, and maintenance of your ABASK J05Pro Dash Cam. This device is designed to enhance your driving safety by recording high-quality video footage of your journeys, both from the front of your vehicle and its interior. Please read this manual thoroughly before using the product to ensure proper functionality and to maximize its benefits.
2. Característiques del producte
- Gravació amb doble càmera: Captures true 4K (3840x2160P) video from the front and 1080P (1920x1080P) video from the interior, ensuring comprehensive coverage.
- Gran Angular View: Features a 170° front lens and a 140° interior lens, providing a total 310° wide-angle field of view.
- Wi-Fi integrat i control per aplicacions: Seamlessly connect to the "LuckyCam" app on your Android or iOS device to view viu footage, descarregar gravacions i ajustar la configuració.
- Super Infrared Night Vision & HDR: Equipped with four infrared lights for the interior camera and HDR technology for the front, ensuring clear video capture even in low-light conditions.
- 24-Hour Parking Surveillance: Automatically activates video recording upon detecting disturbances when hardwired, providing continuous vehicle protection.
- Sensor G: Detects sudden shakes or collisions and automatically locks the current video segment to prevent overwriting.
- Enregistrament en bucle: Overwrites the oldest unlocked footage with new recordings when the memory card is full, ensuring continuous operation.
- Disseny compacte: Features a 1.5-inch display for easy viewi navegació per menús.
- Emmagatzematge: Supports up to 128GB Micro SD cards; a 32GB card is included.
3. Què hi ha a la caixa

Image: The Abask J05Pro Dash Cam with its suction cup mount and a 32GB Micro SD card.
- ABASK J05Pro Dash Cam
- Muntatge de la ventosa
- Cable d'alimentació del carregador de cotxe
- Mini cable USB
- Targeta Micro SD de 32 GB
- Manual d'usuari
- Hardwire Kit (for 24-hour parking monitoring, may be included or sold separately based on product variant)
- Clips de cable
- Eina de palanca de plàstic
4. Configuració
4.1 Installing the Dash Cam
Trieu una ubicació adequada al parabrisa, preferiblement darrere de la part posteriorview mirror, to ensure the dash cam does not obstruct your view. Clean the windshield surface thoroughly before attaching the suction cup mount.
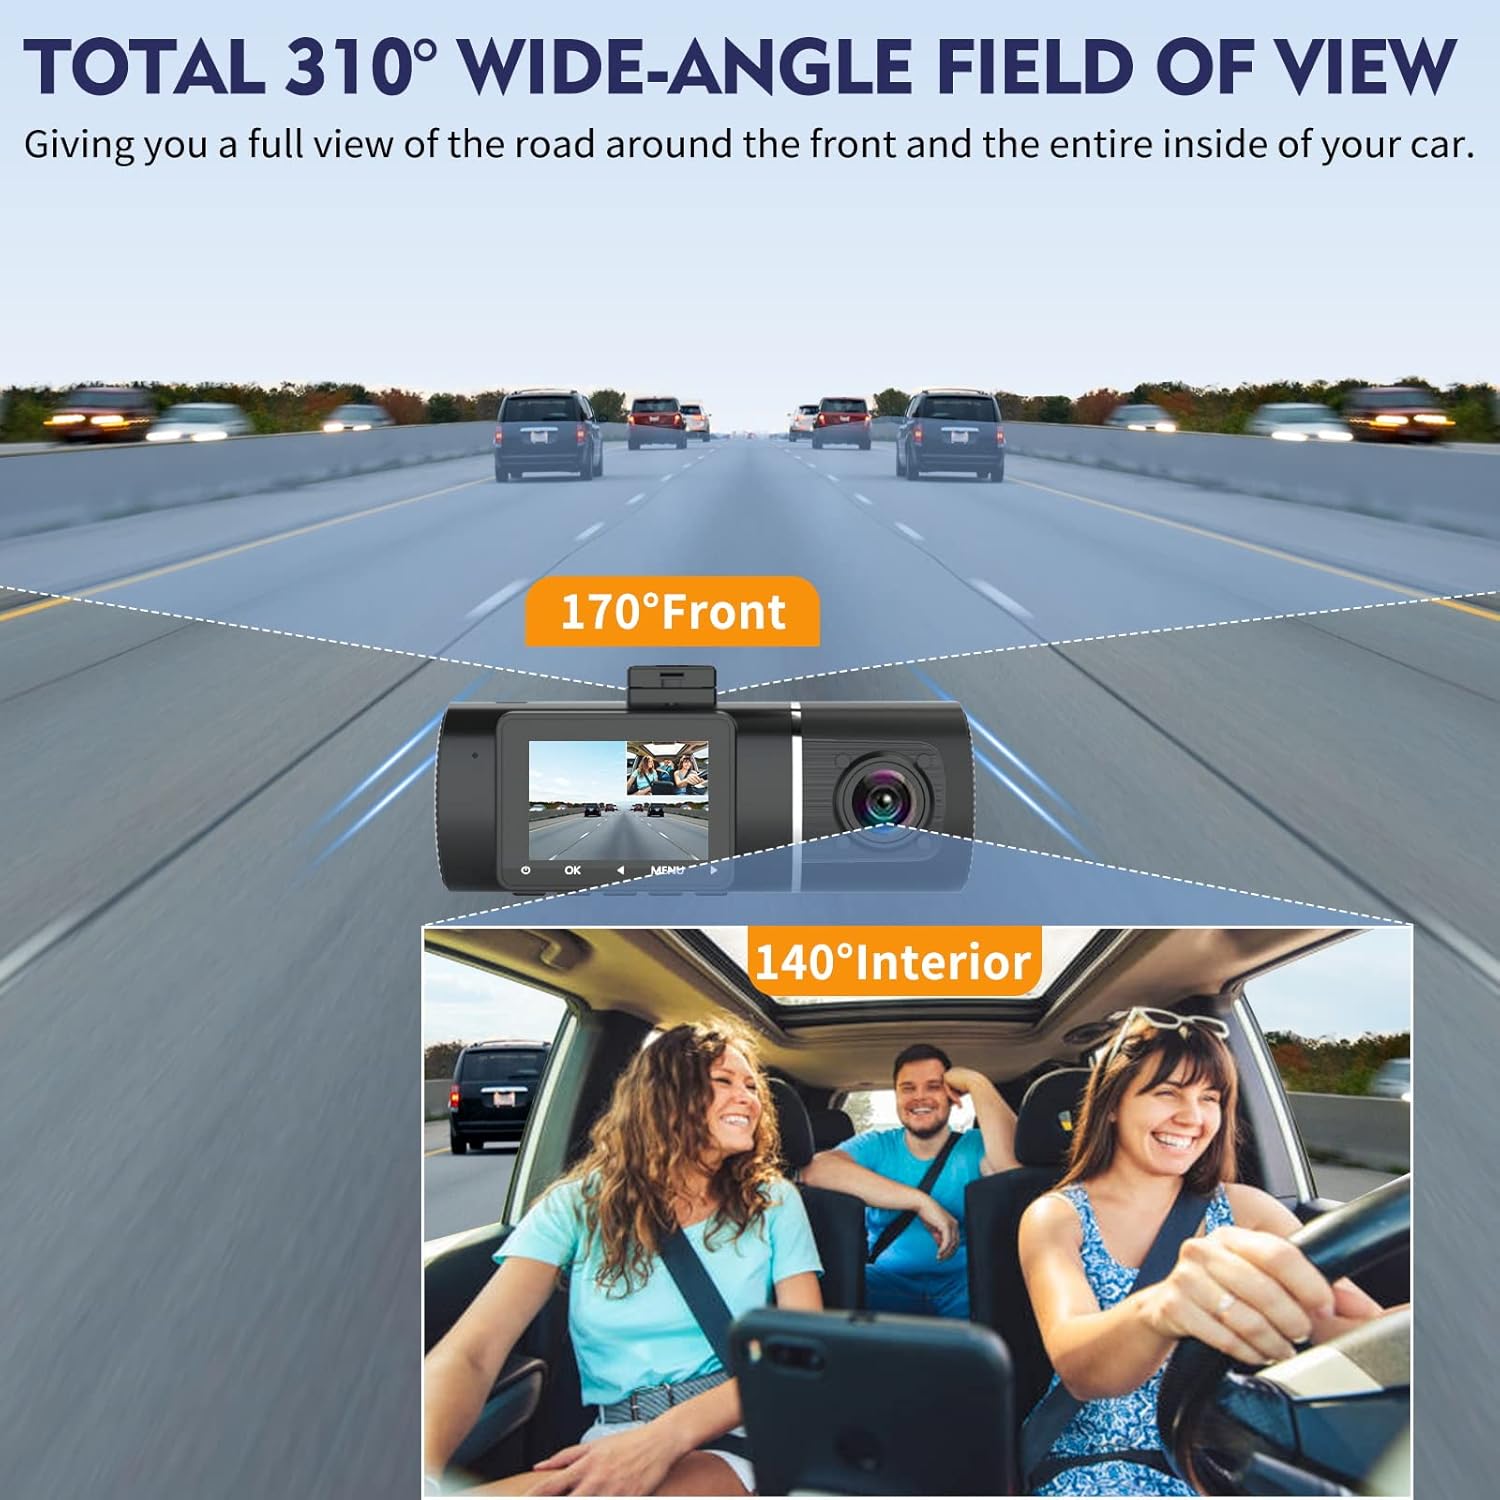
Image: The dash cam mounted on a car windshield, illustrating its wide-angle view capacitats.
Attach the dash cam to the suction cup mount. The lens angle is flexibly adjustable by 160 degrees vertically and 360 degrees horizontally to capture the optimal view.

Image: Diagram illustrating the 360-degree horizontal rotation and 160-degree vertical adjustment of the dash cam lens.
4.2 Connexió d'alimentació
Connect the car charger power cable to the dash cam's power port and plug the other end into your vehicle's cigarette lighter socket. For 24-hour parking monitoring, a hardwire kit (included or sold separately) is required to connect the dash cam directly to your car's fuse box.

Image: Illustration of how to route the power cable neatly along the car's interior trim.
4.3 Inserció de la targeta Micro SD
Insert the provided 32GB Micro SD card into the dash cam's card slot. Ensure the card is inserted correctly until it clicks into place. The dash cam supports up to 128GB Micro SD cards. It is recommended to format the SD card regularly (e.g., once a month) to maintain optimal performance.
4.4 Configuració inicial i connexió de l'aplicació
Upon first power-on, the dash cam may prompt you to set the date, time, and language. Follow the on-screen instructions. To utilize the WiFi features, download the "LuckyCam" app from your smartphone's app store.

Image: A smartphone displaying the LuckyCam app interface, with QR codes for both iOS and Android app downloads. The app allows for easy connection and control of the dash cam via WiFi.
Scan the QR code to download the LuckyCam app:

Once installed, enable WiFi on your dash cam and connect your smartphone to the dash cam's WiFi network (SSID and password typically displayed on the dash cam screen). Open the LuckyCam app to access live view, reproducció i configuració.
5. Instruccions de funcionament
5.1 Enregistrament bàsic
The dash cam automatically begins recording when powered on (e.g., when the car engine starts). Recording will stop when the power is turned off. The dash cam records in a continuous loop, overwriting the oldest unlocked files quan la targeta de memòria està plena.

Image: Visual representation of the dash cam capturing both 4K front road footage and 1080P interior cabin footage simultàniament.

Imatge: Una divisió view showing the dash cam's front 4K recording and the cabin's 1080P recording, with examples of both daylight and night mode for the interior camera.
5.2 Sensor G (bloqueig d'emergència)
The built-in G-Sensor detects sudden impacts or rapid acceleration/deceleration. When triggered, it automatically locks the current video segment, preventing it from being overwritten by loop recording.

Image: An illustration depicting the G-Sensor locking footage during a collision and the loop recording process, showing how new footage overwrites old, unlocked files.
5.3 Monitorització d'aparcament les 24 hores
With the optional hardwire kit installed, the dash cam can monitor your vehicle for 24 hours. If motion or impact is detected while parked, the dash cam will automatically wake up and record a short video.

Image: A car parked, indicating the 24-hour motion-activated parking mode feature of the dash cam.

Image: An illustration showing the dash cam's parking monitoring feature detecting a person approaching the parked car, triggering recording.
5.4 Playback and Download
Pots tornarview recorded videos directly on the dash cam's 1.5-inch display or by connecting to the LuckyCam app via WiFi. The app allows for easy playback, downloading of 4K-quality videos to your smartphone, and sharing on social media.

Image: The dash cam alongside a smartphone displaying the LuckyCam app, highlighting the WiFi app control feature for viewenregistrament i gestió d'enregistraments.
Video: An official product video demonstrating the features of the ABASK J05 Pro Dash Cam, including its dual camera recording, WiFi connectivity, and G-sensor functionality.
Alternatively, you can remove the Micro SD card and insert it into a computer to access the video files directament.
6. Manteniment
6.1 Formatting the SD Card
Regularly format the Micro SD card (e.g., once a month) to prevent data corruption and ensure smooth recording. This can typically be done through the dash cam's menu settings or via the LuckyCam app.
6.2 Cleaning the Lenses and Device
Use a soft, lint-free cloth to gently clean the dash cam lenses and the device body. Avoid using abrasive cleaners or solvents that could damage the surfaces.
7. Solució De Problemes
| Problema | Causa possible | Solució |
|---|---|---|
| Dash cam not turning on. | No power, faulty cable, or full SD card. | Check power connection. Ensure car charger is working. Try a different USB cable. Format or replace SD card. |
| L'enregistrament s'atura inesperadament. | SD card error, card full, or power interruption. | Format the SD card. Use a high-speed (Class 10 or U3) SD card. Check power connection stability. |
| Vídeo footage és borrós o poc clar. | Protective film on lens, dirty lens, or incorrect focus. | Remove any protective film. Clean the lens with a soft cloth. Ensure the dash cam is securely mounted and not vibrating. |
| Problemes de connexió WiFi amb l'aplicació. | Incorrect WiFi password, app not updated, or signal interference. | Ensure correct WiFi password. Update LuckyCam app. Restart dash cam and phone. Stay within 10-meter range. |
| Parking monitoring not working. | Not hardwired, or settings incorrect. | Ensure dash cam is connected via hardwire kit to constant power. Check parking mode settings in the menu. |
8. Especificacions
| Nom del model | J05Pro |
| Marca | ABASK |
| Resolució de captura de vídeo | Front: 2160p (4K), Interior: 1080p |
| Tecnologia de connectivitat | Wi-Fi |
| Característiques especials | Built-In Speaker, Built-In WiFi, Built-In Display (1.5 inch), 4K 2160P, Built-In Microphone, G-Sensor, Loop Recording, Infrared Night Vision, HDR, 24H Parking Monitoring |
| Suport d'emmagatzematge | Fins a 128 GB de Micro SD (32 GB inclosos) |
| Pes de l'article | 13.4 unces |
| Dimensions del paquet | 5.63 x 4.09 x 2.72 polzades |
9. Garantia i Suport
9.1 Informació de la garantia
Your ABASK J05Pro Dash Cam comes with a standard manufacturer's warranty. Please refer to the product packaging or the official ABASK weblloc web per conèixer els termes i condicions específiques de la garantia. Conserveu el rebut de compra com a comprovant de compra per a reclamacions de garantia.
9.2 Atenció al client
For any questions, technical assistance, or support inquiries regarding your ABASK J05Pro Dash Cam, please contact ABASK customer service.
- Assistència en línia: Visit the official ABASK store on Amazon: ABASK Store
- Suport per correu electrònic: Consulteu la informació de contacte que es proporciona a l'embalatge del producte o a la fitxa oficial weblloc.

Image: Customer service representatives ready to assist with product inquiries.
Ask a question about this manual
Ask about setup, troubleshooting, compatibility, parts, safety, or missing instructions. Manuals+ will review the question and use this page’s manual context to help answer it.