
1. Introducció
The Cyeelves Digital Multimeter VC830L is a versatile instrument designed for accurate and precise electrical measurements. It is an essential tool for troubleshooting, maintenance, and repair tasks across various applications, including automotive systems, household appliances, and scientific experiments.
This multimeter measures AC and DC voltage, DC current, resistance, capacitance, and frequency. It also includes functions such as diode testing, continuity testing with audible alerts, and data holding for convenient result retention.
Contingut del paquet:
- Cyeelves Digital Multimeter (VC830L)
- One pair of Digital Multimeter Test Leads
- One 9V Battery (pre-installed)
- Manual d'instruccions (aquest document)

Image 1.1: The Cyeelves Digital Multimeter VC830L is suitable for a wide range of applications, including electrical repair, factory testing, and engineering tasks.
2. Informació de seguretat
Safety is paramount when working with electrical equipment. Always adhere to the following safety guidelines to prevent personal injury or damage to the multimeter.
- Protecció de sobrecàrrega: The multimeter features built-in explosion-proof ceramic fuse tubes and overload protection to safeguard the device and user from excessive voltage pics.
- Funda de silicona: The protective silicone cover helps prevent damage from drops and provides insulation against electric shocks.
- Inspeccionar abans d'utilitzar: Before each use, inspect the multimeter and test leads for any signs of damage, cracks, or exposed wiring. Do not use if damaged.
- Voltage Límits: Do not exceed the maximum input limits for each measurement range. The maximum operating voltage és 600 V DC.
- Connexió adequada: Always connect the test leads to the correct input jacks for the desired measurement.
- De-energize Circuits: Whenever possible, de-energize the circuit under test before making connections.
- Eviteu condicions humides: Do not operate the multimeter in wet or damp ambients.
- Ús professional: If you are unfamiliar with electrical testing, seek guidance from a qualified professional.
3. Producte acabatview
Familiarize yourself with the components of your Cyeelves Digital Multimeter VC830L.
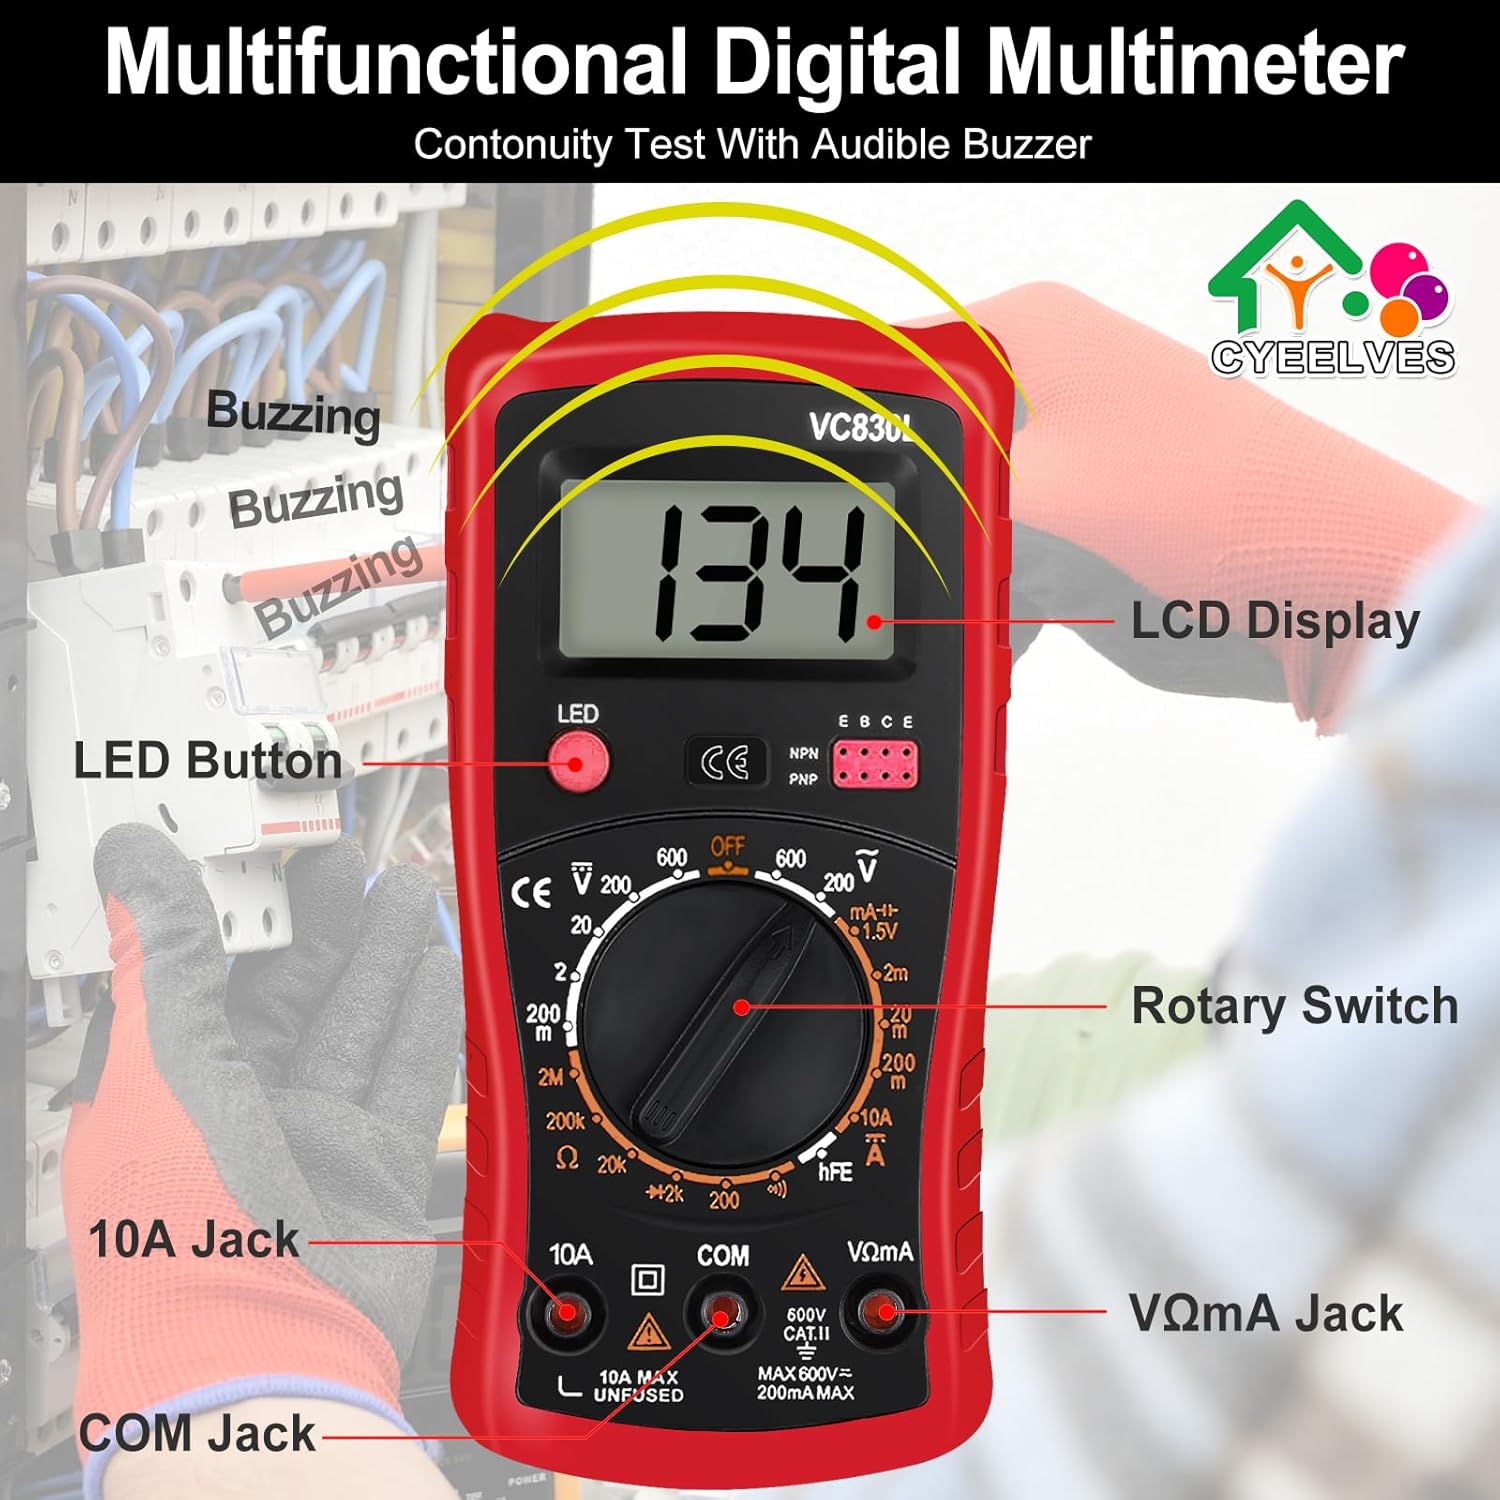
Imatge 3.1: Frontal view of the multimeter with key components labeled, including the LCD Display, LED Button, Rotary Switch, 10A Jack, COM Jack, and VΩmA Jack.
- Pantalla LCD: Large screen for clear digital readings, even in low-light conditions with backlight.
- Botó LED: Activa la retroiluminació de la pantalla.
- Interruptor rotatiu: Used to select the desired measurement function and range.
- Jack de 10A: Input for measuring high DC current (up to 10A).
- COM Jack: Entrada comuna (negativa) per a totes les mesures.
- Presa VΩmA: Input for measuring voltage, resistance, capacitance, frequency, diode, continuity, and low DC current.
- Folding Support: A foldable bracket on the back allows for hands-free operation.
- Non-slip Grip: Ergonomic design for secure handling.

Image 3.2: Side and back views illustrating the multimeter's dimensions, non-slip grip, and the adjustable folding support for convenient hands-free use.
4. Configuració i ús inicial
Your multimeter comes with a 9V battery pre-installed. Follow these steps for initial setup.
4.1. Connexió dels cables de prova
- Introduïu el cable de prova negre al COM Jack (comú).
- Per a la majoria de mesures (voltage, resistance, capacitance, frequency, diode, continuity, and low current), insert the red test lead into the VΩmA jack.
- For high current measurements (up to 10A DC), insert the red test lead into the 10A jack. Ensure the rotary switch is set to the appropriate 10A range.
4.2. Powering On/Off and Backlight
- To power on the multimeter, rotate the switch from the "OFF" position to any desired measurement function.
- To activate the LCD backlight, press the LED button. Press it again to turn off the backlight.
- To power off the multimeter, rotate the switch back to the "OFF" position.
5. Instruccions de funcionament
This section details how to perform various measurements with your multimeter.
5.1. Mesura de la tensió de CCtage (V—)
- Introduïu el cable de prova negre al COM presa i el cable de prova vermell al VΩmA jack.
- Rotate the switch to the desired "V—" (DC Voltage) range. Start with the highest range if the voltage es desconeguda.
- Connect the test probes in parallel across the component or circuit to be measured. The red probe to the positive side, black to the negative.
- Llegeix el voltage valor a la pantalla LCD.
5.2. Mesurar AC Voltage (V∼)
- Introduïu el cable de prova negre al COM presa i el cable de prova vermell al VΩmA jack.
- Rotate the switch to the desired "V∼" (AC Voltage) range. Start with the highest range if the voltage es desconeguda.
- Connect the test probes in parallel across the AC source or component.
- Llegeix el voltage valor a la pantalla LCD.

Image 5.1: Demonstrations of measuring DC voltage from a 9V battery and AC voltage from a standard wall outlet using the multimeter.
5.3. Measuring DC Current (A—)
Precaució: Always connect the multimeter in series with the circuit when measuring current. Never connect it in parallel across a voltage source, as this can damage the multimeter and the circuit.
- For low current (mA): Introduïu el cable de prova negre al COM presa i el cable de prova vermell al VΩmA jack.
- For high current (10A): Introduïu el cable de prova negre al COM presa i el cable de prova vermell al 10A jack.
- Rotate the switch to the appropriate "A—" (DC Current) range (e.g., 200mA, 10A).
- Open the circuit where you want to measure current. Connect the multimeter in series, ensuring the current flows through the multimeter.
- Llegiu el valor actual a la pantalla LCD.
5.4. Mesura de la resistència (Ω)
Precaució: Ensure the circuit or component is completely de-energized before measuring resistance. Measuring resistance on a live circuit can damage the multimeter.
- Introduïu el cable de prova negre al COM presa i el cable de prova vermell al VΩmA jack.
- Rotate the switch to the "Ω" (Resistance) range. Start with a higher range if the resistance is unknown.
- Connect the test probes across the component whose resistance you want to measure.
- Llegiu el valor de la resistència a la pantalla LCD.
5.5. Prova de continuïtat (♫)
The continuity test checks for a complete electrical path between two points. An audible buzzer will sound if continuity is detected.
- Introduïu el cable de prova negre al COM presa i el cable de prova vermell al VΩmA jack.
- Rotate the switch to the continuity (♫) posició.
- Toqueu les sondes de prova als dos punts on voleu comprovar la continuïtat.
- If a continuous path exists (low resistance), the buzzer will sound, and the display will show a low resistance value. If no continuity, the display will show "OL" (Open Line).
5.6. Prova de díodes (→|—)
La prova del díode mesura el volum directetagcaiguda e d'un díode.
- Introduïu el cable de prova negre al COM presa i el cable de prova vermell al VΩmA jack.
- Rotate the switch to the diode (→|—) posició.
- Connecteu la sonda vermella a l'ànode i la sonda negra al càtode del díode. La pantalla mostrarà el volum directe.tage drop (typically 0.5V to 0.8V for silicon diodes).
- Reverse the probes. The display should show "OL" (Open Line) for a good diode. If it shows a reading in both directions or "OL" in both directions, the diode is likely faulty.
5.7. Funció de retenció de dades
To freeze the current reading on the display, press the "HOLD" button (if available, or indicated by the LED button if it has dual functionality). Press it again to release the hold function.
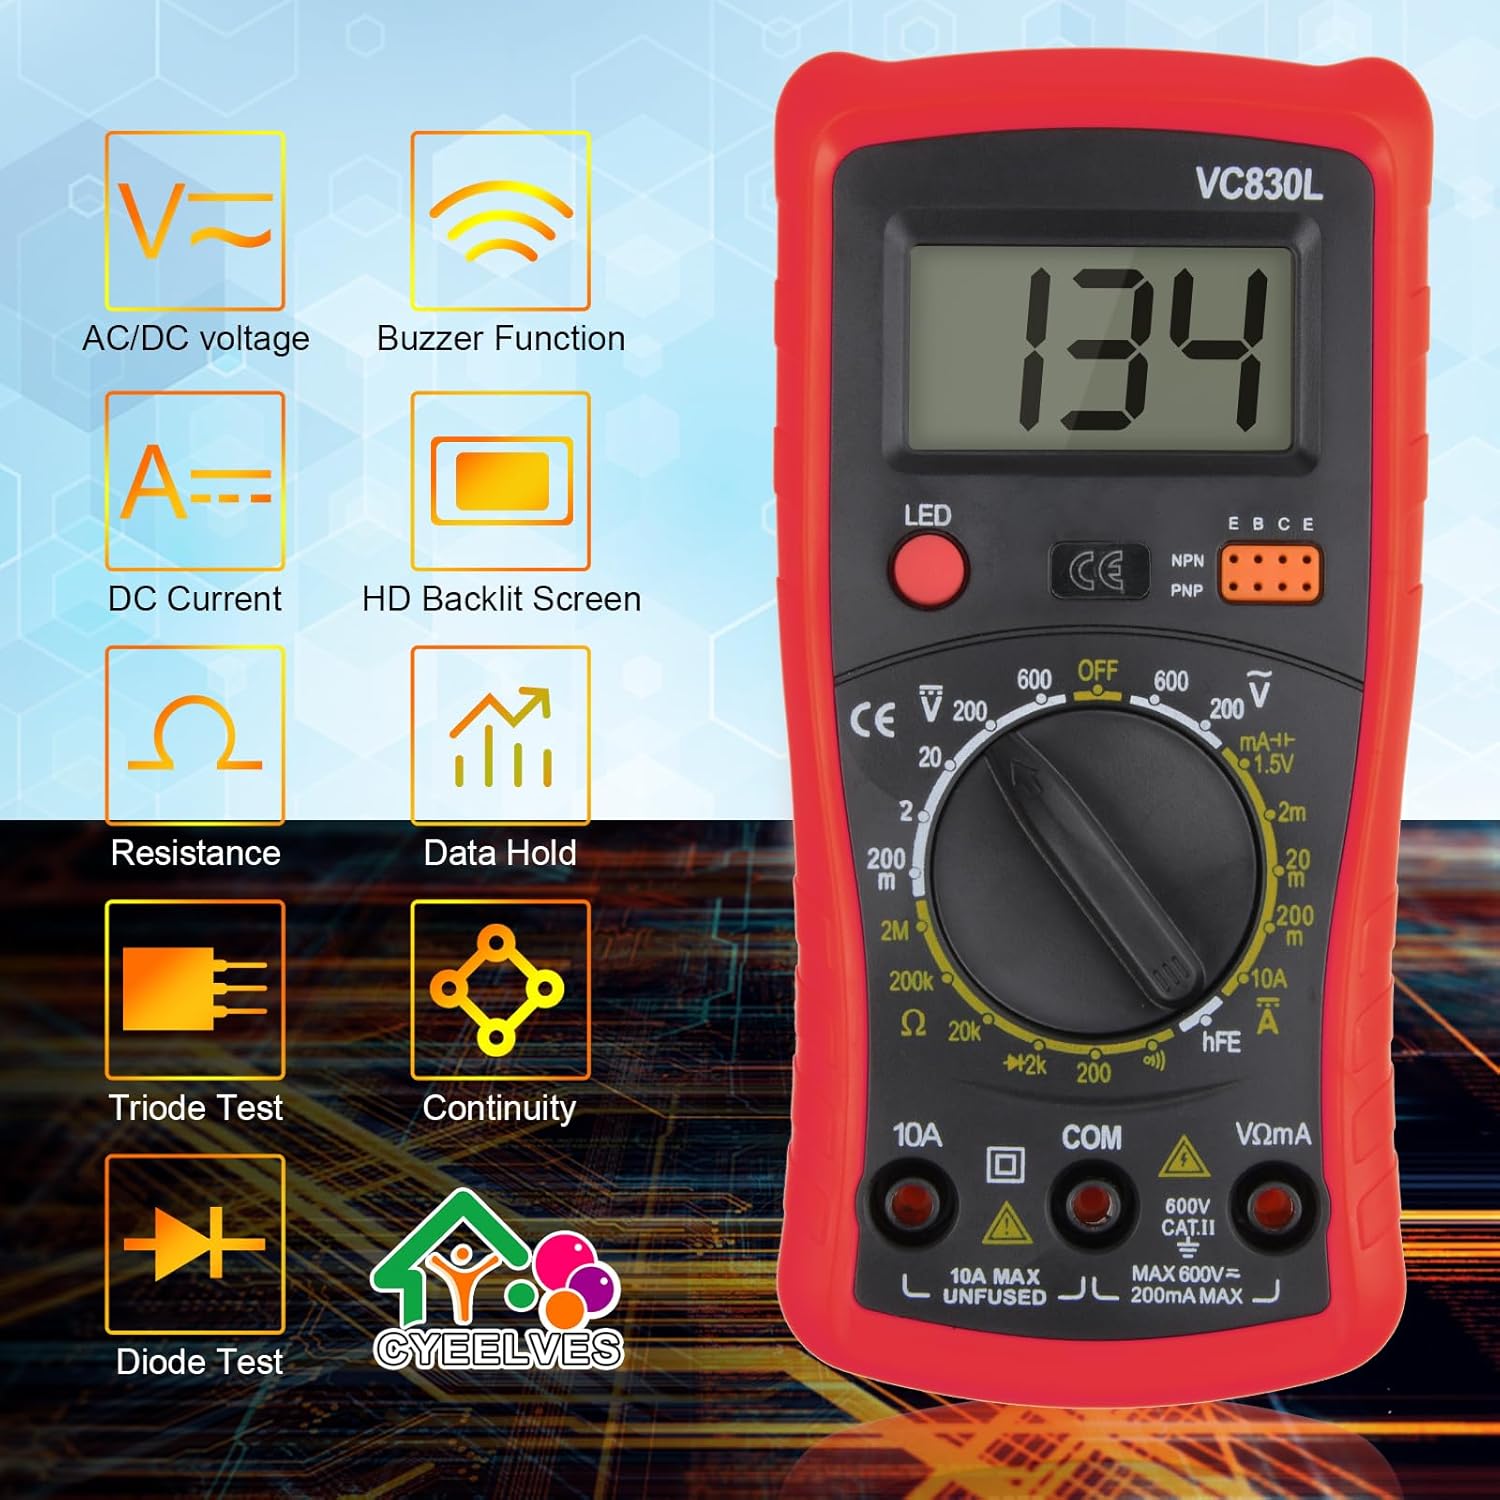
Image 5.2: Visual representation of the various functions available on the Cyeelves Digital Multimeter VC830L.
6. Manteniment
Un manteniment adequat garanteix la longevitat i la precisió del vostre multímetre.
6.1. Neteja
- Netegeu el casing amb anunciamp drap i detergent suau. No utilitzeu abrasius ni dissolvents.
- Ensure the multimeter is powered off and test leads are disconnected before cleaning.
6.2. Substitució de la bateria
When the battery indicator appears on the LCD, the 9V battery needs to be replaced.
- Assegureu-vos que el multímetre estigui apagat i que tots els cables de prova estiguin desconnectats.
- Localitzeu la tapa del compartiment de la bateria a la part posterior del multímetre.
- Descargoleu el(s) cargol(s) de subjecció i traieu la coberta.
- Carefully remove the old 9V battery and replace it with a new one, observing polarity.
- Torneu a col·locar la tapa del compartiment de la bateria i fixeu-la amb el(s) cargol(s).
6.3. Substitució de fusibles
If the current measurement function stops working, the fuse may need replacement. Refer to the specifications for the correct fuse type.
- Assegureu-vos que el multímetre estigui apagat i que tots els cables de prova estiguin desconnectats.
- Obriu el multímetre casing (this may require removing the silicone cover and screws).
- Locate the blown fuse (typically near the current input jacks).
- Replace the fuse with one of the identical type and rating (e.g., 10A/250V fast-blow fuse for the 10A range, 200mA/250V for the mA range).
- Carefully reassemble the multimeter, ensuring all screws are tightened and the silicone cover is properly fitted.
6.4. Emmagatzematge
- Store the multimeter in a cool, dry place, away from direct sunlight and extreme temperatures.
- Si l'emmagatzemeu durant períodes prolongats, retireu la bateria per evitar fuites.
7. Solució De Problemes
If you encounter issues with your multimeter, refer to the following common problems and solutions.
| Problema | Causa possible | Solució |
|---|---|---|
| Sense pantalla o pantalla tènue | Dead or low battery; Multimeter is off. | Replace the 9V battery; Turn the rotary switch to an ON position. |
| Es mostra "OL" (sobrecàrrega) | Measurement exceeds selected range; Open circuit (for continuity/resistance). | Select a higher range; Check for breaks in the circuit or component. |
| Lectures incorrectes | Incorrect function/range selected; Poor test lead connection; Faulty test leads. | Verify function and range; Ensure leads are firmly inserted; Inspect and replace leads if damaged. |
| La mesura de corrent no funciona | Blown fuse; Incorrect jack used (e.g., VΩmA for 10A). | Replace the fuse (see Section 6.3); Ensure red lead is in the correct current jack (10A or VΩmA). |
| No continuity buzzer | Open circuit; Multimeter not in continuity mode. | Check the circuit for breaks; Ensure rotary switch is set to continuity (♫). |
8. Especificacions
Technical specifications for the Cyeelves Digital Multimeter VC830L.
| Característica | Detall |
|---|---|
| Número de model | VC830L |
| Mostra | LCD amb llum de fons |
| DC Voltage Rang | 200mV - 600V |
| Vol. ACtage Rang | 200 V - 600 V |
| Interval de corrent DC | 200µA - 10A |
| Interval de resistència | 200Ω - 2MΩ |
| Prova de continuïtat | Yes, with Buzzer |
| Prova de díode | Sí |
| Font d'alimentació | 9V Battery (NEDA 1604 or 6F22 type) |
| Dimensions (L x A x A) | 13.5 x 6.9 x 3 cm (5.3 x 2.7 x 1.2 polzades) |
| Pes | 226 g (aprox.) |
| Material | Plàstic ABS i silicona d'alta qualitat |
| Norma de seguretat | IEC 61010-1:2000-1 |
9. Garantia i Suport
Cyeelves products are designed for reliability and performance. While specific warranty details are not provided in this manual, please retain your proof of purchase for any warranty claims.
For technical support, troubleshooting assistance, or inquiries regarding your Cyeelves Digital Multimeter VC830L, please contact Cyeelves customer service through the retailer where the product was purchased or visit the official Cyeelves weblloc per obtenir informació de contacte.
Always refer to the latest information available from the manufacturer for the most up-to-date support and warranty policies.