1. Introducció
This manual provides detailed instructions for the installation, operation, and maintenance of your ASHATA H81 MATX Motherboard. Please read this manual thoroughly before proceeding with installation to ensure proper setup and functionality. This motherboard is designed to support Intel LGA 1150 processors and DDR3 memory modules.
2. Característiques del producte
- Suport del processador: Compatible with 4th generation Intel Core i3, i5, i7, E3 V3 series, and G series processors (e.g., Core i7 4790K, i5 4690K, i3 4160T, E3 1280 v3, G3260T, G1830) for the LGA 1150 socket.
- Memòria: Two 240-pin DDR3 SDRAM desktop memory slots, unbuffered, supporting effective frequencies of 1066MHz, 1333MHz, and 1600MHz. Maximum capacity of 16GB.
- Interfícies d'emmagatzematge: Includes two SATA 2.0 (3Gb/s) ports and one SATA 3.0 (6Gb/s) port for connecting multiple storage devices.
- Ranures d'expansió: Features one PCI Express x16 slot for graphics cards and one PCI Express x1 slot for other expansion cards.
- High-Speed M.2 Interface: An M.2 slot supports both NVMe and NGFF interfaces, allowing for high-speed PCIe hard disk switching and SATA 2.0/3.0 channel selection via a jumper.
- Interfícies d'E/S: Provides a comprehensive set of input/output ports including 4 USB 2.0 ports, 2 USB 3.0 ports, 1 VGA port, 1 HD Multimedia Interface compatible port, 1 RJ45 LAN port, and a 3-in-1 audio interface (line in, line out, microphone).
- Disseny durador: Constructed with an 8-layer PCB for enhanced stability and durability of internal circuits.
3. Contingut del paquet
Si us plau, verifiqueu que tots els elements siguin presents al vostre paquet:
- ASHATA H81 MATX Motherboard
- Escut d'E / S
- Cable de dades SATA
- Driver CD (for system drivers)

Image: The ASHATA H81 MATX Motherboard shown with its included I/O shield and a red SATA data cable.
Vídeo: Un overview of the ASHATA H81 MATX Motherboard and its included accessories, demonstrating the physical components and their initial presentation.
4. Configuració i instal·lació
4.1 Disseny de la placa base
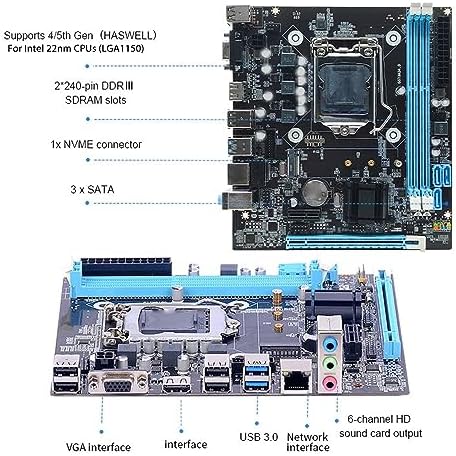
Image: A diagram of the ASHATA H81 MATX Motherboard highlighting key components such as the LGA 1150 CPU socket, DDR3 RAM slots, NVMe connector, and SATA ports.

Imatge: A view of the ASHATA H81 MATX Motherboard's rear I/O panel, showing the various ports including VGA, HDMI, USB 3.0, USB 2.0, Ethernet, and audio jacks.
4.2 Instal·lació de la CPU
- Localitza el sòcol de la CPU LGA 1150 a la placa base.
- Gently lift the load lever and open the CPU socket cover.
- Align the triangular mark on your Intel LGA 1150 processor with the corresponding mark on the socket. Carefully place the CPU into the socket without forcing it.
- Close the socket cover and push down the load lever until it locks into place.
- Apply thermal paste to the CPU and install the CPU cooler according to its manufacturer's instructions.
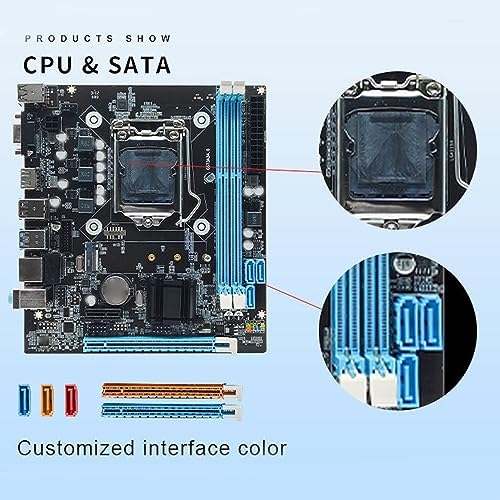
Imatge: Una imatge detallada view of the LGA 1150 CPU socket and the two DDR3 memory slots on the ASHATA H81 MATX Motherboard.
4.3 Instal·lació de memòria (RAM)
- Localitzeu les dues ranures de memòria DDR3.
- Obriu els clips dels dos extrems de la ranura de memòria.
- Alineeu l'osca del mòdul de memòria DDR3 amb la clau de la ranura de memòria.
- Introduïu el mòdul de memòria fermament a la ranura fins que els clips encaixin al seu lloc. Assegureu-vos que tots dos clips estiguin tancats.
4.4 Storage Device Installation (SATA & M.2)
- Unitats SATA: Connect your SATA hard drives or SSDs to the SATA 2.0 (3Gb/s) or SATA 3.0 (6Gb/s) ports using SATA data cables. Connect the power cable from your power supply to the drive.
- SSD M.2: Locate the M.2 slot. Insert your NVMe or NGFF M.2 SSD into the slot at an angle, then gently push it down and secure it with the provided screw. Ensure the jumper setting for the M.2 slot is configured correctly for NVMe or NGFF mode if applicable.
4.5 Instal·lació de la targeta d'expansió (PCIe)
- Locate the PCI Express x16 slot for your graphics card or the PCI Express x1 slot for other expansion cards.
- Traieu la coberta de la ranura corresponent de la carcassa del vostre PC.
- Align the expansion card with the slot and press down firmly until it is securely seated.
- Fixeu la targeta a la carcassa amb un cargol.
4.6 I/O Panel Connections
Connecteu els perifèrics al panell d'E/S posterior:
- Dispositius USB: Connect keyboards, mice, and other USB devices to the USB 2.0 or USB 3.0 ports.
- Visualització: Connect your monitor to the VGA or HD Multimedia Interface compatible port.
- Xarxa: Connect an Ethernet cable to the RJ45 LAN port for network access.
- Àudio: Connect speakers, headphones, or microphones to the 3-in-1 audio jacks.

Image: The ASHATA H81 MATX Motherboard with callouts for USB 3.0 ports, Gigabit Ethernet, SATA 3.0, and its support for 1080P and 4K display resolutions.
5. Instruccions de funcionament
5.1 Primer arrencada
After assembling all components and connecting power, press the power button on your PC case. The system should initiate the boot process. If you are installing a new operating system, ensure your installation media (USB drive or DVD) is connected and set as the primary boot device in the BIOS.
5.2 Accés a la BIOS/UEFI
Per accedir a la utilitat de configuració de la BIOS/UEFI, premeu la tecla designada (normalment DEL, F2, o F10) repeatedly during the initial boot sequence. Consult your system's documentation or on-screen prompts for the exact key. Within the BIOS, you can configure boot order, system time, and other hardware settings.
5.3 Instal·lació del controlador
After installing your operating system, install the necessary drivers from the included driver CD or download the latest drivers from the ASHATA support website. This includes chipset drivers, graphics drivers, audio drivers, and LAN drivers to ensure optimal performance and functionality.
6. Manteniment
Regular maintenance helps prolong the life and performance of your motherboard and PC system:
- Eliminació de pols: Netegeu periòdicament la pols de l'interior de la carcassa de l'ordinador, especialment dels ventiladors i els dissipadors de calor, amb aire comprimit. Assegureu-vos que el sistema estigui apagat i desendollat abans de netejar-lo.
- Gestió de cables: Ensure cables are neatly organized to improve airflow and prevent obstruction.
- Actualitzacions de la BIOS: Comproveu el del fabricant website for BIOS updates. Only update the BIOS if necessary and follow the instructions carefully to avoid system instability.
- Condicions ambientals: Operate the motherboard in a well-ventilated area, away from direct sunlight, excessive heat, and moisture.
7. Solució De Problemes
Si teniu problemes, tingueu en compte els passos següents per resoldre'ls:
- Sense energia: Ensure the power supply is connected correctly to the motherboard (24-pin ATX and 4/8-pin CPU power connectors) and that the power switch on the PSU is on. Check the front panel power button connection to the motherboard.
- Sense pantalla: Verify that the monitor is connected to the correct video output on the graphics card or motherboard. Reseat the graphics card and RAM modules. Test with a different monitor or cable if possible.
- Inestabilitat/Avaries del sistema: Check RAM modules for proper seating. Ensure CPU cooler is installed correctly and making good contact. Verify power supply is adequate for all components. Run memory diagnostic tools.
- Problemes d'arrencada: Check boot order in BIOS. Ensure storage drives are properly connected and detected. If installing a new OS, verify bootable media.
- Perifèric no detectat: Try connecting the peripheral to a different port. Ensure drivers are installed.
- BIOS Access Difficulty: Repeatedly press the BIOS key (DEL, F2, F10) immediately after powering on. If still unable to access, clear the CMOS (refer to motherboard diagram for CMOS jumper or battery removal).
8. Especificacions
| Característica | Especificació |
|---|---|
| Marca | ASHATA |
| Nom del model | ASHATAgnd5sk3vwe (H81 MATX) |
| Socket de CPU | LGA 1150 |
| Processadors compatibles | Intel Core i3, i5, i7 (4th Gen), Intel E3 V3 series, Intel G series |
| Tipus de xipset | Intel H81 |
| Tecnologia de memòria RAM | DDR3 |
| Ranures de memòria | 2 x 240-pin DDR3 DIMM |
| Capacitat màxima de memòria | 16 GB |
| Velocitat de rellotge de memòria | 1066 MHz, 1333 MHz, 1600 MHz |
| Ports SATA | 2 x SATA 2.0 (3Gb/s), 1 x SATA 3.0 (6Gb/s) |
| Ranura M.2 | 1 (Supports NVMe and NGFF) |
| PCIe tragamonedas | 1 x PCIe x16, 1 x PCIe x1 |
| Ports USB (posteriors) | 4x USB 2.0, 2x USB 3.0 |
| Sortida de vídeo | 1 x VGA, 1 x HD Multimedia Interface compatible |
| LAN | 1 x RJ45 (10/100/1000 Mbps) |
| Àudio | 3-in-1 Audio Interface |
| Factor de forma | MATX |
| Dimensions | 9.96 x 7.95 x 1.93 polzades (paquet) |
| Pes de l'article | 1.06 lliures |
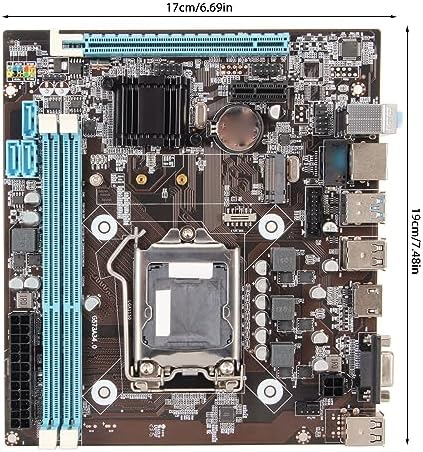
Image: The ASHATA H81 MATX Motherboard displaying its physical dimensions, approximately 17cm in width and 19cm in length.
9. Garantia i Suport
For warranty information and technical support, please refer to the ASHATA official website or contact your retailer. Keep your proof of purchase for warranty claims. For driver updates and further assistance, visit the manufacturer's support page.