
1. Introducció
Thank you for choosing the Grundig KSM 4330 Delisia Coffee Espresso Machine. This semi-automatic espresso machine is designed to provide a premium coffee experience at home. With a powerful 1628 W and 15 bar pump pressure, it allows you to prepare barista-quality coffee. This manual provides essential information for the safe and efficient use of your appliance, including setup, operation, maintenance, and troubleshooting.
2. Informació de seguretat
Please read all safety instructions carefully before using the appliance. Retain this manual for future reference.
- Connecteu sempre l'aparell a una presa de corrent amb connexió a terra i el volum correcte.tage (220-240 V).
- No submergiu l'aparell, el cable d'alimentació ni l'endoll en aigua ni en altres líquids.
- Mantingueu l'aparell fora de l'abast dels nens i de les persones amb capacitats físiques, sensorials o mentals reduïdes.
- No feu funcionar l'aparell si el cable d'alimentació o l'endoll estan danyats, o si l'aparell no funciona correctament o ha estat danyat de qualsevol manera.
- Exercise caution when handling hot surfaces, hot water, and steam. The cup warming plate and steam wand can become very hot.
- Assegureu-vos que el dipòsit d'aigua estigui ple d'aigua fresca i freda abans de l'operació.
- Desendolleu l'aparell de la presa de corrent abans de netejar-lo i quan no l'utilitzeu.
3. Producte acabatview
The Grundig KSM 4330 features an intuitive touch display for easy operation and a semi-automatic milk frother for various coffee specialties.
Components:
- Main Unit with Touch Display
- Portafiltre
- Single and Double Shot Filter Baskets
- Dipòsit d'aigua extraïble (capacitat de 1.1 litres)
- Vareta de vapor / Escumador de llet
- Safata de degoteig extraïble
- Plat escalfador de copes
- Cullera mesuradora / Tamper Accessory

Figura 3.1: Frontal view of the espresso machine with its touch control panel.

Figura 3.2: Explotat view showing the main components of the espresso machine.
4. Configuració
- Desembalatge: Traieu amb cura tots els materials d'embalatge i assegureu-vos que hi hagi tots els components.
- Neteja inicial: Before first use, wash the water tank, portafilter, filter baskets, and drip tray with warm soapy water. Rinse thoroughly and dry. Wipe the exterior of the machine with a damp tela.
- Omplir el dipòsit d'aigua: Remove the water tank from the back of the machine. Fill it with fresh, cold water up to the 'MAX' level indicator. Place the tank back securely.
- Cicle de primer ús: To prime the pump and clean internal components, perform a rinse cycle without coffee. Attach the portafilter (without coffee) to the group head. Place a cup under the portafilter and another under the steam wand. Turn on the machine. Once heated, press the 'Espresso' button to dispense water. Repeat this process for the steam wand by activating the steam function.
- Connexió d'alimentació: Connecteu el cable d'alimentació a una presa de corrent amb connexió a terra adequada.

Figura 4.1: lateral view illustrating the water tank and steam wand placement.
5. Instruccions de funcionament
5.1 Elaboració d'espresso
- Ensure the water tank is filled and the machine is plugged in. Press the power button to turn on the machine. Wait for the machine to heat up (indicator light will stop flashing).
- Select the appropriate filter basket (single or double) and place it into the portafilter.
- Add ground coffee to the filter basket. Use the measuring spoon to ensure the correct amount. Level the coffee and tamp it firmly with the tampl'extrem de la cullera.
- Fixeu el portafiltre al capçal del grup alineant-lo i girant-lo cap a la dreta fins que quedi ben fixat.
- Col·loqueu una o dues tasses d'espresso a la safata de degoteig directament sota els brocs del portafiltre.
- Press the 'Espresso' button for a single shot or 'Double' for a double shot. The machine will automatically brew and stop.
- To customize the coffee quantity, use the Memory function. Press and hold the desired espresso button until the desired amount of coffee is dispensed, then release. The machine will remember this setting for future use.

Figure 5.1: Espresso brewing process.
5.2 Ús de l'escumador de llet
- Fill a milk pitcher with cold milk (dairy or non-dairy). Do not fill more than one-third of the pitcher.
- Ensure the machine is on and heated. Press the steam button on the touch display. The indicator light will flash while heating and become solid when ready.
- Col·loca la vareta de vapor a la llet, just per sota de la superfície.
- Turn the steam control knob to release steam. Move the pitcher up and down to create foam.
- Once the desired texture and temperature are reached, turn off the steam control knob and then press the steam button on the display to deactivate.
- Netegeu immediatament la vareta de vapor amb aiguaamp drap per evitar que s'assequin els residus de llet.
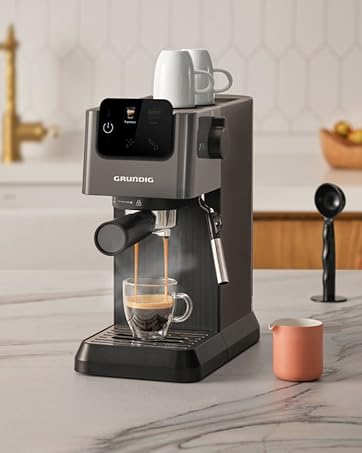
Figure 5.2: Using the milk frother.
5.3 Cup Warming Plate
The top surface of the machine acts as a cup warming plate. Place your espresso cups here before brewing to ensure your coffee stays warm longer.
6. Manteniment i Neteja
La neteja i el manteniment regulars garanteixen un rendiment òptim i una llarga durada de la teva màquina d'espresso.
- Neteja diària: After each use, remove and empty the portafilter. Rinse the filter basket and portafilter under running water. Empty and clean the drip tray. Wipe down the exterior of the machine with a soft, damp tela.
- Neteja de la vareta de vapor: After frothing milk, immediately wipe the steam wand with a damp cloth. Periodically, remove the tip of the steam wand and clean any dried milk residue with a small brush or needle.
- Neteja del dipòsit d'aigua: Clean the water tank regularly with warm soapy water and rinse thoroughly.
- Descalcificació: The machine features an automatic descaling alarm. When the descaling indicator lights up, it's time to descale the machine. Follow the instructions in the descaling solution package and the machine's specific descaling procedure (refer to the full manual for detailed steps). Descaling removes mineral buildup, which is crucial for machine performance and coffee taste.
7. Solució De Problemes
If you encounter issues with your Grundig KSM 4330, refer to the following common problems and solutions:
| Problema | Causa possible | Solució |
|---|---|---|
| No hi ha dispensadors de cafè | Water tank empty; machine not heated; clogged filter basket. | Fill water tank; wait for heating indicator; clean filter basket. |
| El cafè és massa fluix o aquós | Insufficient coffee grounds; coffee too coarsely ground; not tamped amb prou fermesa. | Augmenta la quantitat de cafè; utilitza una mòlta més fina; tamp amb més fermesa. |
| No hi ha vapor que surti de la vareta | Funció de vapor no activada; vareta obstruïda; màquina no escalfada a la temperatura de vapor. | Activate steam function; clean steam wand; wait for steam indicator. |
| La màquina filtra aigua | Dipòsit d'aigua no col·locat correctament; safata de degoteig plena; problema de segellat. | Reseat water tank; empty drip tray; contact support if issue persists. |
| Descaling alarm active | Acumulació de minerals al sistema. | Perform a descaling cycle as per the instructions in Section 6. |
Si el problema persisteix després d'intentar aquestes solucions, poseu-vos en contacte amb el servei d'atenció al client de Grundig.
8. Especificacions
| Característica | Detall |
|---|---|
| Marca | Grundig |
| Número de model | KSM 4330 (GMS7000) |
| Tipus | Màquina d'espresso semiautomàtica |
| Color | Negre |
| Capacitat | 1.1 litres (dipòsit d'aigua) |
| Dimensions (P x A x A) | 41 cm x 18.6 cm x 32 cm |
| Pes | 3.9 quilos |
| Wattage | 1350 Watts (Operating), 1628 Watts (Max) |
| Voltage | 220-240 V |
| Pressió de la bomba | 15 Bar |
| Coffee Type Used | Cafè Mòlt |
| Interfície d'usuari | Pantalla tàctil |
| Característiques especials | Milk Frother, Automatic Descaling Alarm, Cup Warming Plate, Memory Function |

Figure 8.1: Dimensions of the espresso machine.
9. Garantia i Suport
The Grundig KSM 4330 Delisia Coffee Espresso Machine comes with a 3 any de garantia, ensuring high standards of quality and reliability.
For technical assistance, warranty claims, or further inquiries, please contact Grundig customer support through their official weblloc web o la informació de contacte proporcionada amb la documentació de compra.
Please have your model number (KSM 4330 or GMS7000) and proof of purchase ready when contacting support.