
Introducció
Thank you for choosing the CMTECK AR-16 Low Profile Microphone Boom Arm. This product is designed to provide a stable, adjustable, and space-saving solution for mounting your microphone in various setups, including podcasting, streaming, gaming, and studio environments. This manual will guide you through the installation, operation, and maintenance of your new microphone boom arm to ensure optimal performance and longevity.
Què hi ha a la caixa
Si us plau, verifiqueu que tots els components siguin presents abans de continuar amb la instal·lació.
- Braç de boom
- C-clamp
- Extension Riser (150mm / 5.9 inches)
- Adaptador de 3/8"
- Adaptador de 1/4"
- Adaptador de 5/8"
- Femella de bloqueig
- Microphone Clip (Ball Head)
- Cable Management Straps

Instruccions de configuració
Follow these steps to properly set up your CMTECK AR-16 Microphone Boom Arm.
- Install the Desk Clamp:
Enganxeu el C-clamp to a sturdy desk or table edge. Ensure the desk thickness is between 10mm and 60mm. Tighten the clamp securely using the screw knob until it is firm and stable. The clamp features a soft cushion to protect your furniture from scratches.
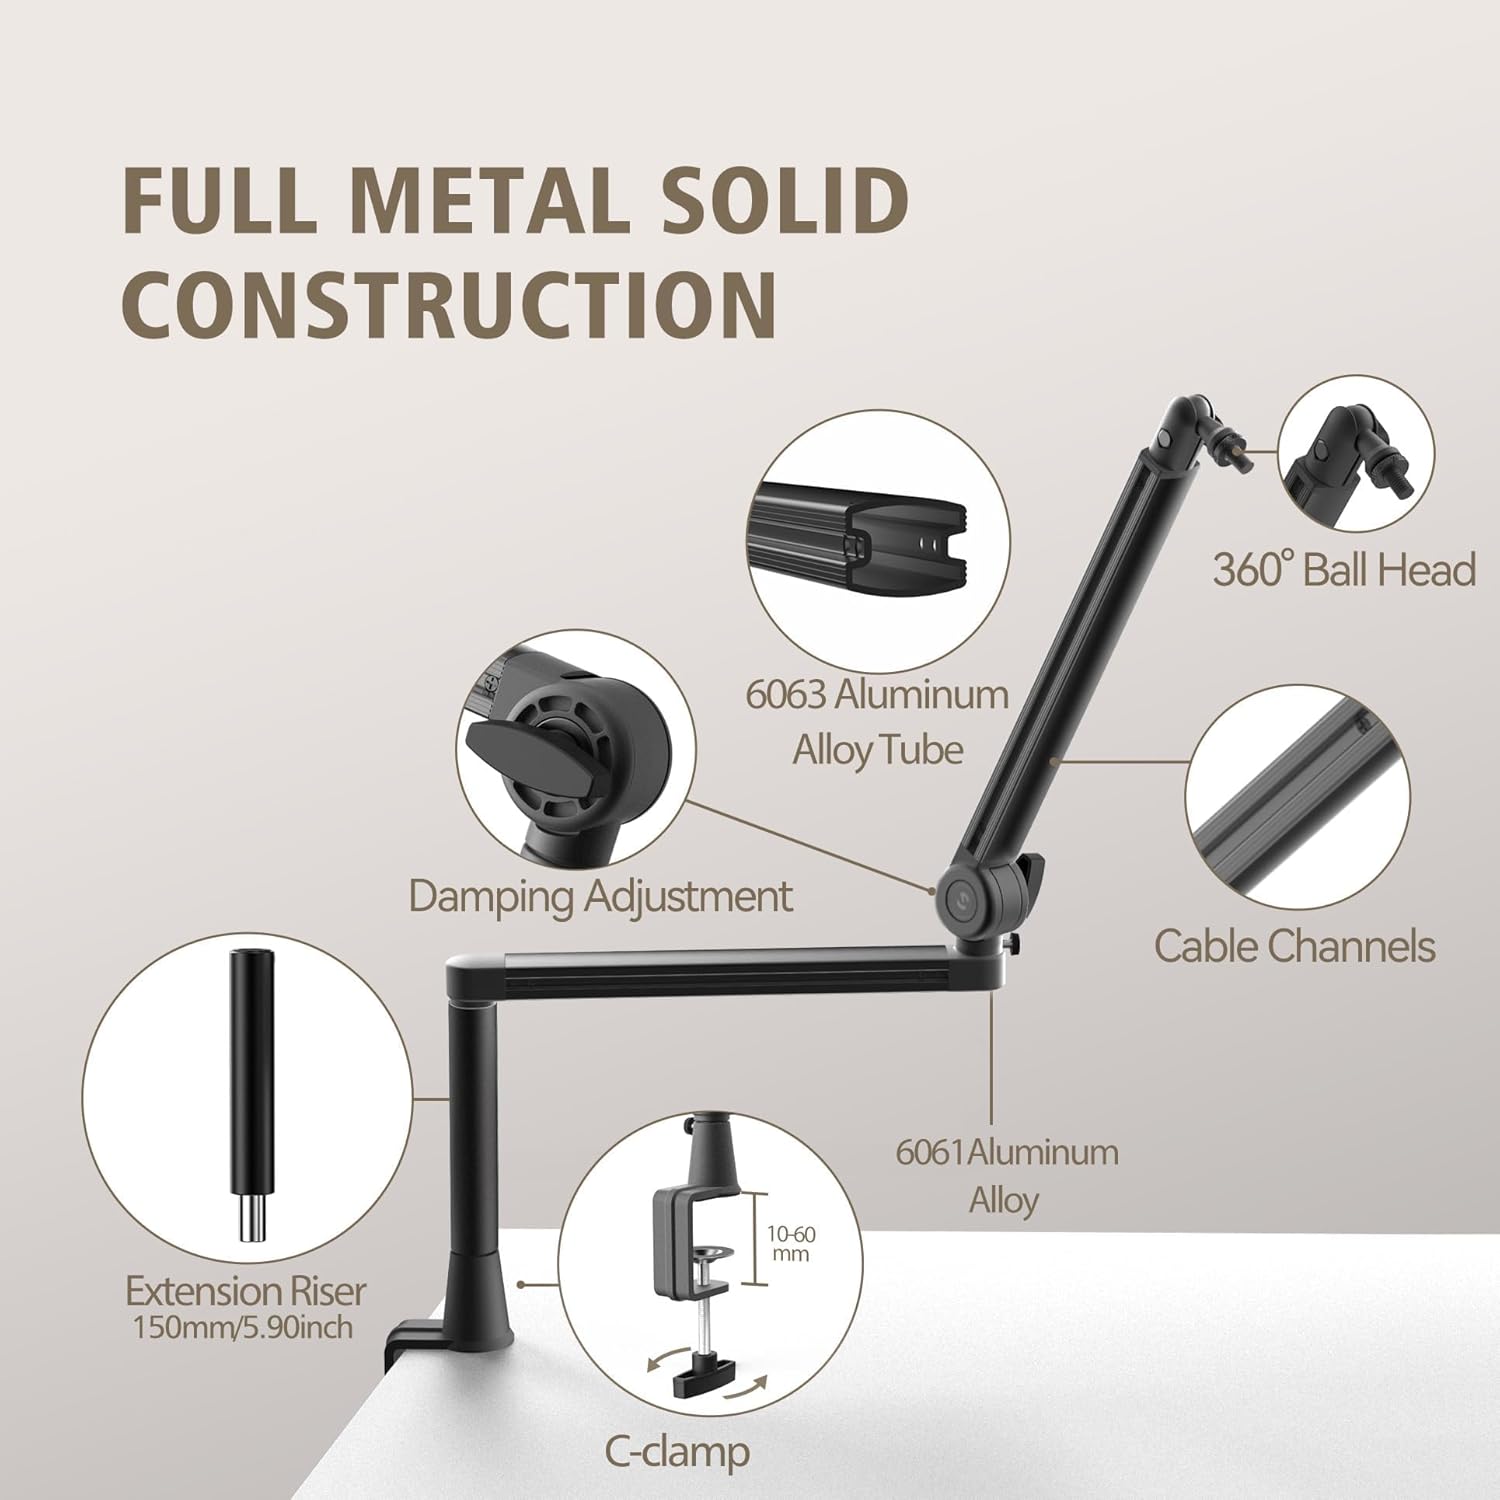
Figura 2: Escriptori Clamp Installation. The image highlights the C-clamp with its protective cushion and adjustable range for desk thickness. - Connecteu el braç de l'eix:
Introduïu la base del braç del boom al forat del suport de l'escriptori.amp. Ensure it is fully seated. The arm can rotate 360 degrees horizontally within the clamp.
- Install the Extension Riser (Optional):
If additional height is required, screw the 150mm (5.9-inch) extension riser onto the top of the boom arm's microphone mounting point. Then, attach the microphone clip or adapter to the top of the riser.

Figure 3: Extension Riser Usage. This image illustrates the difference in microphone height when using the boom arm with and without the extended riser. - Attach Your Microphone:
The boom arm supports 1/4 inch, 3/8 inch, and 5/8 inch thread sizes. Use the appropriate adapter for your microphone or shock mount. Screw the microphone or shock mount onto the ball head or riser. Ensure it is tightened securely.

Figure 4: Microphone Compatibility. This diagram shows how different microphone types connect using the included 1/4", 3/8", and 5/8" adapters. - Gestió de cables:
Route your microphone cable along the boom arm's integrated cable channels. Use the provided cable management straps to secure the cable neatly, preventing clutter and ensuring a clean workspace.
Instruccions de funcionament
The CMTECK AR-16 boom arm offers flexible positioning for your microphone.
- Ajust horitzontal: The arm can rotate 360 degrees at the base clamp and offers a 14x14-inch horizontal boom length for extensive reach.
- Ajust vertical: The arm allows for 220-degree vertical adjustment at its joints, enabling you to position your microphone at various heights and angles.
- Ajust del capçal esfèric: The microphone clip features a 360-degree rotatable ball head for precise microphone angling. Loosen the locking nut to adjust, then tighten to secure.
- DampAjustament de la ing: The joints of the boom arm include damping adjustment mechanisms. These can be tightened or loosened to control the stiffness of the arm's movement, allowing you to set the desired resistance for smooth positioning.


Manteniment
To ensure the longevity and optimal performance of your CMTECK AR-16 Microphone Boom Arm, follow these simple maintenance guidelines:
- Neteja: Wipe the boom arm with a soft, dry cloth to remove dust and fingerprints. Avoid using abrasive cleaners or solvents, as these can damage the finish.
- Comproveu les connexions: Periodically check all screws and clamps to ensure they are securely tightened. This prevents unwanted movement or instability during use.
- Lubricació: The joints are designed for smooth operation and generally do not require lubrication. If movement becomes stiff, ensure no debris is obstructing the joints.
- Emmagatzematge: When not in use for extended periods, you may detach the arm from the clamp and store it in a dry, clean place to prevent dust accumulation.
Resolució de problemes
If you encounter any issues with your microphone boom arm, refer to the following common problems and solutions:
- Microphone Sags or Does Not Hold Position:
- Ensure the locking nut on the ball head is fully tightened after positioning your microphone.
- Comproveu el damping adjustment screws on the arm joints. Tighten them slightly to increase resistance and hold heavier microphones more securely.
- Verify that your microphone's weight does not exceed the arm's maximum capacity of 4.4 pounds (2 kg).
- El braç se sent fluix o inestable:
- Torneu a apretar el C-clamp to the desk. Ensure the desk surface is flat and provides a secure grip.
- Check the connection point where the boom arm inserts into the C-clamp for any looseness.
- Difficulty Adjusting Arm Movement:
- Afluixa el damping adjustment screws slightly if the arm is too stiff to move.
- Ensure no cables or other objects are obstructing the arm's movement.
Especificacions
| Número de model | AR-16 |
| Material | Alumini |
| Color | Negre |
| Pes de l'article | 3.3 lliures (1.5 kg) |
| Dimensions del producte (L x A x A) | 17 x 5.3 x 3.7 polzades (envasat) |
| Max Microphone Weight Capacity | 4.4 lliures (2 kg) |
| Escriptori Clamp Interval de gruix | 10 mm - 60 mm |
| Ajust horitzontal | 360 degrees at base, 14x14 inch boom length |
| Ajust vertical | 220 graus |
| Thread Sizes Supported | 1/4 de polzada, 3/8 de polzada, 5/8 polzada |
Informació de la garantia
CMTECK products are manufactured to high-quality standards. For specific warranty details regarding your AR-16 Microphone Boom Arm, please refer to the warranty card included with your purchase or visit the official CMTECK weblloc web. Conserveu el comprovant de compra per a qualsevol reclamació de garantia.
Suport
If you require further assistance or have questions not covered in this manual, please contact CMTECK customer support. Contact information can typically be found on the product packaging or the official CMTECK website. Please have your product model number (AR-16) and purchase details ready when contacting support.
