1. Introducció
Thank you for choosing the LEDLUX 72-inch Ceiling Fan with Light. This manual provides essential information for the safe installation, operation, and maintenance of your new ceiling fan. Please read these instructions thoroughly before beginning installation and retain them for future reference.
Informació important de seguretat
- Desconnecteu sempre l'alimentació a l'interruptor principal abans de la instal·lació o el manteniment.
- All electrical wiring must be in accordance with national and local electrical codes. If you are unfamiliar with wiring, consult a qualified electrician.
- Ensure the installation site can support the fan's weight (approximately 15-20 kg).
- No doblegueu els porta-fulles durant la instal·lació o la neteja.
- Mantingueu els nens allunyats del ventilador durant el funcionament.
2. Contingut del paquet
Verifiqueu que tots els components siguin presents abans de començar la instal·lació:
- Muntatge de la carcassa del motor
- Pales de ventilador (9 peces)
- Downrods (4.5", 12", 24" options)
- Dosser
- Suport de muntatge
- Kit de llum LED
- Remote Control with Receiver
- Paquet de maquinari (cargols, volanderes, femelles de cable)
- Manual d'instruccions

Image: All components of the LEDLUX 72-inch ceiling fan laid out on a white surface.
3. Especificacions
| Marca | LEDLUX |
| Model | 72-inch Ceiling Fan with Light |
| Color | Negre |
| Mida | 72 polzades |
| Nombre de fulles | 9 |
| Material de la fulla | Plàstic |
| Tipus de motor | DC Motor (Reversible) |
| Nombre de velocitats | 6 |
| Tipus de controlador | Control remot |
| Wattage | 65 watts |
| Nivell de soroll | 45 decibels |
| Ús interior/exterior | Interior |
| Downrod Options | 4.5", 12", 24" |

Image: Diagram showing the dimensions of the 72-inch ceiling fan and available downrod lengths.
4. Guia d'instal·lació
Follow these steps for proper installation. It is recommended to have a qualified electrician perform the installation.
4.1 Assemble the Fan Blades
- Attach each fan blade to the motor housing using the provided screws. Ensure they are securely fastened.

Image: Close-up of a hand using a drill to attach a fan blade to the motor housing.
4.2 Prepare the Downrod
- Select the appropriate downrod length for your ceiling height.
- Feed the fan wires through the downrod.
- Secure the downrod to the motor housing using the provided pin and screws.
4.3 Cablejat del receptor
- Connect the receiver wires to the corresponding fan wires and household wiring using wire nuts. Ensure all connections are secure.
- Carefully tuck the wired receiver into the mounting bracket.
Video: This video demonstrates the step-by-step installation process for the LEDLUX ceiling fan with light, including blade assembly, downrod attachment, and electrical wiring connections.
4.4 Mount the Fan
- Fixeu el suport de muntatge a la caixa de connexions del sostre.
- Pengeu el conjunt del ventilador al suport de muntatge.
- Secure the canopy to the mounting bracket with screws.

Image: Diagrams illustrating installation on flat, sloped, and high ceilings.
4.5 Install the Light Kit
- Connect the light kit wires to the fan's light wires.
- Attach the LED light panel to the fan motor housing.
- Secure the light cover.
5. Instruccions de funcionament
Your LEDLUX ceiling fan is controlled by the included remote control. Ensure the remote has fresh batteries installed.
5.1 Funcions de control remot
- Ventilador activat / desactivat: Press the fan icon button to turn the fan on or off.
- Velocitat del ventilador: Use the '1' through '6' buttons to adjust the fan speed. '1' is the lowest speed, '6' is the highest.
- Llum encès/apagat: Press the light bulb icon button to turn the light on or off.
- Temperatura de color: Press the 'CCT' button to cycle through 3 color temperatures: 3000K (Warm White), 4500K (Natural White), and 6000K (Cool White).
- Funció de temporitzador: Set the fan to turn off automatically after 1H, 2H, 4H, or 8H using the respective timer buttons.
- Motor reversible: Press the 'F/R' button to change the direction of the fan blades.

Image: Remote control with labeled functions for fan speed, light, timer, and reverse.
5.2 Reversible DC Motor
The DC motor allows for reversible blade rotation, providing comfort in different seasons:
- Mode d'estiu (sentit antihorari): Crea un flux d'aire descendent, produint un efecte de refredament.
- Mode d'hivern (en sentit horari): Crea un flux d'aire ascendent, fent circular l'aire calent atrapat a prop del sostre.
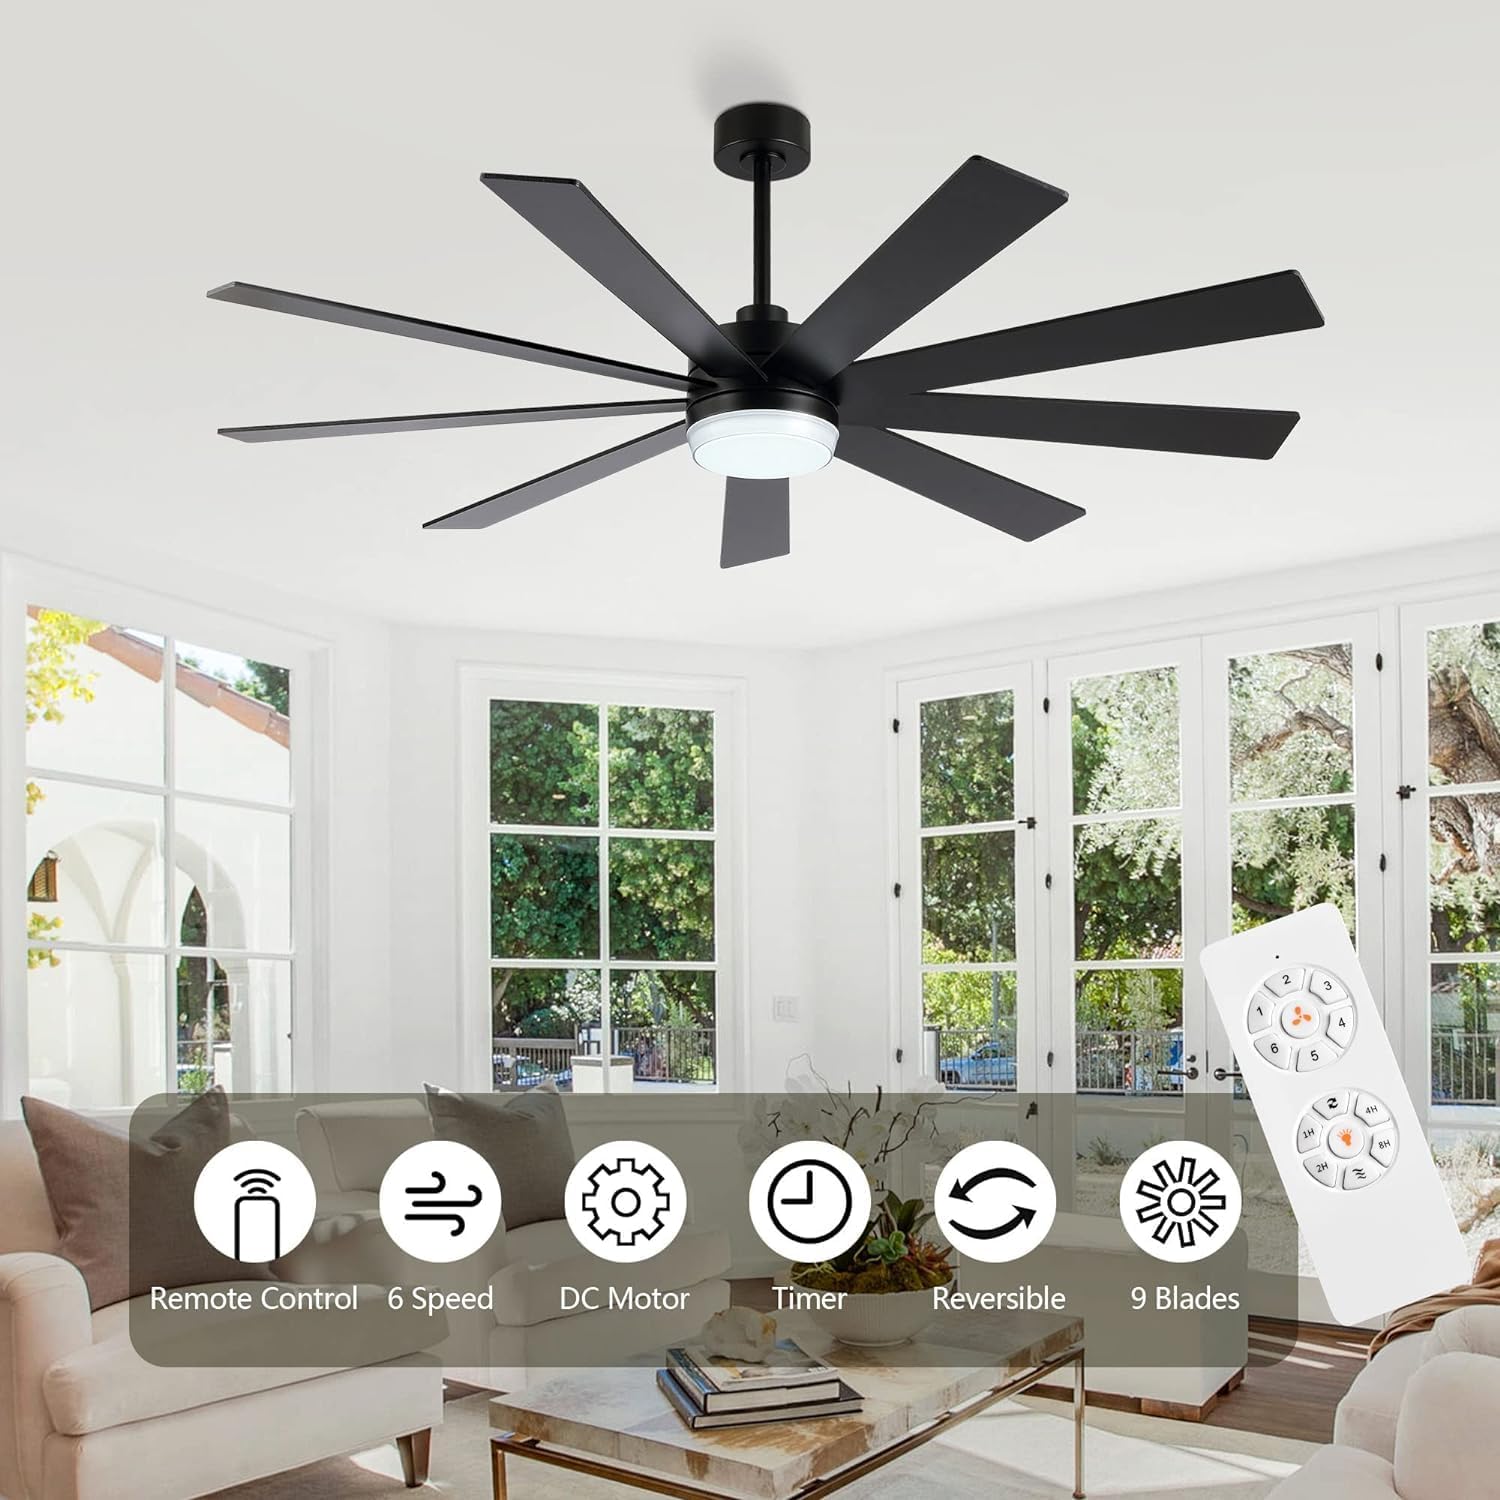
Image: Fan blade direction for summer (cooling) and winter (air circulation) modes.
5.3 Light Color Temperature
The integrated LED light offers three color temperature options to suit your preference:
- 3000K: Warm White, ideal for a cozy atmosphere.
- 4500K: Natural White, suitable for general illumination.
- 6000K: Cool White, bright and invigorating.
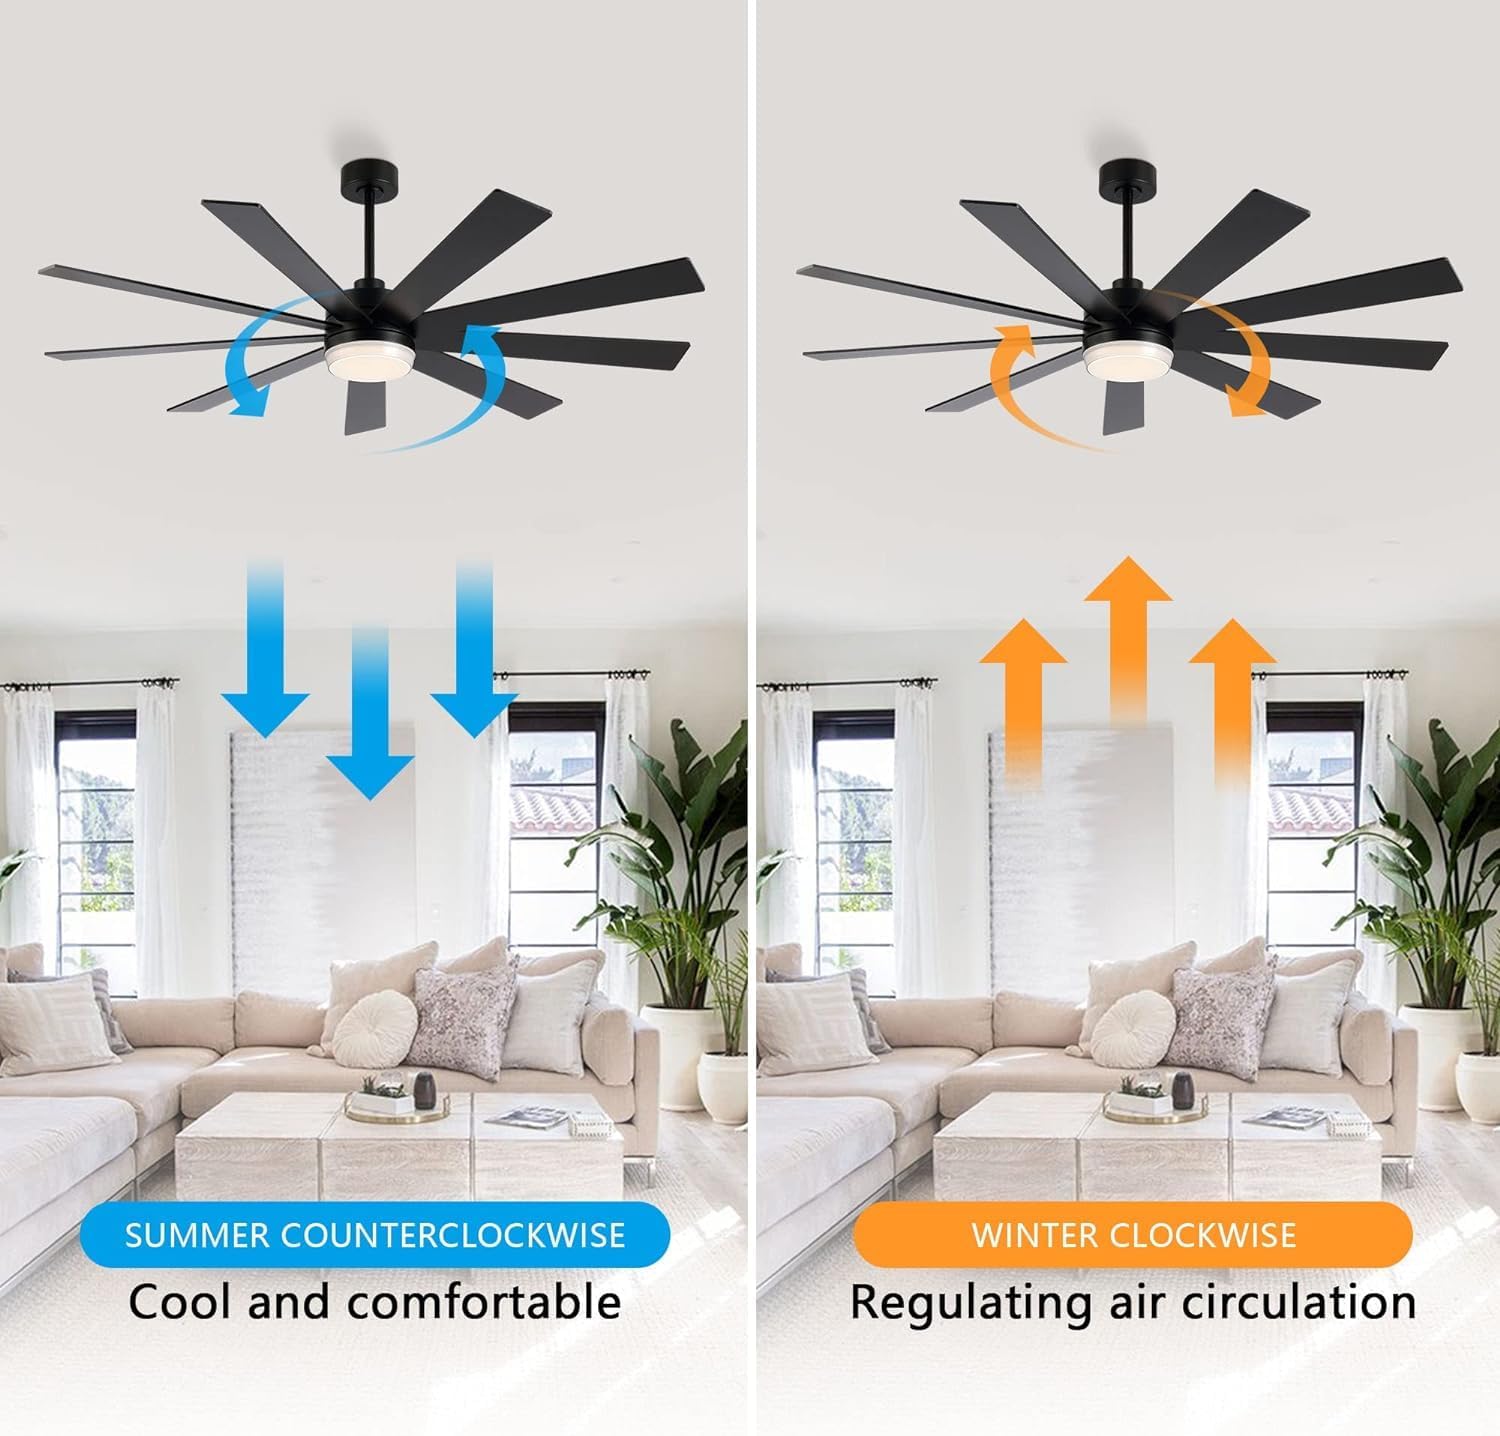
Image: Ceiling fan light demonstrating 3000K, 4500K, and 6000K color temperatures.
6. Manteniment
Un manteniment regular garanteix un rendiment òptim i una llarga vida útil del ventilador de sostre.
6.1 Neteja
- Always turn off the power to the fan at the main circuit breaker before cleaning.
- Utilitzeu un suau, damp drap per netejar les aspes del ventilador i la carcassa del motor. No utilitzeu productes de neteja abrasius ni dissolvents.
- Periodically check all screws for tightness. Re-tighten as necessary.
6.2 Equilibri de les fulles
If the fan wobbles, ensure all blade screws are tight. If wobbling persists, a blade balancing kit (not included) may be used to correct the issue.
7. Solució De Problemes
Before attempting any repairs, ensure the power is disconnected at the circuit breaker.
| Problema | Causa possible | Solució |
|---|---|---|
| El ventilador no arrenca | No hi ha alimentació al ventilador; Connexions de cables soltes; Pila del comandament a distància baixa. | Comproveu l'interruptor; Verifiqueu que totes les connexions dels cables estiguin ben fixades; Substituïu la pila del comandament a distància. |
| La llum no funciona | Loose wire connection to light kit; Faulty LED light kit. | Check light kit wiring; Contact customer support for replacement if faulty. |
| El ventilador trontolla | Cargols de la fulla solts; Fulles mal equilibrades; Suport de muntatge solt. | Tighten all blade screws; Use a blade balancing kit; Ensure mounting bracket is securely fastened to the ceiling. |
| Funcionament sorollós | Loose screws; Motor housing rubbing against canopy; Incorrect installation. | Check and tighten all screws; Ensure proper clearance between motor housing and canopy; Re-check installation steps. |
8. Garantia i Suport
LEDLUX stands behind the quality of its products.
8.1 Informació de la garantia
- 10-Year Motor Warranty: The DC motor is covered by a 10-year free replacement warranty.
- 3-Year Full Warranty: All other parts of the ceiling fan are covered by a 3-year warranty.
Image: LEDLUX Warranty details: 3-Year Full Warranty and 10-Year Motor Warranty.
8.2 Atenció al client
For any installation, pre-sales, or after-sales questions, please contact our professional service team via Amazon mail. We are committed to resolving your issues within 24 hours.