
1. Introducció
The ORICO TS200 is a 2-bay Network Attached Storage (NAS) enclosure designed for home and small to medium-sized businesses (SMBs). It provides a centralized storage solution for your data, enabling private cloud functionality, remote access, and multimedia sharing. This manual provides detailed instructions for the installation, setup, operation, and maintenance of your ORICO TS200 device.
Les característiques clau inclouen:
- Home Storage Center: Supports up to 44TB across two drive bays for secure data management.
- Anytime, Anywhere Access: Dedicated mobile application with automatic VPN security for remote file accés.
- Multimedia Sharing: Supports Samba and DLNA protocols for effortless file compartició i transmissió multimèdia.
- Stable and Durable: Integrated cooling fan for optimal temperature management and longevity.
- Expansió flexible: Supports Hardware RAID for data redundancy and storage expansion.

Figure 1: ORICO TS200 2-Bay NAS Storage and Private Cloud.
2. Contingut del paquet
Please verify that all items listed below are included in your package. If any items are missing or damaged, please contact ORICO customer support.
- ORICO TS200 2-Bay NAS Enclosure (Diskless)
- Adaptador d'alimentació
- Cable de xarxa
- Screws for Hard Drive Installation
- Tornavís
- Manual d'usuari (aquest document)

Figure 2: ORICO TS200 Package Contents.
3. Producte acabatview
3.1. Interface Display
Familiarize yourself with the ports and buttons on the rear panel of the ORICO TS200:
- DC In 12V: Port d'entrada d'alimentació.
- USB-C: USB Type-C port for data transfer.
- USB 3.0: Standard USB-A 3.0 port for external device connection.
- LAN: Network interface for Ethernet cable connection.
- RESET: Reset button (use a paperclip or similar tool to press).
- Interruptor d'alimentació: Button to power on/off the device.
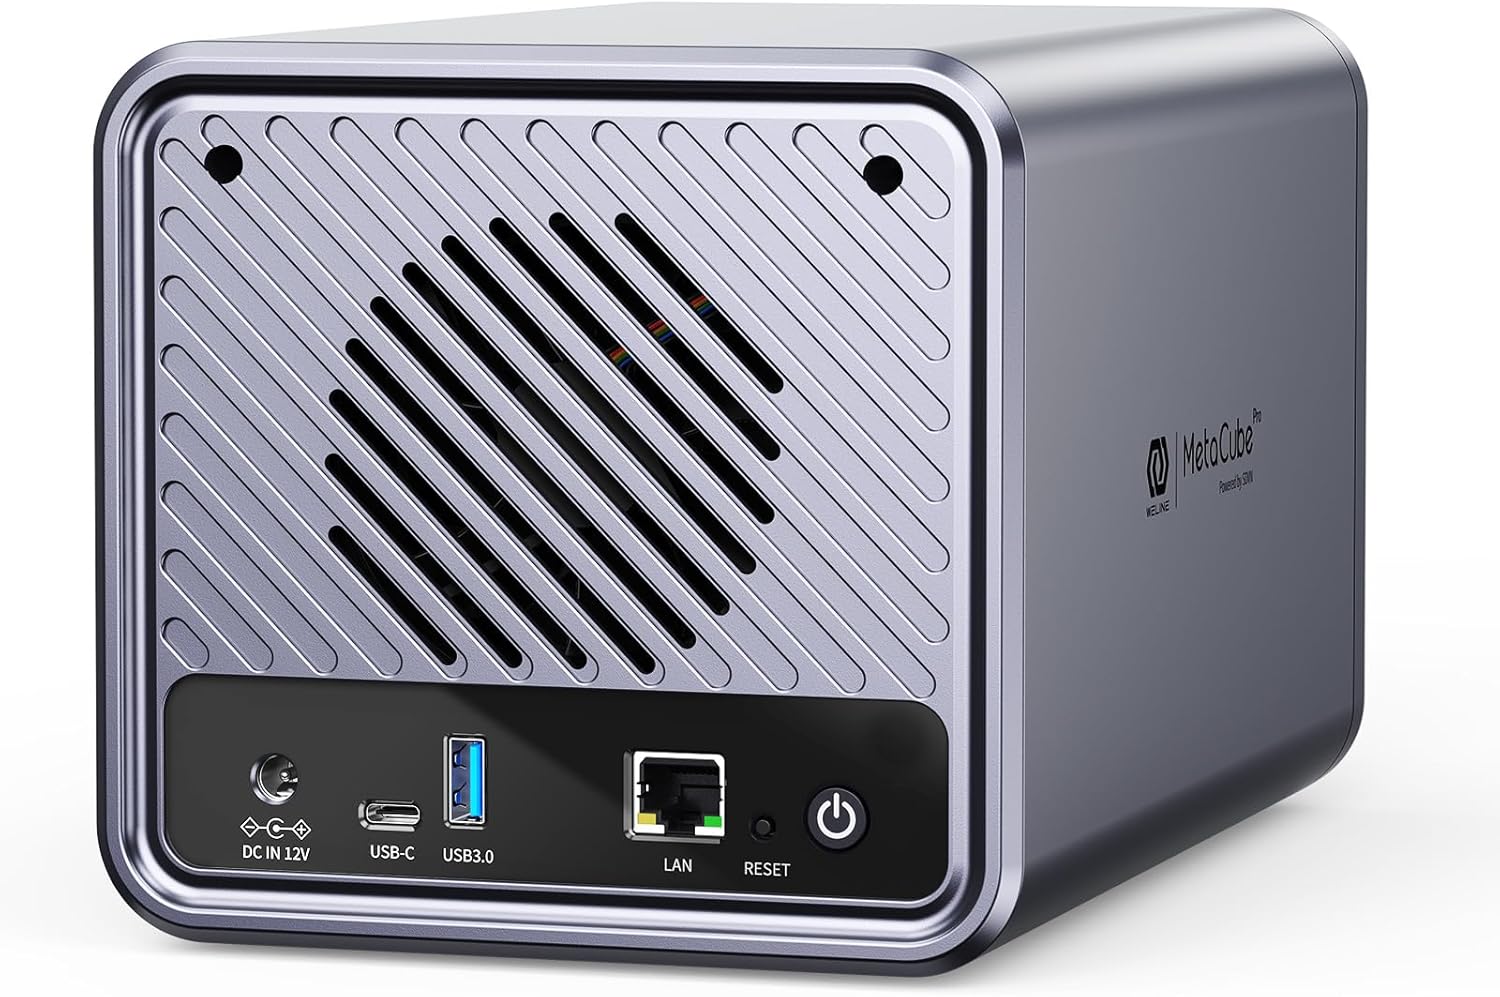
Figure 3: ORICO TS200 Rear Panel Interfaces.
3.2. Descripció de l'indicador
The front panel features indicator lights that provide status information:
- Hard Disk Light (Red/Blue):
- Slow blinking red: Hard disk needs formatting.
- Solid blue: Hard disk is ready for use.
- Solid red: Hard disk abnormality or failure.
- Network Light (Red/Blue):
- Rapid blinking red: Network connection failure.
- Solid blue: Network is normal.
- System Light (Blue):
- Fast blinking blue: During boot-up.
- Solid blue: System boot is complete.
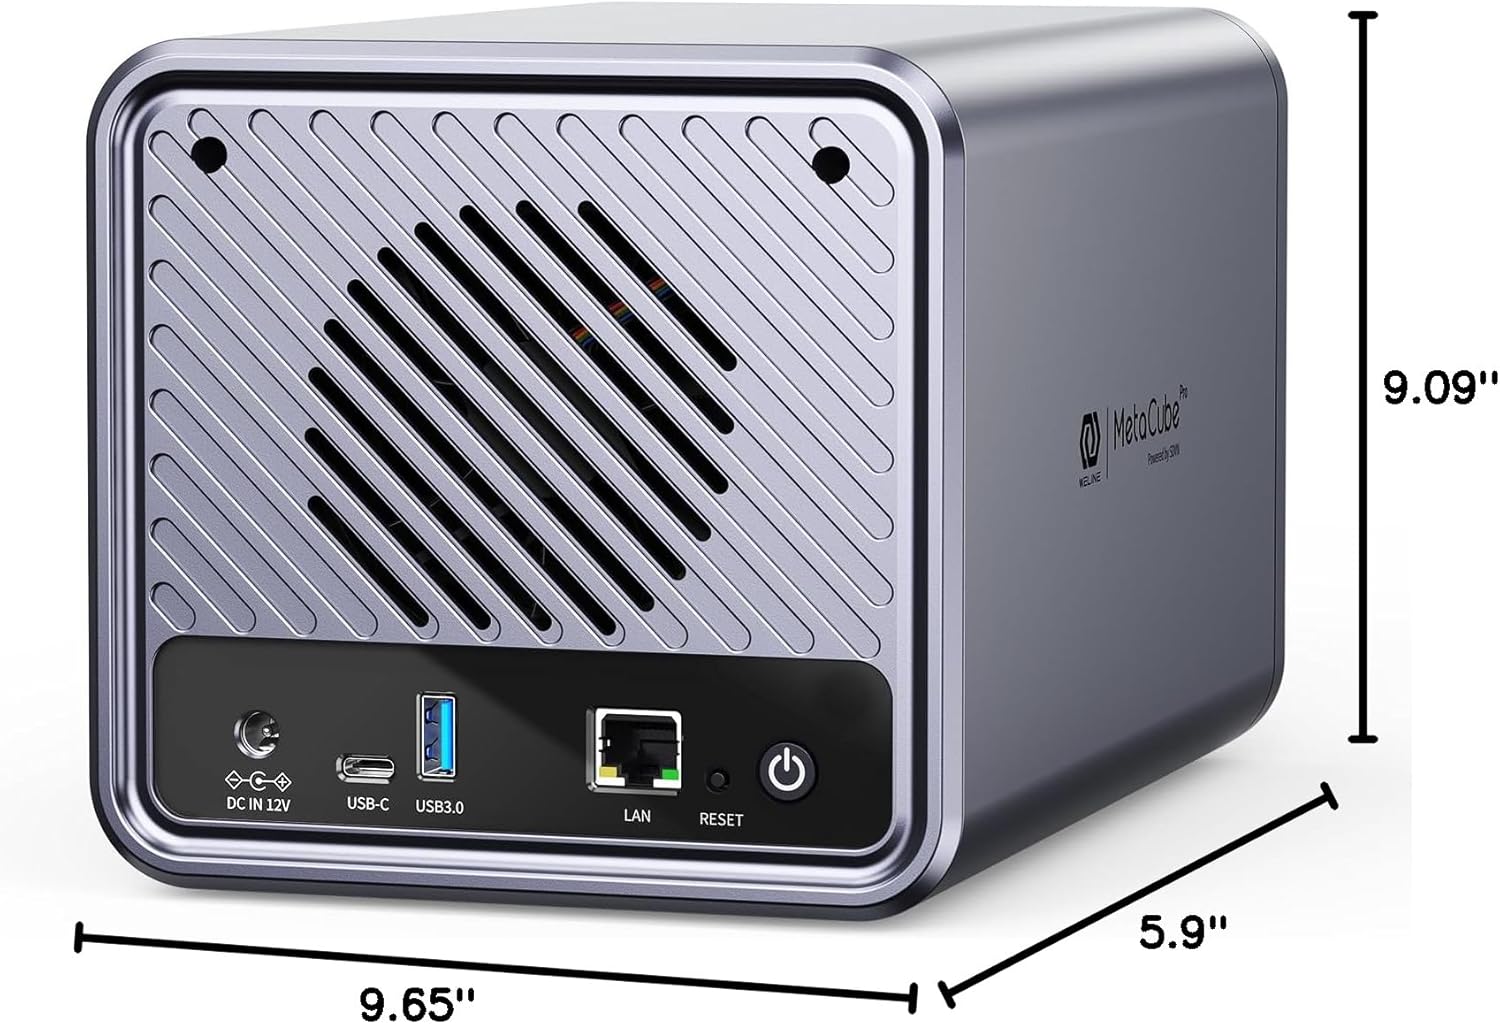
Figure 4: ORICO TS200 Indicator Lights.
4. Instal·lació de maquinari
The ORICO TS200 supports 2.5-inch and 3.5-inch SATA hard disks. Follow these steps to install your hard drives:
- First, remove the front magnetic cover of the NAS enclosure.
- Press the bayonet position on the hard drive tray. The tray handle will automatically eject.
- Grab the handle and pull out the hard drive tray rack.
- Attach your 2.5-inch or 3.5-inch SATA hard disk to the tray. For 2.5-inch drives, note that the screw holes are located on the bottom of the tray.
- Use the provided screws and screwdriver to securely fix the hard disk to the tray.
- Finally, slide the tray with the installed hard disk back into the enclosure until it clicks into place. Reattach the front magnetic cover to complete the installation.
Nota important:
- If you are using an old hard disk, please ensure you perform a complete data backup before installation. The NAS may require formatting the disk, which will erase all existing data.

Figure 5: Hard Drive Installation Process.
Video 1: Detailed Hard Drive Installation Guide for ORICO TS200. This video demonstrates the physical steps for installing hard drives into the NAS enclosure, including removing the magnetic cover, ejecting trays, securing drives, and reinserting them.
5. Configuració i configuració inicial
5.1. Connexió del dispositiu
Before initial use, connect your ORICO TS200 to your network and power source:
- Connect one end of the provided network cable to the LAN port on the rear of the TS200 and the other end to an available Ethernet port on your router or network switch.
- Connect the power adapter to the DC In 12V port on the TS200 and plug the adapter into a power outlet.
- Press the Power Switch to turn on the device. The device will automatically boot up by default. Observe the System Light and Network Light indicators on the front panel for status.
Video 2: ORICO TS200 Quick Setup Guide. This video provides a brief overview of the ORICO TS200, including its features and basic connectivity, demonstrating how to connect the device to your network and power.
5.2. App Installation and Device Binding
To manage your ORICO TS200 and access its features, you need to install the Welink APP on your mobile device:
- Scan the QR code located inside the front cover of the TS200 to download the Welink APP. Alternatively, search for "Welink.io" in the Apple App Store (for iOS) or Google Play Store (for Android).
- Open the Welink APP. The first time you log in on an Android device, a VPN authorization request will appear. Please agree to this request; otherwise, the account may not log in properly.
- Register and log in to your Welink account.
- Once logged in, navigate to the "Resources" screen within the app.
- Choose to scan the QR code to add your device. Scan the QR code located on the top of the TS200 unit. You can also bind your device by LAN searching if preferred.
- Click "Confirm binding" to complete the device binding process.
5.3. RAID Configuration and Disk Formatting
After binding your device, you will need to configure the RAID mode and format the hard disks. This step is crucial for the NAS to function correctly and for data integrity.
- Enter the device node within the Welink APP.
- Follow the prompts to select the desired RAID mode. The TS200 supports up to 3 RAID modes (e.g., RAID 0, RAID 1, JBOD). Refer to the app for detailed descriptions of each mode.
- Confirm the formatting process. This will erase all data on the installed hard disks.
- Wait for the hard disk to finish formatting. Once complete, you can use all the functions of your ORICO TS200 normally.

Figure 6: VPN-SDVN Encrypted Channel for Secure Access.
6. Funcionament
6.1. Accessing and Managing Files
The Welink APP provides comprehensive tools for managing your files on the NAS. You can upload, download, delete, and organize files directly from your mobile device or PC.

Figure 7: Remote Data Backup and Online Editing via Welink APP.
6.2. Multimedia Sharing
The ORICO TS200 supports both Samba and DLNA protocols for seamless multimedia sharing across your devices.
- Samba: Permet files to be shared across multiple devices on your network, making it easy to access your NAS content from Windows, macOS, or Linux computers.
- DLNA: Enables you to stream media (videos, photos, music) from your NAS to DLNA-compatible devices such as smart TVs, gaming consoles, and media players, creating a private family video library.

Figure 8: Private Video Library via DLNA Function.
6.3. Team Office Center Functionality
For small teams or family groups, the ORICO TS200 can serve as a central file sharing hub, facilitating collaboration and document management.

Figure 9: Building a Team Office Center with ORICO NAS.
7. Manteniment
7.1. Heat Dissipation and Cooling
The ORICO TS200 is equipped with a built-in high-speed fan to ensure continuous and stable cooling, maintaining optimal operating temperatures for the hard disks and internal components. This helps in prolonging the lifespan of your device and hard drives.
- The daily operating temperature of the equipment is approximately 35°C.
- Ensure proper ventilation around the device to allow for efficient airflow. Avoid placing the NAS in enclosed spaces or near heat sources.
Figure 10: High Efficiency Heat Dissipation System.
7.2. Data Backup Practices
While RAID configurations provide data redundancy, it is always recommended to implement a comprehensive backup strategy for critical data. Regularly back up important files from your NAS to an external drive or another cloud service to prevent data loss from unforeseen circumstances.
8. Solució De Problemes
This section addresses common issues you might encounter with your ORICO TS200. Refer to the indicator lights for initial diagnosis.
8.1. Indicador d'estat de la llum
| Llum indicadora | Estat | Meaning / Solution |
|---|---|---|
| Llum del sistema | Blau parpellejant ràpid | Device is booting up. Wait for it to become solid blue. |
| Llum del sistema | Blau sòlid | System boot is complete. Device is ready. |
| Llum de xarxa | Vermell parpelleig ràpid | Network connection failure. Check Ethernet cable connection to NAS and router. Ensure router is functioning. |
| Llum de xarxa | Blau sòlid | Network connection is normal. |
| Hard Disk Light | Parpelleig lent en vermell | Hard disk needs formatting. Use the Welink APP to format the disk. (Avís: Això esborrarà totes les dades). |
| Hard Disk Light | Blau sòlid | Hard disk is ready for use. |
| Hard Disk Light | Vermell sòlid | Hard disk abnormality or failure. Check the hard disk connection. If the issue persists, the hard disk may be faulty and require replacement. |
8.2. Problemes comuns i solucions
- Cannot connect to the NAS via Welink APP:
- Ensure the NAS is powered on and connected to the network (check Network Light).
- Verify your mobile device is connected to the internet.
- For Android users, ensure the VPN authorization request was accepted upon first login.
- Try restarting both the NAS and your mobile device.
- Ensure the Welink APP is updated to the latest version.
- Lenta file transfer speeds:
- Check your network connection speed and stability.
- Ensure your network cable is securely connected and not damaged.
- Avoid simultaneous large file transfers or multiple concurrent users if possible.
- Hard disk not recognized or accessible:
- Check if the Hard Disk Light is solid blue. If it's blinking or solid red, refer to the Indicator Light Status table above.
- Ensure the hard disk is properly seated in its tray and the tray is fully inserted into the NAS.
- If the hard disk is new or from another system, it may need to be formatted via the Welink APP.
9. Especificacions
Detailed technical specifications for the ORICO TS200 2-Bay NAS Storage:
| Característica | Descripció |
|---|---|
| Número de model | TS200 |
| Drive Bays | 2-bay |
| RAM | 2 GB DDR4 |
| CPU | 4-Nucli |
| Capacitat màxima d'emmagatzematge | Up to 44TB (2 x 22TB drives) |
| Modes RAID compatibles | Hardware RAID (up to 3 modes supported) |
| Protocols de xarxa | Samba, DLNA |
| Connectivitat | USB-C, USB 3.0, LAN |
| Dimensions del producte | 9.09" de profunditat x 9.65" d'amplada x 5.9" d'alçada (23.09 x 24.51 x 14.99 cm) |
| Pes de l'article | 4.18 lliures (1.9 kg) |
| Material | Acrilonitril butadiè estirè (ABS) |
| Color | Gris |
Figure 11: ORICO TS200 Product Dimensions.
10. Garantia i Suport
ORICO is committed to providing high-quality products and excellent customer service.
- Garantia: The ORICO TS200 comes with an 18-month warranty from the date of purchase.
- Lifetime Service Support: ORICO offers lifetime service support for this product.
- Assistència tècnica: If you have any questions regarding APP settings, NAS settings, troubleshooting, or any other product-related inquiries, please do not hesitate to contact ORICO customer service.
For support, please refer to the contact information provided on the ORICO official weblloc web o la vostra plataforma de compra.

