
Blackmagic Design SWPANELCCU4
Blackmagic Design ATEM Camera Control Panel User Manual
Model: SWPANELCCU4
Introducció
The Blackmagic Design ATEM Camera Control Panel is a compact, professional remote camera control unit designed for live production environments. It allows a single operator to control up to four Blackmagic URSA Broadcast, URSA Mini, Blackmagic Studio, or Blackmagic Micro Studio cameras simultaneously. This panel provides traditional broadcast-style controls for precise adjustments of technical parameters, freeing camera operators to focus on creative aspects like framing and composition.
This manual provides detailed instructions for setting up, operating, maintaining, and troubleshooting your ATEM Camera Control Panel.
1. Configuració
Proper setup ensures optimal performance and seamless integration with your ATEM live production switcher.
1.1 Desembalatge i inspecció inicial
- Traieu amb cura tots els components de l'embalatge.
- Verify that all included items are present: ATEM Camera Control Panel, 6ft Power Cord, 7ft Cat5e Cable, 6ft USB-C Cable, Solid Signal Cable Ties.
- Inspect the unit for any signs of physical damage. If damage is found, contact your reseller immediately.
1.2 Connexió d'alimentació
Connect the included 6ft Power Cord to the AC power input on the rear of the ATEM Camera Control Panel and then to a suitable power outlet.
1.3 Network Connection (Ethernet)
The ATEM Camera Control Panel connects to your ATEM live production switcher or ATEM hardware control panel via Ethernet. Use the included 7ft Cat5e Cable for this connection.
- Connect one end of the Ethernet cable to an Ethernet port on the ATEM Camera Control Panel.
- Connect the other end to an Ethernet port on your ATEM switcher or another ATEM device in your network. Ethernet can be looped from one ATEM device to another.
- Ensure your ATEM switcher and cameras are properly configured for network communication.
1.4 Connexió USB-C
The USB-C port on the rear of the panel is used for firmware updates and initial configuration via a computer. Connect the included 6ft USB-C Cable to your computer and the panel when performing these tasks.

Figure 1: The ATEM Camera Control Panel with its included accessories, including power, Ethernet, and USB-C cables.
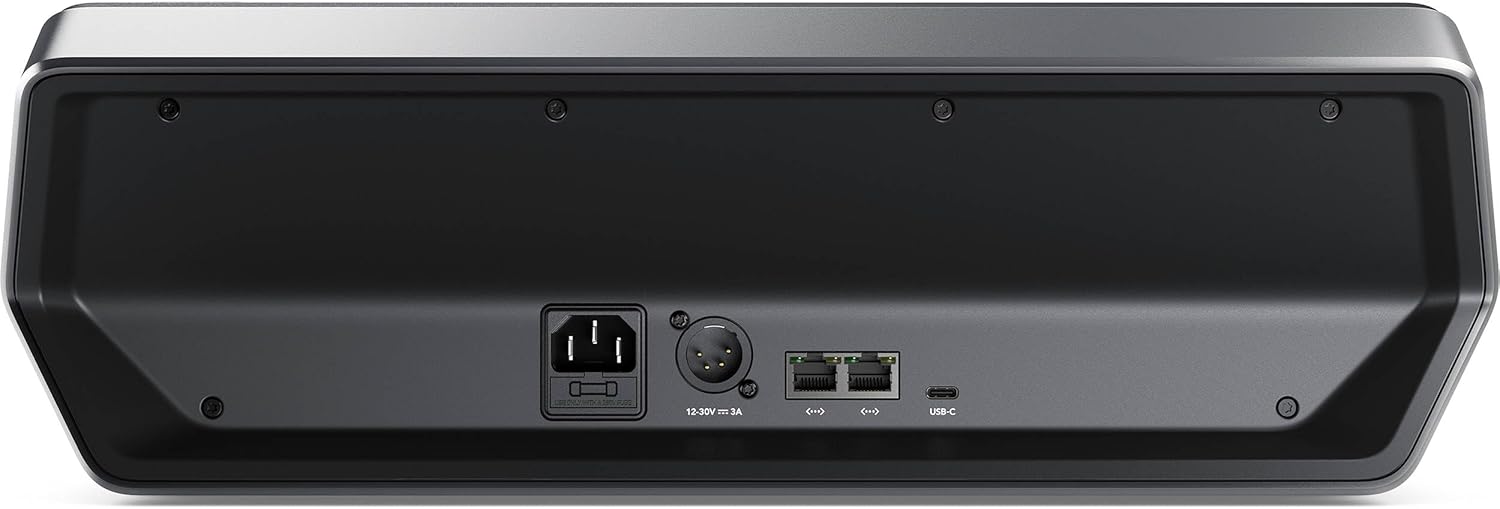
Figura 2: posterior view of the control panel, highlighting the AC power input, XLR DC input, Ethernet ports, and USB-C port for connectivity.
2. Funcionament del tauler de control
The ATEM Camera Control Panel is designed with a familiar and logical layout for efficient camera control.
2.1 Acabatview de Controls
The panel features four camera controllers, each with a dedicated LCD screen, soft buttons, and knobs at the top, and a full set of professional controls below.

Figura 3: Detallada view of the control panel's interface, showing the four camera control sections with their respective LCDs, buttons, and joysticks.
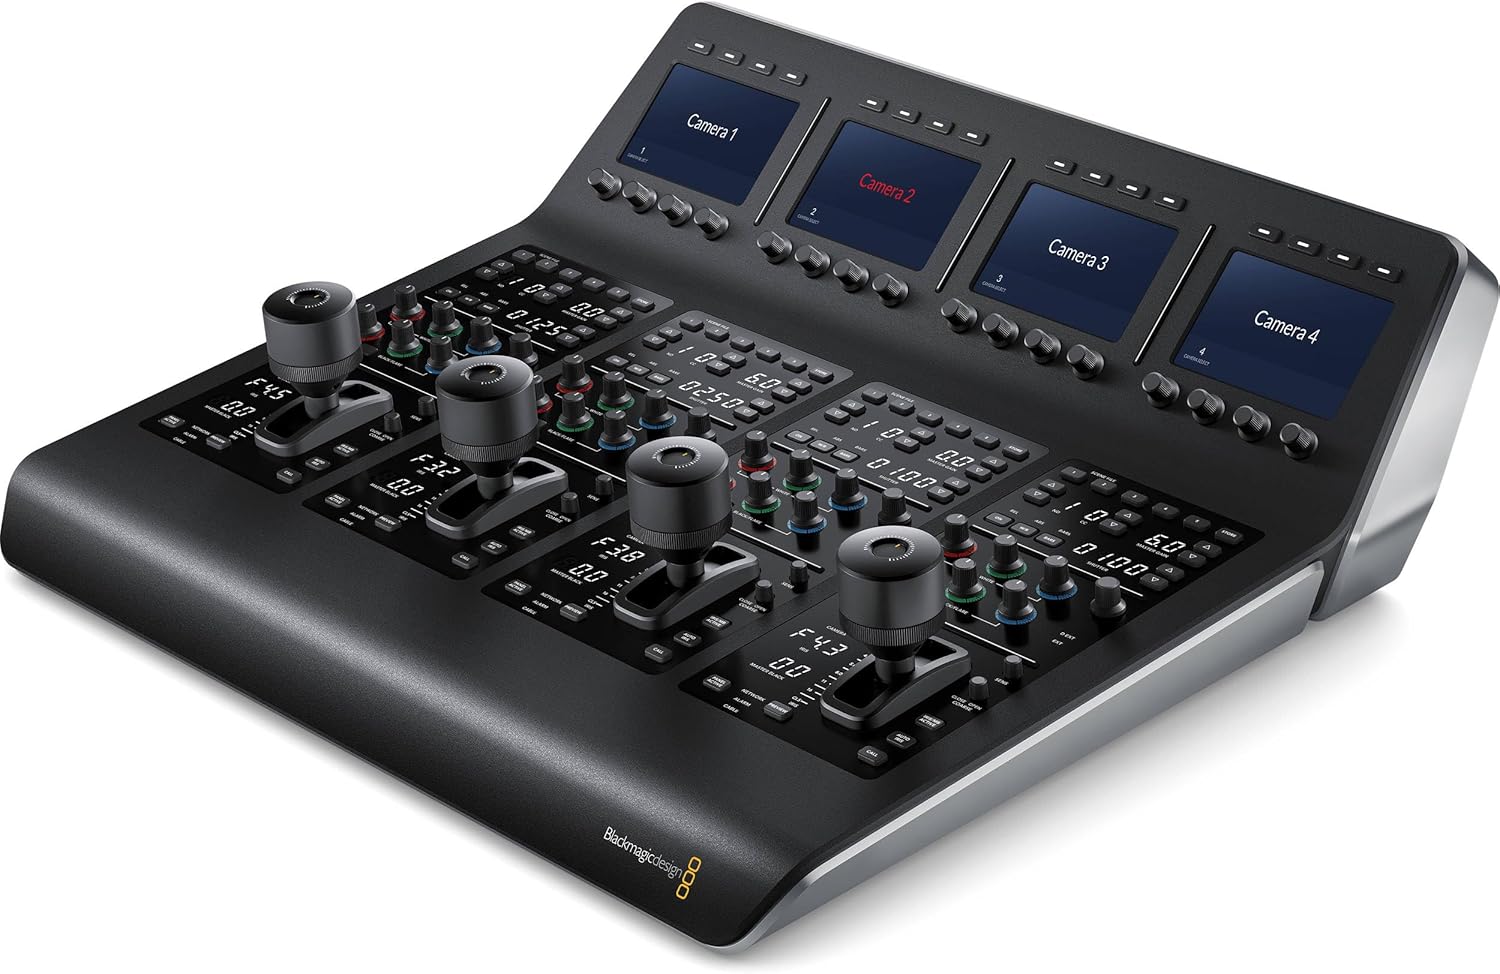
Figure 4: Angled perspective of the control panel, illustrating the ergonomic design and accessibility of its various controls.
2.2 Scene and Camera Controls (Top Section)
- Scene Presets: Use the controls in the top section to save and recall scene presets. This allows for quick adjustments to cameras based on changes in lighting or scene conditions.
- Guany mestre: Adjust the overall gain level for the camera.
- Balanç de blancs: Perform white balancing to ensure accurate color reproduction.
- Velocitat d'obturació: Modify the camera's shutter speed to control motion blur and exposure.
2.3 Gain and Pedestal Controls (Center Section)
- This section features independent RGB controls for gain (white levels) and pedestal (black levels).
- Adjust individual red, green, and blue levels in your blacks and whites to compensate for unwanted color casts and achieve precise color balance.
2.4 Lens and Iris Controls (Bottom Section)
- LED Camera Number: Indicates the active camera and its preview/on-air status.
- Palanca de control: A high-quality professional joystick is used for precise adjustment of the iris (aperture) and master black levels.
- Botó de trucada: Activates talkback communication with the camera operator.
- Panel Lock Button: Locks the panel controls to prevent accidental changes during live production.
- Indicadors: LEDs for network, power, and cable connection status to the camera.
3. Manteniment
Regular maintenance helps ensure the longevity and reliable operation of your ATEM Camera Control Panel.
- Neteja: Use a soft, dry, lint-free cloth to clean the exterior of the unit. Avoid using liquid cleaners, aerosols, or solvents, as these can damage the finish or internal components.
- Actualitzacions de firmware: Periodically check the Blackmagic Design support website for new firmware updates. Keeping your panel's firmware up-to-date ensures access to the latest features and performance improvements. Connect via USB-C for updates.
- Emmagatzematge: When not in use for extended periods, store the panel in a clean, dry environment, away from extreme temperatures and direct sunlight.
4. Solució De Problemes
This section addresses common issues you might encounter with your ATEM Camera Control Panel.
4.1 Sense poder
- Comproveu el cable d'alimentació: Ensure the AC power cord is securely connected to both the panel and a working power outlet.
- Verificar la presa de corrent: Proveu la presa de corrent amb un altre dispositiu per confirmar que subministra corrent.
4.2 No Connection to ATEM Switcher/Cameras
- Cable Ethernet: Confirm the Ethernet cable is securely connected to both the control panel and the ATEM switcher/network. Try a different Ethernet cable if necessary.
- Configuració de la xarxa: Ensure the IP addresses and network settings of the control panel, ATEM switcher, and cameras are correctly configured and on the same subnet. Refer to the Blackmagic Design ATEM Switcher manual for network setup details.
- ATEM Switcher Status: Verify that your ATEM switcher is powered on and functioning correctly.
- Camera Compatibility/Firmware: Ensure your Blackmagic cameras are compatible with the ATEM Camera Control Panel and have the latest firmware installed.
4.3 Controls Unresponsive
- Bloqueig del panell: Check if the "Panel Lock" button is engaged. Disengage it to enable controls.
- Reinicia: Try power cycling the ATEM Camera Control Panel and the ATEM switcher.
- Firmware: Ensure the panel's firmware is up-to-date.
For further assistance, visit the official Blackmagic Design support weblloc o poseu-vos en contacte amb el seu servei d'atenció al client.
5. Especificacions
Key technical specifications for the Blackmagic Design ATEM Camera Control Panel (SWPANELCCU4).
| Característica | Especificació |
|---|---|
| Dimensions del producte (L x A x A) | 15.31 x 16.93 x 5.57 polzades |
| Pes de l'article | 20 lliures |
| Color | Black or dark gray |
| Tipus de connectors | Ethernet, USB-C, AC Power, DC Power (XLR) |
| Dispositius compatibles | Blackmagic ATEM Panels, Blackmagic ATEM Switchers, Blackmagic Studio Cameras, Blackmagic URSA Cameras |
| Cable Type (Included) | Ethernet, USB-C, AC Power Cord |
| Data de primera disponibilitat | 28 de desembre de 2023 |
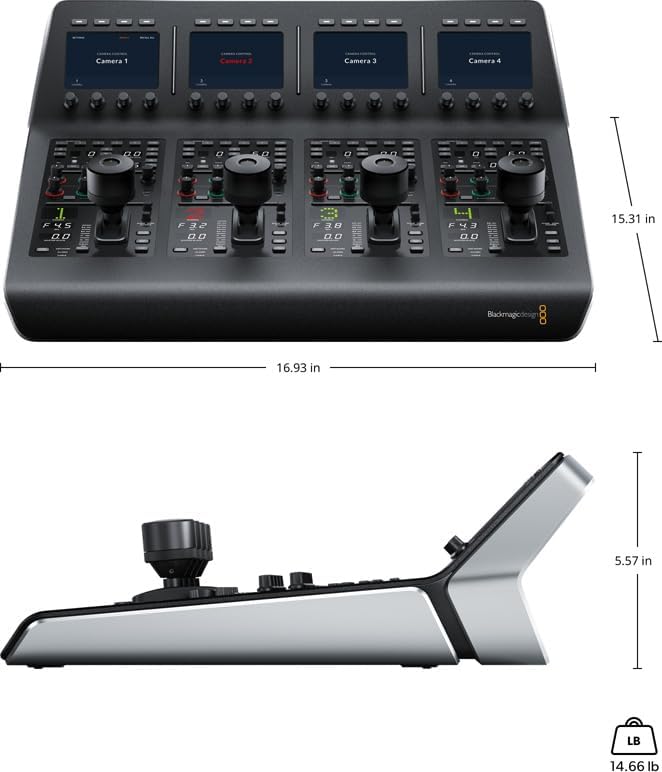
Figure 5: Diagram illustrating the physical dimensions (length, width, height) and weight of the ATEM Camera Control Panel.
6. Garantia i Suport
For detailed information regarding the product warranty, please refer to the official Blackmagic Design weblloc web o la targeta de garantia inclosa amb la compra. Els termes i condicions de la garantia poden variar segons la regió.
For technical support, software downloads, and additional resources, please visit the Blackmagic Design support page:
Ask a question about this manual
Ask about setup, troubleshooting, compatibility, parts, safety, or missing instructions. Manuals+ will review the question and use this page’s manual context to help answer it.