Introducció
This manual provides detailed instructions for the installation, operation, and maintenance of your ASHATA H511 VD4 Motherboard. Please read this manual thoroughly before proceeding with installation to ensure correct setup and optimal performance. Keep this manual for future reference.
Informació de seguretat
Observeu sempre les precaucions de seguretat següents:
- Disconnect power from your computer before installing or removing any components.
- Porteu una polsera antiestàtica per evitar danys per descàrrega electrostàtica (ESD) als components.
- Manegeu la placa base per les vores per evitar tocar els components sensibles.
- Assegureu-vos de ventilar adequadament la carcassa del vostre PC per evitar que s'escalfi.
- No exposeu la placa base a la humitat ni a temperatures extremes.
Contingut del paquet
Verify that all items are present in your ASHATA H511 VD4 Motherboard package:
- ASHATA H511 VD4 Motherboard
- Escut d'E / S
- Cables de dades SATA (2x)
- Manual d'usuari (aquest document)
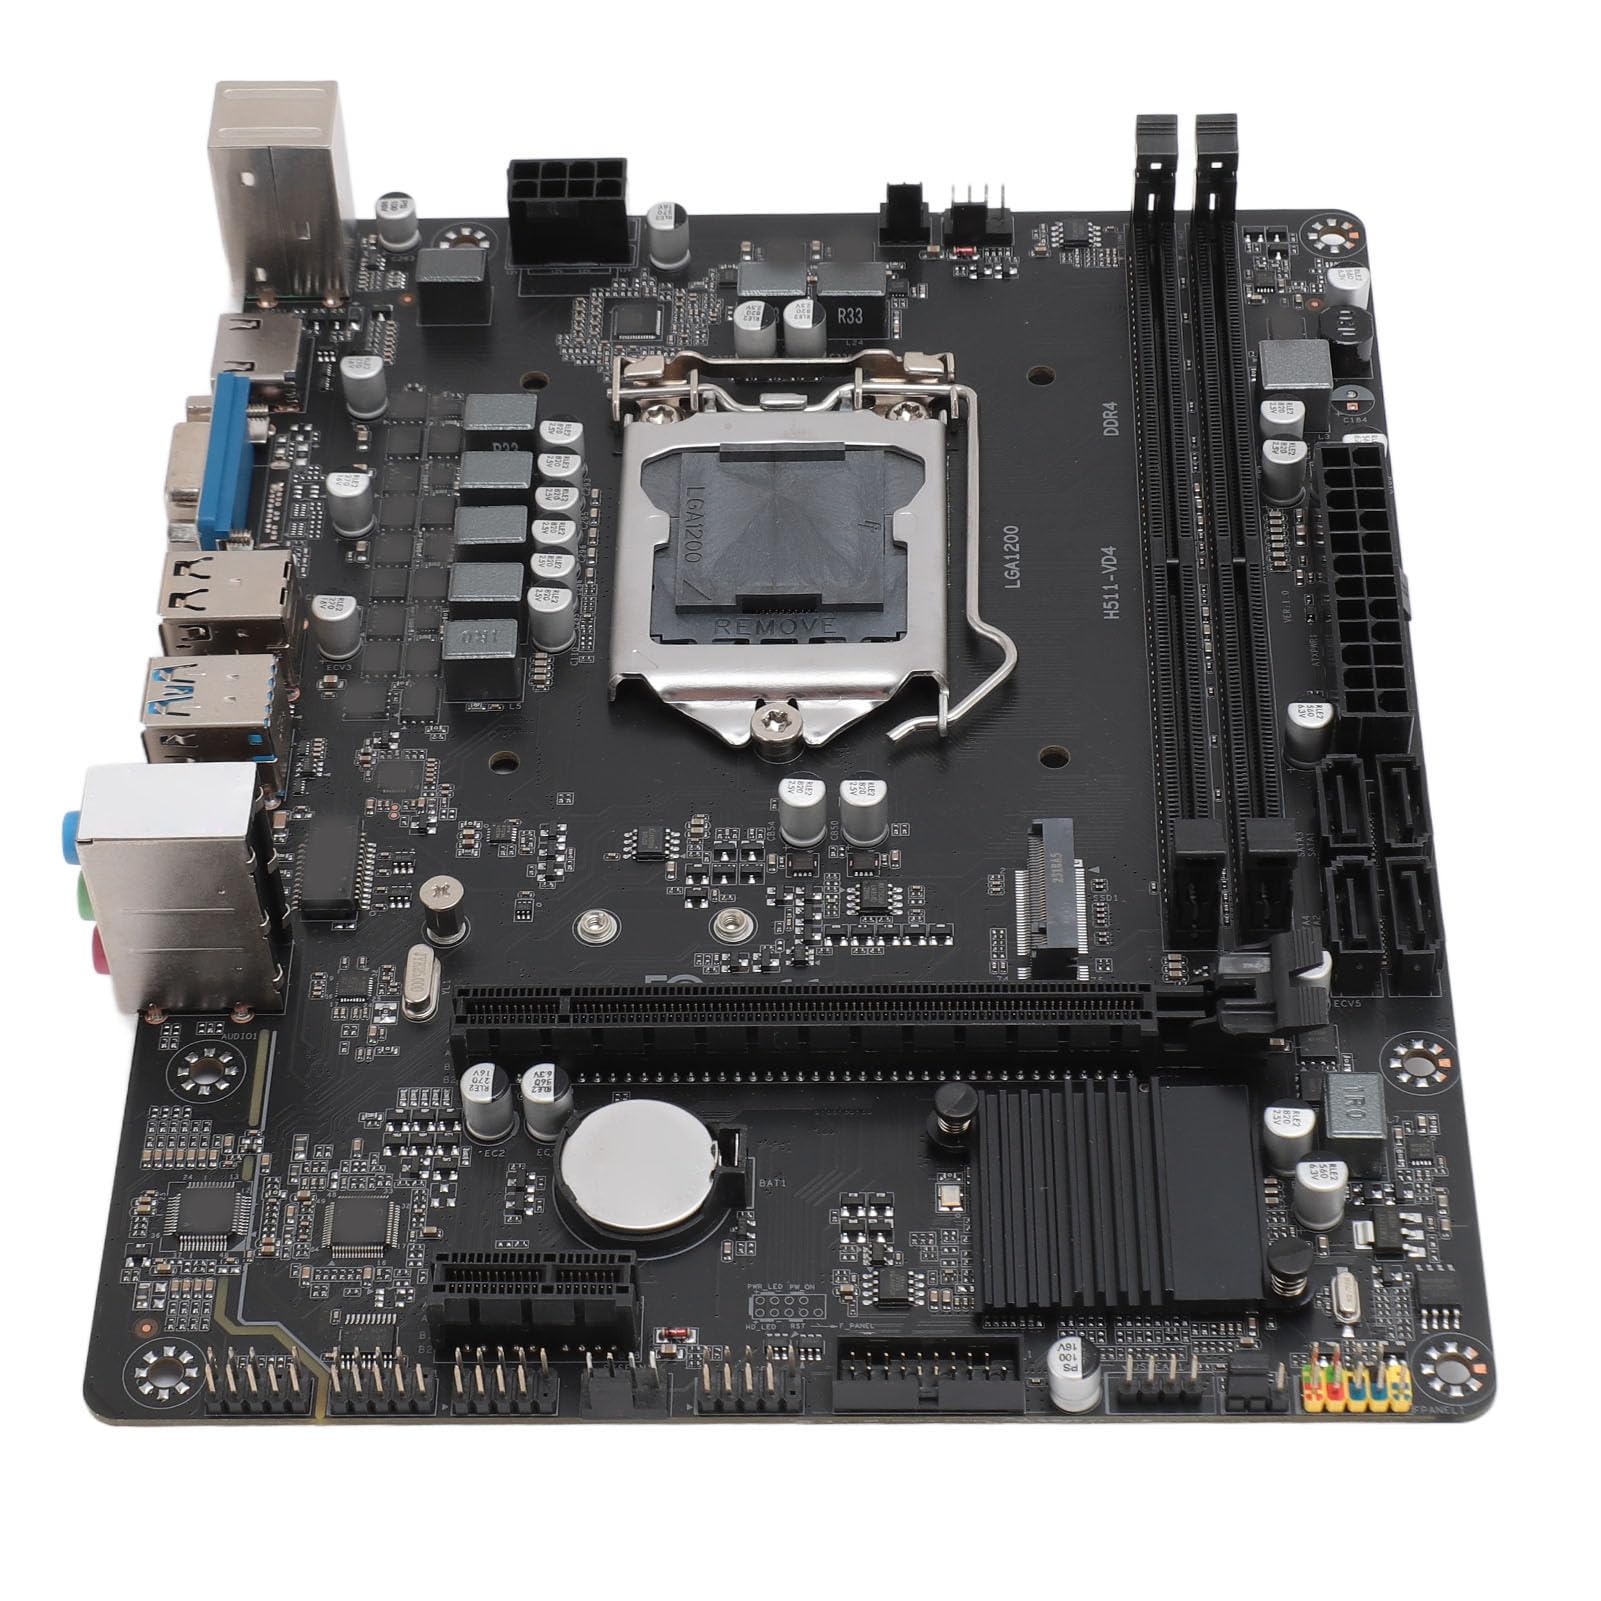
Image: ASHATA H511 VD4 Motherboard, including the I/O shield and two SATA data cables, as typically found in the product package.
Producte acabatview
The ASHATA H511 VD4 Motherboard is designed for desktop PCs, supporting 10th/11th generation Intel CPUs with an LGA1200 socket. It features dual-channel DDR4 memory slots and multiple expansion interfaces.

Imatge: De dalt a baix view of the ASHATA H511 VD4 Motherboard, showing the LGA1200 CPU socket, DDR4 memory slots, PCIe slots, and various headers.

Imatge: Anglesa view of the ASHATA H511 VD4 Motherboard, highlighting the rear I/O panel with USB ports, video outputs, and audio jacks.
Components clau:
- Sòcol de la CPU LGA1200: Supports 10th and 11th Generation Intel Core processors.
- Ranures de memòria DDR4: Dual-channel support for DDR4 SDRAM.
- PCIe x16 Slot: Per a targetes gràfiques.
- PCIe x1 Slots: Per a targetes d'expansió.
- Ranura M.2: High-speed storage interface.
- Ports SATA: For connecting storage devices.
- Ports d'E/S posterior: USB ports, LAN, audio jacks, video outputs (VGA, HDMI if integrated graphics are used).
Configuració i instal·lació
1. Preparació del cas:
Install the I/O shield into the rear opening of your PC case. Ensure it is securely snapped into place.
2. Instal·lació de la placa base:
- Alineeu la placa base amb els separadors de la carcassa del vostre PC.
- Carefully lower the motherboard onto the standoffs, ensuring the I/O ports align with the I/O shield.
- Secure the motherboard with screws into the standoffs. Do not overtighten.
3. Installing the CPU:
- Obriu la palanca del sòcol de la CPU.
- Carefully place the CPU into the socket, aligning the golden triangle on the CPU with the triangle on the socket. Do not force it.
- Tanqueu la palanca del sòcol de la CPU per fixar la CPU.
- Apliqueu pasta tèrmica i instal·leu el refrigerador de CPU segons les instruccions del fabricant.
4. Installing Memory (RAM):
- Obriu els clips dels dos extrems de les ranures de memòria DDR4.
- Align the notch on the RAM module with the notch in the memory slot.
- Premeu fermament els dos extrems del mòdul RAM fins que els clips encaixin al seu lloc.
- For dual-channel performance, install modules in matching slots (refer to motherboard diagram for specific slot pairing).
5. Instal·lació de dispositius d'emmagatzematge:
- SSD M.2: Insert the M.2 SSD into the M.2 slot at an angle, then push it down and secure it with the provided screw.
- Unitats SATA: Connect SATA data cables from the motherboard's SATA ports to your SSDs/HDDs. Connect power cables from your power supply to the drives.
6. Installing Graphics Card (Optional):
- Obriu el clip de retenció de la ranura PCIe x16.
- Alineeu la targeta gràfica amb la ranura i premeu fermament fins que encaixi al seu lloc.
- Fixeu la targeta a la carcassa amb un cargol.
- Connect PCIe power cables from your power supply to the graphics card if required.
7. Connexió de la font d'alimentació:
- Connecteu el connector d'alimentació ATX de 24 pins de la font d'alimentació a la placa base.
- Connect the 8-pin (or 4-pin) CPU power connector to the motherboard.
8. Connecting Front Panel Headers:
Connect the front panel connectors (Power SW, Reset SW, HDD LED, Power LED, USB, Audio) to their respective headers on the motherboard. Refer to the motherboard's silkscreen labels for correct orientation.
Instruccions de funcionament
Primer arrencada:
- Un cop instal·lats i connectats tots els components, connecteu el monitor, el teclat i el ratolí.
- Turn on the power supply and then press the power button on your PC case.
- The system should boot to the BIOS/UEFI interface or begin the operating system installation process.
Configuració de la BIOS/UEFI:
During boot-up, press the designated key (usually Del or F2) to enter the BIOS/UEFI setup. Here you can configure boot order, system time, fan speeds, and other advanced settings. Save changes before exiting.
Instal·lació del controlador:
After installing your operating system, install the necessary drivers for the motherboard chipset, LAN, audio, and any integrated graphics. These drivers are typically available on the manufacturer's website or included on a driver CD/USB (if provided).
Manteniment
- Eliminació de pols: Netegeu regularment la pols de l'interior de la carcassa del vostre PC, especialment dels ventiladors i dissipadors de calor, amb aire comprimit. Assegureu-vos que el sistema estigui apagat i desendollat abans de netejar-lo.
- Actualitzacions de la BIOS/UEFI: Periodically check the ASHATA website for BIOS/UEFI updates. Updates can improve stability, compatibility, and performance. Follow the update instructions carefully to avoid system damage.
- Actualitzacions de controladors: Mantingueu els controladors del sistema actualitzats per garantir un rendiment òptim i la compatibilitat amb el programari i el maquinari nous.
- Gestió de cables: Assegureu-vos que els cables interns estiguin ben gestionats per millorar el flux d'aire i evitar interferències.
Resolució de problemes
- Sense energia:
- Check if the power supply is switched on and properly connected to the motherboard (24-pin and 8-pin/4-pin CPU power).
- Assegureu-vos que el cable de l'interruptor d'alimentació del panell frontal estigui connectat correctament a la placa base.
- Proveu la font d'alimentació amb un altre sistema o un provador de fonts d'alimentació.
- Sense pantalla:
- Verify that the monitor is connected to the correct video output (either integrated graphics or dedicated graphics card).
- Torneu a col·locar els mòduls de la targeta gràfica i de la RAM.
- Prova d'arrencar amb només una memòria RAM.
- Comproveu si el cable d'alimentació de la CPU està connectat correctament.
- Inestabilitat/Avaries del sistema:
- Comproveu si el refrigerador de la CPU està correctament instal·lat i que els ventiladors funcionen.
- Executeu eines de diagnòstic de memòria per comprovar si hi ha defectes a la memòria RAM.
- Assegureu-vos que tots els controladors estiguin actualitzats.
- Check for loose cables or connections.
- Perifèric no detectat:
- Assegureu-vos que el perifèric estigui connectat correctament al port correcte.
- Install the latest drivers for the peripheral.
- Test the peripheral on another port or another computer.
Especificacions
| Característica | Especificació |
|---|---|
| Marca | ASHATA |
| Model | H511 VD4 |
| Socket de CPU | LGA1200 (Supports 10th/11th Gen Intel Core) |
| Tecnologia de la memòria | SDRAM DDR4 |
| Velocitat de rellotge de memòria | 2833 MHz (màx.) |
| Canals de memòria | Doble canal |
| Interfície de la targeta gràfica | Integrated, PCI, PCI-Express x16 |
| Interfície d'emmagatzematge | M.2, SATA |
| Font d'alimentació | Font d'alimentació monofàsica |
| ASIN | B0CS6QDQ35 |
| Primera data disponible | 18 de febrer de 2025 |
Garantia i Suport
For warranty information and technical support, please refer to the documentation provided with your purchase or visit the official ASHATA weblloc web. Conserveu el comprovant de compra per a reclamacions de garantia.
Fabricant: ASHATA
Weblloc: www.ashata.com (Nota: Això és un marcador de posició URL. Please refer to your product packaging or official documentation for the correct support weblloc.)