
ssontong Type C 3-Lead Hard Wire Kit
ssontong Dash Cam Hardwire Kit (Type C 3-Lead) Instruction Manual
Model: Type C 3-Lead Hard Wire Kit
1. Introducció
This manual provides detailed instructions for the installation, operation, and maintenance of your ssontong Dash Cam Hardwire Kit. This kit is designed to provide continuous power to your dash camera and other compatible devices, enabling features like 24-hour parking surveillance and low voltagprotecció.
2. Informació de seguretat
- Ensure the vehicle's engine is off and the negative battery terminal is disconnected before installation to prevent short circuits.
- Si no esteu segurs sobre algun dels passos d'instal·lació, consulteu un tècnic d'automoció qualificat.
- Do not attempt to modify the hardwire kit. Unauthorized modifications may void the warranty and pose safety risks.
- This product is not an RF Device.
3. Contingut del paquet
The ssontong Dash Cam Hardwire Kit includes the following items:
- 1 x Dash Cam Hardwire Kit (Type C 3-Lead, 13ft charger power cord)
- 2 x Low-Profile Mini Fuse Adapter
- 2 x Mini Fuse Adapter
- 2 x ATO (Regular) Fuse Adapter
- 2 x Micro2 Fuse Adapter
- 1 x Shielding Magnetic Ring
- Clips and Crowbar for installation
- 1 x Manual d'usuari

Figura 1: All components included in the ssontong Dash Cam Hardwire Kit. This image displays the main hardwire cable with Type C connector, various fuse adapters (Low-Profile Mini, Mini, ATO, Micro2), cable clips, a pry bar, and a magnetic ring.
4. Producte acabatview
The hardwire kit converts 12V-24V vehicle power to 5V/3A for your dash cam. It features a 3-lead design for ACC detection and continuous power, along with built-in low voltagprotecció.
4.1 Característiques clau
- Àmplia compatibilitat: Compatible with most dash cams, car DVRs, GPS navigators, and radar detectors using a Type C USB port. Supports 12V-24V input.
- Volum baixtage Protecció: Automatically cuts power to the dash cam when the vehicle battery voltage drops below a preset threshold (11.4V for 12V input or 23.2V for 24V input) to prevent battery drain.
- 24-Hour Parking Surveillance: Provides continuous power to the dash cam even when the engine is off, enabling parking mode features.
- ACC Mode 3-Lead Design: Supports ACC detection for proper parking mode functionality.
- Fàcil instal·lació: Designed for straightforward installation, replacing the need for a car cigarette lighter socket.
- Anti-Interference Magnetic Ring: Included to help reduce interference with car radios.

Figura 2: Diagram illustrating the wide compatibility of the hardwire kit with various devices such as dash cams, mirror dash cams, GPS units, radar detectors, and phones, all utilizing a Type C USB connection.
5. Configuració i instal·lació
Follow these steps carefully to install your ssontong Dash Cam Hardwire Kit.
5.1 Identifying Fuse Box Location
- Locate your vehicle's fuse box. Common locations include under the dashboard (driver or passenger side), in the glove compartment, or in the engine bay. Refer to your vehicle's owner's manual for the exact location.
- Use the included pry bar to carefully remove the fuse box cover.
Vídeo 1: This video demonstrates how to locate and open the car's fuse box using the provided pry bar, revealing the fuses inside.

Figura 3: An illustration showing the fuse box layout, indicating where the ACC (red wire), BAT+ (yellow wire), and Ground (black wire) should be connected. It also highlights the two slots on each fuse tap for the original fuse and the ssontong fuse.
5.2 Selecting the Correct Fuse Adapters
- The kit includes various fuse adapters (Low-Profile Mini, Mini, ATO, Micro2) to fit different car models. Compare your vehicle's existing fuses with the provided adapters to select the correct type.
- Each fuse tap has two slots: one for the original fuse from your car and one for the new fuse provided with the hardwire kit. Ensure both fuses are correctly inserted into the tap.
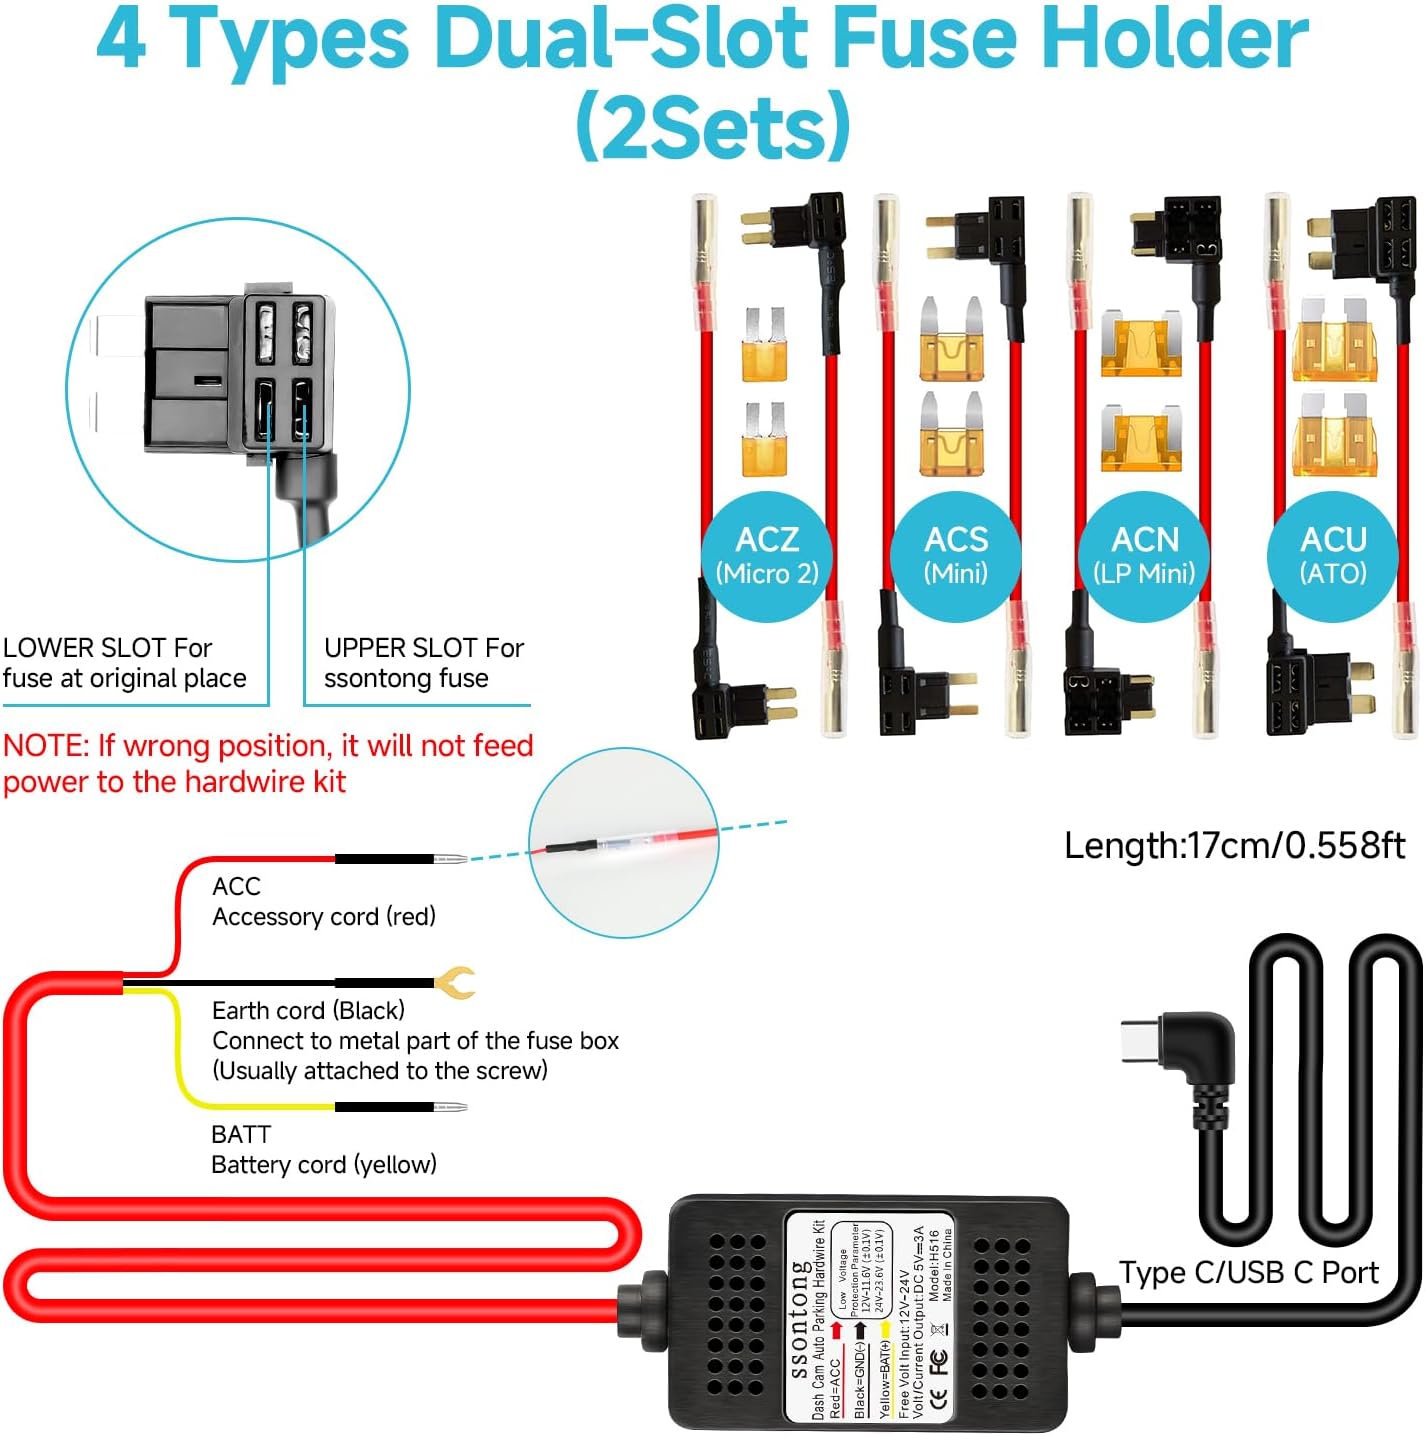
Figura 4: This image displays the four types of dual-slot fuse holders (ACZ/Micro2, ACS/Mini, ACN/LP Mini, ACU/ATO) included in the kit, designed for wide compatibility with various vehicle fuse boxes.
Vídeo 2: This video provides a detailed guide on how to install the REDTIGER Hardwire Kit, including identifying fuse types and connecting the wires to the fuse box.
5.3 Connexió dels cables
- Cable groc (BAT+): Connect the yellow wire to a fuse slot that provides constant power (always on), even when the vehicle is off. Use a multimeter or circuit tester to identify such a fuse.
- Cable vermell (ACC): Connect the red wire to a fuse slot that only receives power when the vehicle's ignition is on (ACC power). Use a multimeter or circuit tester to identify this.
- Cable negre (terra): Connect the black wire to any unpainted metal part of the vehicle's chassis or a designated ground screw.
Important: Before connecting the hardwire kit, ensure the vehicle's engine is off and disconnect the negative terminal of the battery to prevent a short circuit.
Vídeo 3: This video demonstrates the process of connecting the hardwire kit's B+ (yellow) and ACC (red) wires to the appropriate fuse slots in the vehicle's fuse box, and the ground wire to a metal point.
5.4 Routing the Cable
- Connect the Type C connector of the hardwire kit to your dash cam.
- Carefully route the 13ft power cord from the fuse box to your dash cam's mounting location. Use the included clips and pry bar to tuck the cable neatly along the vehicle's interior panels, such as the windshield gap, A-pillar, and headliner.
- Ensure the cable does not interfere with airbags, pedals, or other moving parts.

Figura 5: Step-by-step visual guide for easy hardwire kit installation, including finding the fuse box, identifying fuse types, inserting cables, locating a ground point, and neatly tucking cables.
Vídeo 4: This video demonstrates the process of routing the hardwire cable from the fuse box to the dash cam, ensuring it is hidden and does not obstruct any vehicle functions.
5.5 Final Test
Once all connections are made and the cable is routed, reconnect the negative battery terminal. Start your vehicle to ensure the dash cam powers on correctly and switches to parking mode when the ignition is turned off.
6. Instruccions de funcionament
6.1 24-Hour Parking Surveillance
With the hardwire kit correctly installed, your dash cam will receive continuous power, allowing it to monitor your vehicle even when the engine is off. This enables features such as collision detection and motion detection during parking.
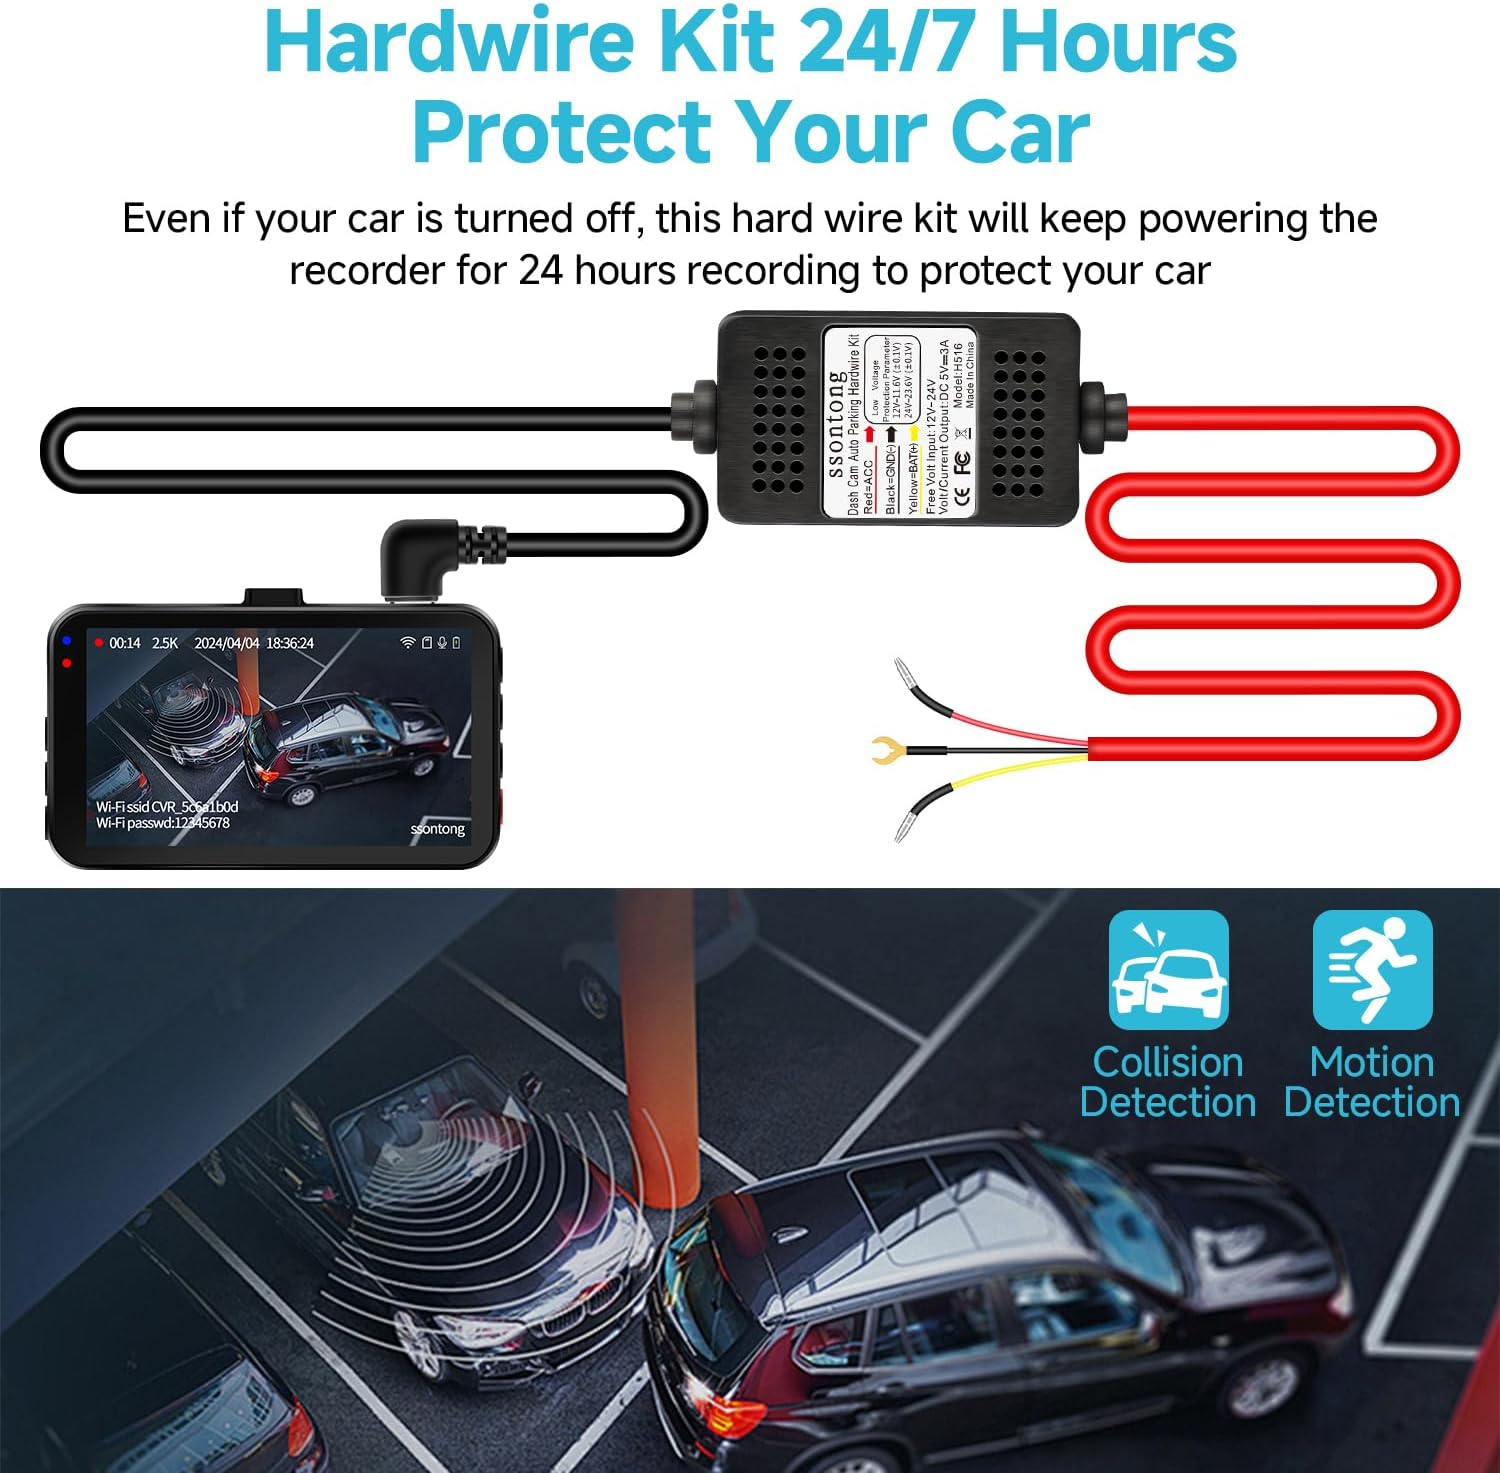
Figura 6: An illustration showing how the hardwire kit provides 24/7 power to the dash cam, enabling continuous recording and parking surveillance features like collision and motion detection.
6.2 Vol baixtage Protecció
The hardwire kit is equipped with a sensitive voltage sensing switch. It continuously monitors your car battery's voltage. Si el voltage drops below 11.4V (for 12V systems) or 23.2V (for 24V systems), the kit will automatically cut off power to the dash cam. This ensures enough power remains to start your vehicle's engine and protects your battery from excessive discharge.

Figura 7: This image highlights the low-voltage battery drain protection feature, showing how the system automatically shuts down when input voltage drops below critical levels to protect the car battery. It also lists other protections like over-current, short-circuit, reverse connection, and overheat protection.
7. Manteniment
- Comproveu regularment totes les connexions per assegurar-vos que són segures.
- Keep the hardwire kit and dash cam free from dust and moisture.
- If you experience any issues, refer to the troubleshooting section or contact customer support.
8. Solució De Problemes
| Problema | Causa possible | Solució |
|---|---|---|
| La càmera del salpicader no s'encén. | Incorrect fuse connection; Blown fuse; Loose ground wire; Low vehicle battery voltage. | Check fuse connections (BAT+ and ACC); Replace blown fuses; Secure ground wire connection; Check vehicle battery voltage. |
| El mode d'aparcament no funciona. | ACC wire not connected correctly; Dash cam settings not configured for parking mode. | Ensure ACC wire is connected to an ignition-switched fuse; Configure parking mode settings in your dash cam. |
| Interferència de ràdio. | Electromagnetic interference from the hardwire kit. | Ensure the shielding magnetic ring is installed on the cable. |
| La bateria s'esgota ràpidament. | Vol baixtage protection not functioning or set too low. | Comproveu el baix voltage protection settings are correct (11.4V/23.2V). |
9. Especificacions
- Entrada Voltage: 12 V-24V DC
- Vol. De sortidatage: 5V/3A
- Tipus de connector: USB tipus C
- Longitud del cable: 13 peus
- Volum baixtage Protection (12V): Cuts off at 11.4V
- Volum baixtage Protection (24V): Cuts off at 23.2V
- Temperatura de funcionament: -40 °F a 160 °F
- Característiques especials: Volum baixtage Protection, Over-current Protection, Short-circuit Protection, Reverse Connection Protection, Overheat Protection.
10. Garantia i Suport
ssontong is committed to providing high-quality products and excellent customer service.
- Quality Protection: This product comes with 1 Year Quality Protection.
- Suport postvenda: We offer Lifetime After-Sales Support.
- Contacta amb nosaltres: For any problems or questions regarding your ssontong Dash Cam Hardwire Kit, please feel free to contact us. We will reply within 12 hours and ensure your satisfaction.
Ask a question about this manual
Ask about setup, troubleshooting, compatibility, parts, safety, or missing instructions. Manuals+ will review the question and use this page’s manual context to help answer it.