
airnasa HLPCBA-050
airnasa Electric Wax Melt Warmer with Timer (Model HLPCBA-050)
Manual d'usuari
Introducció
Thank you for choosing the airnasa Electric Wax Melt Warmer with Timer, Model HLPCBA-050. This 4-in-1 device is designed to safely and efficiently diffuse your favorite scents using wax melts, fragrance oils, or scented candles. It features a unique PTC electric heating technology for stable and efficient operation, along with a timer function for convenience and safety. Please read this manual thoroughly before use to ensure proper operation and maintenance.
Components del producte
The airnasa Electric Wax Melt Warmer includes the following components:
- Warmer Base with Maple Leaf Pattern Design and Fire Pit LED Light
- Removable Warmer Dish (2 included)
- Breathable Lid
- Power Cord with 2/4/8H Timer Switch
- 10 Reusable Wax Melt Liners
- Manual d'usuari (aquest document)
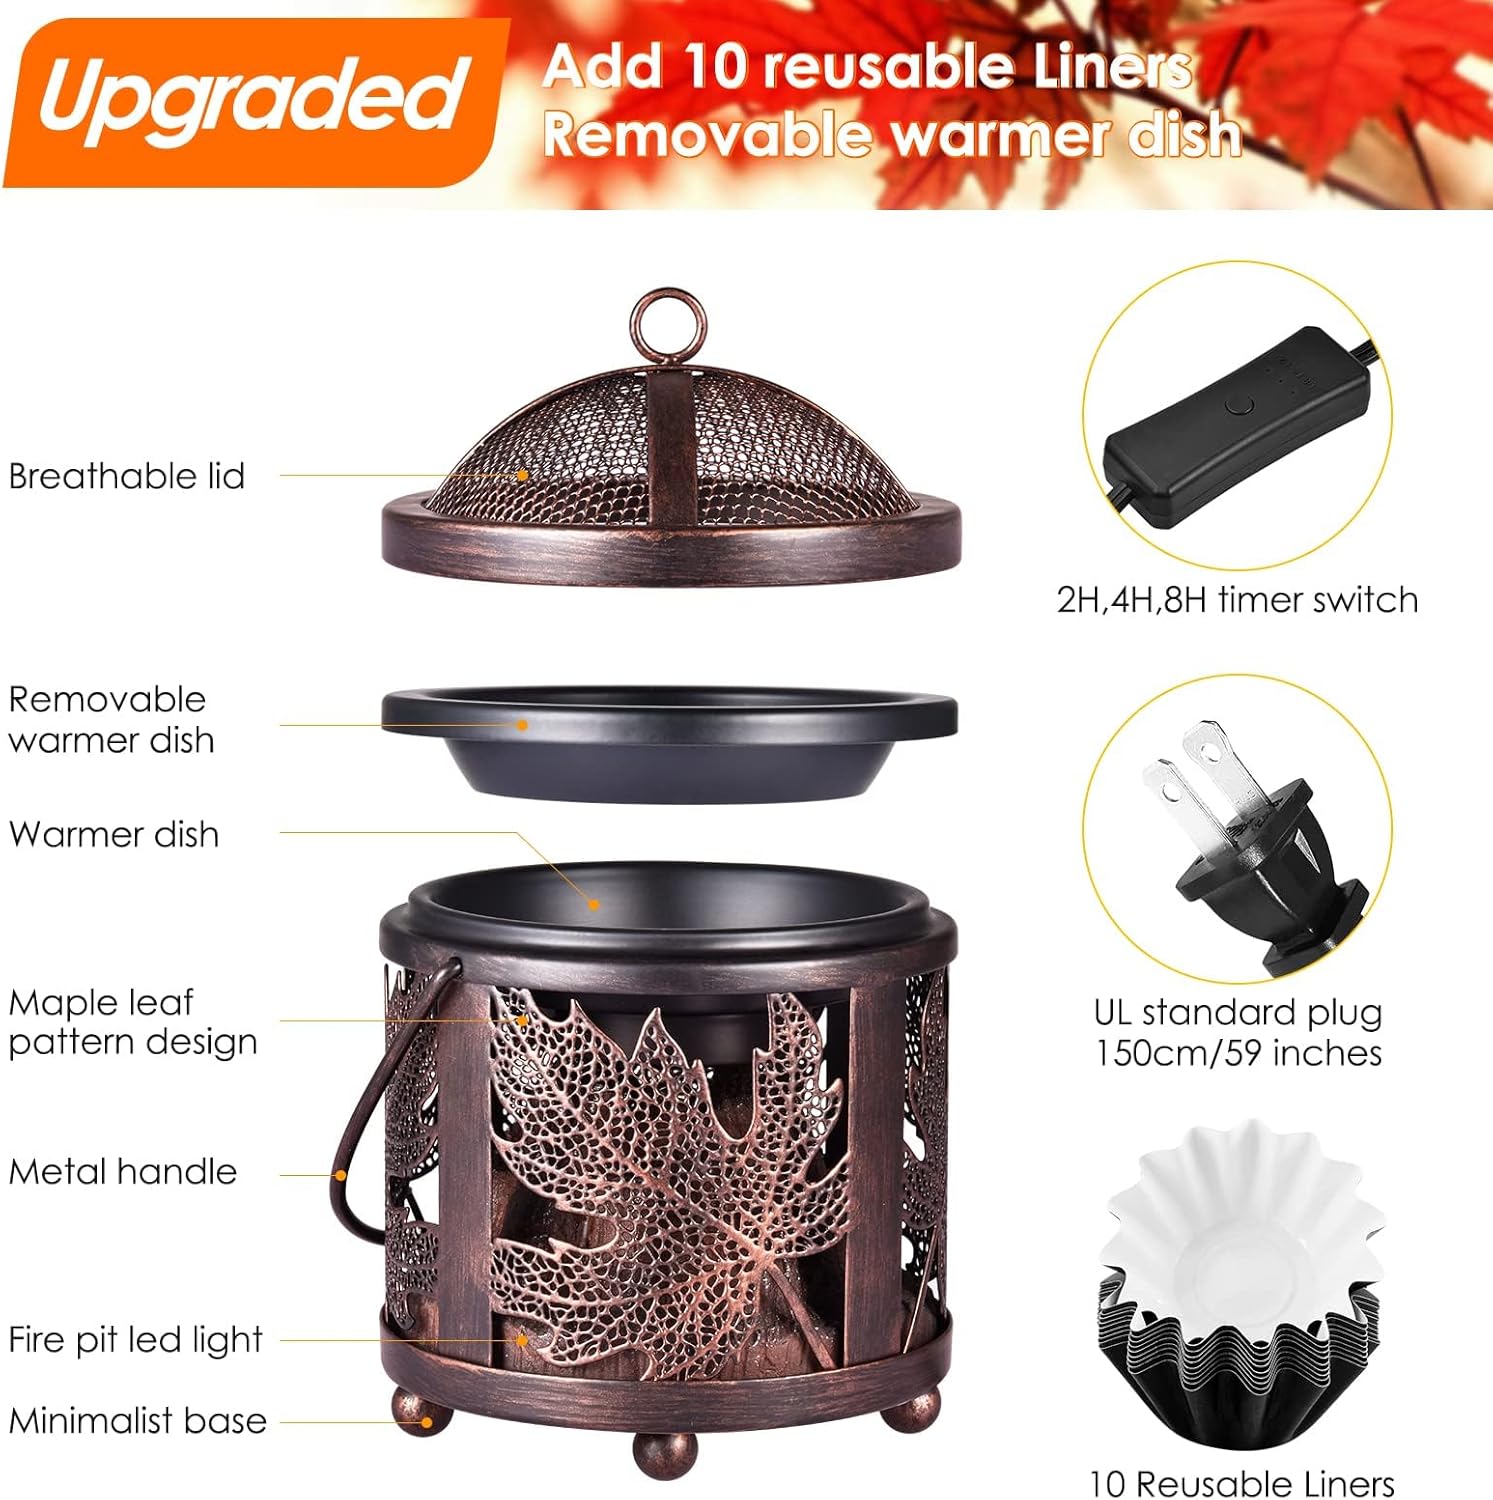
Descripció de la imatge: Un va explotar view diagram showing the various components of the airnasa Electric Wax Melt Warmer. From top to bottom, it displays the breathable lid, a removable warmer dish, the main warmer base with a maple leaf pattern and a fire pit LED light, a metal handle, and a minimalist base. To the right, the power cord with a 2/4/8H timer switch and a UL standard plug are shown, along with a stack of 10 reusable wax melt liners.
Informació de seguretat
Si us plau, llegiu i seguiu totes les instruccions de seguretat per evitar lesions o danys al producte.
- Seguretat elèctrica: Ensure the warmer is plugged into a suitable electrical outlet. Do not use with damaged cords or plugs.
- Avís de calor: The warmer dish and surrounding areas will become hot during operation. Avoid direct contact with hot surfaces.
- Col·locació: Place the warmer on a stable, heat-resistant surface, away from flammable materials, drafts, and out of reach of children and pets.
- Ventilació: Ensure proper ventilation during use, especially when using essential oils.
- Aigua: Do not immerse the warmer in water or other liquids. Do not use near water.
- Ompliment excessiu: Do not overfill the warmer dish with wax or oil.
- Ús sense vigilància: Although equipped with a timer, it is recommended not to leave the warmer operating unattended for extended periods.
- Manteniment: Unplug the warmer and allow it to cool completely before cleaning or performing any maintenance.
Configuració
- Desembalar: Traieu amb cura tots els components de l'embalatge.
- Col·locació: Select a flat, stable, and heat-resistant surface for the warmer. Ensure it is away from children, pets, and flammable objects.
- Muntar: Place one of the removable warmer dishes into the top opening of the warmer base. If using a wax melt liner, place it inside the warmer dish.
- Connectar l'alimentació: Connecteu el cable d'alimentació a una presa de corrent estàndard.

Descripció de la imatge: The airnasa Electric Wax Melt Warmer, featuring a bronze-colored metal lantern design with maple leaf cutouts and a glowing interior simulating a fire pit. The power cord with its timer switch is visible on the right, along with a stack of white and black wax melt liners.
Instruccions de funcionament
The airnasa Electric Wax Melt Warmer offers versatile scent diffusion options:
Using Wax Melts or Cubes:
- Place one or more wax melts/cubes into the removable warmer dish (or liner). The warmer can accommodate up to 4 wax cubes.
- Plug in the warmer.
- Press the power button on the inline switch to turn on the warmer. The internal LED light will illuminate, and the heating element will begin to melt the wax.
- Set the desired timer (see "Timer Function" below).
- The wax will melt, releasing fragrance into the room.
Using Fragrance Oils:
- Add a few drops of your preferred fragrance oil to the removable warmer dish. You may add a small amount of water if desired, but ensure it does not overflow.
- Plug in the warmer.
- Press the power button on the inline switch to turn on the warmer.
- Set the desired timer.
- The heat will diffuse the fragrance oil.
Using Scented Candles:
- Place a small, jarred scented candle directly into the removable warmer dish. Ensure the candle jar fits securely and does not touch the heating element directly.
- Plug in the warmer.
- Press the power button on the inline switch to turn on the warmer.
- Set the desired timer.
- The warmer will gently heat the candle, releasing its fragrance without an open flame.
Timer Function and Auto Shut-Off:
The inline power switch includes a timer function for convenience and safety. Press the button to cycle through the following settings:
- 1a premsa: Always On (No timer)
- 2a premsa: 2 hores
- 3a premsa: 4 hores
- 4a premsa: 8 hores
- 5a premsa: Apagat
The warmer will automatically shut off after the selected time period. This feature helps prevent overheating and saves energy.
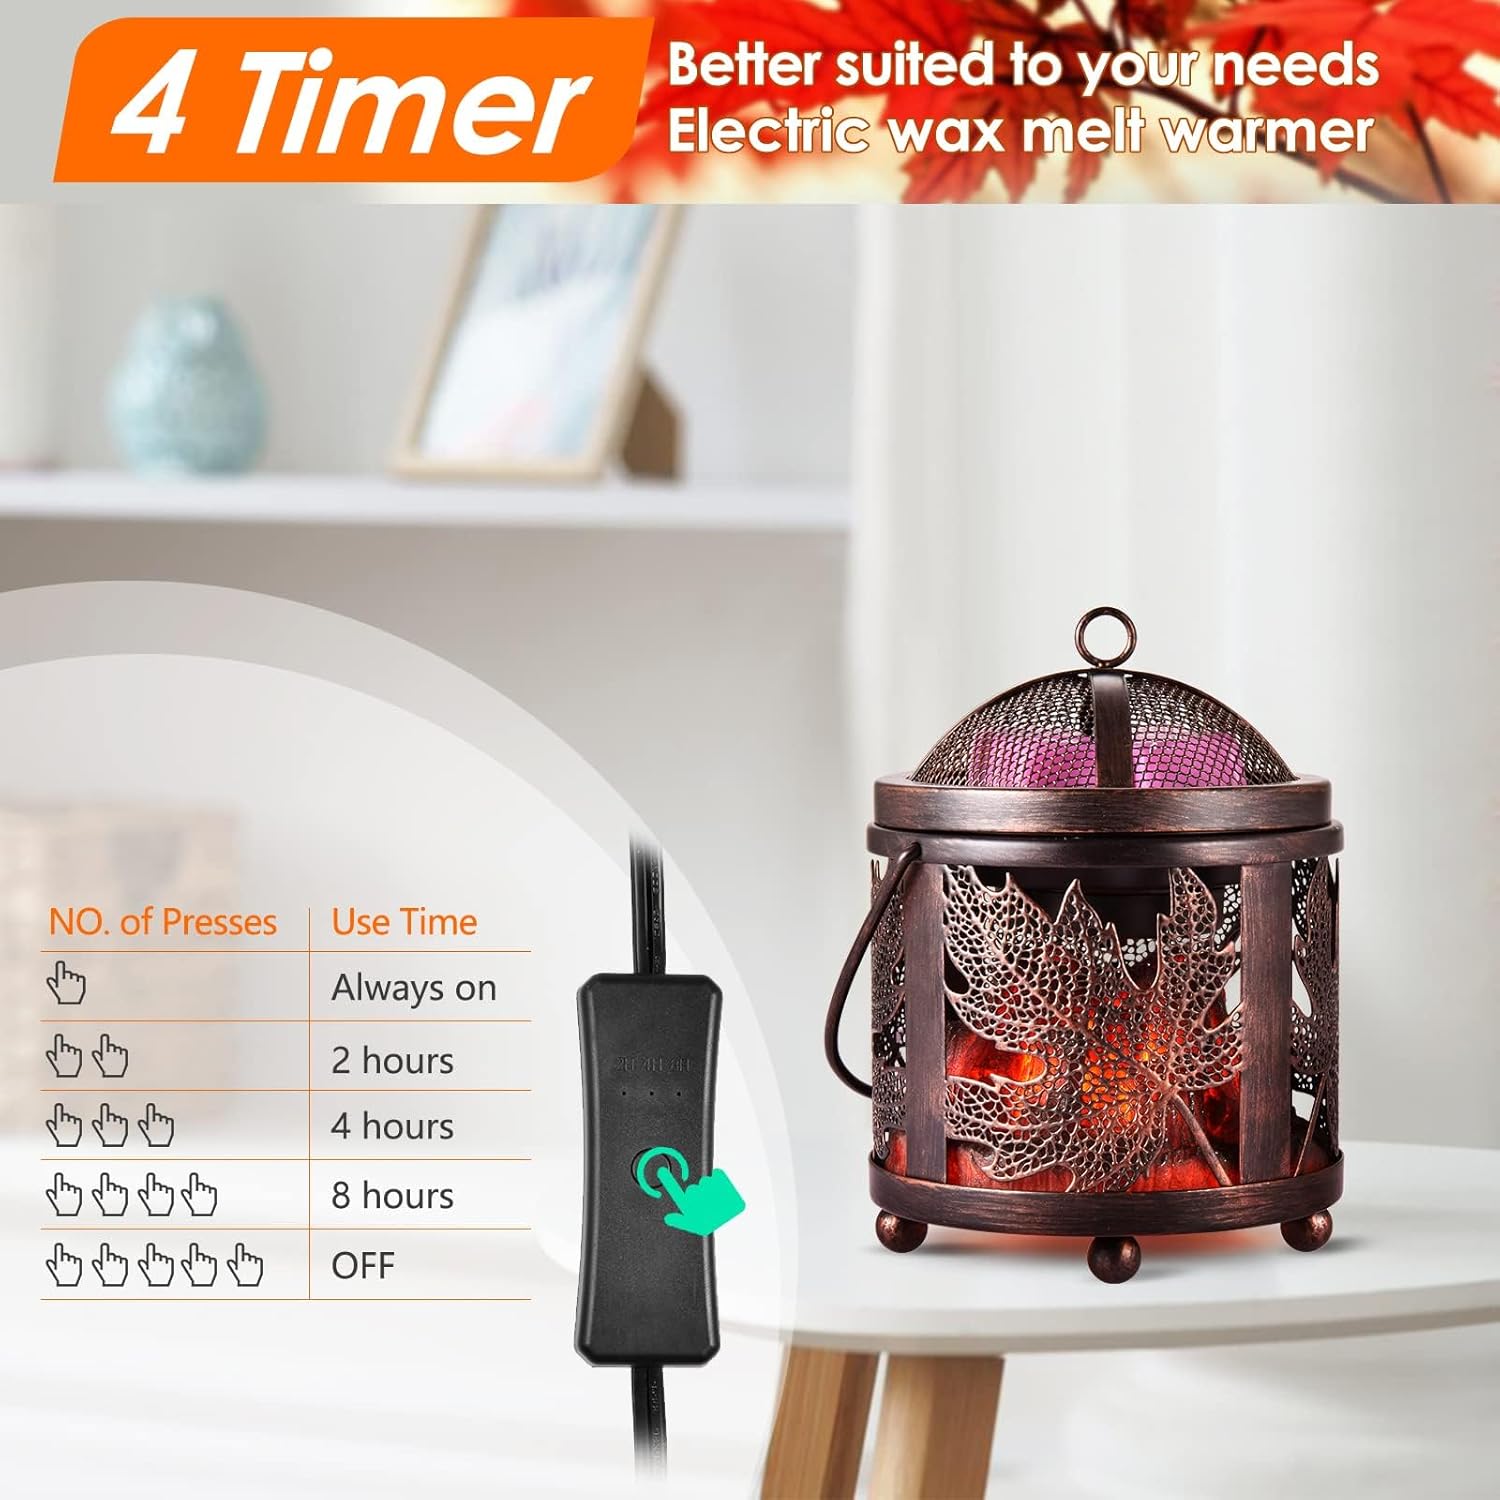
Descripció de la imatge: A graphic illustrating the timer settings for the airnasa Electric Wax Melt Warmer. It shows the inline switch with indicators for "Always On," "2 hours," "4 hours," "8 hours," and "Off," corresponding to the number of presses on the button.

Descripció de la imatge: A banner image depicting various scenarios for using the airnasa Electric Wax Melt Warmer's timer function. It shows examples like 2 hours for cosmetology, 4 hours for reading, 8 hours for sleeping, and "Always On" for work or family gatherings, highlighting the flexibility of the timer settings.
Manteniment i Neteja
Regular cleaning ensures optimal performance and extends the life of your warmer.
- Desconnecta i refresca: Always unplug the warmer from the power outlet and allow it to cool completely before cleaning.
- Remove Wax:
- If using wax melt liners, simply remove the used liner and discard. Replace with a new liner.
- If not using liners, allow the wax to solidify. Once solid, gently push on one side of the wax to pop it out of the dish. If the wax is difficult to remove, briefly turn on the warmer for 1-2 minutes to slightly soften the bottom layer, then turn off and remove.
- Clean Warmer Dish: Wash the removable warmer dish with warm, soapy water. Rinse thoroughly and dry completely before placing it back on the warmer.
- Clean Warmer Base: Wipe the exterior of the warmer base with a soft, damp drap. No utilitzeu productes de neteja abrasius ni submergiu la base en aigua.
- Emmagatzematge: When not in use, store the warmer in a cool, dry place.
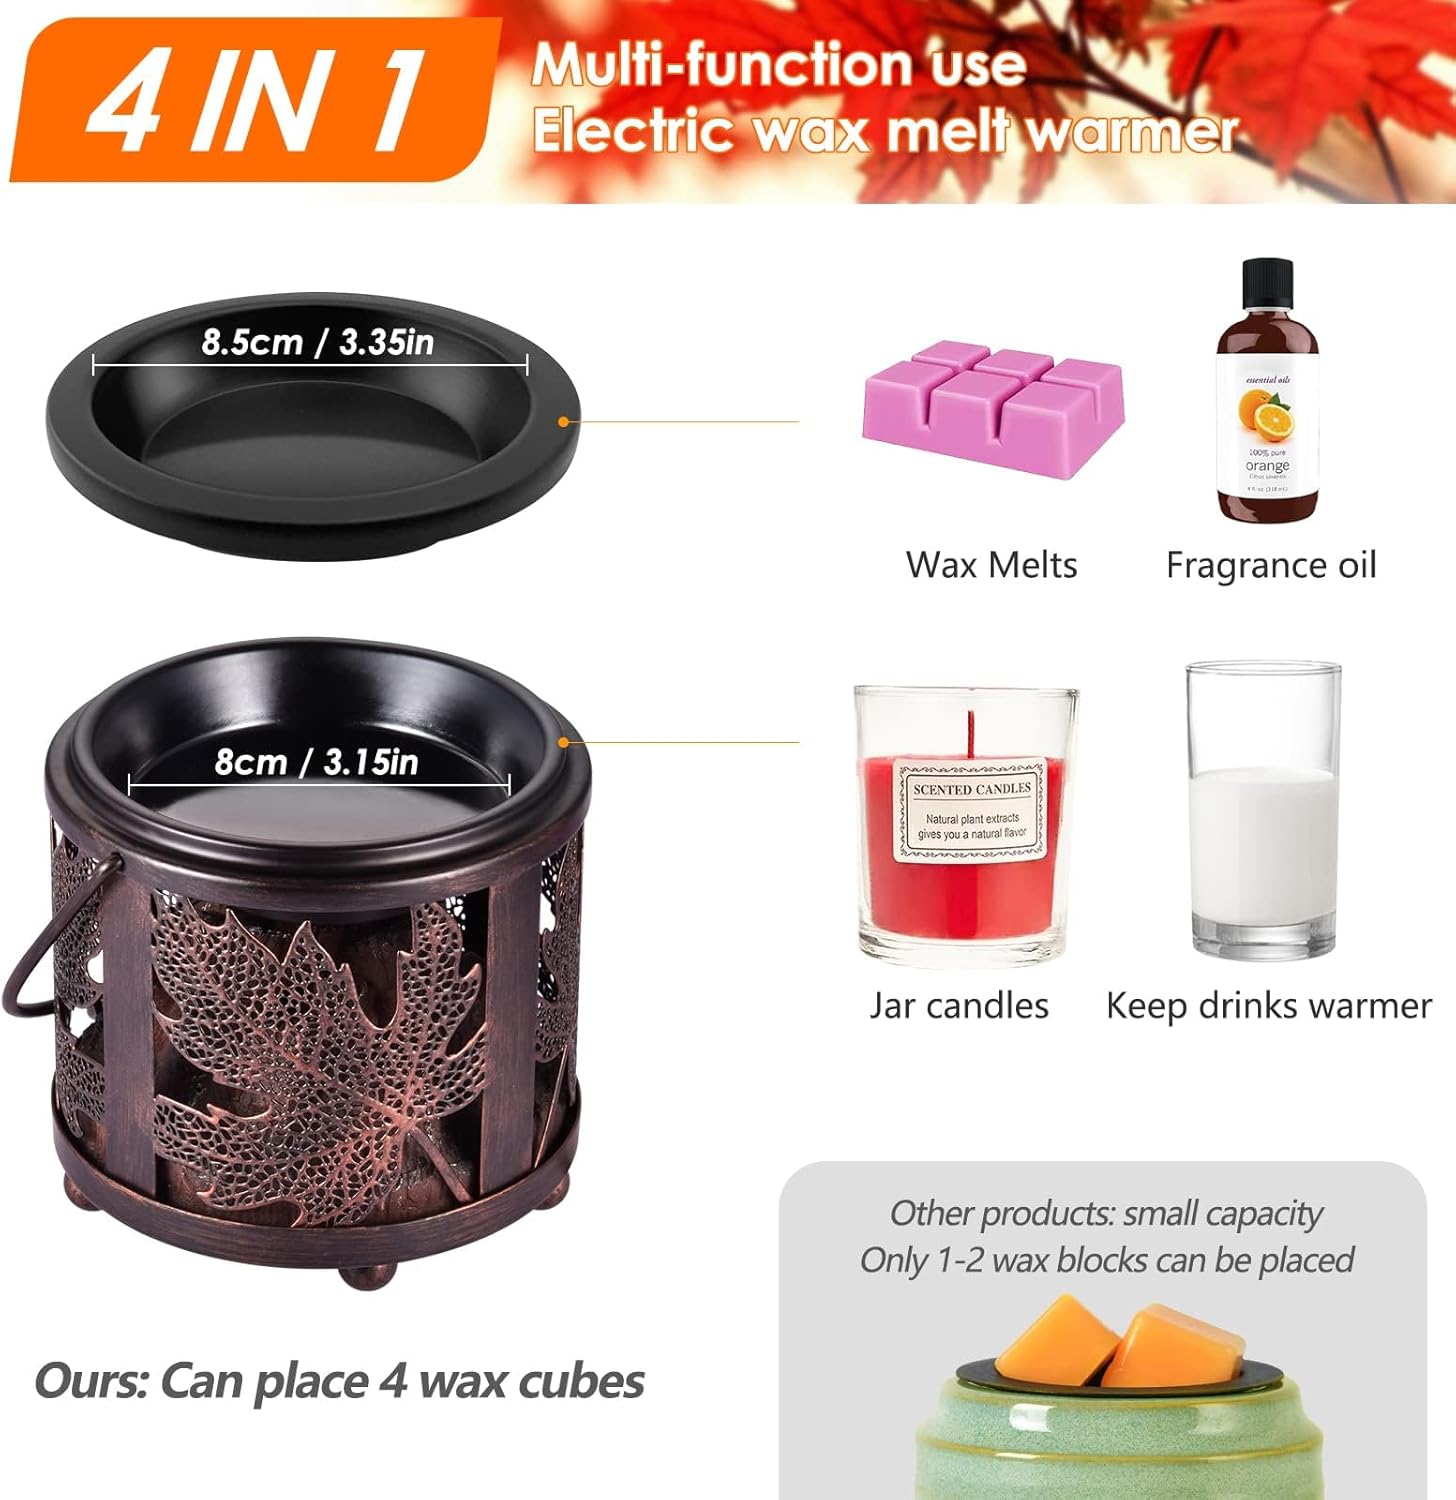
Descripció de la imatge: A visual demonstrating the 4-in-1 multi-function use of the airnasa Electric Wax Melt Warmer. It shows the dimensions of the warmer dish (8.5cm / 3.35in) and the main body (8cm / 3.15in). Examples of use include wax melts, fragrance oil, jar candles, and even keeping drinks warmer. It also highlights that this warmer can accommodate up to 4 wax cubes, unlike smaller alternatives.
Resolució de problemes
| Problema | Causa possible | Solució |
|---|---|---|
| Warmer does not turn on. |
|
|
| Wax is not melting or scent is weak. |
|
|
| Warmer emits an unusual smell. |
|
|
Especificacions
- Número de model: HLPCBA-050
- Marca: airnasa
- Potència: 18W elèctric
- Tecnologia de calefacció: PTC Electric Heating
- Configuració del temporitzador: 2H, 4H, 8H, Always On
- Dimensions (aprox.): 7.05 x 5.47 x 5.43 polzades (paquet)
- Pes de l'article: 1.45 lliures
- Tipus d'endoll: UL Standard Plug (150cm/59 inches cord length)
- Accessoris inclosos: 2 Warmer Dishes, 10 Wax Melt Liners

Descripció de la imatge: A graphic highlighting the energy-saving and eco-friendly aspects of the airnasa Electric Wax Melt Warmer. It displays key specifications such as 18W electric power, resistance heating, multi-functionality, and faster heating. Dimensions are also shown: 10cm / 3.93in (height of top section), 10.5cm / 4.13in (height of base section), and 11cm / 4.33in (width).
Garantia i Suport
airnasa provides a one-year protection period for this Electric Wax Melt Warmer. If you encounter any issues or have questions regarding your product, please contact our customer service team for assistance.
Per a atenció al client, visiteu la airnasa Store on Amazon o consulteu la informació de contacte que us hem proporcionat amb la vostra compra.
Documents relacionatsHLPCBA-050

Ask a question about this manual
Ask about setup, troubleshooting, compatibility, parts, safety, or missing instructions. Manuals+ will review the question and use this page’s manual context to help answer it.