
1. Producte acabatview
The HUAREW 110V Digital Temperature Controller is a versatile device designed for precise temperature management in various environments. It features an LCD screen for clear display of settings and current conditions, supporting both heating and cooling operations, as well as advanced timing functions.

Figura 1: HUAREW Digital Temperature Controller with its dimensions. The device measures approximately 121mm (4.76in) in height and 59.1mm (2.32in) in width. The temperature sensor probe cable is 170mm (6.69in) long.
2. Característiques clau
- Pantalla LCD: A 2.24-inch LCD screen provides clear visibility of temperature and settings. Note: This product does not have a backlight function.
- Wide Temperature Control Range: Operates from -40°C to 120°C (-72°F to 176°F) with an accuracy of ±1%.
- Alta capacitat de sortida: Supports a maximum output of 16A/3680W.
- Modes de funcionament dual: Configurable for both heating and cooling applications.
- Timing Functions (F01-F04): Includes cycle timer, countdown on, countdown off, and combined on/off countdown modes.
- Calibració de temperatura: Allows for precise adjustment of temperature readings within -9.9°C to 9.9°C.
- Funció de memòria: Retains all settings after power loss.
- Característiques de seguretat: Equipped with a safety socket to prevent accidental insertion and constructed with PC flame-retardant material.
3. Identificació de components
Familiarize yourself with the main components of the temperature controller:
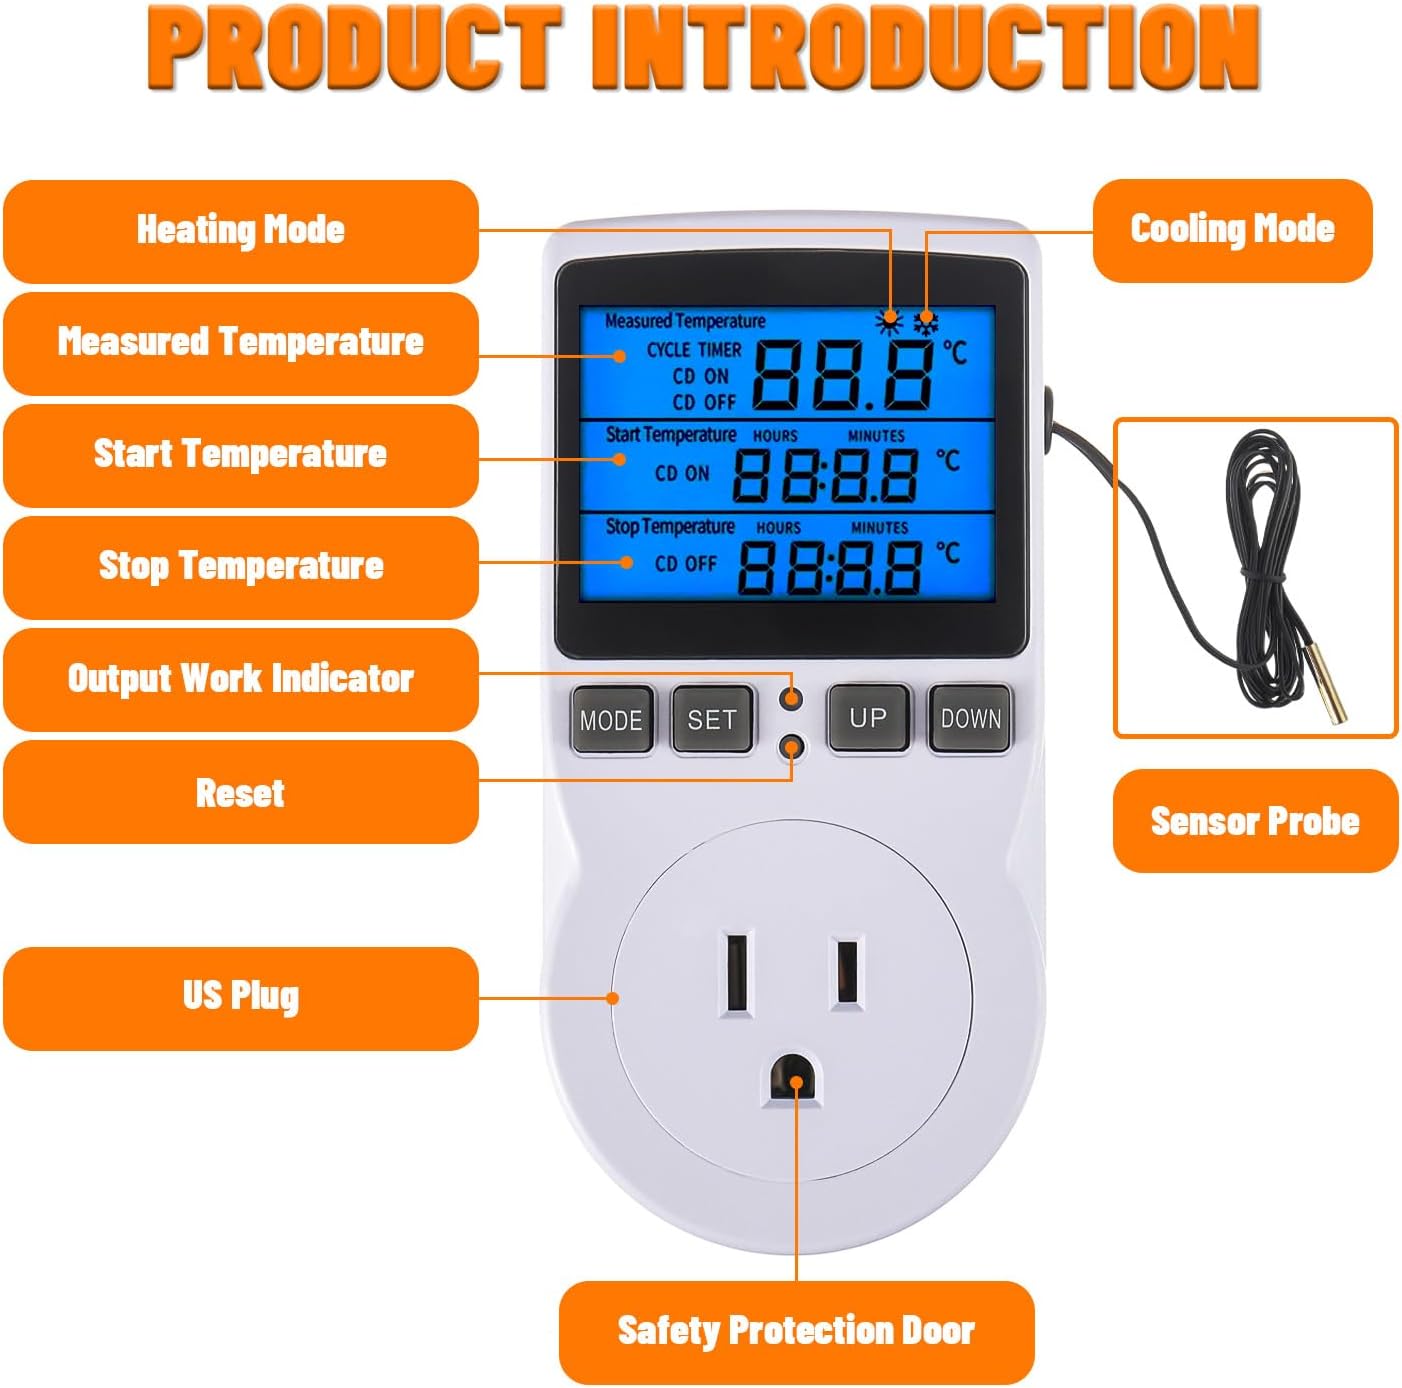
Figura 2: Davant view of the controller with labeled components including the LCD display, control buttons (MODE, SET, UP, DOWN), US plug, safety protection door, and the external sensor probe.
- Pantalla LCD: Shows measured temperature, start/stop temperatures, timing settings, and operating mode.
- Botó MODE: Used to cycle through different settings and functions.
- Botó SET: Used to confirm settings or enter/exit programming mode.
- Botó amunt: Augmenta valors o navega pels menús.
- Botó ABAIX: Disminueix valors o navega pels menús.
- Sonda del sensor: NTC 10K temperature sensor for accurate temperature measurement.
- Endoll dels EUA: For connecting the controller to a 110V power outlet.
- Safety Protection Door: Covers the outlet for child safety.
4. Instruccions de configuració
- Desempaquetar el controlador: Carefully remove the temperature controller and its sensor probe from the packaging.
- Connecteu el sensor: Ensure the temperature sensor probe is securely plugged into the designated port on the controller.
- Col·loca el sensor: Place the sensor probe in the environment where temperature needs to be controlled (e.g., incubator, greenhouse, refrigerator). Ensure it is not directly exposed to heating or cooling elements to get an accurate ambient reading.
- Plug in the Controller: Insert the controller's plug into a standard 110V AC power outlet. The LCD screen will illuminate, displaying the current measured temperature.
- Connecteu l'aparell: Plug your heating or cooling appliance (e.g., heater, fan, refrigerator) into the controlled outlet on the front of the temperature controller.
5. Instruccions de funcionament
5.1. Setting Temperature (Heating/Cooling Mode)
The controller operates in either heating or cooling mode based on the relationship between the "Start Temperature" and "Stop Temperature" settings.
- Operació de refrigeració: If the Start Temperature is set més alt than the Stop Temperature, the controller will activate the cooling appliance when the measured temperature rises above the Start Temperature and deactivate it when the temperature drops to the Stop Temperature.
- Funcionament de calefacció: If the Start Temperature is set inferior than the Stop Temperature, the controller will activate the heating appliance when the measured temperature falls below the Start Temperature and deactivate it when the temperature rises to the Stop Temperature.
To set the temperatures:
- Premeu el botó SET button once. The "Start Temperature" will flash.
- Utilitza el UP or ABAIX buttons to adjust the desired Start Temperature.
- Premeu el botó SET button again. The "Stop Temperature" will flash.
- Utilitza el UP or ABAIX buttons to adjust the desired Stop Temperature.
- Premeu el botó SET button a third time to confirm and exit, or wait a few seconds for it to automatically save and exit.
5.2. Timing Functions (F01-F04)
The controller offers four timing modes for various applications. The setting range for timing is 0 to 99 hours and 59 minutes.

Figura 3: Explanation of the F01, F02, F03, and F04 timing modes.
- F01 - Cycle Timer Mode: The device works for a set "ON" time and then stops for a set "OFF" time, repeating in cycles.
- Example: Set ON=0:05 (5 minutes), OFF=0:02 (2 minutes). The device will work for 5 minutes, stop for 2 minutes, and then repeat.
- F02 - Countdown ON Mode: The device starts working after a set countdown time has elapsed.
- Example: Set CD ON=0:05 (5 minutes). The device will start working after 5 minutes.
- F03 - Countdown OFF Mode: The device stops working after a set countdown time has elapsed.
- Example: Set CD OFF=0:05 (5 minutes). The device will work for 5 minutes and then stop indefinitely.
- F04 - Countdown ON/OFF Mode: The device starts working after a set "CD ON" time and then stops working after a set "CD OFF" time.
- Example: Set CD ON=0:02 (2 minutes), CD OFF=0:05 (5 minutes). The device will start working after 2 minutes, then stop working after 5 minutes.
To access and set timing functions:
- Manteniu premut el botó MODE button until "F01" (or current timing mode) appears.
- Ús UP or ABAIX to select the desired timing mode (F01-F04).
- Premeu SET to enter the settings for the selected mode.
- Ús UP or ABAIX to adjust the hours and minutes for ON/OFF or countdown times. Press SET per canviar entre la configuració de les hores i els minuts.
- Premeu SET again to confirm and exit, or wait for automatic exit.
5.3. Calibració de la temperatura
If the measured temperature appears inaccurate, you can calibrate the sensor reading.

Figura 4: Instructions for temperature calibration and product information.
- Manteniu premut el botó MODE botó.
- Mentre aguanta MODE, utilitza el UP or ABAIX buttons to adjust the temperature offset in real-time. The calibration range is -9.9°C to 9.9°C.
- Allibera el MODE button to save the calibration.
- To exit without saving changes, press and hold the SET botó durant 5 segons.
6. Manteniment
To ensure the longevity and proper functioning of your HUAREW Digital Temperature Controller, follow these simple maintenance guidelines:
- Neteja: Wipe the exterior of the controller with a clean, damp cloth. Do not use abrasive cleaners or immerse the device in water. Ensure the device is unplugged before cleaning.
- Cura del sensor: Keep the temperature sensor probe clean and free from debris. Avoid bending or damaging the sensor cable.
- Emmagatzematge: When not in use for extended periods, store the controller in a cool, dry place away from direct sunlight and extreme temperatures.
7. Solució De Problemes
Si teniu problemes amb el controlador de temperatura, consulteu els problemes i solucions més comuns següents:
| Problema | Causa possible | Solució |
|---|---|---|
| Display is blank or not turning on. | Sense font d'alimentació; connexió fluixa. | Ensure the controller is securely plugged into a live 110V outlet. Check the outlet with another device. |
| Lectura de temperatura incorrecta. | Sensor probe improperly placed or damaged; calibration needed. | Verify the sensor probe is correctly positioned and not damaged. Perform a temperature calibration as described in Section 5.3. |
| Appliance (heater/cooler) not turning on/off as expected. | Incorrect Start/Stop temperature settings; appliance not plugged in; appliance malfunction. | Review and adjust Start/Stop temperatures (Section 5.1). Ensure the appliance is correctly plugged into the controller's outlet and is functional. Check if the operating mode (heating/cooling) is correctly inferred by the Start/Stop temperature relationship. |
| Timing functions not working. | Incorrect timing mode or duration settings. | Re-check the settings for the selected timing mode (F01-F04) as described in Section 5.2. |
| Display shows erratic characters or freezes. | Temporary software glitch; power fluctuation. | Unplug the controller from the power outlet, wait 30 seconds, and plug it back in to reset. If the issue persists, contact customer support. |
8. Especificacions
| Característica | Detall |
|---|---|
| Número de model | HWX-Backlight Controller |
| Voltage | 110 V AC |
| Corrent de sortida | Màxim 16 A |
| Potència màxima | 3680W |
| Interval de control de temperatura | -40 °C a 120 °C (-72 °F a 176 °F) |
| Precisió del control de temperatura | ±1% |
| Tipus de sensor | NTC 10K |
| Longitud del cable del sensor | 1.7 metres (5.6 peus) |
| Tipus de visualització | Digital LCD (No backlight) |
| Material | Polycarbonate (PC) flame retardant |
| Dimensions (aprox.) | 121 mm x 59.1 mm (4.76 polzades x 2.32 polzades) |
| Pes de l'article | 6.6 unces |
| UPC | 791162826354 |
9. Garantia i Suport
For warranty information and customer support, please refer to the documentation included with your purchase or contact the manufacturer directly. Keep your purchase receipt for warranty claims.
Manufacturer: HUAREW