
1. Introducció
This manual provides detailed instructions for the installation, operation, and maintenance of your GAMEON Midnight I Series Mid Tower Gaming PC Case. Please read this manual thoroughly before beginning installation to ensure proper setup and to maximize the performance and lifespan of your product. Keep this manual for future reference.
2. Informació de seguretat
- Always disconnect the power supply from the wall outlet before performing any installation or maintenance inside the PC case.
- Handle the tempered glass panels with care. Tempered glass, while durable, can shatter if dropped or subjected to sharp impacts.
- Avoid exposing the case to extreme temperatures or high humidity.
- No intenteu modificar la carcassa ni els seus components. Les modificacions no autoritzades poden anul·lar la garantia i plantejar riscos per a la seguretat.
- Mantingueu les peces petites i els cargols fora de l'abast dels nens.
3. Contingut del paquet
Si us plau, verifiqueu que tots els elements que s'enumeren a continuació siguin presents al vostre paquet:
- GAMEON Midnight I Series Mid Tower Gaming PC Case
- 7 x 120mm ARGB PWM Cooling Fans (pre-installed)
- Accessory Box (containing screws, cable ties, and other mounting hardware)
- ARGB/PWM Fan Controller and Remote Control
- Manual d'usuari (aquest document)
4. Producte acabatview
The GAMEON Midnight I Series PC case is designed for optimal cooling and aesthetic appeal, featuring tempered glass panels and pre-installed ARGB PWM fans.

Figure 4.1: Internal layout of the PC case, highlighting the spacious interior for component installation.

Figure 4.2: Rear and top internal view, illustrating fan placement and overall structure.
4.1 ARGB+PWM Case Fans
The case comes with 7 pre-installed 120mm ARGB PWM fans, providing efficient cooling and customizable lighting. The fans are controlled via an included ARGB/PWM controller and remote.

Figure 4.3: ARGB+PWM fan features and fan mounting support. The front supports 360mm water cooling. Fan mounts include 3x120mm for PSU cover, 3x120mm for bottom, 3x120mm for top, and 1x120mm for rear.
4.2 Ports d'E/S frontals
El panell frontal proporciona un accés convenient als ports essencials per a la connectivitat.
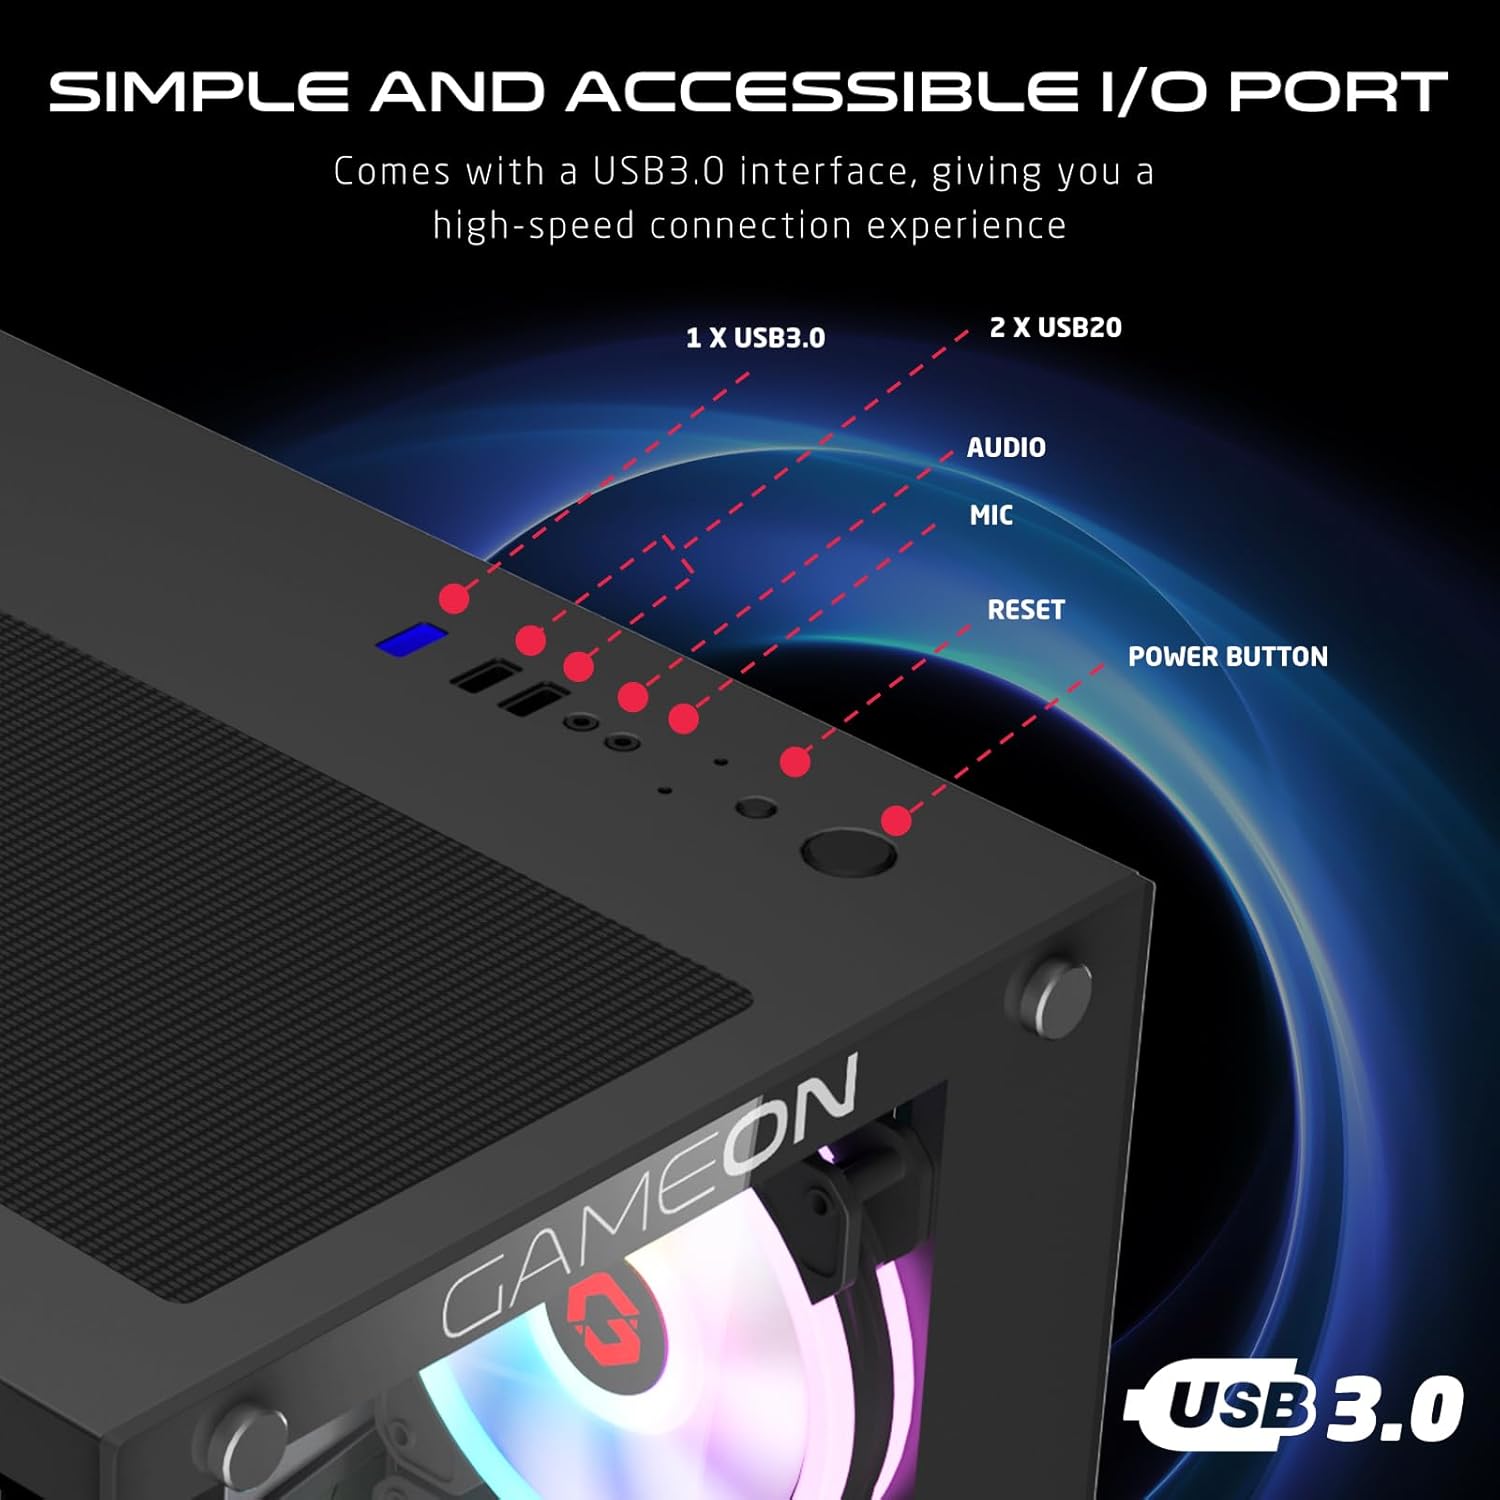
Figure 4.4: Front I/O ports, including 1x USB 3.0, 2x USB 2.0, Audio jack, Microphone jack, Reset button, and Power button.
4.3 Cooling and Construction
The case is designed with an optimized cooling solution, featuring multiple fan mounts and durable tempered glass panels.

Figure 4.5: Optimized cooling solution with massive air intake and exhaust. Features 7 pre-installed fans and durable tempered glass construction.
4.4 Compatibility and Drive Support
The case offers wide compatibility for various motherboard form factors and ample drive bay support.

Figure 4.6: Motherboard compatibility includes ATX, M-ATX, and ITX. Drive bay support for 2x HDD and 2x SSD. Also shown are the front panel header connections.
5. Instruccions de configuració
Follow these steps to install your components into the GAMEON Midnight I Series PC case.
5.1 Preparació del cas
- Col·loqueu la caixa sobre una superfície plana i estable.
- Carefully remove the tempered glass side panel(s) by unscrewing the thumb screws and gently sliding the panel off. Set them aside in a safe place.
- Traieu tots els materials d'embalatge interns.
5.2 Instal·lació de la placa base
- Instal·leu la protecció d'E/S (si no està preinstal·lada a la placa base) a l'obertura posterior de la carcassa.
- Align your motherboard with the standoffs inside the case. Ensure the standoffs match your motherboard's form factor (ATX, M-ATX, ITX).
- Fixeu la placa base amb els cargols proporcionats.
5.3 Instal·lació de la unitat d'alimentació (PSU).
- Localitzeu la zona de muntatge de la font d'alimentació a la part inferior posterior de la carcassa.
- Slide your PSU into position from the rear of the case.
- Secure the PSU with the provided screws.
5.4 Drive Installation (HDD/SSD)
The case supports 2x 3.5" HDDs and 2x 2.5" SSDs.
- For 3.5" HDDs: Locate the drive cage, typically near the PSU shroud. Slide the HDD into the drive bay and secure it with screws.
- For 2.5" SSDs: Mount the SSDs to the designated mounting points, usually on the back of the motherboard tray or within the drive cage, using the provided screws.
5.5 Instal·lació de la targeta gràfica i la targeta d'expansió
- Traieu les cobertes de les ranures PCIe necessàries de la part posterior de la carcassa.
- Inseriu la targeta gràfica o altres targetes d'expansió a les ranures PCIe corresponents de la placa base.
- Fixeu les targetes amb cargols.
5.6 Gestió de cables
Aprofita els retalls de cables i els punts d'amarratge que hi ha darrere de la safata de la placa base per gestionar els cables. Això millora la circulació del flux i l'estètica.
5.7 Connecting Front Panel I/O and Fans
- Connect the front panel cables (Power SW, Reset SW, HDD LED, Power LED, USB 3.0, USB 2.0, HD Audio) to their corresponding headers on your motherboard. Refer to your motherboard manual for header locations.
- Ensure the pre-installed ARGB fans are connected to the included ARGB/PWM controller. Connect the controller to a SATA power connector from your PSU and a 3-pin ARGB header (if available) and a 4-pin PWM header on your motherboard for software control, or use the remote for standalone control.
6. Instruccions de funcionament
6.1 Engegada/apagada
- After all components are installed and cables connected, replace the side panels.
- Connect your monitor, keyboard, mouse, and power cable to the PSU.
- Press the Power button on the front panel to turn on your PC.
- To turn off, use the operating system's shutdown function or press and hold the Power button for several seconds.
Control del ventilador 6.2 ARGB
Els ventiladors ARGB preinstal·lats es poden controlar de dues maneres:
- Comandament a distància: Use the included remote to cycle through various lighting effects, adjust brightness, and change fan speed.
- Programari de la placa base: If the ARGB controller is connected to a compatible 3-pin ARGB header on your motherboard, you can synchronize lighting effects with your motherboard's RGB software (e.g., ASUS Aura Sync, MSI Mystic Light Sync, ASRock Polychrome RGB, Gigabyte RGB Fusion).
7. Manteniment
Un manteniment regular ajuda a garantir un rendiment òptim i una major longevitat de la carcassa del teu PC.
7.1 Neteja del filtre de pols
The case includes dust filters to prevent dust buildup. It is recommended to clean them every 1-3 months, depending on your environment.
- Locate the dust filters (e.g., top, bottom, front).
- Gently remove the filters.
- Clean them using compressed air, a soft brush, or by rinsing with water (ensure they are completely dry before re-installing).
- Re-attach the dust filters.
7.2 Neteja general
- Utilitzeu un suau, damp cloth to wipe down the exterior surfaces of the case. Avoid abrasive cleaners.
- For tempered glass panels, use a glass cleaner and a microfiber cloth to avoid streaks.
7.3 Neteja del ventilador
Periodically inspect the fan blades for dust accumulation. Use compressed air to gently clear dust from the fan blades and grilles.
8. Solució De Problemes
If you encounter issues with your PC case, refer to the following common problems and solutions.
8.1 Fans Not Spinning or ARGB Not Working
- Comproveu la connexió d'alimentació: Ensure the ARGB/PWM controller is properly connected to a SATA power connector from your PSU.
- Check Fan Connections: Verify that all fans are securely connected to the ARGB/PWM controller.
- Bateria de control remot: If using the remote, check if its battery needs replacement.
- Programari de la placa base: If using motherboard software for control, ensure the controller is connected to the correct ARGB header and the software is installed and configured correctly.
- Direcció del fan: Assegureu-vos que els ventiladors estiguin orientats correctament per a un flux d'aire òptim (entrada/sortida).
8.2 Front I/O Ports Not Functioning
- Check Motherboard Connections: Ensure all front panel cables (USB 3.0, USB 2.0, HD Audio) are correctly and securely connected to their respective headers on the motherboard. Refer to your motherboard manual.
8.3 PC Not Powering On
- Power Button Connection: Verify the Power SW cable from the front panel is correctly connected to the motherboard's front panel header.
- PSU Connection: Assegureu-vos que la font d'alimentació estigui connectada correctament a la presa de corrent i que l'interruptor d'alimentació de la font d'alimentació estigui en la posició "ON".
- Internal Power Cables: Check that all necessary power cables (24-pin ATX, CPU, GPU) are securely connected to the motherboard and components.
9. Especificacions
| Característica | Especificació |
|---|---|
| Nom del model | GO-EMPERORII-M (Midnight I Series) |
| Tipus de cas | Torre mitja |
| Material | Vidre temperat |
| Color | Negre |
| Dimensions del producte (L x A x A) | 44 x 28 x 42.7 cm |
| Pes de l'article | 6.45 kg |
| Suport de la placa base | ATX, Micro ATX, ITX |
| Ventiladors preinstal·lats | 7 ventiladors ARGB PWM de 120 mm |
| Mida del ventilador | 120 mm |
| Mètode de refrigeració | Air, Water (supports up to 360mm radiator in front) |
| Drive Bays | 2 discs durs de 3.5", 2 discs SSD de 2.5" |
| Ports d'E / S frontals | 1 x USB 3.0, 2 x USB 2.0, Audio, Mic, Reset, Power |
| Característiques addicionals | Dust Filters, ARGB Controller with Remote |
10. Garantia i Suport
This product comes with a standard manufacturer's warranty. For specific warranty terms and conditions, please refer to the documentation provided with your purchase or contact GAMEON customer support. For technical assistance or further inquiries, please visit the official GAMEON weblloc web o contacteu amb els seus canals d'assistència.