
1. Introducció
This manual provides detailed instructions for the installation, operation, and maintenance of your RetroSound RetroRadio LABC-M1-226-08-80F1. This unit is designed for 1967-68 Ford Mustang vehicles and features an AM/FM RDS tuner, Bluetooth connectivity, and auxiliary input.
2. Informació de seguretat
- Always disconnect the vehicle's battery before installation to prevent electrical shorts.
- Ensure all wiring connections are secure and properly insulated to avoid damage to the unit or vehicle.
- No feu servir la unitat de manera que us distregui de la conducció.
- Refer to a professional installer if you are unsure about any part of the installation process.
3. Contingut del paquet
Verifiqueu que tots els elements siguin presents al vostre paquet:
- RetroSound RetroRadio LABC-M1-226-08-80F1 Head Unit
- Wiring Harness (Power/Speakers)
- InfiniMount Brackets
- Knob Shafts
- Micròfon extern
- Maquinari d'instal·lació

Figure 3.1: Included Knob Shafts

Figure 3.2: External Microphone
4. Configuració i instal·lació
4.1. Dimensions
Before installation, ensure the unit fits your vehicle's dashboard opening. Refer to the diagram below for precise measurements.

Figura 4.1: Dimensions de la unitat
4.2. Mounting with InfiniMount Brackets
The patented InfiniMount brackets allow for flexible mounting of the unit's shafts at various angles to accommodate different dashboard configurations.

Figure 4.2: InfiniMount Brackets and Flexible Shaft Mounting
- Attach the InfiniMount brackets to the sides of the head unit using the provided screws.
- Insert the knob shafts into the desired positions on the brackets.
- Adjust the angle of the shafts as needed to align with your vehicle's dashboard openings.
- Secure the unit into the dashboard opening.
4.3. Connexions de cablejat
Carefully connect all necessary wires as shown in the diagram below. Ensure all connections are secure.
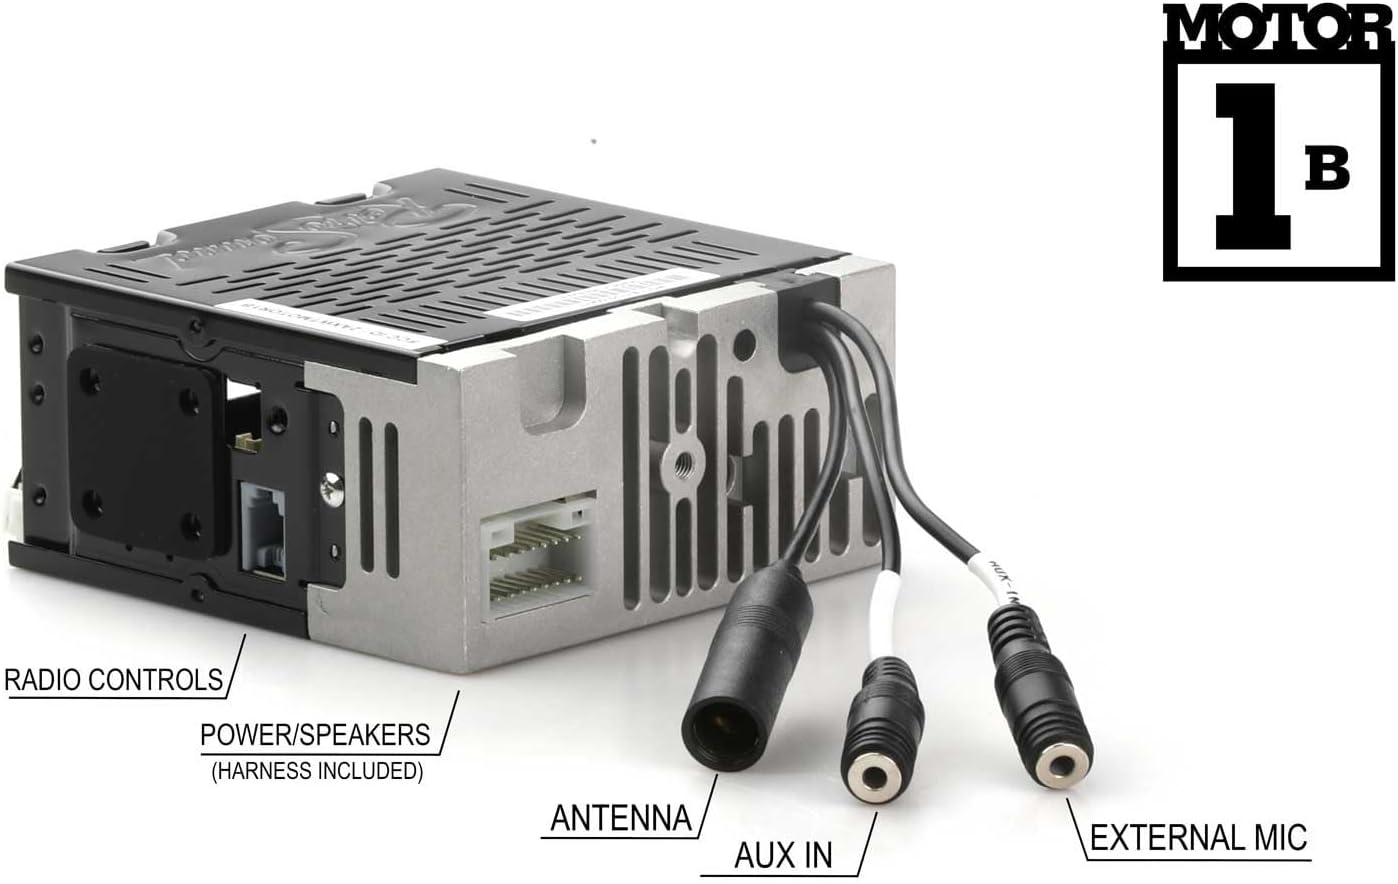
Figura 4.3: Connexions del panell posterior
- Power/Speakers: Connect the included wiring harness to the corresponding port on the unit and then to your vehicle's power and speaker wiring. Refer to your vehicle's wiring diagram for correct connections.
- Antena: Connect your vehicle's AM/FM antenna to the antenna input.
- Entrada AUX: Connect external audio devices using a 3.5mm audio cable to this input.
- External Mic: Plug in the provided external microphone for hands-free calling. Position the microphone in a location that allows for clear voice pickup.
- Comandaments de ràdio: Connect to compatible vehicle radio controls if available.
5. Instruccions de funcionament
5.1. Encendre/apagar
Premeu el botó d'engegada (normalment integrat amb el botó de volum) per encendre o apagar la unitat.
5.2. Sintonitzador AM/FM
- Selecció de la banda: Press the BAND button to switch between AM and FM bands.
- tuning: Use the tuning knobs or seek buttons to find radio stations.
- Presets: The unit supports 30 presets. To save a station, tune to the desired station, then press and hold a preset button until you hear a confirmation beep. To recall a preset, press the corresponding preset button.
- RDS (Sistema de dades de ràdio): When available, RDS will display station information such as station name, song title, or artist.
- Tuner Frequencies: The tuner frequencies can be selected for USA, Europe, Australia, Japan, or Russia. Refer to the settings menu to adjust this if needed.
5.3. Bluetooth Connectivity (Version 5.0)
The unit features built-in Bluetooth for hands-free calling and audio streaming.
- Maridatge:
- Assegureu-vos que el Bluetooth estigui habilitat al vostre dispositiu mòbil.
- On the RetroRadio, navigate to the Bluetooth menu (refer to the display for menu options).
- Select "Pair Device" or similar option. The unit will become discoverable.
- On your mobile device, search for available Bluetooth devices and select "RetroRadio" (or similar name).
- Confirma el codi d'emparellament si se't demana.
- Trucades mans lliures: Once paired, you can make and receive calls through the unit using the external microphone. Use the unit's controls to answer, end, or reject calls.
- Transmissió d'àudio: Play audio from your paired mobile device directly through the RetroRadio. Use the unit's controls to play, pause, skip tracks, and adjust volume.
5.4. Entrada auxiliar
Connect any portable audio device (e.g., MP3 player, smartphone) to the rear-mounted auxiliary input using a 3.5mm audio cable. Select the AUX input source on the RetroRadio to listen to audio from the connected device.
6. Manteniment
- Neteja: Use a soft, dry cloth to clean the unit's display and controls. Do not use abrasive cleaners or solvents.
- Actualitzacions de firmware: Check the RetroSound weblloc web periòdicament per a les actualitzacions de firmware disponibles per garantir un rendiment òptim.
7. Solució De Problemes
| Problema | Causa possible | Solució |
|---|---|---|
| Sense poder | Connexió d'alimentació fluixa, fusible fundit, bateria del vehicle desconnectada. | Comproveu el cablejat d'alimentació, inspeccioneu els fusibles del vehicle i assegureu-vos que la bateria estigui connectada. |
| Sense so | Cables d'altaveu desconnectats, volum massa baix, font incorrecta seleccionada. | Verify speaker connections, increase volume, select correct audio source (AM/FM, Bluetooth, AUX). |
| Bluetooth no emparellat | Bluetooth not enabled on device, unit not in pairing mode, device too far. | Ensure Bluetooth is on, put unit in pairing mode, bring device closer, try re-pairing. |
| Mala recepció de ràdio | Antenna not connected, damaged antenna, weak signal area. | Check antenna connection, inspect antenna for damage, try tuning to a stronger station. |
8. Especificacions
- Model: LABC-M1-226-08-80F1
- Marca: RetroSound
- Ampmés viu: Built-in 275-watt (peak power) Mosfet amplifier, 18 watts RMS x 4 channels
- Bluetooth: Version 5.0 (with external microphone for hands-free calls)
- Sintonitzador: AM/FM RDS tuner with 30 presets
- Tuner Frequencies: Selectable (USA/EUR/AUS/JAP/RUS)
- Entrades: Rear-mounted Auxiliary input (3.5mm), Bluetooth
- Memòria no volàtil: Sí
- Dimensions de la unitat (H x A x P): Approximately 2" x 4.34" x 4" (51mm x 110mm x 100mm) - Refer to Figure 4.1 for exact measurements.
- Pes de l'article: 3.3 lliures
9. Informació de la garantia
This RetroSound product is covered by a 1 anys de garantia from the date of purchase. This warranty covers defects in materials and workmanship under normal use. Please retain your proof of purchase for warranty claims. For full warranty terms and conditions, please refer to the official RetroSound weblloc o contacteu amb el servei d'atenció al client.
10. Atenció al client
If you encounter any issues not covered in this manual or require further assistance, please contact RetroSound customer support. Contact information can typically be found on the official RetroSound weblloc.
Weblloc: www.retrosound.com