
Jesverty SPS-12003 & 928D
Manual d'usuari del kit d'estació de soldador amb pantalla digital Jesverty DC Power Supply variable + 60W
Model: SPS-12003 & 928D
Introducció
This manual provides detailed instructions for the safe and efficient operation of your Jesverty DC Power Supply Variable and 60W Digital Display Soldering Iron Station Kit. Please read this manual thoroughly before use and retain it for future reference.
The kit combines a high-precision adjustable DC power supply (SPS-12003) and a digital display soldering iron station (928D), designed for various electronic projects, repairs, and laboratory applications.
Informació de seguretat
Observeu sempre les següents precaucions de seguretat per evitar lesions o danys a l'equip:
- Assegureu-vos que la font d'alimentació estigui connectada a una presa de corrent amb connexió a terra.
- Do not operate the equipment in wet or damp condicions.
- Avoid touching the soldering iron tip when hot. Use appropriate heat-resistant gloves.
- Assegureu-vos de ventilar adequadament durant la soldadura per evitar la inhalació de fums.
- Desconnecteu l'alimentació abans de realitzar qualsevol manteniment o neteja.
- This product conforms to UL Standard (U.S.) for electrical appliance safety.
Producte acabatview
DC Power Supply (SPS-12003) Components

The DC Power Supply features a clear digital display and intuitive controls. Refer to Figure 1 for component identification:
- Voltage Visualització: Mostra el volum de sortidatage en Volts (V).
- Visualització actual: Mostra el corrent de sortida a Amperes (A).
- Pantalla de potència: Mostra la potència de sortida en watts (W).
- Indicador del mode CV: S'il·lumina quan la unitat funciona a Volum Constanttagmode e.
- Indicador del mode CC: S'il·lumina quan la unitat funciona en mode de corrent constant.
- VoltagManeta e (gruixuda): Ajusta el volum de sortidatage en increments més grans.
- Botó de corrent (gruixut): Adjusts the output current limit in larger increments.
- VoltagManeta e (Fi): Ajusta el volum de sortidatage en increments més petits i precisos.
- Botó actual (Fi): Adjusts the output current limit in smaller, precise increments.
- Port de càrrega USB (5V/2A): Provides a stable 5V, 2A output for charging compatible devices.
- Terminal de sortida + (vermell): Terminal de sortida positiu.
- Terminal de connexió a terra (verd): Terminal de connexió a terra.
- Terminal de sortida - (Negre): Terminal de sortida negativa.
- Interruptor d'alimentació: Encén/apaga la unitat.
- Ventilador de refrigeració: Dissipates heat during operation.
- Entrada d'alimentació CA: Connects the power cord to the AC mains.
- Caixa de fusibles: Contains a spare fuse for protection.
Soldering Iron Station (928D) Components

The soldering station includes a digital display and various features for efficient soldering:
- Pantalla digital: Shows current temperature, settings, and error codes.
- Botons d'ajust de temperatura: S'utilitza per augmentar o disminuir la temperatura establerta.
- Function/Calibration Button: Accesses various functions and calibration mode.
- Soldering Iron Holder: Securely holds the soldering iron when not in use.
- Tip Cleaner: Sponge or brass wool for cleaning the soldering tip.
- Helping Hands: Two adjustable arms with alligator clips for holding components.
- Solder Wire Dispenser: Integrated holder for a roll of solder wire.
- Interruptor d'alimentació: Turns the soldering station ON/OFF.
Configuració
DC Power Supply Setup
- Place the power supply on a stable, level surface with adequate ventilation.
- Assegureu-vos que l'interruptor d'alimentació estigui a la posició OFF.
- Connect the provided AC power cord to the AC Power Inlet (16) on the rear panel and then to a grounded wall outlet.
- For output, connect your load to the Output Terminal + (11) and Output Terminal - (13) using appropriate test leads. For grounding, connect to the Grounding Terminal (12) if required by your application.
Soldering Iron Station Setup
- Place the soldering station on a heat-resistant, stable surface.
- Assegureu-vos que l'interruptor d'alimentació estigui a la posició OFF.
- Connect the soldering iron handle cable to the designated port on the soldering station.
- If using, attach the helping hands to the designated slots on the station.
- Place the tip cleaning sponge in its tray and dampen it slightly with water, or use the brass wool provided.
- Connect the AC power cord to the station and then to a grounded wall outlet.
Instruccions de funcionament
DC Power Supply Operation
- Encès: Engegueu l'alimentació amb l'interruptor d'alimentació (14). La pantalla LED s'il·luminarà.
- Configuració Voltage i actual:
- Utilitzeu el voltage Knob (Coarse) (6) and Voltage Knob (Fine) (8) to set the desired output voltage.
- Use the Current Knob (Coarse) (7) and Current Knob (Fine) (9) to set the desired current limit. It is recommended to set the current limit before connecting the load to prevent overcurrent.
- Vol. Constanttage (C.V.) and Constant Current (C.C.) Mode:
The power supply automatically switches between C.V. and C.C. modes based on the load. If the load resistance is high, the unit operates in C.V. mode, maintaining the set voltage. If the load resistance is low and the current reaches the set limit, the unit switches to C.C. mode, maintaining the set current and reducing the output voltage.
The C.V. (4) or C.C. (5) indicator will light up to show the active mode.
- Port de càrrega USB: The 5V/2A USB Charging Port (10) can be used independently to charge compatible USB devices. Simply connect your device to the port.

Soldering Iron Station Operation
- Encès: Turn on the soldering station using the Power Switch. The digital display will show the current temperature.
- Configuració de la temperatura:
Use the temperature adjustment buttons (Up/Down arrows) to set the desired soldering temperature. The station features rapid heating and PID temperature stabilization to maintain the set temperature consistently.
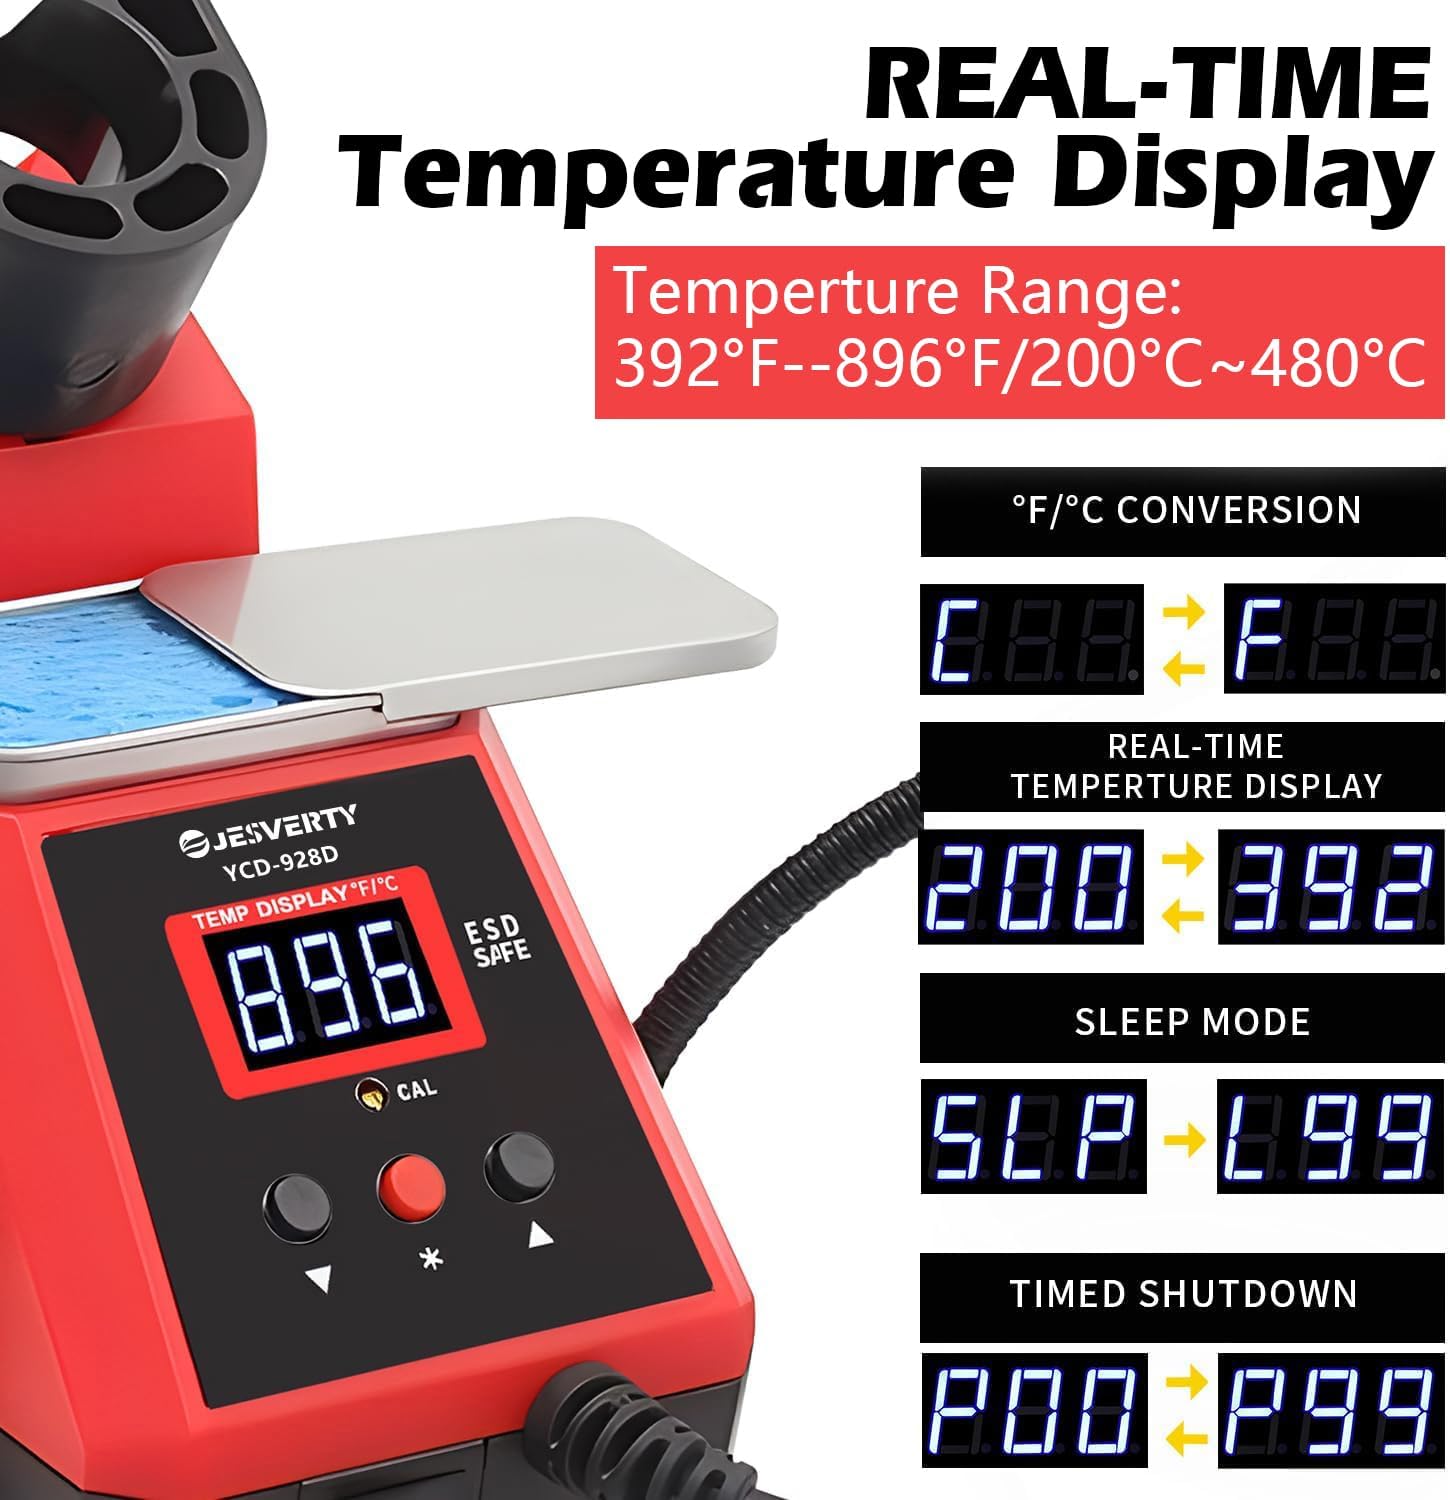
Figure 4: Real-time Temperature Display and Functionality. - °C/°F Conversion: Press the Function/Calibration button to switch between Celsius (°C) and Fahrenheit (°F) temperature display modes.
- Funció de repòs automàtica: The station is equipped with an auto-sleep function to conserve energy and extend tip life. If the iron is idle for a set period, it will enter sleep mode, reducing the tip temperature. Moving the iron will wake it up.
- Calibració digital de temperatura: For precise temperature control, the station supports digital temperature calibration. Refer to the specific instructions in the full manual for calibration procedures.
- Using Helping Hands: Position the flexible helping hands to securely hold PCBs or components during soldering.
- Neteja de consells: Regularly clean the soldering tip using the damp sponge or brass wool to ensure optimal performance and extend tip lifespan.
Manteniment
- Neteja general: Disconnect both units from power. Use a soft, dry cloth to wipe down the exterior of the power supply and soldering station. Do not use abrasive cleaners or solvents.
- Soldering Tip Maintenance:
- Always tin the soldering tip with a small amount of solder before storing it and after cleaning.
- Replace the soldering tip when it becomes excessively worn or corroded.
- Ventilador de refrigeració: Ensure the cooling fan vents on the power supply are clear of dust and obstructions to maintain proper airflow.
- Substitució de fusibles: If the power supply does not turn on, check the fuse in the Fuse Box (17) on the rear panel. Replace with a fuse of the same type and rating if blown.
Resolució de problemes
| Problema | Causa possible | Solució |
|---|---|---|
| Power Supply does not turn on. | No power from outlet; Blown fuse; Power cord not connected. | Check wall outlet; Replace fuse; Ensure power cord is securely connected. |
| No output from Power Supply. | Output terminals not connected; Voltage/current set to zero; Overload protection activated. | Check connections; Adjust voltage/current settings; Reduce load or check for short circuit. |
| Soldering Iron not heating up. | Iron not connected to station; Heating element failure; Incorrect temperature setting. | Ensure iron cable is fully inserted; Contact support if heating element is faulty; Increase temperature setting. |
| Soldering tip not tinning properly. | Tip is oxidized or dirty; Insufficient temperature. | Clean tip thoroughly with sponge/brass wool and re-tin; Increase temperature. |
Especificacions
DC Power Supply (SPS-12003)
- Nom del model: SPS-12003
- Vol. De sortidatage: 0-120V (ajustable)
- Corrent de sortida: 0-3A (Ajustable)
- Potència de sortidatage: 360 W (màx.)
- Visualització: 4-Digit LED (V/A/W)
- Resolució de visualització: 0.01V, 0.001A, 0.1W
- Port USB: 5V/2A
- Entrada Voltage: 90-120V AC
- Mètode de refrigeració: Air (Intelligent Temperature Controlled Fan)
- Característiques de seguretat: Short Circuit Protection, Leakage Protection, Thermal Protection, Voltage Overload, Power Overload
Soldering Iron Station (928D)
- Nom del model: 928D (Implied from description, not explicitly listed as model name in specs)
- Potència de sortida: 60W
- Interval de temperatura: 194 °F-896 °F / 90 °C-480 °C
- Visualització: LED digital
- Característiques: °C/°F Conversion, Auto Sleep, Digital Temperature Calibration, Anti-static Design
- Accessoris: 2 Helping Hands, Solder Wire Dispenser, Tip Cleaning Sponge/Brass Wool
Què hi ha a la caixa
The Jesverty DC Power Supply Variable + 60W Digital Display Soldering Iron Station Kit includes:
- 1 x Jesverty DC Power Supply (SPS-12003)
- 1 x Jesverty 60W Digital Display Soldering Iron Station (928D)
- 1 x Mànec de soldador
- 1 x Solder Tip (pre-installed or included)
- 2 x Helping Hands
- 1 x Tip Cleaning Sponge/Brass Wool
- 1 x Power Cord for DC Power Supply
- 1 x Power Cord for Soldering Station
- 1 x Manual d'usuari (aquest document)
Garantia i Suport
For warranty information, technical support, or service inquiries, please contact Jesverty customer service. Refer to the contact information provided with your product packaging or visit the official Jesverty weblloc.
This product is manufactured by Jesverty and is designed for reliable performance. For any issues not covered in this manual, professional assistance is recommended.
Ask a question about this manual
Ask about setup, troubleshooting, compatibility, parts, safety, or missing instructions. Manuals+ will review the question and use this page’s manual context to help answer it.