
ErGear EGCM25-US
ErGear EGCM25-US Freestanding Dual Monitor Stand User Manual
Model: EGCM25-US | Brand: ErGear
1. Introducció
This manual provides detailed instructions for the assembly, operation, and maintenance of your ErGear EGCM25-US Freestanding Dual Monitor Stand. Please read this manual thoroughly before installation and use to ensure proper setup and safe operation.
The ErGear EGCM25-US is designed to support two monitors, each up to 32 inches and weighing up to 22 lbs, featuring VESA 75x75mm or 100x100mm mounting patterns. Its freestanding design offers flexibility for various desktop surfaces, promoting an ergonomic workspace.
2. Informació de seguretat
- Capacitat de pes: Do not exceed the maximum weight capacity of 22 lbs (10 kg) per arm. Overloading can cause instability and potential damage or injury.
- Mida del monitor: This stand is designed for monitors between 13 and 32 inches.
- Compatibilitat VESA: Ensure your monitors have VESA mounting patterns of 75x75mm or 100x100mm.
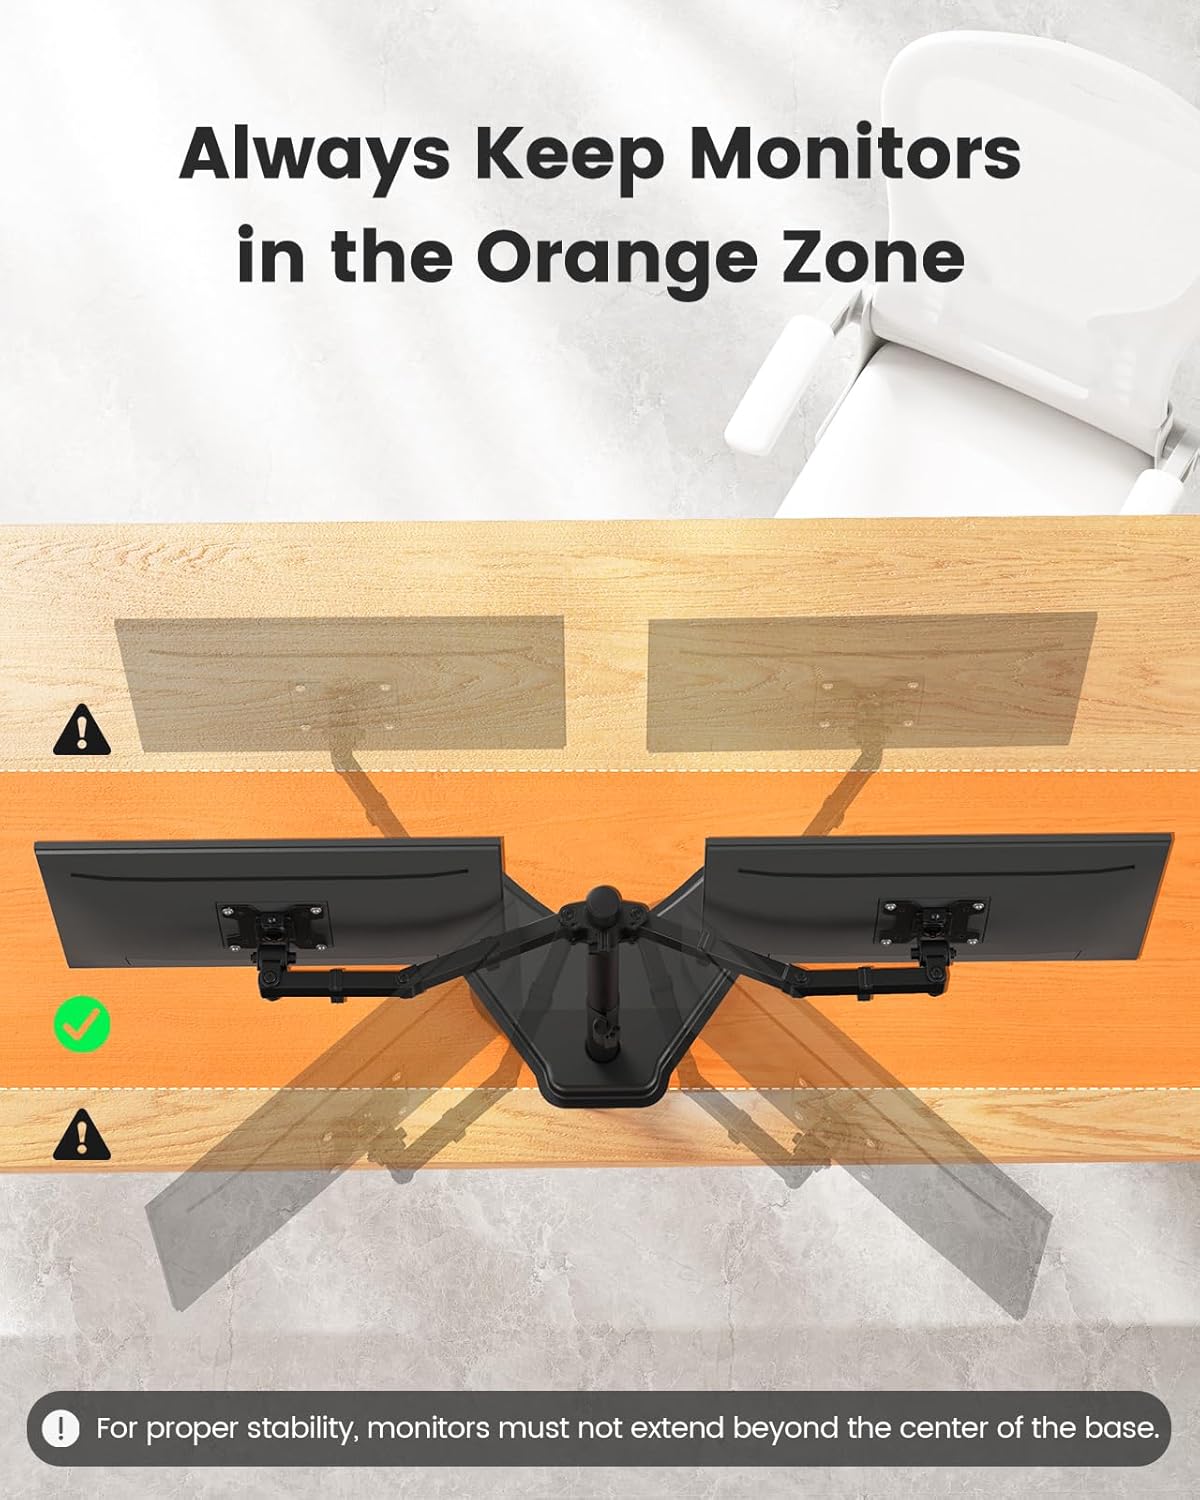
- Estabilitat: Always keep your monitors within the designated "Orange Zone" (centered over the base) to prevent tipping. Do not extend the arms too far forward or backward.
- Muntatge: Follow all assembly instructions carefully. If you encounter any difficulties, contact customer support.
- Nens: Mantingueu les peces petites allunyades dels nens per evitar perills d'asfixia.
3. Contingut del paquet
Verify that all components are present and undamaged before proceeding with assembly. If any parts are missing or damaged, please contact ErGear customer support.
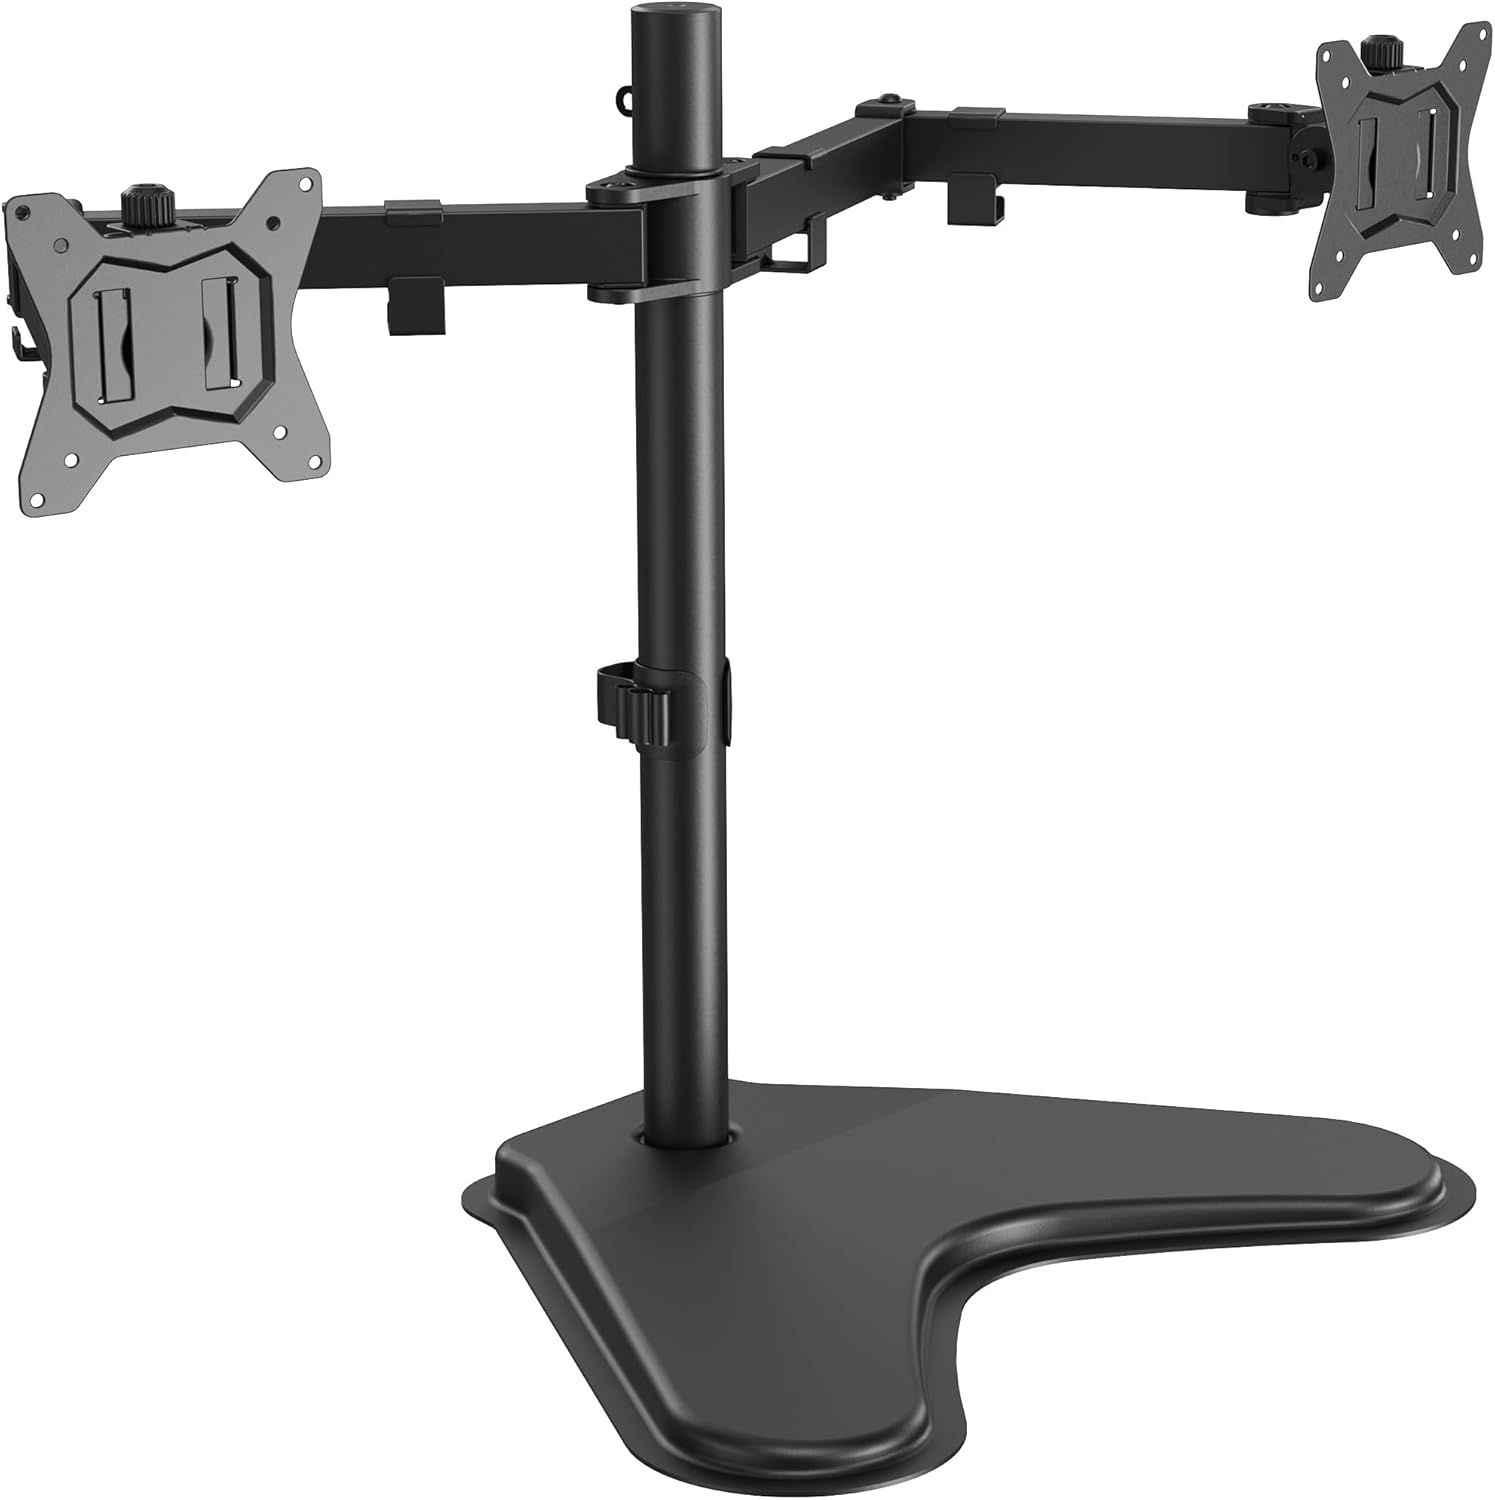
- Placa base
- Pol principal
- Conjunt de braç de monitor dual
- Plaques VESA (2x)
- Clips de gestió de cables
- Kit de ferramenta (cargols, volanderes, separadors, claus Allen)
4. Especificacions
| Característica | Detall |
|---|---|
| Número de model | EGCM25-US |
| Marca | ErGear |
| Compatibilitat de la mida del monitor | 13" - 32" per monitor |
| Capacitat de pes | Max 22 lbs (10 kg) per arm |
| Compatibilitat VESA | 75x75mm, 100x100mm |
| Tipus de moviment | Articulating, Tilt, Swivel, Rotation |
| Angle d'inclinació | +/- 90 graus |
| Angle de gir | +/- 90 graus |
| Rotació | 360 degrees (Landscape/Portrait) |
| Ajust d'alçada màxima | Up to 18.2 inches (pole height) |
| Dimensions de la base | 13 cm x 10.7 cm |
| Material | Acer d'aliatge, alumini |
| Color | Negre |

5. Muntatge i muntatge
Please follow these steps carefully for safe and correct assembly.
5.1 Attach Pole to Base
- Place the base plate on a stable, flat surface.
- Insert the main pole into the designated slot on the base.
- Secure the pole to the base using the provided screws and Allen key from the hardware kit. Ensure it is tightened firmly.
5.2 Attach Monitor Arms to Pole
- Slide the dual monitor arm assembly onto the main pole.
- Adjust the height of the arms to your desired initial position.
- Tighten the locking mechanism on the arm assembly to secure it to the pole.
5.3 Fixar plaques VESA als monitors
- Carefully lay your monitor face down on a soft, clean surface.
- Identify the VESA mounting holes on the back of your monitor (75x75mm or 100x100mm).
- Attach a VESA plate to the back of each monitor using the appropriate screws, washers, and spacers from the hardware kit. Do not overtighten.
- Nota: If your monitor does not have VESA holes, a VESA adapter (sold separately) will be required.

5.4 Muntar els monitors als braços
- With assistance, carefully lift each monitor and slide the VESA plate attached to the monitor onto the corresponding arm's mounting head.
- Ensure the monitor is securely seated and locked into place. Some VESA plates may have a quick-release mechanism or require a screw to fully secure.
6. Instruccions d'ús i ajustos
Once your monitors are mounted, you can adjust them for optimal viewcomoditat i productivitat.
6.1 Ajust d'alçada
To adjust the height of the monitors:
- Loosen the locking mechanism on the main pole that secures the arm assembly.
- Carefully slide the arm assembly up or down the pole to the desired height.
- Tighten the locking mechanism firmly to secure the arms at the new height.

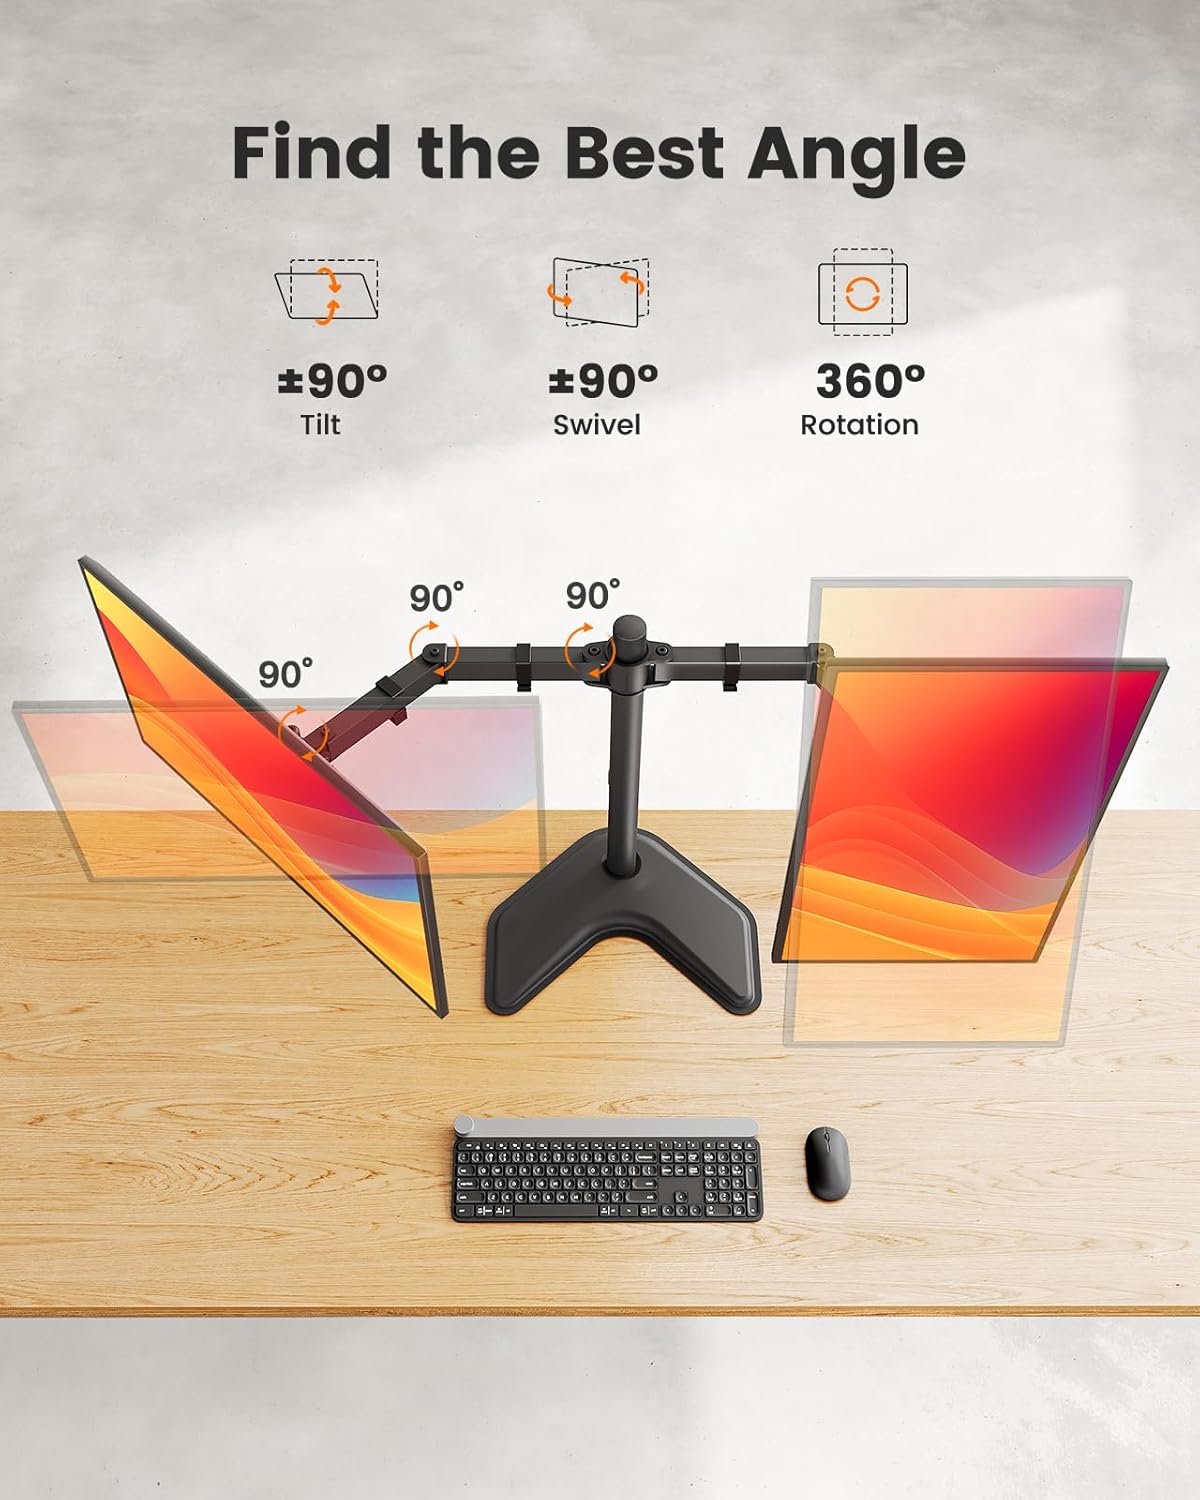
6.2 Inclinació, gir i rotació
The monitor arms offer extensive adjustability:
- Inclinació: Grasp the top and bottom edges of your monitor and gently tilt it forward or backward up to +/- 90 degrees to reduce glare or find your preferred angle.
- Girar: Gently push or pull the monitor to swivel it left or right up to +/- 90 degrees, allowing you to share your screen or adjust viewangles d'ajust.
- Rotació: Gireu el monitor 360 graus per canviar entre les orientacions horitzontal i vertical.
6.3 Gestió de cables
Use the integrated cable clips along the arms and pole to route and organize your monitor cables. This helps maintain a tidy and clutter-free workspace.

6.4 Maintaining Stability
Important: To ensure stability, always keep your monitors positioned within the "Orange Zone" – meaning the center of gravity of your monitors should remain over the base. Avoid extending the arms too far forward or backward, as this can cause the stand to tip.
7. Manteniment
- Neteja: Netegeu el suport amb un drap suauamp drap. Eviteu productes de neteja abrasius o dissolvents que puguin danyar l'acabat.
- Comprovació d'estanquitat: Periodically check all screws and connections to ensure they remain tight. Re-tighten if necessary, especially after making significant adjustments or moving the stand.
- Lubricació: No lubrication is required for the moving parts.
8. Solució De Problemes
| Problema | Causa possible | Solució |
|---|---|---|
| Stand is unstable or tips over. | Monitors extended too far from the base; weight imbalance; loose connections. | Reposition monitors closer to the center of the base. Ensure all screws are tightened. Verify monitor weight is within limits. |
| Monitors sag or do not hold position. | Connections at the VESA plate or arm joints are loose. | Tighten the screws at the VESA plate and arm joints. Ensure monitor weight is within limits. |
| Dificultat per ajustar l'alçada. | Locking mechanism on the pole is too tight or not fully loosened. | Ensure the locking mechanism is fully loosened before attempting to adjust height. Re-tighten after adjustment. |
| Els monitors no estan anivellats. | Slight variations in arm tension or VESA plate attachment. | Adjust the tilt mechanism on each VESA plate individually until monitors are level. |
9. Informació de la garantia
ErGear products are designed for durability and performance. For specific warranty details regarding your EGCM25-US Freestanding Dual Monitor Stand, please refer to the warranty card included in your product packaging or visit the official ErGear weblloc web. Conserveu el rebut de compra com a comprovant de compra per a qualsevol reclamació de garantia.
10. Atenció al client
If you have any questions, require assistance with assembly, or need troubleshooting support, please contact ErGear customer service:
- Weblloc: Visit the ErGear Store on Amazon (per a informació sobre el producte i recursos d'assistència)
- Correu electrònic: Refer to your product packaging or the official ErGear weblloc web per obtenir informació de contacte directe.
Ask a question about this manual
Ask about setup, troubleshooting, compatibility, parts, safety, or missing instructions. Manuals+ will review the question and use this page’s manual context to help answer it.