
1. Introducció
This manual provides detailed instructions for the safe and efficient operation, installation, and maintenance of your feyree 40A Level 2 EV Charger. Please read this manual thoroughly before using the product to ensure proper functionality and to prevent damage or injury.
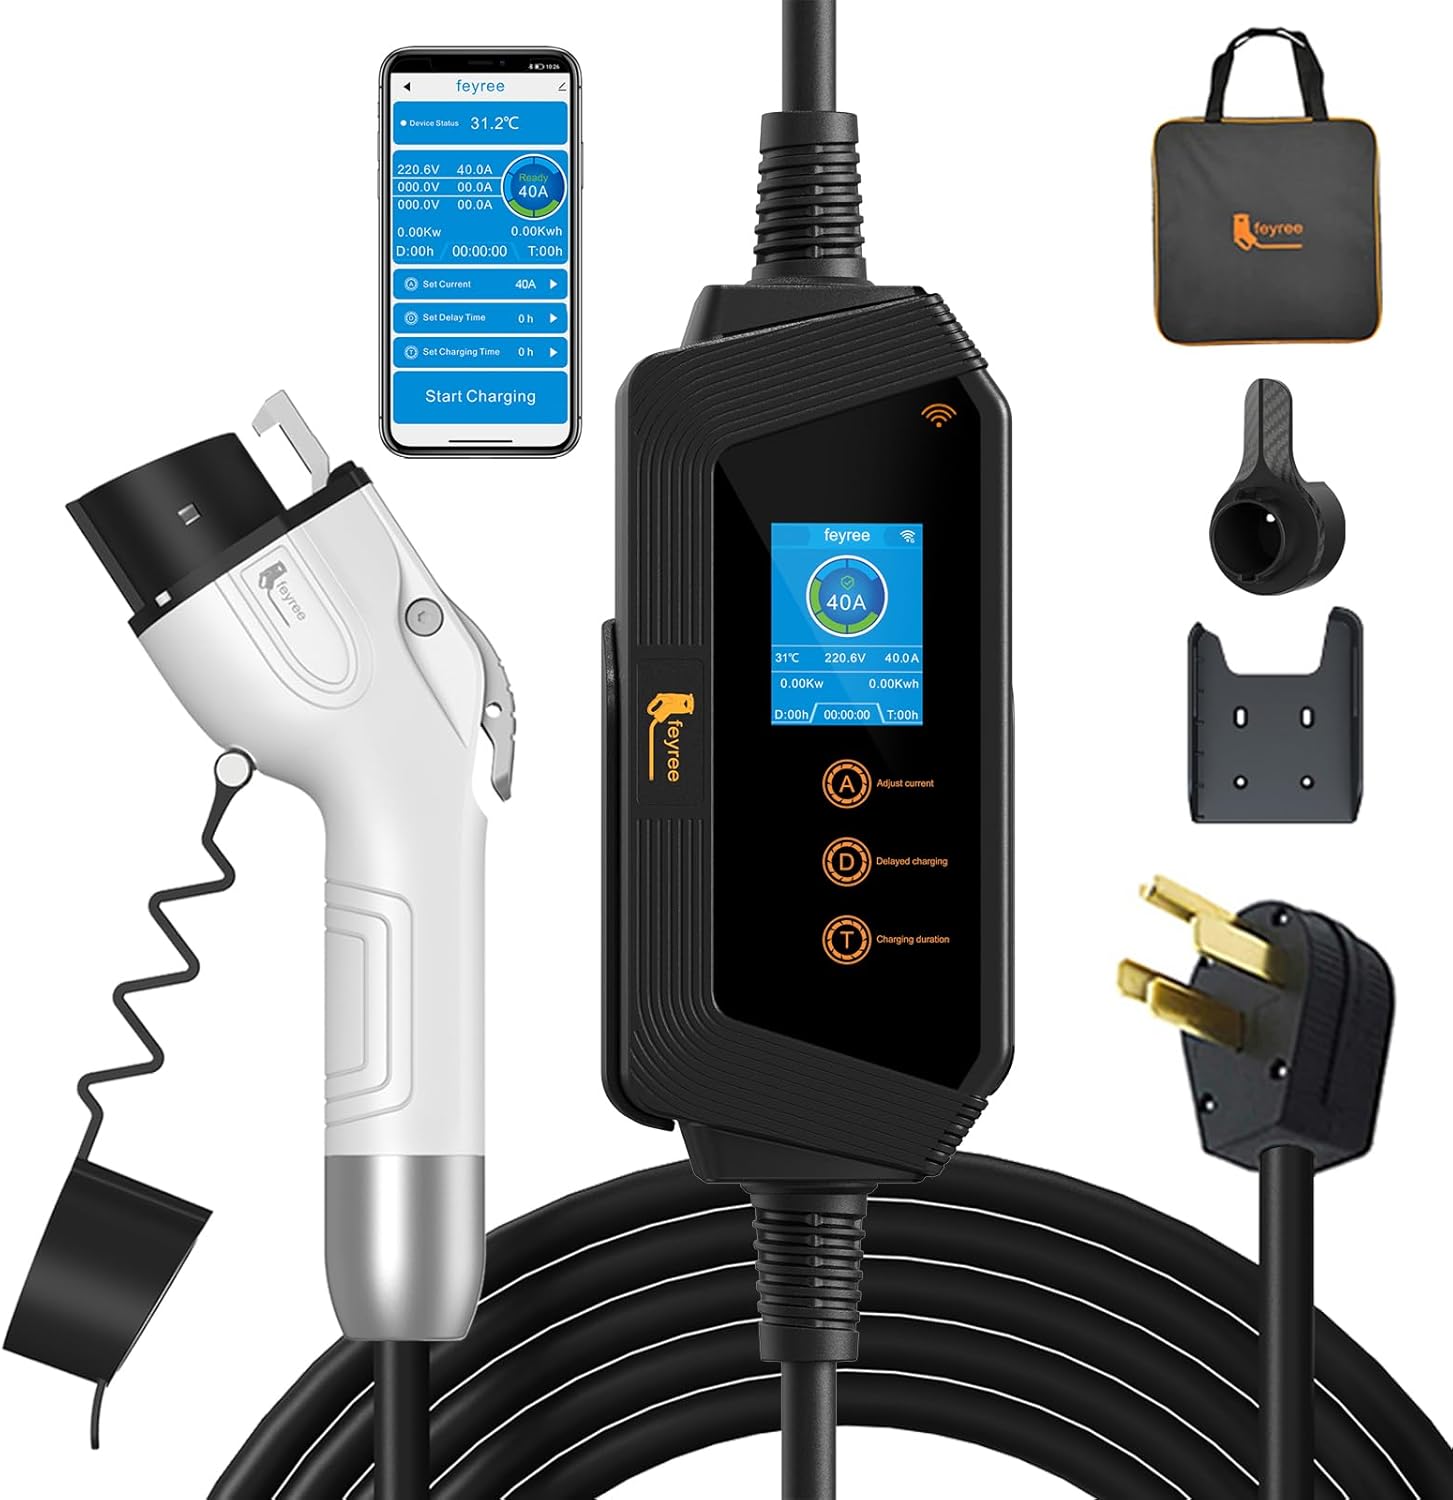
Figura 1: Mésview of the feyree 40A Level 2 EV Charger components.
2. Característiques del producte
The feyree 40A Level 2 EV Charger is designed for fast, reliable, and smart electric vehicle charging. Key features include:
- WiFi Connection & Smart APP Control: Monitor charging status, adjust current, and set charging times remotely via a dedicated mobile application.
- Up to 40A Fast Charging: Delivers up to 9.6KW of power, significantly reducing charging time compared to Level 1 chargers.
- SAE J1772 Compatibility: Compatible with all J1772 electric and plug-in hybrid vehicles (Tesla requires an additional adapter).
- Proteccions de seguretat avançades: Inclou sobrecorrent, sobrevol.tage, baix voltage, leakage (TypeA), over-heating, and grounding protection.
- Construcció duradora: Made from high flame-retardant material (UL94V-0 fire rating) and IP66 waterproof for outdoor use.
- Dos modes d'ús: Can be wall-mounted for permanent installation or used as a portable charger with the included carrying bag.

Figure 2: Key specifications and features of the feyree EV Charger.

Figure 3: Comparison of charging speed, highlighting 8X faster charging.
3. Què hi ha a la caixa
En obrir el paquet, comproveu que hi hagi tots els elements següents:
- 40A Portable EV Charger Level 2
- Porta carregador EV
- EV Plug Holder
- Kit de cargols per a la instal·lació
- Manual d'usuari (aquest document)
- Bossa portàtil

Figura 4: Tots els components inclosos al paquet del producte.
4. Configuració
4.1 Installation (Wall-Mounted)
For a fixed charging station, you can mount the charger and cable holder to a wall using the provided screw kit. Choose a location near your NEMA 14-50P outlet that allows the charging cable to comfortably reach your vehicle's charging port.
- Identify a suitable wall location, ensuring it is structurally sound and free from obstructions.
- Use the charger holder as a template to mark drilling points on the wall.
- Perforeu forats i inseriu ancoratges de paret si cal.
- Secure the charger holder and EV plug holder to the wall using the provided screws.
- Hang the charger unit on its holder and neatly coil the cable.

Figura 5: Example of a wall-mounted installation.
4.2 Ús portàtil
The feyree charger is also designed for portability. When traveling, simply store the charger and cable in the provided portable bag. Ensure the NEMA 14-50P outlet is accessible at your charging location.

Figure 6: Portable storage of the charger in a vehicle trunk.
4.3 Connexió a l'alimentació
The charger uses a NEMA 14-50P plug. Ensure you have a compatible 240V NEMA 14-50R outlet available. Plug the charger's power cord firmly into the outlet.

Figure 7: NEMA 14-50P plug and compatible outlet.
5. Instruccions de funcionament
5.1 Basic Charging
To begin charging your electric vehicle:
- Ensure the charger is securely plugged into a NEMA 14-50R outlet.
- Obriu la tapa del port de càrrega del vehicle.
- Insert the SAE J1772 connector firmly into your vehicle's charging port until it clicks into place.
- The charger will automatically begin charging, and the LCD screen will display charging status.
- To stop charging, disconnect the J1772 connector from your vehicle.

Figure 8: Compatibility with J1772 EVs.
5.2 Smart APP Control (WiFi Connection)
The feyree charger can be controlled and monitored via a smart application (Tuya Smart or Smart Life). This allows for real-time monitoring, current adjustment, and scheduling.
- Baixeu l'aplicació Tuya Smart o Smart Life des de la botiga d'aplicacions del vostre dispositiu.
- Registreu-vos o inicieu sessió al vostre compte.
- Add the charger device by following the in-app instructions for WiFi/Bluetooth pairing.
- Un cop connectat, pots view charging status, adjust current, and set charging schedules directly from your smartphone.

Figure 9: APP remote monitoring interface.
5.3 Adjusting Current
You can adjust the charging current to optimize charging speed or manage power consumption. The charger supports 8 levels of current adjustment.
- Via APP: Use the 'Set Current' option within the mobile application to select your desired amperage.
- Via Charger Buttons: Use the 'A' button on the charger unit to cycle through available current settings.

Figure 10: Current adjustment options.
5.4 Setting Charging Time (Delayed Charging)
Per avançartage of off-peak electricity rates, you can schedule delayed charging times.
- Via APP: Use the 'Set Delay Time' option in the app to specify when charging should begin.
- Via Charger Buttons: Use the 'D' button on the charger unit to manually set a delayed charging time (0-15 hours).

Figure 11: Scheduling delayed charging for cost efficiency.
5.5 Pantalla LCD acabadaview
The 2.8-inch LCD display provides real-time information about the charging process:
- WiFi State: Indicates connection status (Connection Waiting, Connect, Not Connected).
- Estat de càrrega: Shows if the charger is actively charging.
- Vol. De càrregatage: Mostra el volum actualtage.
- Temperatura en temps real: Shows the operating temperature of the unit.
- Energia en temps real: Displays instantaneous power consumption (KW).
- Selectable Current: Shows the currently selected amperage.
- Corrent de càrrega: Displays the actual current being drawn.
- Consum d'energia: Total energy consumed (KWh).
- Set Delayed Charging Time: Displays the set delay time.
- Set Charging Time: Displays the set charging duration.

Figure 12: LCD display information.
5.6 Funcions dels botons
The charger unit features three buttons for direct control:
- 'A' Button (Adjust Current): Short press to cycle through current levels.
- 'D' Button (Set Delay Time): Short press to enter delay time setting.
- 'T' Button (Set Charging Time / Menu): Short press to enter charging duration setting. Long press for 10 seconds to enter the main menu page.

Figure 13: Charger button functions.
6. Manteniment
Regular maintenance ensures the longevity and optimal performance of your feyree EV charger.
- Neteja: Wipe the charger unit and cable with a soft, damp drap. No utilitzeu productes químics agressius ni netejadors abrasius. Assegureu-vos que la unitat estigui desendollada abans de netejar-la.
- Inspecció del cable: Periodically inspect the charging cable and connector for any signs of wear, damage, or fraying. Do not use if damaged.
- Emmagatzematge: When not in use, store the charger in a dry, clean place. Use the provided cable holder for wall-mounted units or the portable bag for storage.
6.1 Environmental Resistance
The feyree charger is designed with an IP66 waterproof rating, making it suitable for various weather conditions. It can withstand temperatures ranging from -22°F (-30°C) to 131°F (55°C).

Figure 14: IP66 waterproof and temperature resistance.
7. Característiques de seguretat
Your feyree EV charger is equipped with multiple safety protection functions to ensure safe operation:
- Protecció contra sobreintensitat
- Més de voltage Protecció
- Sota Voltage Protecció
- Leakage Protection (TypeA)
- Protecció contra sobreescalfament
- Protecció de posada a terra
- Protecció contra curtcircuits
- Protecció contra llamps

Figure 15: Comprehensive safety protections.
8. Solució De Problemes
If you encounter issues with your feyree EV charger, consider the following common troubleshooting steps:
- Sense energia: Ensure the NEMA 14-50P plug is fully inserted into the outlet and that the circuit breaker for the outlet is not tripped.
- No es carrega: Verify the J1772 connector is securely plugged into the vehicle's charging port. Check the LCD display for any error codes or status messages.
- Problemes de connectivitat de l'aplicació: Ensure your mobile device is connected to a stable WiFi network. Restart the charger and your mobile device, then attempt to reconnect via the app.
- Càrrega lenta: Check the current setting on the charger's LCD or via the app to ensure it is set to the desired amperage. Verify your vehicle's charging capabilities.
- Sobreescalfament: If the charger indicates an overheating error, disconnect it immediately and allow it to cool down in a well-ventilated area. Ensure the charger is not covered or in direct sunlight during operation.
For persistent issues or error codes not listed, please refer to the detailed troubleshooting section within the mobile application or contact customer support.
9. Especificacions
| Atribut | Especificació |
|---|---|
| Marca | feyree |
| Model | Electric Car Charger Level 2 |
| Número de model de l'article | Hero EV-H8 (40A) |
| Número de peça del fabricant | FR-CP-0616 |
| Corrent màxim | 40A |
| Potència màxima | 9.6KW |
| Entrada Voltage | 240 V |
| Tipus de connector | SAE J1772 (tipus 1) |
| Tipus d'endoll d'alimentació | NEMA 14-50P |
| Longitud del cable | 17FT |
| Pes de l'article | 9.79 lliures |
| Dimensions del paquet | 15.16 x 15.12 x 4.53 polzades |
| Classificació de seguretat | CE/FCC |
| Classificació impermeable | IP66 |
| Temperatura de funcionament | -22 °F a 131 °F (-30 °C a 55 °C) |
10. Garantia i Suport
10.1 Informació de la garantia
Feyree provides a 2-year assurance service for all feyree products. This warranty covers defects in materials and workmanship under normal use.
10.2 Atenció al client
If you have any questions, require technical assistance, or need to claim warranty service, please feel free to contact our professional after-sales support team. Refer to the product packaging or the feyree official weblloc web per obtenir la informació de contacte més actualitzada.