1. Producte acabatview
The Generic A-1 Desktop Sand Blasting Cabinet is designed for efficient surface restoration, including the removal of rust, paint, and oxidation. This versatile unit supports both wet and dry sandblasting operations, making it suitable for a variety of materials and applications. It features a durable metal construction and an integrated lighting system for improved visibility.
Components clau:
- Sandblasting Cabinet: The main enclosure for containing abrasive media and workpieces.
- Glove Holes: Integrated openings with gloves for safe handling of items inside the cabinet.
- ViewFinestra d'entrada: A clear protective cover for observing the sandblasting process.
- Air Pressure Valves: Two gauges for regulating jet air pressure and sandblasting bubble adjustment.
- Il·luminació Lamp: An 8W fluorescent lamp to illuminate the interior workspace.
- Interruptor d'alimentació: Controls the electrical power to the unit.
- Interruptor de peu: Provides hands-free control over the sandblasting operation.
- Integrated Exhaust System: Ensures safe and clean abrasive operations, includes a replaceable air filter.
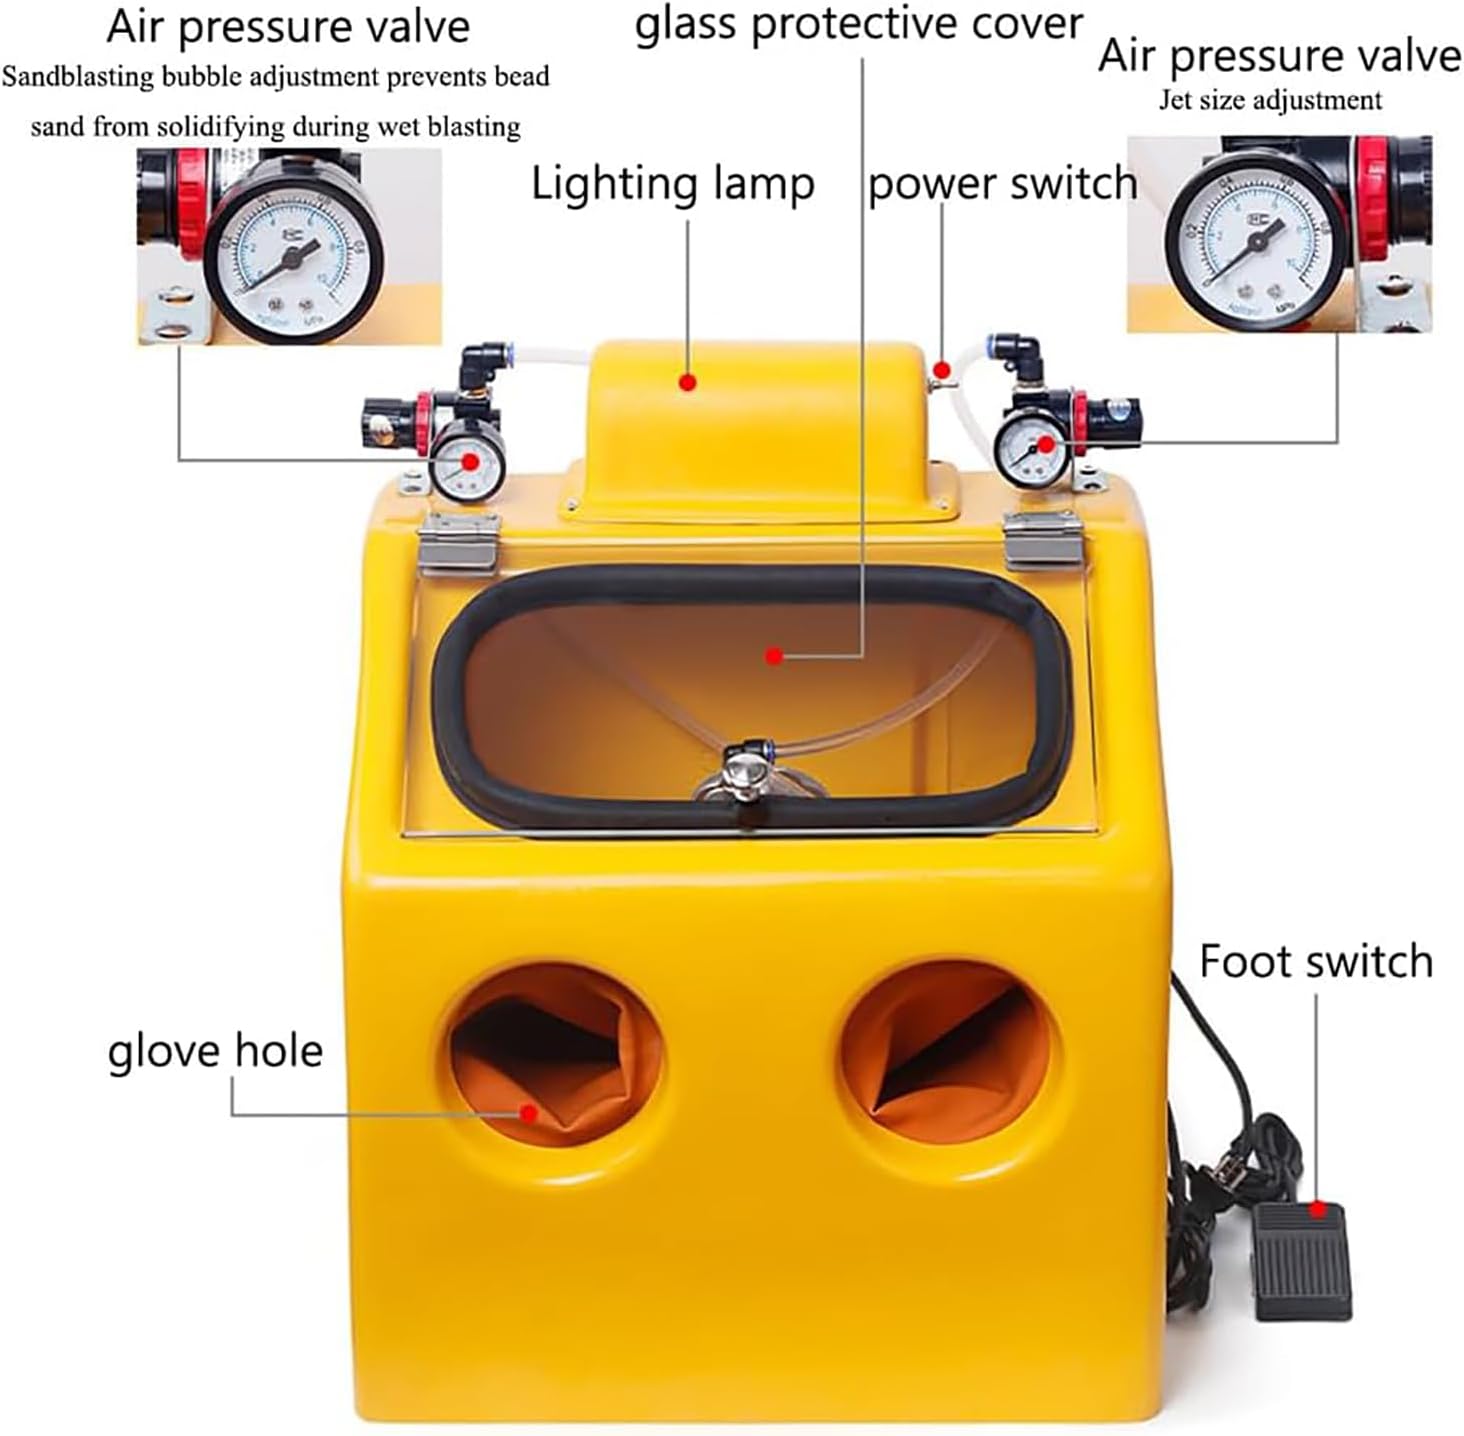
Figura 1: Mésview of the Sand Blasting Cabinet components, including air pressure valves, lighting lamp, power switch, foot switch, glove holes, and glass protective cover.
2. Instruccions de seguretat
Read all safety warnings and instructions before operating this sandblasting cabinet. Failure to follow these instructions may result in serious injury or property damage. Keep this manual for future reference.
- Always wear appropriate personal protective equipment (PPE), including eye protection, respiratory protection (dust mask), and hearing protection.
- Ensure the work area is well-ventilated to prevent the accumulation of dust and abrasive particles.
- Connect the unit to a grounded power outlet. Do not modify the plug.
- Do not operate the sandblaster in damp or wet conditions unless specifically designed for wet blasting and all electrical connections are properly sealed.
- Mantingueu els nens i les persones no autoritzades allunyats de la zona d'operació.
- Before performing any maintenance or cleaning, disconnect the unit from the power supply and air compressor.
- Use only recommended abrasive media. Incorrect media can damage the equipment or workpiece.
- Regularly inspect the gloves, viewing window, and hoses for wear or damage. Replace worn parts immediately.
- The integrated exhaust system and replaceable air filter are crucial for safe operation. Ensure they are functioning correctly and replace the filter as needed.
3. Configuració
Follow these steps to set up your sandblasting cabinet before initial use:
- Desembalatge: Traieu amb cura tots els components de l'embalatge. Inspeccioneu-ho per veure si hi ha danys durant l'enviament.
- Col·locació: Place the sandblasting cabinet on a stable, level workbench or surface capable of supporting its weight and the weight of the workpiece.
- Air Compressor Connection: Connect your air compressor to the cabinet's air inlet. Ensure all connections are secure and leak-free. The cabinet requires a stable air pressure supply for optimal performance.
- Abrasive Media Loading: Open the cabinet and carefully pour the chosen abrasive media into the designated hopper or collection area at the bottom of the cabinet. Refer to the media manufacturer's instructions for proper loading.
- Connexió elèctrica: Connecteu el cable d'alimentació a una presa elèctrica amb connexió a terra.
- Foot Switch Connection: Connect the foot switch to its designated port on the cabinet.
4. Instruccions de funcionament
The sandblasting cabinet is designed for user-friendly operation with a two-hand system and foot pedal control.

Figure 2: Two-hand operation inside the cabinet, allowing for precise control of the workpiece and nozzle.
- Preparació de la peça de treball: Place the item to be sandblasted inside the cabinet. Ensure it is positioned securely.
- Encès: Turn on the main power switch. The internal lighting lamp should illuminate, improving visibility.
- Ajustar la pressió de l'aire: Use the two air pressure regulating valves located on top of the cabinet to set the desired jet air pressure and sandblasting bubble adjustment.
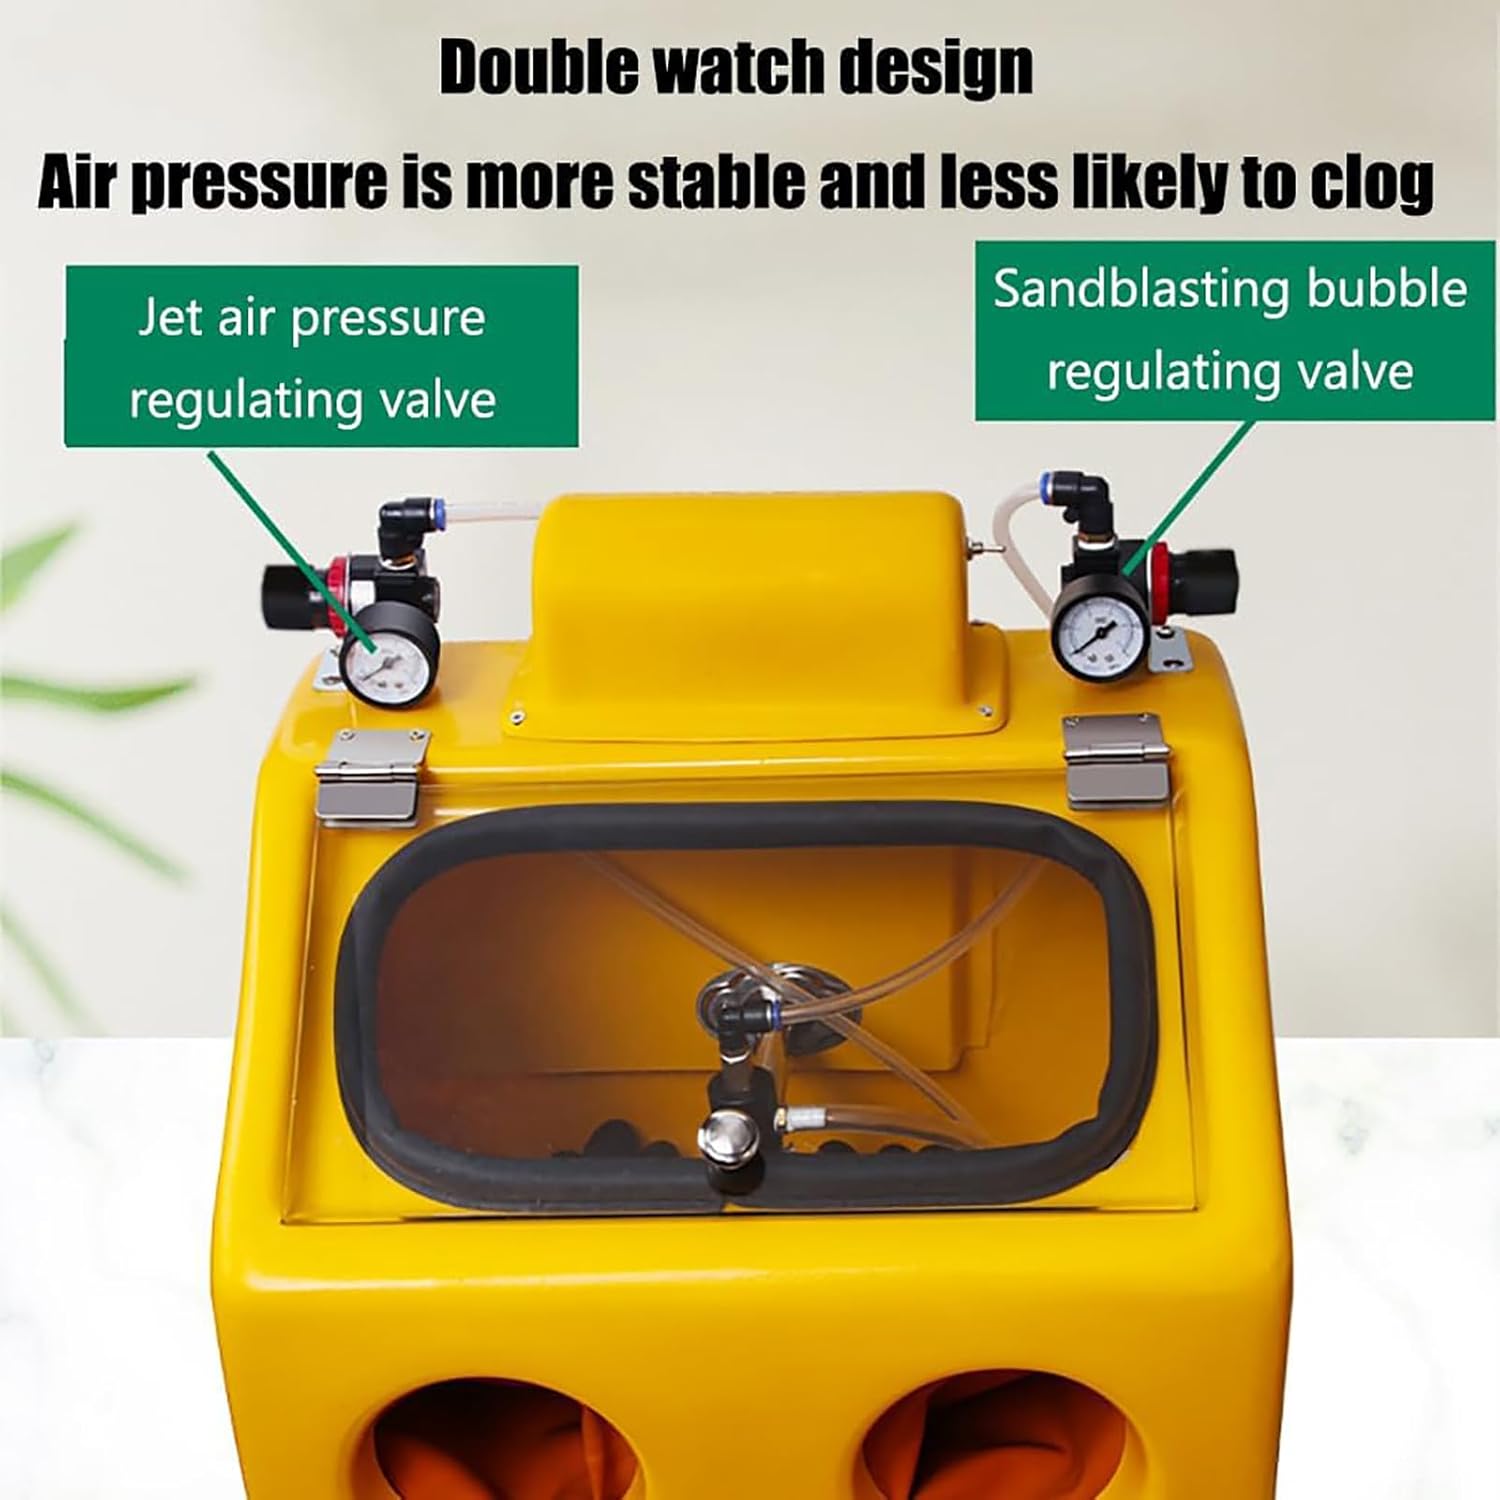
Figure 3: Double gauge design for stable air pressure and reduced clogging.

Figura 4: Detallada view of the two adjustment valves: one for sandblasting bubble adjustment (wet spraying) and one for jet air pressure adjustment.
- Insert Hands: Place your hands into the glove holes.
- Començar a volar: Press the foot switch to activate the sandblasting nozzle. The foot-controlled operation allows you to manipulate the workpiece with both hands freely.

Figure 5: The foot switch enables hands-free operation, allowing better control of the workpiece.
- Control Nozzle: Direct the nozzle towards the workpiece, moving it steadily to achieve an even finish. The nozzle can be fixed or detached depending on the task.
- Supervisar el progrés: Observe the blasting process through the viewfinestra d’engegada.
- Acabar el granallat: Release the foot switch to stop the abrasive flow.
- Apagar: Turn off the main power switch and disconnect the air supply after use.
4.1. Aplicacions adequades
This sandblasting cabinet is suitable for cleaning, deburring, and surface preparation of various small to medium-sized items, including:
- Jewelry (gold, silver, copper, alloy)
- Small metal parts
- Automotive components
- Restoration projects

Figura 6: Examples of items suitable for sandblasting, such as various types of jewelry.
5. Manteniment
Regular maintenance ensures the longevity and safe operation of your sandblasting cabinet.
- Clean Cabinet: After each use, remove any remaining abrasive media and clean the interior of the cabinet. The dust-proof operating box and dust collector help manage debris.
- Comprovació del filtre d'aire: Regularly inspect the replaceable air filter in the integrated exhaust system. Replace it when it becomes clogged to maintain efficient dust collection and safe operation.
- Inspect Gloves: Check the integrity of the gloves. Replace them if they show signs of wear, tears, or punctures to maintain a sealed environment.
- Neteja ViewFinestra d'entrada: Keep the glass protective cover clean for optimal visibility. Use a non-abrasive cleaner to avoid scratching.
- Comproveu les mànegues i les connexions: Periodically inspect all air hoses and connections for leaks or damage. Tighten or replace as necessary.
- Lubricació: Refer to the manufacturer's recommendations for any lubrication requirements for moving parts, though typically minimal for this type of equipment.
6. Solució De Problemes
This section addresses common issues you might encounter with your sandblasting cabinet.
| Problema | Causa possible | Solució |
|---|---|---|
| No abrasive flow. |
|
|
| Poor visibility inside cabinet. |
|
|
| Air leaks from cabinet. |
|
|
If you encounter problems not listed here or if the suggested solutions do not resolve the issue, contact customer support.
7. Especificacions
| Característica | Detall |
|---|---|
| Nom del producte | Desktop Sandblasting Cabinet |
| Marca | Genèric |
| Model | A-1 |
| Material | High-quality steel with powder coating |
| Light Source Equipment | Fluorescent de 8 W Lamp |
| Sandblasting Type | Manual, Wet and Dry compatible |
| Dimensions (L x A x A) | 42 cm x 38 cm x 53 cm (16.5 x 15 x 20.9 polzades) |
| ASIN | B0DB122Z7N |

Figure 7: Dimensional drawing of the sandblasting cabinet.
8. Garantia i Suport
Per obtenir informació sobre la garantia o assistència tècnica, consulteu la documentació proporcionada en el moment de la compra o poseu-vos en contacte amb el vostre distribuïdor. Conserveu el rebut de compra com a comprovant de compra.