myGEKOgear D111
myGEKOgear Orbit D111 Dash Cam User Manual
Model: D111
1. Introducció
This manual provides detailed instructions for the installation, operation, and maintenance of your myGEKOgear Orbit D111 Full HD Dash Cam. Please read this manual thoroughly before using the device to ensure proper functionality and to maximize your user experience.
2. Què hi ha a la caixa
Verifiqueu que tots els elements siguin presents al paquet:
- Orbit D111 Dashcam
- Cable d'alimentació (carregador de cotxe)
- Muntatge de la ventosa
- Targeta Micro SD de 32 GB
- Manual d'usuari (aquest document)
3. Producte acabatview
The myGEKOgear Orbit D111 is a compact dash camera designed to record your driving in Full HD 1080P resolution. It features a 3-inch display, a 140-degree wide-angle lens, G-Sensor for emergency recording, and supports loop recording.

Figura 3.1: Davant view of the Orbit D111 Dash Cam with its suction cup mount.
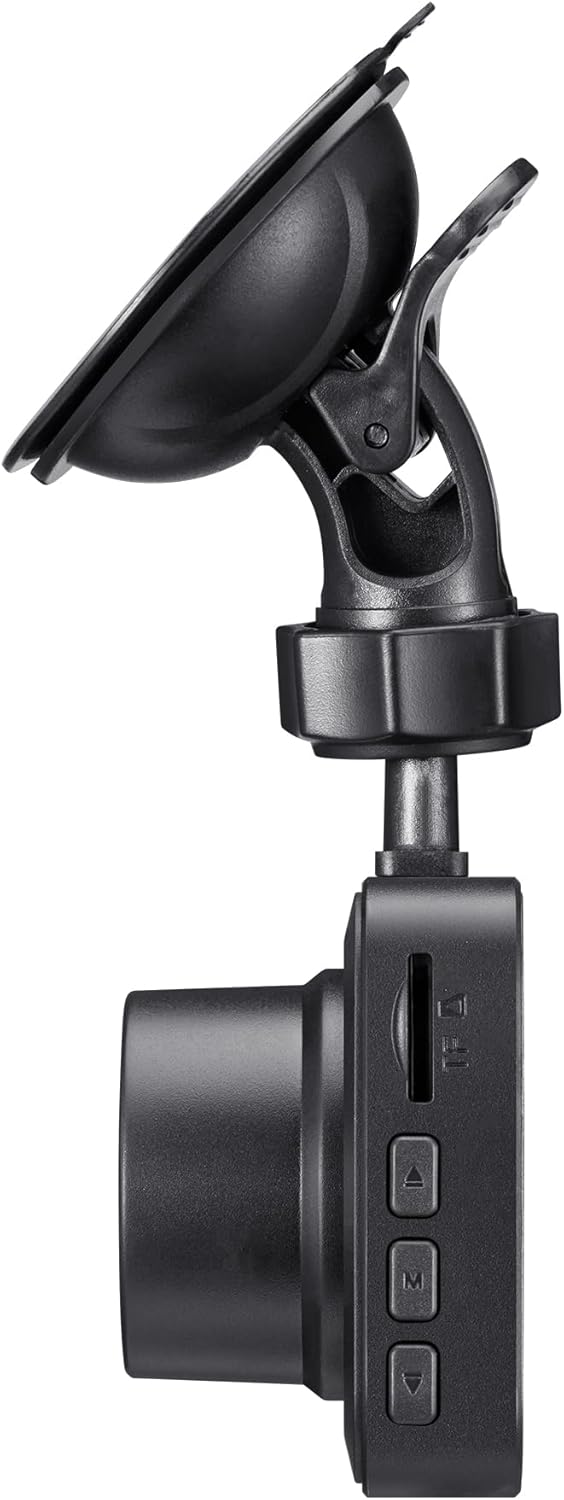
Figura 3.2: lateral view illustrating the control buttons and ports on the Orbit D111 Dash Cam.
4. Configuració
4.1. Instal·lació de la targeta MicroSD
The Orbit D111 supports MicroSD cards up to 64GB. A 32GB MicroSD card is included. Ensure the card is inserted correctly before use.
- Locate the MicroSD card slot on the side of the dash cam.
- Introduïu la targeta MicroSD amb els contactes daurats mirant cap a la part posterior de la càmera fins que encaixi al seu lloc.
- Per treure-la, premeu suaument la targeta fins que surti.

Figura 4.1: MicroSD card and adapter, illustrating the type of storage supported.
4.2. Muntatge de la Dash Cam
Use the provided suction cup mount to secure the dash cam to your vehicle's windshield.
- Netegeu la zona del parabrisa on voleu muntar la càmera del salpicader.
- Fixeu el suport de ventosa a la càmera del salpicader.
- Premeu la ventosa fermament contra el parabrisa i gireu la palanca per fixar-la.
- Ajusta l'angle de la càmera per garantir una visió clara view del camí per davant.

Figura 4.2: The Orbit D111 Dash Cam securely mounted on a vehicle's windshield, displaying its live recording view.
4.3. Connexió d'alimentació
Connect the dash cam to your vehicle's power source using the included power cable.
- Plug the small end of the power cable into the dash cam's power port.
- Plug the other end (car charger) into your vehicle's 12V power outlet (cigarette lighter socket).
- The dash cam will typically power on and begin recording automatically when the vehicle's ignition is turned on.
5. Instruccions de funcionament
5.1. Encendre/apagar
The dash cam is designed to power on and off automatically with your vehicle's ignition. You can also manually power it on or off by pressing and holding the power button.
5.2. Modes d'enregistrament
The Orbit D111 features continuous loop recording and emergency recording via its G-Sensor.
- Enregistrament en bucle: The camera records video in segments (e.g., 1, 3, or 5 minutes). When the MicroSD card is full, the oldest unlocked fileLes s se sobreescriuen per fer espai per a noves gravacions.
- Sensor G (enregistrament d'emergència): The built-in G-Sensor detects sudden impacts or rapid deceleration. When triggered, it automatically locks the current video segment, preventing it from being overwritten by loop recording.

Figura 5.1: Visual representation of the G-Sensor feature, which automatically saves critical footage during incidents.
5.3. Pantalla i navegació pels menús
The 3-inch IPS display provides a live view of the recording and allows access to settings.

Figura 5.2: Un clar view of the 3-inch display, showing the live feed and recording indicators.
Use the physical buttons on the side of the dash cam to navigate through the menu options and adjust settings such as video resolution, loop recording duration, G-Sensor sensitivity, and date/time.
5.4. Wide-Angle Lens
L'objectiu gran angular de 140 graus captura una àmplia view of the road, covering multiple lanes and reducing blind spots.

Figura 5.3: Illustration of the 140-degree wide-angle lens coverage, showing an expansive view de la carretera.
6. Manteniment
- Neteja: Use a soft, dry cloth to clean the camera lens and display. Avoid abrasive cleaners or solvents.
- Targeta MicroSD: Periodically format the MicroSD card (at least once a month) within the camera's settings to ensure optimal performance and prevent data corruption. Back up any important files abans de formatar.
- Actualitzacions de firmware: Check the myGEKOgear website for available firmware updates. Keeping your dash cam's firmware updated can improve performance and add new features.

Figura 6.1: A laptop screen displaying a firmware update interface, indicating the availability of ongoing software support.
7. Solució De Problemes
- La càmera no s'encén:
- Ensure the power cable is securely connected to both the dash cam and the vehicle's 12V outlet.
- Check if the vehicle's 12V outlet is functioning (e.g., by testing with another device).
- The dash cam may have a low battery; charge it for a few minutes. - L'enregistrament s'atura o es congela:
- The MicroSD card may be full. Format the card (after backing up important files).
- The MicroSD card may be faulty or too slow. Use a high-speed (Class 10 or U1/U3) MicroSD card.
- Ensure the card is properly inserted. - Poca qualitat de vídeo:
- Netegeu la lent de la càmera.
- Assegureu-vos que s'ha tret la pel·lícula protectora de la lent.
- Check the video resolution settings in the camera menu. - El sensor G és massa sensible/no prou sensible:
- Adjust the G-Sensor sensitivity setting in the camera menu. - Date/Time is incorrect:
- Set the correct date and time in the camera's settings menu.
8. Especificacions
| Característica | Especificació |
|---|---|
| Nom del model | D111 |
| Resolució de captura de vídeo | 1080p Full HD |
| Mostra | Pantalla IPS de 3 polzades |
| Camp de View | 140 graus |
| Característiques especials | Built-In Display, Compact Design, G-Sensor, Loop Recording |
| Suport d'emmagatzematge | Up to 64GB MicroSD (32GB included) |
| Tecnologia de connectivitat | USB |
| Tipus de muntatge | Windshield Mount (Suction Cup) |
| Dimensions del producte | 3.5 x 2 x 2 polzades |
| Pes de l'article | 9.6 unces |
| Fabricant | Adesso |
9. Garantia i Suport
For warranty information and technical support, please refer to the official myGEKOgear weblloc web o contacteu directament amb el seu servei d'atenció al client. Conserveu el rebut de compra com a comprovant de compra.
Ask a question about this manual
Ask about setup, troubleshooting, compatibility, parts, safety, or missing instructions. Manuals+ will review the question and use this page’s manual context to help answer it.