
1. Introducció
This manual provides detailed instructions for the installation, operation, and maintenance of your Unifit Gen 2 Non-WiFi Pellet Grill Control Board, model PG24-82. This digital temperature control board is designed to enhance the performance of compatible Camp Chef pellet grills by offering precise temperature management and advanced features.
2. Producte acabatview
The Unifit PG24-82 control board features a high-visibility, low-glare digital display and an intuitive dial for easy navigation. It incorporates PID technology for consistent temperature control and includes a smart smoke mode for adjustable smoke intensity. The board supports both Fahrenheit and Celsius temperature units and offers a startup bypass option for quick operation.
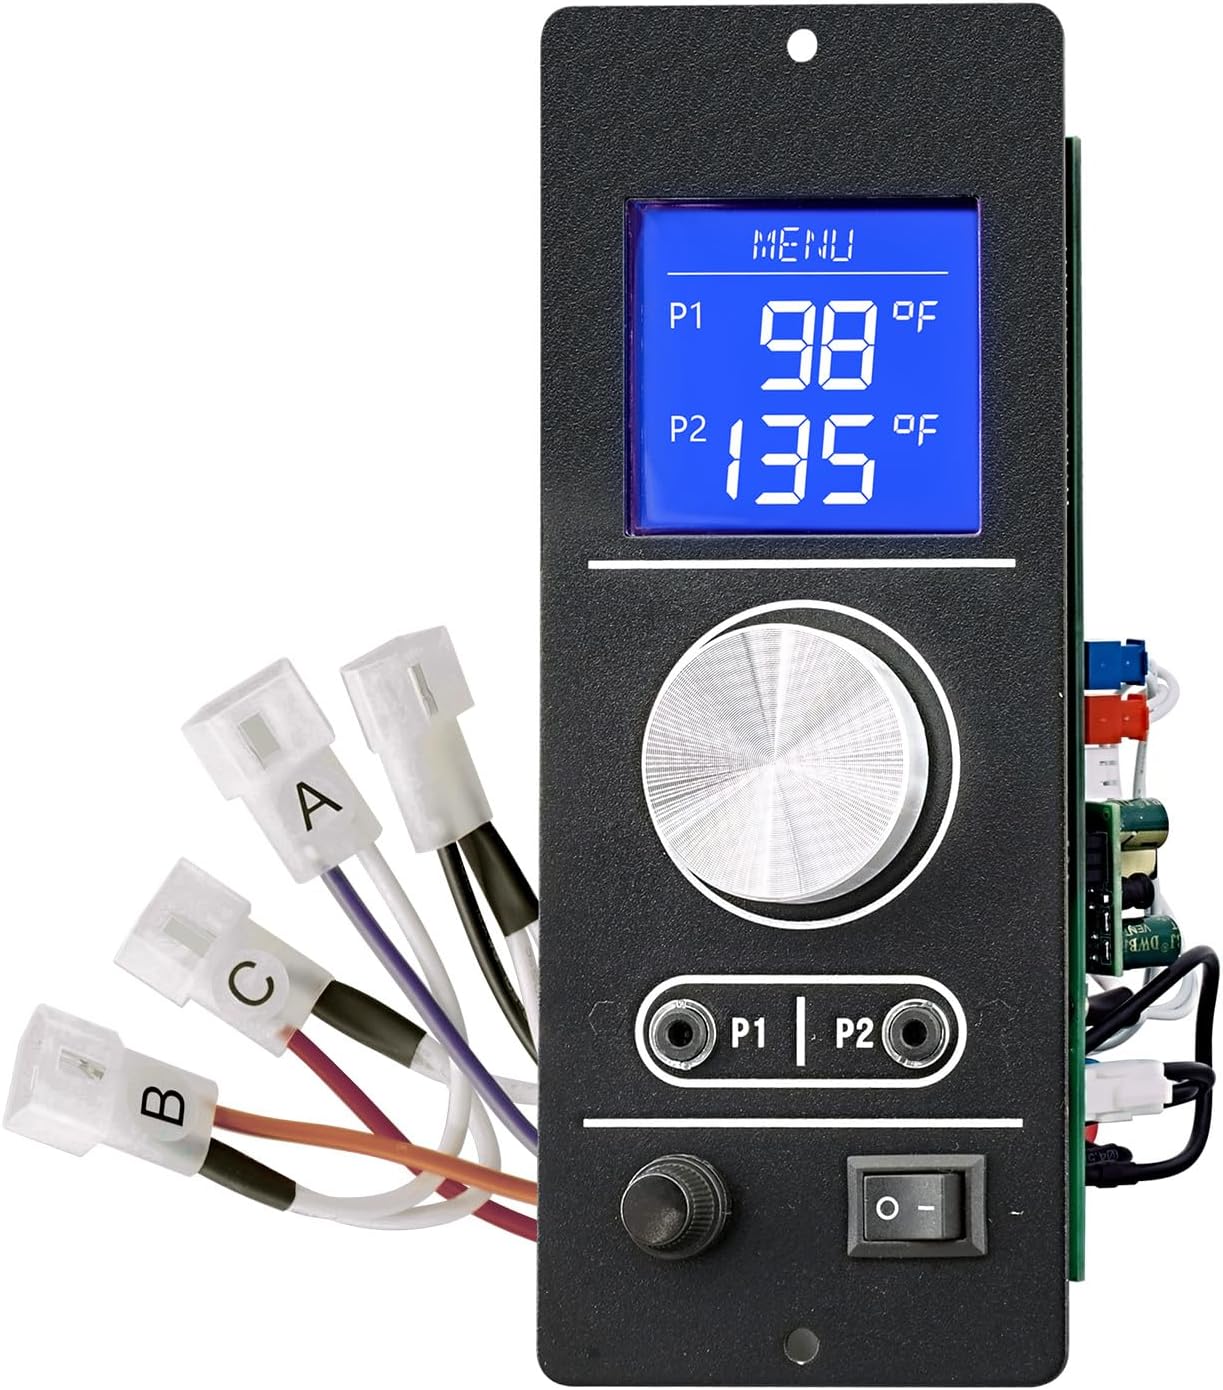
Imatge 2.1: Frontal view of the Unifit Gen 2 Digital Temperature Control Board, showing the digital display, control knob, probe inputs, and power switch.
3. Compatibilitat
This control board (PG24-82) is compatible with the following Camp Chef pellet grill models:
- persecució 20
- SG24, SGG/SG 30, SGX
- DLX, XT grill models
- SmokePro DLX 24, SmokePro LUX 36, SmokePro STX 24, SmokePro XT 24, SmokePro SE
- Woodwind Classic 24 (PG24STX, PG24XT, PG24S, PG24WWS)
Note: This control board is NOT compatible with XXL Vertical models.

Image 3.1: Visual representation of compatible Camp Chef grill models, including SmokePro DLX 24, LUX 36, SG 24, SGX 36, STX 24, XT 24, Woodwind Classic 24, and Woodwind SG 24.
4. Contingut del paquet
Your Unifit PG24-82 control board package includes:
- 1 x Unifit Gen 2 Digital Temperature Control Board (PG24-82)
- 1 x RTD Temperature Probe
- 2 x Meat Temperature Probes
- Wiring Harnesses (pre-attached)
- Mounting Hardware (screws, nuts, zip ties)
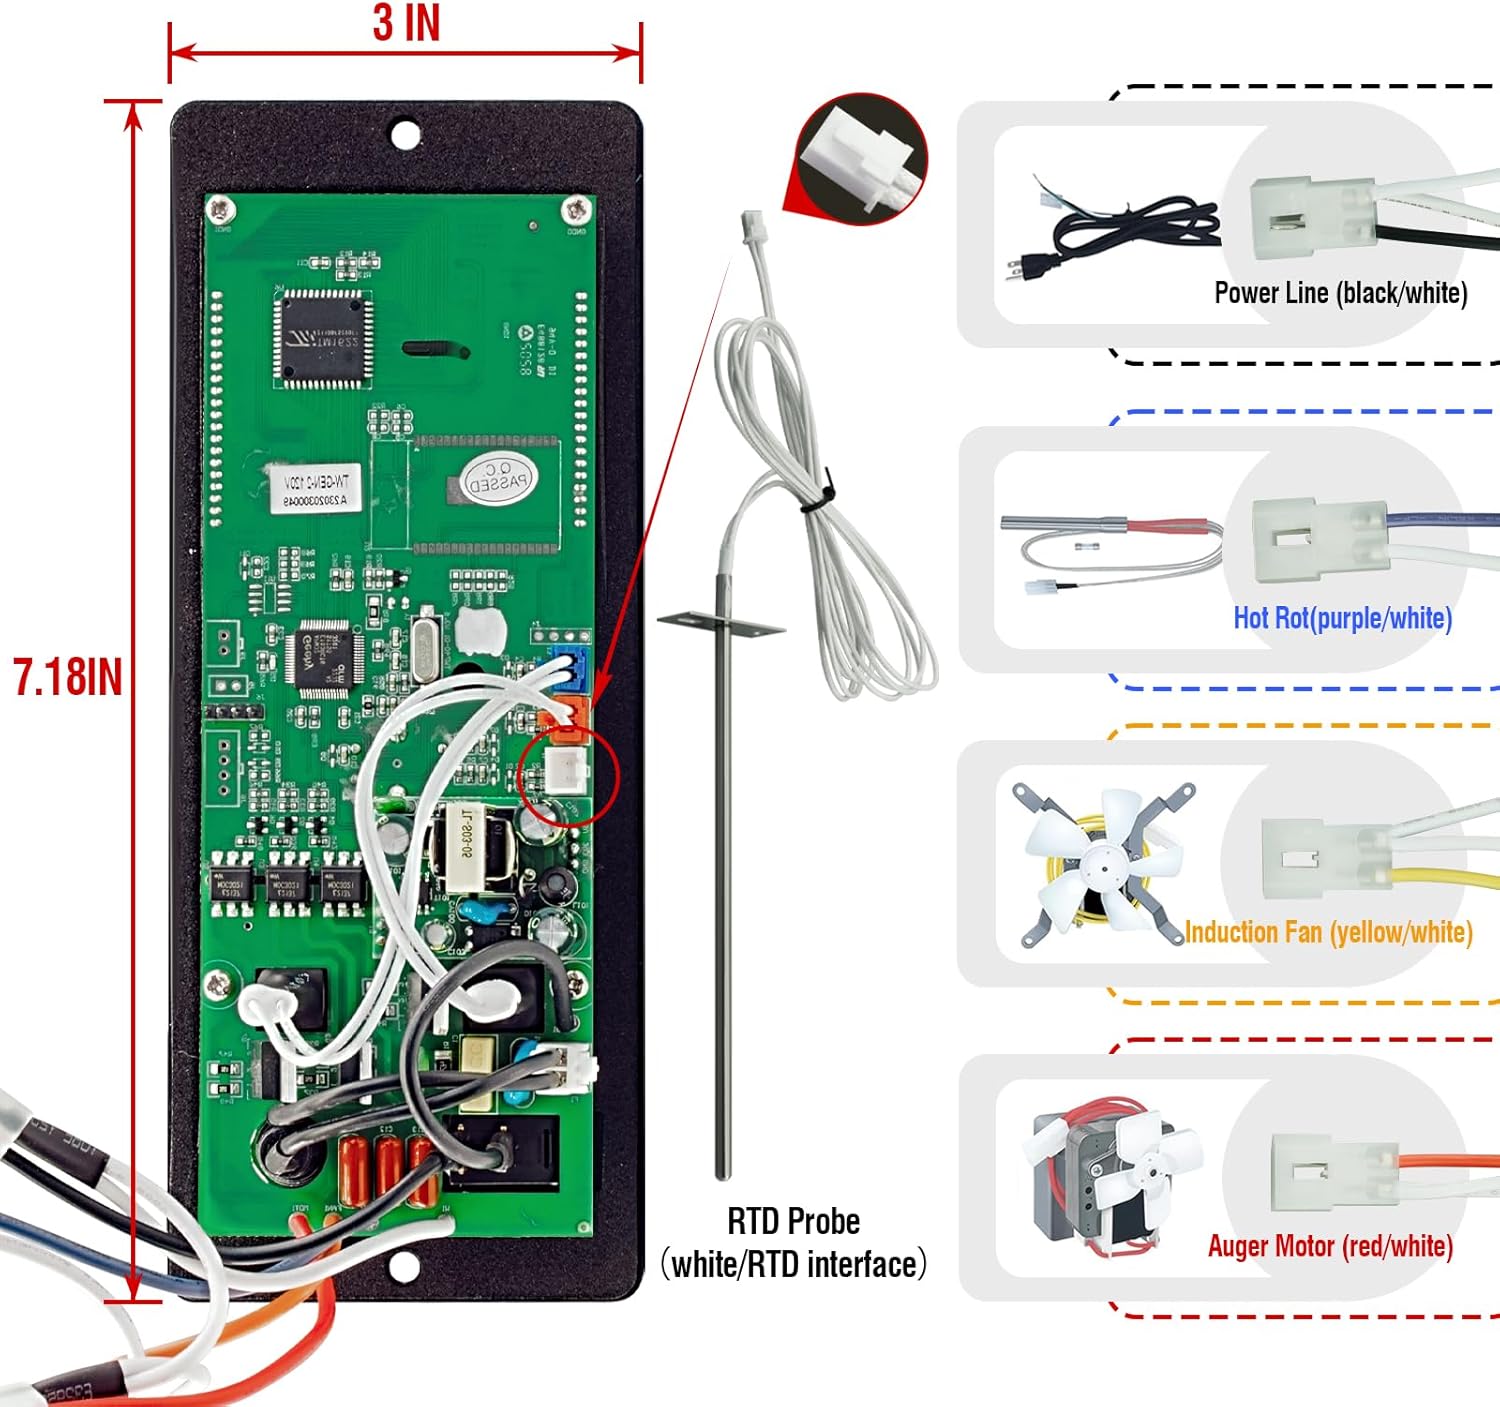
Imatge 4.1: Detallada view of the control board's back, showing dimensions (7.18 x 3 inches) and a clear wiring diagram for the power line, hot rod, induction fan, auger motor, and RTD probe connections.
5. Configuració i instal·lació
Safety First: Always ensure your grill is completely powered off and unplugged from the electrical outlet before attempting any installation or maintenance.
- Preparació: Open the control panel housing of your Camp Chef grill. Carefully disconnect all existing wiring from the old control board. Take photos of the existing connections for reference if needed.
- Treure la placa antiga: Unscrew and remove the old control board from the grill housing.
- Instal·lar la placa nova: Position the new Unifit PG24-82 control board in the housing. Secure it using the provided screws.
- Connecteu el cablejat: Refer to Image 4.1 for the wiring diagram. Connect the wiring harnesses from your grill to the corresponding ports on the new control board. It is crucial to match the wire colors, not necessarily the labels on the connectors, as some older models may have mislabeled connectors. Ensure the following connections are made correctly:
- Power Line (black/white)
- Hot Rod (purple/white)
- Induction Fan (yellow/white)
- Auger Motor (red/white)
- RTD Probe (white/RTD interface)
- Connectar sondes: Plug the RTD temperature probe into its designated port. The two meat temperature probes can be plugged into the P1 and P2 ports on the front of the control board.
- Comprovació final: Double-check all connections to ensure they are secure and correctly matched. Close the control panel housing.

Image 5.1: The Unifit Gen 2 control board seamlessly integrated into a Camp Chef Pursuit grill, highlighting its sleek faceplate and PID controller for consistent temperatures.
6. Instruccions de funcionament
This section details how to operate your Unifit digital temperature control board.
6.1. Funcionament bàsic
- Encès: Flip the power switch to the 'ON' position. The display will illuminate.
- Entra al menú: Press the central control knob to enter the menu selection.
- Menú de navegació: Rotate the knob to scroll through menu options such as 'SET TEMP', 'SMOKE', 'FEED', 'UNITS', 'BYPASS', 'SHUTDOWN', and 'ABOUT'.
- Seleccioneu l'opció: Press the knob to select the desired option.
6.2. Configuració de la temperatura
- From the menu, select 'SET TEMP'.
- Rotate the knob to adjust the desired cooking temperature (range: 160°F to 500°F / 71°C to 260°C).
- Press the knob to confirm the temperature setting.
6.3. Adjusting Smoke Mode
- From the menu, select 'SMOKE'.
- Rotate the knob to select a smoke setting from 1 to 10. Higher numbers indicate more smoke.
- Press the knob to confirm the smoke setting.
6.4. Startup Bypass Option
The startup bypass option allows you to skip the normal startup process and quickly resume grilling. From the menu, select 'BYPASS' and press the knob to activate.
6.5. Feeding Pellets
To manually feed pellets to the burner, select 'FEED' from the menu and press the knob. This can be useful for priming the auger or adding fuel.
6.6. Canvi d'unitats de temperatura
To switch between Fahrenheit (°F) and Celsius (°C):
- From the menu, select 'UNITS'.
- Rotate the knob to choose 'F' for Fahrenheit or 'C' for Celsius.
- Premeu el botó per confirmar la vostra selecció.
6.7. Procediment d'aturada
To properly shut down your grill:
- From the menu, select 'SHUTDOWN'.
- Press the knob to initiate the shutdown sequence. The grill will enter a cool-down cycle, typically lasting 20 minutes, before completely powering off.
Video 6.1: Demonstration of the controller's function settings, including menu navigation, temperature adjustment, smoke level selection, startup bypass, and shutdown procedure. This video illustrates how to interact with the control knob and display to manage grill operations.
7. Manteniment
Regular maintenance ensures optimal performance and longevity of your control board and grill.
- Neteja: Keep the control board's display and buttons clean. Use a soft, dry cloth to wipe away dust and grime. Avoid abrasive cleaners or excessive moisture.
- Cura de la sonda: Clean temperature probes after each use. Ensure they are free of food residue. Store them properly to prevent damage.
- Inspecció del cablejat: Periodically check all wiring connections for tightness and signs of wear or damage. Ensure no wires are pinched or exposed.
- Comprovació de fusibles: The control board includes a fuse for protection. If the board loses power unexpectedly, check the fuse. Replace it with a fuse of the same rating if blown.
8. Solució De Problemes
If you encounter issues with your Unifit control board, refer to the following common problems and solutions:
- Temperature Not Holding or Overshooting:
- Comproveu el cablejat: Verify all wiring connections, especially for the auger motor and induction fan. Some older grill models may have mislabeled connectors; ensure you match wire colors as per Image 4.1. Incorrect wiring can lead to the auger feeding pellets continuously or the fan not operating correctly, causing temperature instability.
- RTD Probe: Ensure the RTD probe is clean and properly inserted. A faulty or dirty probe can provide inaccurate readings.
- Qualitat del pellet: Poor quality or wet pellets can affect combustion and temperature stability.
- Display Issues (Dim, Flickering, or Blank):
- Connexió d'alimentació: Ensure the board is receiving stable power. Check the power switch and fuse.
- Connexions internes: If the display is dim or flickers, there might be an internal connection issue. If this occurs, contact customer support.
- Grill Not Starting or Shutting Down Properly:
- Cablejat: Re-check all wiring connections, particularly the power line and hot rod.
- Startup Bypass: If using the bypass option, ensure it was selected correctly. For normal startup, follow the standard procedure.
If troubleshooting steps do not resolve the issue, please contact Unifit customer support for further assistance.
9. Especificacions
| Marca | Unifit |
| Número de model | CC Gen 2 controller (PG24-82) |
| Tipus de controlador | Polsador / Dial |
| Tipus de control de temperatura | Digital (PID Technology) |
| Interval de temperatura | De 160 °C (71 °F) a 500 °C (260 °F) |
| Precisió de la temperatura | +/- 5 ° F. |
| Smoke Settings | 1-10 nivells |
| Tipus de visualització | Digital, Low-Glare |
| Tecnologia de connectivitat | Wired (Non-WiFi) |
| Font d'alimentació | AC |
| Dimensions del producte | 7.18 x 3 x 0.59 polzades |
| Pes de l'article | 10.7 unces |
10. Garantia i Suport
This Unifit product is covered by the manufacturer's standard warranty. For specific warranty details, claims, or technical support, please refer to the documentation included with your purchase or contact Unifit customer service directly. Ensure you have your product model number (PG24-82) and purchase information available when contacting support.