
1. Producte acabatview
The ANYSECU TYT MD-UV390 Plus is an upgraded version of the TYT MD-390, offering dual-band VHF/UHF operation with digital (DMR) and analog modes. It features a robust IP67 waterproof and dustproof rating, 5W/1W output power, and supports 1000 channels. This radio is equipped with AES256 encryption for secure communications.
Característiques principals:
- FCC ID: POD-MDUV390
- Dual Band VHF/UHF Operation
- IP67 Waterproof and Dustproof Rating
- Digital/Analog Dual Mode
- 5W/1W Output Power
- 1000 canals
- Xifratge AES256
- Transmit Interruption
- Group Call Match (Promiscuous)
- Private Call Match (Promiscuous)
- Dual Band, Dual Wait, Dual Standby

Image: TYT MD-UV390 Plus radio highlighting its AES256 encryption capabilities.

Image: TYT MD-UV390 Plus radio partially submerged in water, demonstrating its IP67 waterproof rating.
2. Contingut del paquet
Verifiqueu que tots els elements que s'enumeren a continuació s'inclouen al vostre paquet. Si falta algun element o està malmès, poseu-vos en contacte amb el vostre proveïdor.
- TYT MD-UV390 Plus Radio Body
- 7.4 V 2000mAh Li-ion Battery Pack
- Antena
- Carregador d'escriptori
- Adaptador
- Cable carregador
- Clip de cinturó
- Manual d'usuari

Image: All included accessories for the TYT MD-UV390 Plus radio.
3. Configuració
3.1 Identificació de components
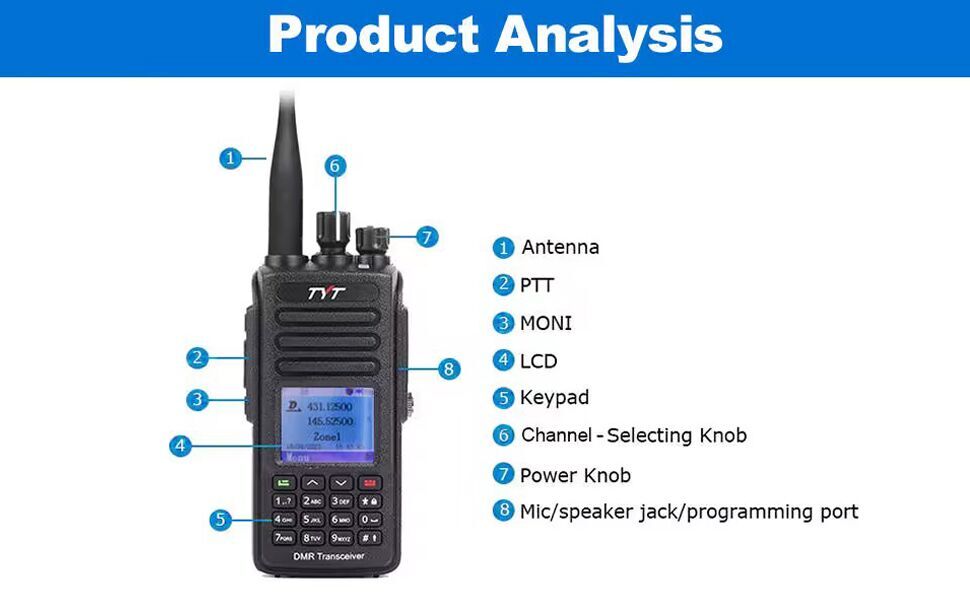
Image: Diagram showing the main components of the TYT MD-UV390 Plus radio.
- Antena
- Botó PTT (Prem per parlar).
- MONI (Monitor) Button
- Pantalla LCD
- Teclat
- Channel-Selecting Knob
- Control de potència/volum
- Mic/Speaker Jack / Programming Port
3.2 Instal·lació de la bateria
To install the battery, align the battery pack with the grooves on the back of the radio and slide it upwards until it clicks into place. Ensure the battery release latch is securely engaged. To remove, press the battery release latch and slide the battery downwards.
3.3 Fixació de l'antena
Enrosqueu l'antena en sentit horari al connector de la part superior de la ràdio fins que quedi ben ajustada amb els dits. No l'estrengueu massa.
3.4 Càrrega de la bateria
Place the radio with the battery installed into the desktop charger. Connect the adapter to the desktop charger and plug it into a power outlet. The charging indicator light on the charger will show the charging status. A full charge typically takes several hours.
4. Instruccions de funcionament
4.1 Engegada/Apagada i Ajust de Volum
Rotate the Power/Volume knob (7) clockwise to power on the radio. Continue rotating clockwise to increase the volume. Rotate counter-clockwise to decrease the volume and power off the radio.
4.2 Selecció de canals
Use the Channel-Selecting knob (6) to cycle through programmed channels. Alternatively, use the keypad (5) to directly input a channel number or navigate through the menu to select a channel.
4.3 Making a Call (PTT)
To transmit, press and hold the PTT (Push-to-Talk) button (2) on the side of the radio. Speak clearly into the microphone. Release the PTT button to receive.
4.4 Navegació de menús
Use the navigation buttons on the keypad to access and scroll through the radio's menu options. The LCD display (4) will show the current menu. Press the 'Confirm' button (usually the green button) to select an option and 'Back' (usually the red button) to return to the previous screen or exit the menu.
4.5 Digital and Analog Modes
The MD-UV390 Plus supports both digital (DMR) and analog communication modes. The radio will automatically detect the mode based on the channel settings. Ensure your channels are programmed correctly for the desired mode of operation.
Video: This video demonstrates the unboxing and basic operational features of the TYT MD-UV390 Plus DMR radio, including powering on, navigating menus, and adjusting channels.
5. Manteniment
5.1 Neteja
Netegeu regularment l'exterior de la ràdio amb un drap suau i sec.amp cloth. Do not use harsh chemicals or abrasive cleaners. Ensure all ports are dry before use, especially after exposure to water.
5.2 Cura de la bateria
To prolong battery life, avoid overcharging or completely discharging the Li-ion battery. Store the battery in a cool, dry place when not in use. If the radio will not be used for an extended period, remove the battery.
5.3 Protecció contra l'aigua i la pols (IP67)
The MD-UV390 Plus is rated IP67, meaning it is protected against dust ingress and can withstand immersion in water up to 1 meter for 30 minutes. Ensure all port covers are securely closed before exposing the radio to water or dusty environments. Do not intentionally submerge the radio beyond its rated limits.
6. Solució De Problemes
6.1 La ràdio no s'encén
- Comproveu si la bateria està correctament instal·lada i completament carregada.
- Ensure the Power/Volume knob is rotated clockwise past the 'off' position.
- Verify the battery contacts are clean and free of debris.
6.2 No es pot transmetre ni rebre
- Confirmeu que l'antena estigui ben connectada.
- Check if the radio is on the correct channel and frequency.
- Ensure the volume is adjusted to an audible level.
- Verify that the radio is not in a restricted mode or has a low battery.
- For digital mode, ensure correct contact and talk group settings.
6.3 Mala qualitat d'àudio
- Ajusteu el volum.
- Check for obstructions around the microphone and speaker.
- Ensure you are within range of the other radio or repeater.
- Verify the antenna connection.
7. Especificacions
| Número de model | MD-UV390-5W |
| ID de la FCC | POD-MDUV390 |
| Potència de sortida | 5 W / 1 W |
| Nivell de resistència a l'aigua | IP67 (impermeable) |
| Nombre de canals | 1000 |
| Interval de freqüència | UHF VHF Dual band |
| Bateria | 7.4 V 2000mAh Li-ion Battery Pack |
| Pes de l'article | 1.57 lliures |
| Dimensions del paquet | 9.65 x 6.97 x 4.25 polzades |
| Característica especial | Alerta de trucada |
| Dispositius compatibles | Other two-way radios using Motorola's digital mobile radio standards, two-way radios operating on UHF/VHF bands. |
8. Informació de la garantia
The ANYSECU TYT MD-UV390 Plus radio body is covered by a 1 any de garantia from the date of purchase. This warranty covers manufacturing defects under normal use. Please retain your proof of purchase for warranty claims. The warranty does not cover damage caused by misuse, accidents, unauthorized modifications, or normal wear and tear.
9. Suport
For technical assistance, troubleshooting beyond this manual, or warranty inquiries, please contact your authorized ANYSECU dealer or the manufacturer's customer support. Refer to the contact information provided with your purchase documentation or on the official ANYSECU weblloc.