
1. Introducció
The Teslong NTS430 is a versatile dual-lens endoscope camera designed for detailed visual inspection in various environments. It features a 4.3-inch HD display, a flexible probe with front and side cameras, adjustable LED illumination, and a durable, waterproof design. This manual provides essential information for the safe and effective use of your NTS430 endoscope camera.

Figure 1: Teslong NTS430 Dual Lens Endoscope Camera with flexible probe.
2. Contingut del paquet
Verifiqueu que tots els elements siguin presents al vostre paquet:
- NTS430 Monitor
- Dual Lens Probe (available in 3.3FT, 16.5FT, or 50FT lengths)
- Cable de càrrega USB
- Manual d'usuari (aquest document)
- Magnet Hook
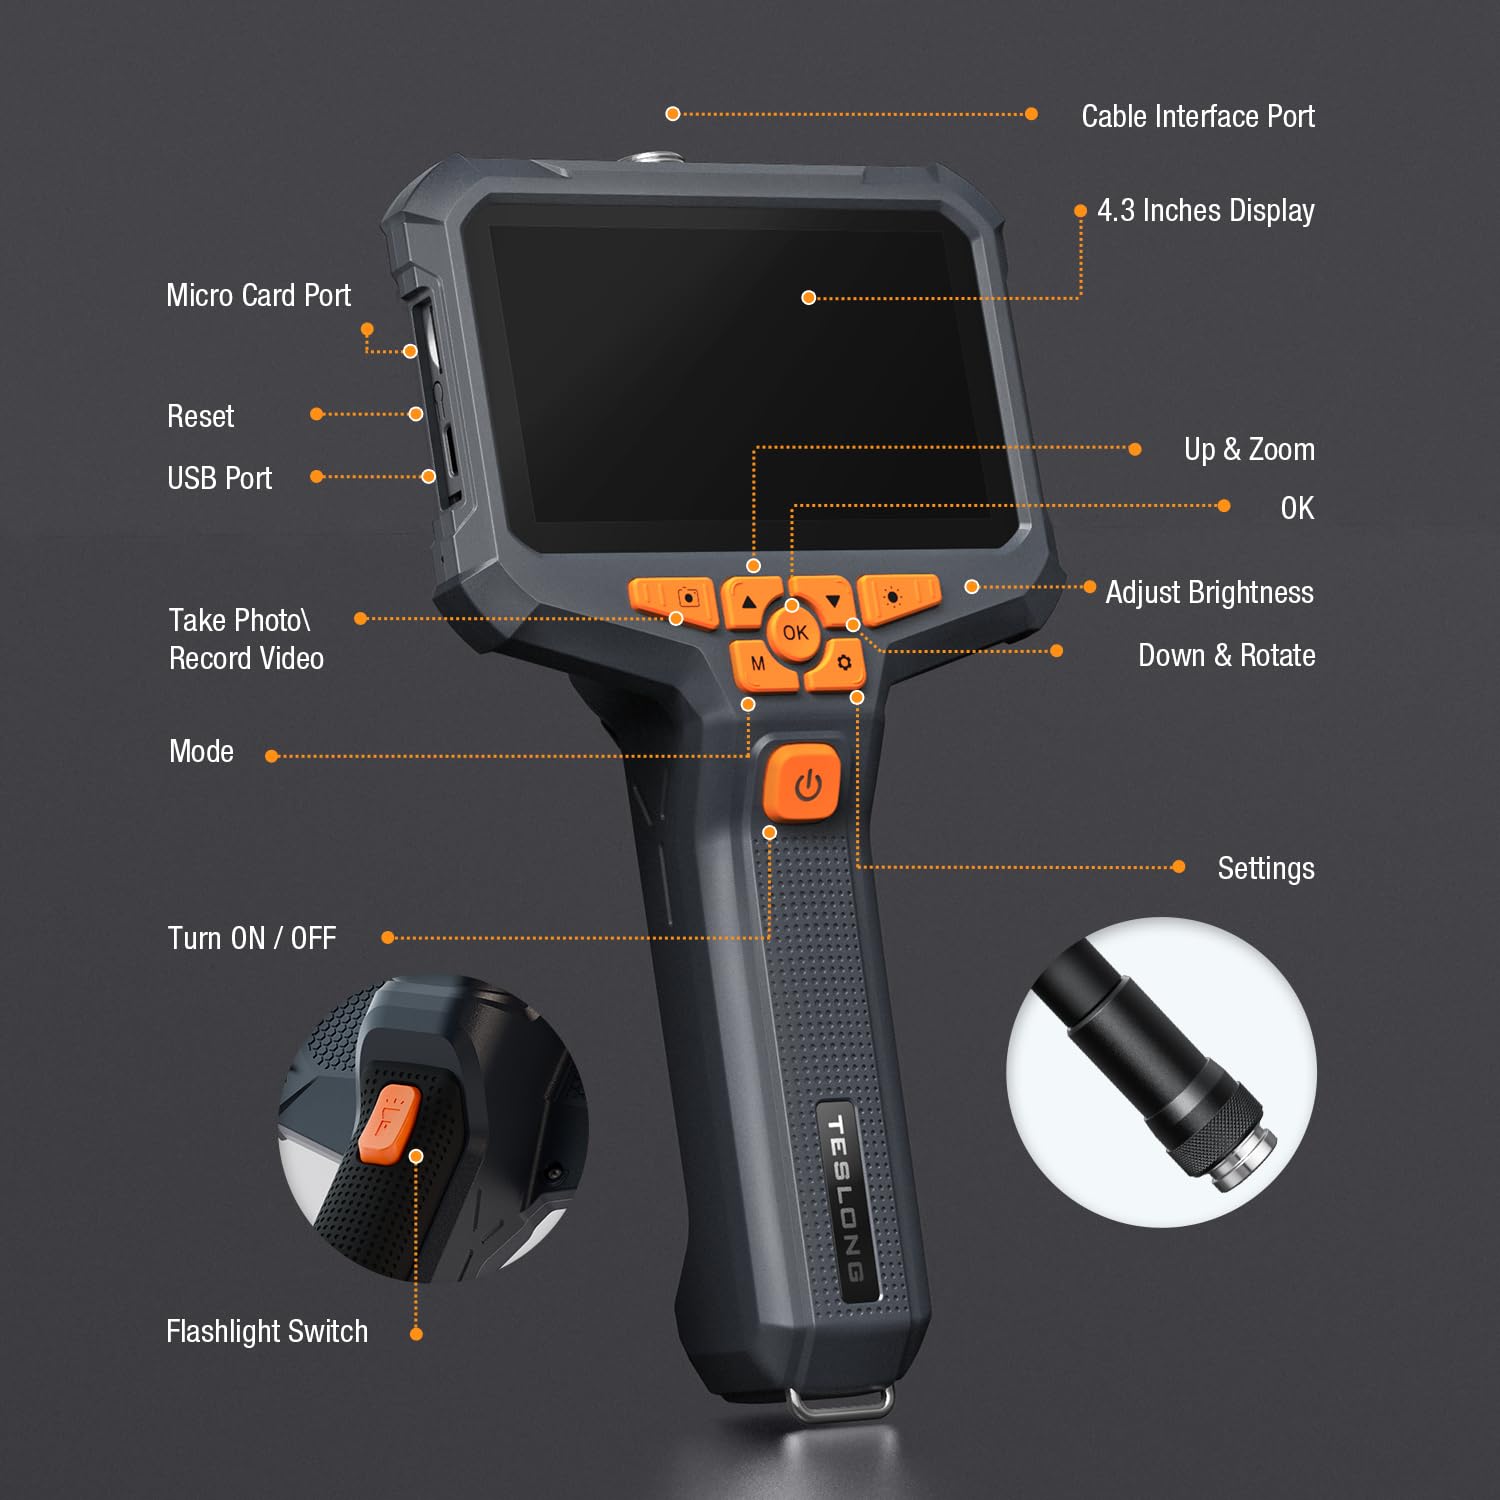
Figure 2: Included components: NTS430 monitor, dual lens probe, USB charging cable, user manual, and magnet hook.
3. Producte acabatview
3.1 Disseny del dispositiu

Figure 3: Key components and controls of the NTS430 monitor.
- Cable Interface Port: Connects the flexible probe.
- 4.3 Inches Display: High-definition IPS screen for viewcrear imatges i vídeos.
- Micro Card Port: Slot for inserting a Micro SD card for storage.
- Reset Button: Used to reset the device.
- USB Port: For charging and data transfer.
- Up & Zoom Button: Navigates menus upwards and controls digital zoom.
- OK Button: Confirms selections.
- Adjust Brightness Button: Controls the intensity of the LED lights.
- Down & Rotate Button: Navigates menus downwards and rotates images.
- Take Photo / Record Video Button: Captures still images or starts/stops video recording.
- Mode Button: Switches between photo, video, and playback modes.
- Turn ON / OFF Button: Powers the device on or off.
- Settings Button: Accesses system settings.
- Flashlight Switch: Activates the built-in flashlight.
3.2 Dual Lens Probe
The NTS430 features a dual-lens system for comprehensive inspection:
- Càmera frontal: Provides a straight-ahead view with 6 adjustable LED lights.
- Càmera lateral: Offers a 90-degree side view with 1 additional LED light, ideal for inspecting pipe walls or internal surfaces.

Figure 4: Close-up of the dual-lens probe showing front and side cameras with LED lights.
4. Configuració
4.1 Càrrega del dispositiu
Before first use, fully charge the NTS430. Connect the USB charging cable to the device's USB port and to a standard USB power adapter (not included). The 3000mAh battery provides over 4.5 hours of continuous usage when fully charged.
4.2 Inserció d'una targeta Micro SD
To save photos and videos, a Micro SD card (not included) is required. Locate the Micro Card Port on the side of the monitor. Gently insert a compatible Micro SD card until it clicks into place. Ensure the card is correctly oriented to avoid damage. The device supports Class 10 Micro SD cards.
Note: Some users have reported difficulty with card insertion or compatibility. Ensure the card is properly aligned and consider trying a different brand if issues persist.
4.3 Attaching the Probe
Align the connector of the flexible probe with the Cable Interface Port on the NTS430 monitor. Gently push and twist the connector clockwise until it is securely fastened. Ensure a firm connection for stable image transmission.
5. Instruccions de funcionament
5.1 Engegada/apagada
Manteniu premut el botó Activar/desactivar button (labeled with a power icon) for a few seconds to power the device on or off.
5.2 Switching Between Lenses (Split Screen View)
The NTS430 allows for simultaneous viewing from both the front and side cameras. To switch between views or activate split-screen mode:
- Solter View: Premeu breument Mode button to cycle between Front Camera view and Side Camera view.
- Pantalla dividida View: Premeu llargament el botó Fes una foto / Grava vídeo button to activate the split-screen display, showing both front and side camera feeds simultaneously. Long press again to exit split-screen mode.

Figura 5: Example of split-screen view showing both front and side camera perspectives.
5.3 Ajust de la il·luminació del LED
The probe's LED lights provide illumination in dark areas. Press the Ajusta la brillantor button to cycle through different brightness levels. The front camera has 6 LEDs, and the side camera has 1 LED.

Figure 6: Illustration of adjustable LED light intensity on the endoscope probe.
5.4 Captura de fotos i vídeos
Ensure a Micro SD card is inserted before attempting to record. In live view mode:
- Fes una foto: Premeu breument Fes una foto / Grava vídeo botó per capturar una imatge fixa.
- Grava vídeo: Premeu llargament el botó Fes una foto / Grava vídeo button to start video recording. Long press again to stop recording.
5.5 Digital Zoom and Image Rotation
- Zoom: Utilitza el Up & Zoom button to digitally zoom in on the image.
- Girar: Utilitza el Down & Rotate button to rotate the image on the display.
5.6 Ús d'accessoris
The included magnet hook can be attached to the endoscope probe for retrieving small metallic objects from inaccessible areas.

Figure 7: The magnet hook accessory attached to the endoscope probe.
6. Manteniment
6.1 Neteja
The probe is IP67 waterproof. After use in wet or dirty environments, wipe the probe clean with a damp cloth. For the monitor, use a soft, dry cloth. Do not use abrasive cleaners or solvents.
6.2 Emmagatzematge
Store the NTS430 in a cool, dry place away from direct sunlight and extreme temperatures. Ensure the probe is coiled loosely to prevent damage to the cable.
6.3 Cura de la bateria
Per allargar la durada de la bateria, eviteu descarregar-la completament amb freqüència. Si la guardeu durant períodes prolongats, carregueu-la aproximadament al 50% cada pocs mesos.
7. Solució De Problemes
- El dispositiu no s'encén: Assegureu-vos que la bateria estigui carregada. Connecteu el dispositiu a una font d'alimentació USB i torneu-ho a provar.
- Sense imatge a la pantalla: Check if the probe is securely connected to the monitor.
- Poca qualitat d'imatge: Adjust the LED brightness. Clean the camera lenses if they are dirty. Ensure the focus distance (2-8 cm) is appropriate for the object being viewed.
- No es poden fer fotos/gravar vídeos: Verify that a compatible Micro SD card is inserted and has sufficient free space. Reformat the Micro SD card if necessary (this will erase all data).
- Targeta Micro SD no reconeguda: Ensure the card is inserted correctly. Try a different Micro SD card, preferably a Class 10 card from a reputable brand.
8. Especificacions
| Característica | Especificació |
|---|---|
| Model | NTS430 |
| Mostra | Pantalla IPS HD de 4.3 polzades |
| Tipus de càmera | Lent doble (frontal i lateral) |
| Resolució de captura de vídeo | 1080p |
| Llums LED | 6 (Front) + 1 (Side) adjustable |
| Classificació impermeable | IP67 (Sonda) |
| Capacitat de la bateria | 3000 mAh |
| Durada de la bateria | Més de 4.5 hores |
| Rang d'enfocament macro | 2-8 cm |
| Modes de tir | Manual, Automàtic |
| Tipus de control d'exposició | Manual automàtic |
| Color | Negre |
| Fabricant | Teslong |
9. Garantia i Suport
For warranty information and technical support, please refer to the documentation included with your purchase or visit the official Teslong weblloc. També podeu visitar el Teslong Store on Amazon per obtenir recursos addicionals.
Teslong is committed to customer satisfaction and provides support for product inquiries and issues.