Gigo 1263
Gigo Teaching Aid 1263 Gear Drawing Machine User Manual
Model: 1263 | Brand: Gigo
Introducció
This user manual provides comprehensive instructions for the assembly, operation, and maintenance of the Gigo Teaching Aid 1263 Gear Drawing Machine. Designed to enhance motor skills, hand-eye coordination, and logical thinking, this educational tool allows users to create intricate patterns using a system of gears. Please read this manual carefully before beginning assembly or operation to ensure proper use and longevity of the product.
Llista de peces
Before starting assembly, verify that all components listed below are present. Refer to the image for visual identification of each part.
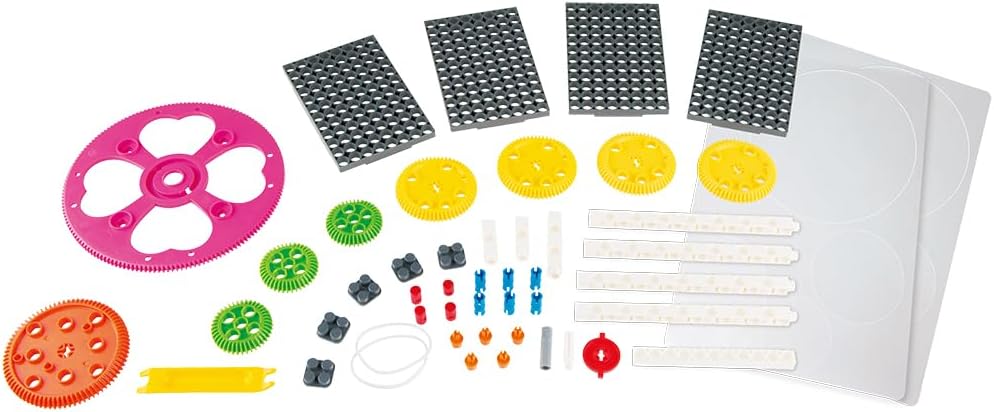
Image: All components of the Gigo Gear Drawing Machine, including various gears, base plates, connecting rods, and a pen holder.
- Base Plates: Rectangular plates with peg holes for mounting components.
- Engranatges: Assorted sizes and tooth counts (e.g., 60T, 40T, smaller green gears).
- Connecting Rods: White rectangular pieces with holes for linking gears and pen holders.
- Pen Holder: Component designed to hold a pen or marker.
- Pegs/Connectors: Small pieces (various colors) for securing components to base plates and connecting rods.
- Rubber Bands: For securing the pen in the pen holder.
- Drawing Discs: Circular paper discs for drawing.
- Large Heart-shaped Gear: A unique gear for specific patterns.

Image: A page from the instruction manual illustrating the parts list with quantities and the first few assembly steps for the 60T Gear Spirograph.
Muntatge i muntatge
Follow these steps to assemble the Gear Drawing Machine. The instructions below describe a common configuration, but the kit allows for multiple designs.
- Preparar la base: Select one or more base plates and connect them if necessary to form a stable foundation for your machine.
- Mount Fixed Gears: Attach the larger gears (e.g., 60T or 40T gears) to the base plate using the appropriate pegs. These gears will remain stationary or rotate around a fixed point.
- Assemble Pen Holder Arm: Connect the pen holder to a connecting rod. Ensure the pen fits snugly and is secured with rubber bands if provided.
- Attach Moving Gears and Arm: Connect smaller gears to the connecting rods. These gears will mesh with the fixed gears and guide the pen holder arm.
- Posició del porta-bolígrafs: Place the pen holder arm so that the pen tip is positioned over a drawing disc, which should be placed on a gear or directly on the base plate.
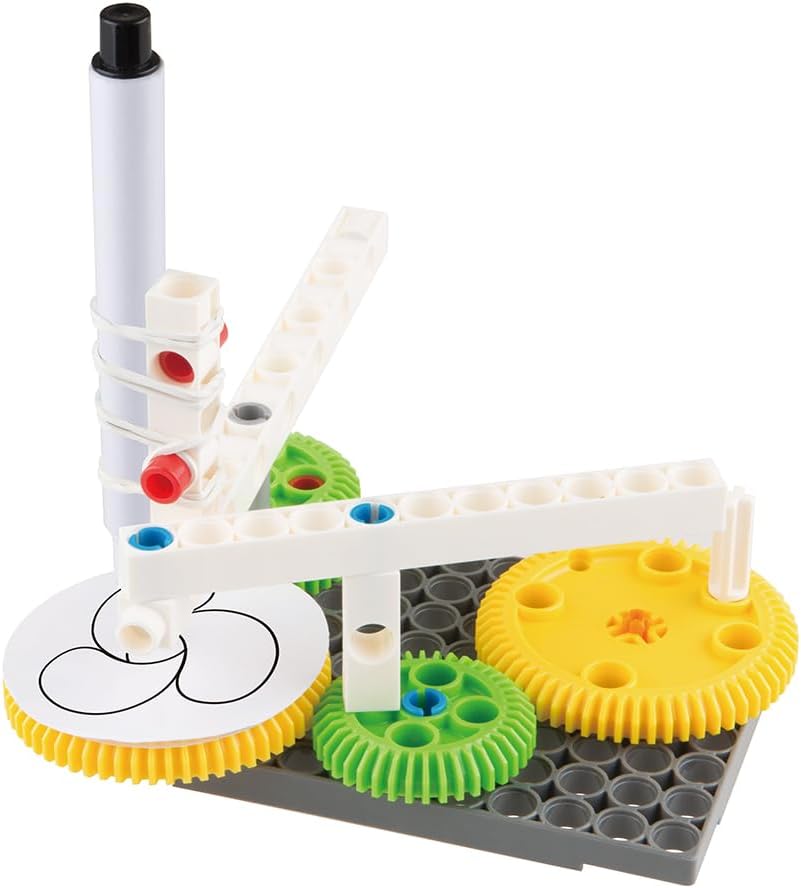
Image: An assembled Gear Drawing Machine showing a pen held by a white arm, drawing a circular pattern on a disc, driven by meshing yellow and green gears on a grey base plate.

Image: A different perspective of the assembled Gear Drawing Machine, highlighting the interaction between the gears and the pen's movement as it creates a design.
Instruccions de funcionament
Once assembled, the Gear Drawing Machine is ready for use. Experiment with different gear combinations and pen positions to create a variety of unique patterns.
- Insert Pen: Securely place a pen or marker into the pen holder. Ensure the tip extends far enough to touch the drawing surface.
- Place Drawing Disc: Position a drawing disc (paper) on the designated gear or base area where the pen will draw.
- Engage Gears: Ensure all gears are properly meshed. The movement of one gear should smoothly drive the others.
- Begin Drawing: Gently rotate the main driving gear or the pen holder arm. The meshing gears will guide the pen in complex, repeating patterns.
- Experiment:
- Try different sizes of gears.
- Change the position of the pen holder on the connecting rod.
- Use different fixed points for the gears on the base plate.
- Combine multiple gears for more intricate designs.

Image: The Gear Drawing Machine configured with a different set of gears, demonstrating the versatility of the kit for creating varied patterns.
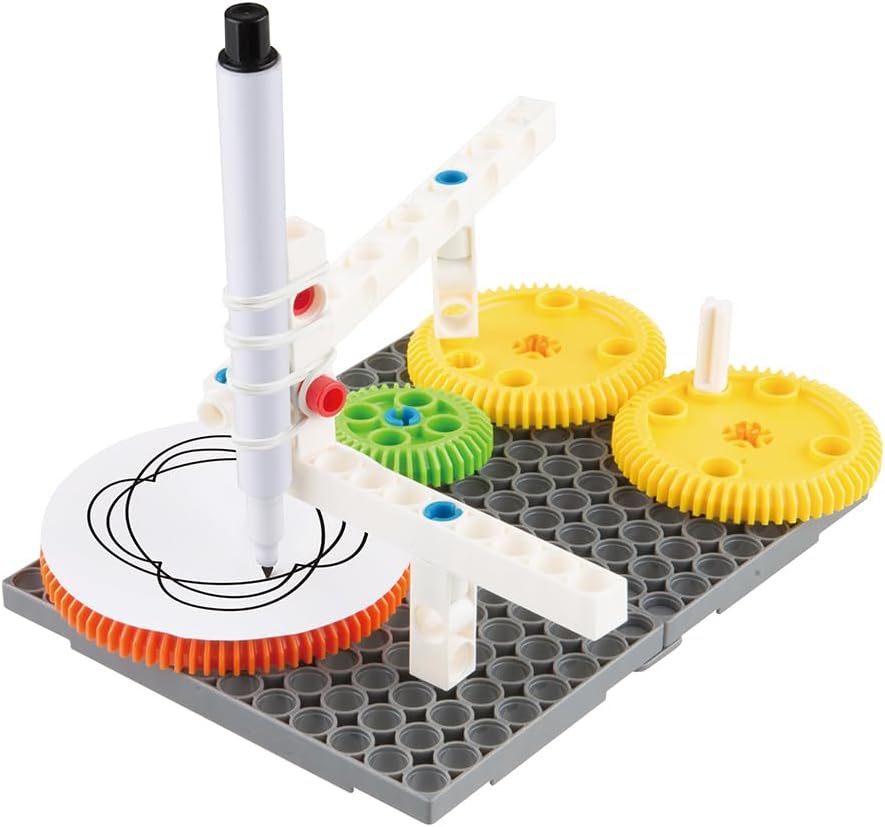
Image: The Gear Drawing Machine actively drawing a more complex pattern, showcasing the results of different gear ratios and pen placements.
Manteniment
Proper care and maintenance will ensure the longevity of your Gigo Gear Drawing Machine.
- Neteja: Wipe components with a soft, dry cloth after use. For stubborn marks, a slightly damp cloth can be used, but ensure parts are completely dry before storage. Avoid harsh chemicals or abrasive cleaners.
- Emmagatzematge: Store all parts in their original packaging or a designated container to prevent loss and damage. Keep the kit in a cool, dry place away from direct sunlight and extreme temperatures.
- Inspecció: Periodically inspect gears and connecting rods for any signs of wear or damage. Replace any broken parts to maintain optimal performance.
Resolució de problemes
If you encounter any issues while using the Gear Drawing Machine, refer to the common problems and solutions below.
| Problema | Causa possible | Solució |
|---|---|---|
| Els engranatges no engranaven suaument. | Incorrect placement; debris in teeth; worn gears. | Ensure gears are properly aligned on pegs. Check for and remove any obstructions. Replace damaged gears. |
| Pen is not drawing or skipping. | Pen tip too high; pen out of ink; pen not secured. | Adjust pen position so tip touches the drawing surface. Replace pen if ink is dry. Secure pen firmly with rubber bands. |
| Machine is unstable during operation. | Base plates not securely connected; components loose. | Ensure all base plates are firmly interlocked. Check that all pegs and connectors are fully inserted. |
Especificacions
| Característica | Detall |
|---|---|
| Marca | Gigo |
| Número de model | 1263 |
| Objectius educatius | Motor Skill, Hand-Eye Coordination, Logical Thinking |
| Color | Multicolor |
| Dimensions del paquet | 33.2 x 24.4 x 6.8 cm |
| Pes de l'article | 800 g |
| Tema | Ciència |
| Interval d'edat (descripció) | Kid, Child |
Garantia i Suport
Gigo products are manufactured to high quality standards. For information regarding warranty coverage, product support, or to purchase replacement parts, please visit the official Gigo weblloc web o poseu-vos en contacte amb el seu departament d'atenció al client. Conserveu el rebut de compra com a comprovant de compra.
For general inquiries or further assistance, please refer to the contact information provided on the product packaging or the official Gigo brand weblloc.
Ask a question about this manual
Ask about setup, troubleshooting, compatibility, parts, safety, or missing instructions. Manuals+ will review the question and use this page’s manual context to help answer it.