
1. Producte acabatview
This HOgardenME Controller Meter Kit is designed for JP Electric Scooters, providing essential components for optimal performance and functionality. It serves as a replacement or upgrade for the scooter's control system.

Image 1.1: Complete HOgardenME JP Electric Scooter Controller Meter Kit (48V 25A).
Característiques principals:
- Kit tot en un: Includes 2 controller units, 1 meter, and 1 connection line for a complete system.
- Construcció duradora: Manufactured from aluminum alloy and plastic for wear resistance and longevity.
- Fàcil instal·lació: Designed for straightforward setup, minimizing installation time.
- Functionality Restoration: Ideal for replacing damaged or malfunctioning controller instruments, enhancing scooter efficiency and reliability.
- Disseny compacte: Measures 90x52x30mm and weighs approximately 700g, ensuring seamless integration.
2. Contingut del paquet
Verifiqueu que tots els elements que s'enumeren a continuació siguin presents al vostre paquet:
- 2 x Controller units
- 1 x LCD Display Meter
- 1 x Connection line
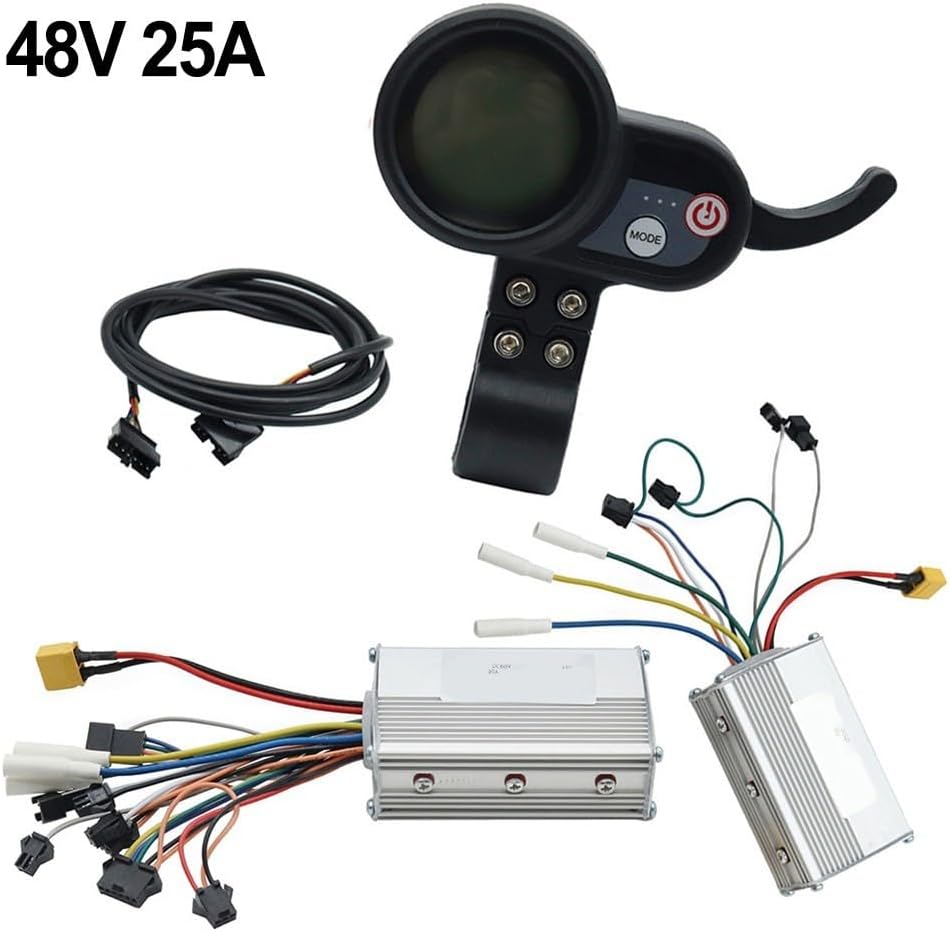
Image 2.1: Components included in the HOgardenME Controller Meter Kit.
3. Informació de seguretat
Before installation and operation, please read and understand all safety instructions. Failure to follow these guidelines may result in electric shock, fire, or serious injury.
- Always disconnect the scooter's power source before performing any installation or maintenance.
- Ensure all connections are secure and correctly polarized to prevent short circuits.
- Do not attempt to modify the components. Unauthorized modifications can void the warranty and create safety hazards.
- Si no esteu segurs de cap pas, demaneu ajuda a un tècnic qualificat.
- Keep components away from water and extreme temperatures.
4. Configuració i instal·lació
This section provides general guidance for installing the controller meter kit. Specific scooter models may have variations in wiring and mounting points. Refer to your scooter's original manual for detailed wiring diagrams if necessary.
4.1 Preparació per a la instal·lació
- Ensure the electric scooter is powered off and the battery is disconnected.
- Gather necessary tools, which may include screwdrivers, wire cutters, and electrical tape.
- Carefully remove the existing controller and meter components from your scooter, noting their connections.
4.2 Instal·lació del controlador
The kit includes two controller units. Identify the appropriate mounting location for each controller on your scooter chassis. Typically, controllers are housed in a protective compartment.
- Mount the new controller units securely using appropriate fasteners.
- Connect the motor phase wires (usually thicker wires, often green, blue, yellow) from the scooter's motor to the corresponding terminals on the controllers.
- Connect the battery power wires (red for positive, black for negative) to the main power input of the controllers. Ensure correct polarity.
- Connect the hall sensor wires and other signal wires (e.g., brake, throttle, display) from the scooter's harness to the controllers.

Image 4.1: Two controller units with various wiring harnesses for connection.
4.3 Meter (LCD Display) Installation
The LCD display meter typically mounts on the handlebar. Ensure it is positioned for clear visibility and easy access.
- Attach the LCD display meter to the handlebar using its integrated clamp. Apretar amb seguretat.
- Connect the meter's wiring harness to the designated connection point on one of the controllers or the main wiring harness of the scooter.
- Ensure the connection line is properly routed and secured to prevent interference with steering or other moving parts.

Imatge 4.2: Primer pla view of the LCD display meter with control buttons.
4.4 Initial Power-Up and Testing
- Once all connections are made and secured, reconnect the scooter's battery.
- Turn on the scooter's power. The LCD display should illuminate.
- Verify that the throttle responds correctly and that the motor engages smoothly.
- Check brake functionality and ensure the display shows accurate speed and battery information.
- Si sorgeix algun problema, consulteu la secció Resolució de problemes.
5. Instruccions de funcionament
The LCD display meter provides essential information and control over your electric scooter's functions.
5.1 Funcions de visualització
- Visualització de velocitat: Mostra la velocitat actual de conducció.
- Nivell de bateria: Indica la càrrega restant de la bateria.
- Indicador de mode: Displays the current riding mode (e.g., Eco, Normal, Sport).
- Comptaquilòmetres/comptaquilòmetres parcial: Fa un seguiment de la distància total o de la distància actual del viatge.
5.2 Funcions dels botons
- Botó d'encesa: Press and hold to turn the scooter's power on/off.
- Botó de mode: Press to cycle through different riding modes or display information.
- Palanca de l'accelerador: Controls the scooter's speed.
Note: Specific button functions and display parameters may vary slightly depending on the scooter's firmware.
6. Manteniment
Proper maintenance ensures the longevity and reliable performance of your controller meter kit.
- Inspecció periòdica: Periodically check all wiring connections for looseness or damage.
- Neteja: Keep the LCD display clean and free from dust and debris using a soft, dry cloth. Avoid abrasive cleaners.
- Protecció del medi ambient: Protect the controllers and meter from excessive moisture, direct sunlight, and extreme temperatures.
- Integritat dels components: Inspect the aluminum alloy casing of the controllers for any signs of physical damage.
7. Solució De Problemes
This section addresses common issues you might encounter with the controller meter kit.
7.1 La pantalla no s'encén
- Comproveu la potència: Ensure the scooter's battery is charged and connected.
- Cablejat: Verify that the display's connection line is securely plugged into the controller.
- Fusible: Check if the scooter's main fuse (if applicable) is intact.
7.2 El motor no respon
- Connexió de l'accelerador: Ensure the accelerator lever is properly connected to the controller.
- Cables del motor: Verify that the motor phase wires and hall sensor wires are correctly and securely connected to the controllers.
- Palanques de fre: Some scooters have safety cut-offs. Ensure brake levers are not engaged.
- Controller Status: Listen for any unusual sounds or check for error codes on the display (if supported).
7.3 Incorrect Speed/Battery Reading
- Configuració de la mida de la roda: The display might require calibration for your scooter's wheel size. Consult your scooter's manual or the display's advanced settings.
- Voltage: Ensure the kit matches your scooter's battery voltage (p. ex., 48 V).
Si els passos de resolució de problemes no resolen el problema, poseu-vos en contacte amb l'atenció al client.
8. Especificacions
| Característica | Especificació |
|---|---|
| Nom del producte | HOgardenME JP Electric Scooter Controller Meter Kit |
| Model (Current Variant) | 48V 25A Set |
| Material | Aliatge d'alumini, plàstic |
| Dimensions (Controllers) | Aproximadament 90 x 52 x 30 mm |
| Pes (kit) | Aproximadament 700 g |
| Color | As pictured (typically silver controllers, black meter) |
| Compatibilitat | JP Electric Scooters (48V/52V/60V 25A versions available, this kit is 48V 25A) |
| Fabricant | HOgardenME |
| Número de model | 3NYB43JZ01S8OZM9ZCA27S6Q817 |

Image 8.1: Controller unit with approximate dimensions indicated.
9. Informació de la garantia
This product is covered by a limited warranty against manufacturing defects. The warranty period typically begins from the date of purchase. Please retain your proof of purchase for warranty claims.
- La garantia cobreix els defectes de materials i de mà d'obra en ús normal.
- It does not cover damage caused by misuse, accidents, unauthorized modifications, or improper installation.
- For specific warranty terms and conditions, please refer to the documentation provided at the time of purchase or contact HOgardenME customer support.
10. Atenció al client
If you have any questions, require technical assistance, or need to report an issue, please contact HOgardenME customer support through your retailer or the official HOgardenME weblloc.
When contacting support, please be prepared to provide the following information:
- Product Model: 48V 25A Set
- Model Number: 3NYB43JZ01S8OZM9ZCA27S6Q817
- Data de compra
- Una descripció detallada del problema