1. Introducció
Thank you for choosing the JOMISE D530 Dash Cam. This manual provides detailed instructions for the proper installation, operation, and maintenance of your device. Please read this manual thoroughly before use to ensure optimal performance and safety.
2. Què hi ha a la caixa
- Càmera frontal (unitat principal)
- Càmera posterior
- Carregador de cotxe
- Manual d'usuari
- Targeta Micro SD de 32 GB
- Static Cling Film for Windshield Mounting
- Cable d'extensió de la càmera posterior

Image: Contents of the JOMISE D530 Dash Cam package, showing the main front camera unit, the smaller rear camera, the car charger, and the user manual.
3. Producte acabatview: Components and Controls
The JOMISE D530 Dash Cam features a compact design with a 3-inch LCD screen. It includes a front camera for 4K recording and a rear camera for 1080P recording.

Image: Detailed diagram of the JOMISE D530 Dash Cam, highlighting the Mini USB interfaces for the car charger and rear camera, the GPS Player Verification code, and the control buttons (Menu, Up, Down, Mode) with their respective functions.
Característiques de la unitat principal:
- Lent frontal: Captura vídeo en 4K.
- Pantalla LCD d'3 polzades: Per a directes view, reproducció i configuració.
- Ranura per a targetes Micro SD: Supports up to 256GB (32GB card included).
- Botó d'encesa: Per encendre/apagar el dispositiu.
- Botó de restabliment: Per restablir les dades de fàbrica si cal.
- Mini USB Interface (Top): Connects to the car charger.
- Mini USB Interface (Side): Connects to the rear camera.
- Control Buttons (Menu, Up, Down, Mode): Navigate menus and settings.
Hotkey Guide:
- Menú: Short press to lock video.
- Amunt: Short press to take a photo; Long press to open Wi-Fi settings.
- Avall: Short press to switch front or rear view; Long press to turn On/Off audio recording.
- Mode: Short press to start and stop recording. After stopping recording, long press to switch between recording, photographing, and playback modes.
4. Configuració i instal·lació
Una instal·lació correcta és crucial per a un rendiment òptim. Seguiu aquests passos amb atenció:
4.1. Prepareu la targeta Micro SD
- Insert the included 32GB Micro SD card into the card slot on the main unit.
- For first-time use, or after using a new card, format the SD card within the dash cam's settings menu. This ensures compatibility and proper function.
4.2. Muntar la càmera frontal
- Netegeu la zona del parabrisa on voleu muntar la càmera del salpicader.
- Apply the static cling film to the cleaned area on the windshield. This helps protect your windshield and makes removal easier.
- Attach the front camera's mount to the static cling film. Ensure it is positioned to provide a clear view de la carretera sense obstruir la visió del conductor.
- Connect the car charger to the main unit's top Mini USB interface and route the cable neatly along the windshield trim to your car's cigarette lighter socket.
4.3. Muntar la càmera posterior
The rear camera can be installed with the bracket facing up or down, making it suitable for various vehicle types.

Image: Illustrates the flexibility of the rear camera installation, showing it mounted with the bracket facing up for larger vehicles like RVs and trucks, and facing down for standard cars.
- Choose a suitable location on your rear window for the rear camera. Clean the area thoroughly.
- Attach the rear camera using its adhesive mount.
- Connect the rear camera to the main unit using the provided extension cable. Route the cable discreetly along the vehicle's interior trim to avoid interference.
5. Instruccions de funcionament
5.1. Encendre/apagar
La càmera del salpicader s'encendrà automàticament i començarà a gravar quan es connecti a la font d'alimentació del cotxe i el motor arrenqui. S'apagarà automàticament quan s'apagui el motor.
5.2. Recording Modes and Settings
Use the control buttons (Menu, Up, Down, Mode) to navigate through the settings. The screen is not touch-sensitive.
- Resolució: Adjust video resolution (e.g., 4K+1080P).
- Enregistrament en bucle: Sobreescriu el menjar més antictage when the SD card is full, ensuring continuous recording.
- Sensor G: Detecta impactes o col·lisions sobtades i bloqueja automàticament el segment de vídeo actual per evitar que se sobreescrigui.
- WDR (ampli rang dinàmic): Enhances video quality in varying light conditions, improving clarity in both bright and dark areas.
- Visió nocturna: The Starvis sensor and WDR technology improve low-light performance for clear night recordings.

Image: Demonstrates the enhanced night vision capabilities of the JOMISE D530 Dash Cam, showing a clear street scene at night with improved brightness and reduced glare.
5.3. GPS i Wi-Fi integrats
- GPS: Records driving speed, location, and route data in real-time. This information can be viewed during playback.
- Wi-Fi: Connect your smartphone to the dash cam via the dedicated app (OK CAM Plus for iOS/Android) to view viu footage, manage recordings, and share videos. The effective Wi-Fi connection range is approximately 15 feet.
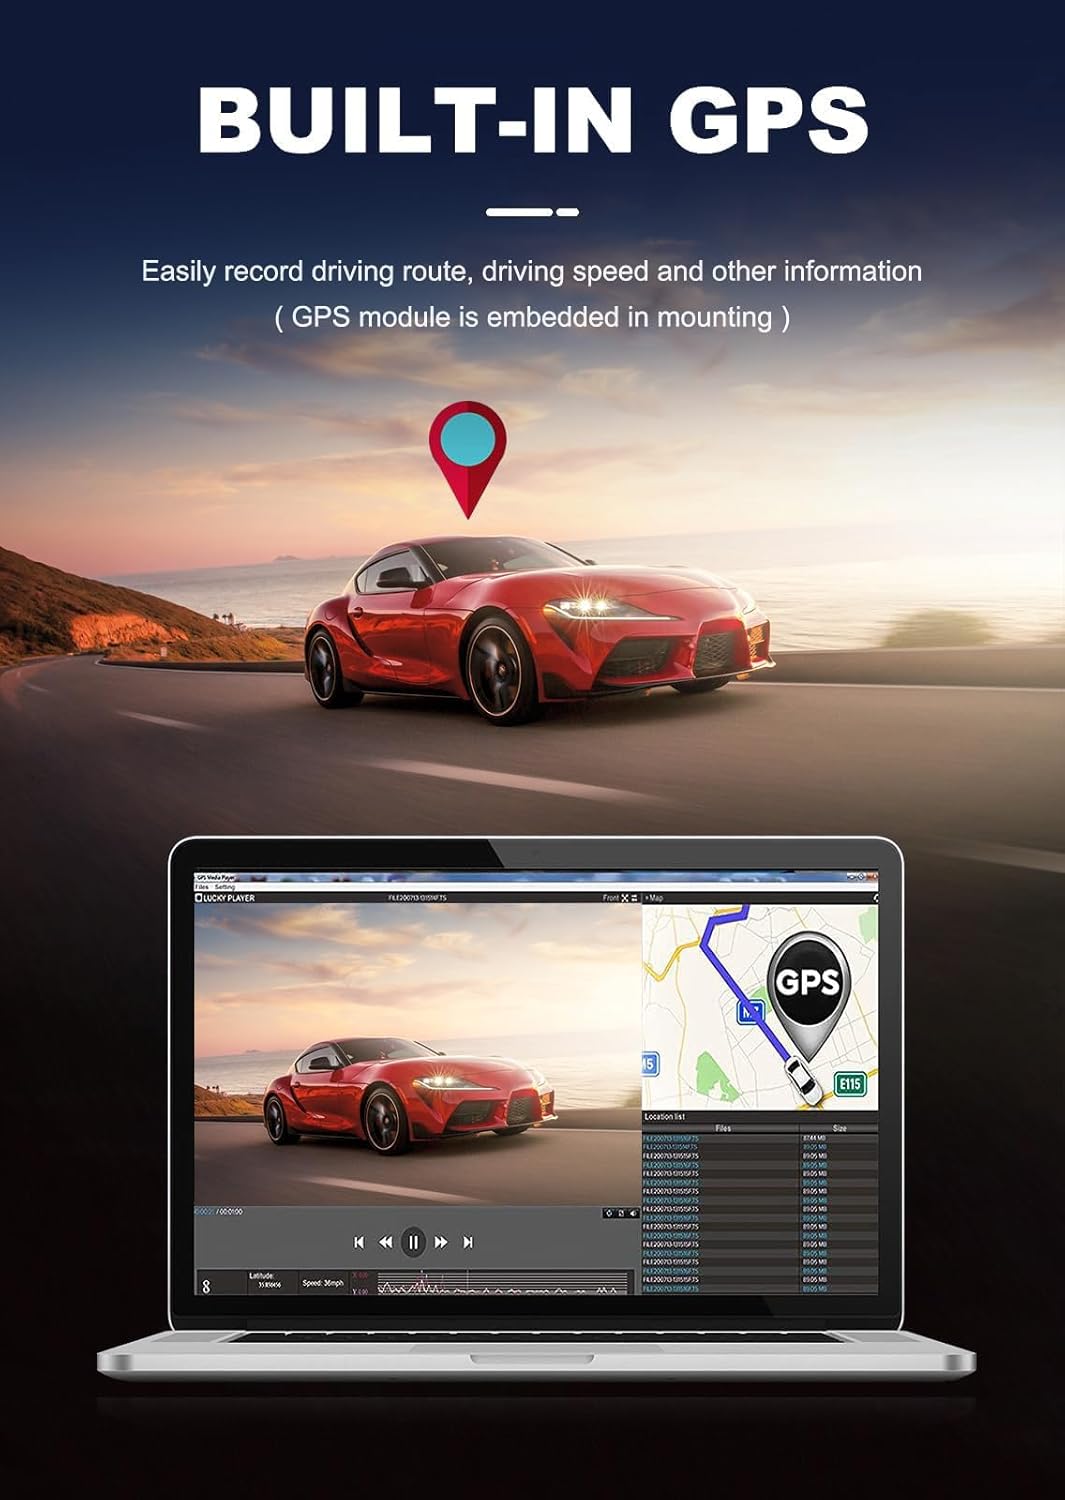
Image: Shows the built-in GPS functionality of the JOMISE D530 Dash Cam, illustrating how driving routes and speed are recorded and can be viewed en un ordinador.

Image: Depicts the JOMISE D530 Dash Cam connecting wirelessly to a smartphone via the mobile app, allowing for easy access and management of footage.
5.4. Mode d'aparcament 24/7
To enable 24/7 Parking Mode for continuous surveillance, a JOMISE hardwire kit is required (sold separately). When activated, the dash cam will automatically record motion or impacts while your vehicle is parked, providing protection against hit-and-runs or attempted theft.
6. Manteniment
- Targeta SD: Regularly format the Micro SD card (at least once a month) to maintain optimal recording performance and prevent data corruption.
- Font d'alimentació: Always use the original accessories provided by JOMISE to avoid compatibility issues and ensure sufficient current supply. Using 2-in-1 or 3-in-1 cigar sockets may lead to insufficient power.
- Actualitzacions de firmware: JOMISE continuously updates and improves product functions through firmware upgrades. Check the official JOMISE website or app for the latest firmware versions.
7. Solució De Problemes
- Problemes de gravació: If the dash cam does not record automatically after power-on, short press the [M] button to start recording manually. Ensure the SD card is formatted correctly.
- Connectivitat Wi-Fi: If you experience Wi-Fi connection issues, ensure your mobile phone is within 15 feet of the dash cam. Check for app or firmware updates.
- Battery Swelling/Failure: The JOMISE D530 uses a supercapacitor for improved stability and durability, especially in high-temperature environments, reducing the risk of battery-related failures.
- Pantalla de la càmera posterior: If the rear camera image is inverted, use the vertical flip function in the settings to adjust the display.
8. Especificacions
| Característica | Detall |
|---|---|
| Dimensions del producte | 1.57 x 3.42 x 1.96 polzades |
| Pes de l'article | 1.43 lliures |
| Resolució de la càmera frontal | 4K (2160p) |
| Resolució de la càmera posterior | 1080P |
| Sensor | Starvis Sensor, IMX415 |
| Mostra | LCD de 3 polzades |
| Connectivitat | Wi-Fi, Built-in GPS |
| Característiques especials | App Control, Compact Design, G-Sensor, Parking Monitor, WDR |
| Emmagatzematge | Admet targetes Micro SD de fins a 256 GB (32 GB incloses) |
| Font d'alimentació | Supercapacitor (1 Lithium Ion battery included for clock/settings) |
| Tipus de muntatge | Muntatge del parabrisa |
9. Garantia i Suport
JOMISE offers a 12-month warranty on this product. Additionally, a 7-day return policy is available, and returns are accepted for defects.
For customer support, please contact JOMISE via:
- Correu electrònic: jomise-us@jomise-cam.com
- Telèfon: +1 866 788 8775
Please refer to the included warranty card or the JOMISE official weblloc web per obtenir la informació d'assistència més actualitzada.